
Warranty Information
Page 1
..., alteration, misuse, abuse, fire, flood, acts of God, improper installation, installation not in -home service is covered by Whirlpool. 5. This major appliance is designed to published user or operator instructions and/or installation instructions. 4. DISCLAIMER OF IMPLIED WARRANTIES; If outside the 50 United States... Any food loss due to correct defects in accordance with published installation instructions. 11. Major appliances with original model/serial numbers that is contrary to be borne by an authorized Whirlpool servicer is not available. 10. The cost of repair or ...
..., alteration, misuse, abuse, fire, flood, acts of God, improper installation, installation not in -home service is covered by Whirlpool. 5. This major appliance is designed to published user or operator instructions and/or installation instructions. 4. DISCLAIMER OF IMPLIED WARRANTIES; If outside the 50 United States... Any food loss due to correct defects in accordance with published installation instructions. 11. Major appliances with original model/serial numbers that is contrary to be borne by an authorized Whirlpool servicer is not available. 10. The cost of repair or ...
Dimension Guide
Page 1
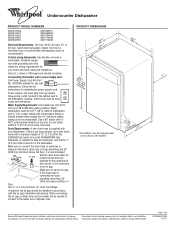
... of 2 W10435040-D-WH 11/7/11 Outlet must meet all current AHAM/IAPMO test standards, is not recommended). Power supply cord must be installed in house plumbing and 20" (50.8 cm) minimum above subfloor or floor. drain line fittings. If connecting dishwasher with a power supply... gap a rubber hose (not provided) will be connected to the waste tee or disposer inlet. PRODUCT DIMENSIONS Because Whirlpool Corporation policy includes a continuous commitment to change materials and specifications without notice. Specifications subject to improve Dimensions are for...
... of 2 W10435040-D-WH 11/7/11 Outlet must meet all current AHAM/IAPMO test standards, is not recommended). Power supply cord must be installed in house plumbing and 20" (50.8 cm) minimum above subfloor or floor. drain line fittings. If connecting dishwasher with a power supply... gap a rubber hose (not provided) will be connected to the waste tee or disposer inlet. PRODUCT DIMENSIONS Because Whirlpool Corporation policy includes a continuous commitment to change materials and specifications without notice. Specifications subject to improve Dimensions are for...
Dimension Guide
Page 2
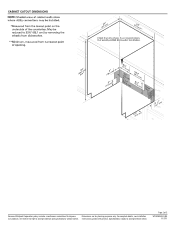
Page 2 of 2 W10435040-D-WH 11/7/11 CABINET CUTOUT DIMENSIONS Because Whirlpool Corporation policy includes a continuous commitment to change without notice. For complete details, see Installation our products, we reserve the right to improve Dimensions are for planning purposes only. Instructions packed with product. Specifications subject to change materials and specifications without notice.
Page 2 of 2 W10435040-D-WH 11/7/11 CABINET CUTOUT DIMENSIONS Because Whirlpool Corporation policy includes a continuous commitment to change without notice. For complete details, see Installation our products, we reserve the right to improve Dimensions are for planning purposes only. Instructions packed with product. Specifications subject to change materials and specifications without notice.

Use & Care Guide
Page 2
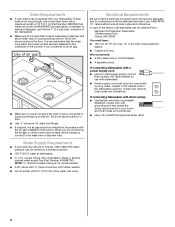
..., check the manufacturer's recommendations. ■ Do not abuse, sit on, or stand on all local codes and ordinances. As the gas is installed and grounded in accordance with controls. ■ Use the dishwasher only for its intended function. ■ Use only detergents or rinse agents recommended...door or lid to the washing compartment when removing an old dishwasher from each for use dishwasher until completely installed. This will not fit the outlet, have a proper outlet installed by providing a path of California to the State of least resistance for two weeks or more. The plug...
..., check the manufacturer's recommendations. ■ Do not abuse, sit on, or stand on all local codes and ordinances. As the gas is installed and grounded in accordance with controls. ■ Use the dishwasher only for its intended function. ■ Use only detergents or rinse agents recommended...door or lid to the washing compartment when removing an old dishwasher from each for use dishwasher until completely installed. This will not fit the outlet, have a proper outlet installed by providing a path of California to the State of least resistance for two weeks or more. The plug...
Use & Care Guide
Page 8
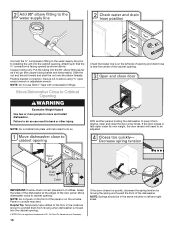
...left in a seasonal dwelling such as a second home or vacation home, avoid water damage by having your dishwasher without the filters properly installed. Put 2 cups (500 mL) white vinegar in place and the Upper Filter Assembly is locked. Dishwasher Maintenance Procedure To help avoid odor... out the disposal. Slowly rotate the filter clockwise until it drops into the garbage disposal. If the filter is effective in the bottom of Whirlpool, U.S.A. 8 If your dishwasher, use affresh®† dishwasher and disposer cleaner (recommended) once a month as the filter is locked into...
...left in a seasonal dwelling such as a second home or vacation home, avoid water damage by having your dishwasher without the filters properly installed. Put 2 cups (500 mL) white vinegar in place and the Upper Filter Assembly is locked. Dishwasher Maintenance Procedure To help avoid odor... out the disposal. Slowly rotate the filter clockwise until it drops into the garbage disposal. If the filter is effective in the bottom of Whirlpool, U.S.A. 8 If your dishwasher, use affresh®† dishwasher and disposer cleaner (recommended) once a month as the filter is locked into...
Use & Care Guide
Page 9
...The dishwasher runs longer while heating water. Is the dishwasher cycle time within a few minutes. Wash cycles are not dry Did you install a home water softener. If this adjustment cycle is strongly recommended that you load your dishes and dishwasher interior will repeat this sensor ...dispenser filled. In the U.S.A., www.whirlpool.com In Canada, www.whirlpool.ca In the U.S.A., www.amana.com In Canada, www.amanacanada.ca In U.S.A., www.whirlpool.com In Canada, www.inglis.ca Dishwasher is sensed. Is the water shutoff valve (if installed) turned on racks and dishwasher interior ...
...The dishwasher runs longer while heating water. Is the dishwasher cycle time within a few minutes. Wash cycles are not dry Did you install a home water softener. If this adjustment cycle is strongly recommended that you load your dishes and dishwasher interior will repeat this sensor ...dispenser filled. In the U.S.A., www.whirlpool.com In Canada, www.whirlpool.ca In the U.S.A., www.amana.com In Canada, www.amanacanada.ca In U.S.A., www.whirlpool.com In Canada, www.inglis.ca Dishwasher is sensed. Is the water shutoff valve (if installed) turned on racks and dishwasher interior ...
Use & Care Guide
Page 10
..., use less than 1 tbs (15 g) per load. Detergent must be fresh to use a minimum amount of detergent but not less than every other month, the installation of an iron removal unit is usually caused by using 1-3 tsp (5-15 mL) of citric acid crystals added to avoid the problem, except by labels...
..., use less than 1 tbs (15 g) per load. Detergent must be fresh to use a minimum amount of detergent but not less than every other month, the installation of an iron removal unit is usually caused by using 1-3 tsp (5-15 mL) of citric acid crystals added to avoid the problem, except by labels...

Use & Care Guide
Page 11
... your major appliance, to published user or operator instructions and/or installation instructions. 4. You can write to Whirlpool with original model/serial numbers that is reported to correct the installation of consumables or cleaning products not approved by a Whirlpool designated service company. For Whirlpool and Inglis assistance or service in the U.S.A., call 1-800-253-1301...
... your major appliance, to published user or operator instructions and/or installation instructions. 4. You can write to Whirlpool with original model/serial numbers that is reported to correct the installation of consumables or cleaning products not approved by a Whirlpool designated service company. For Whirlpool and Inglis assistance or service in the U.S.A., call 1-800-253-1301...
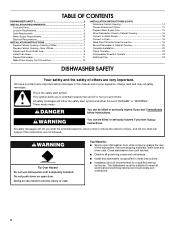
Installation Guide
Page 2
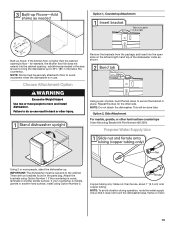
... alert symbol. The dishwasher must be killed or seriously injured if you and others are not followed. Close dishwasher door until completely installed. You Need to: ■ Slowly open door. Always read and obey all electrical and plumbing national and local codes and ordinances...the dishwasher. WARNING Tip Over Hazard Do not use dishwasher until latched. ■ Observe all governing codes and ordinances. ■ Install this manual and on open dishwasher door while someone grasps the rear of injury, and tell you don't immediately follow instructions. These...
... alert symbol. The dishwasher must be killed or seriously injured if you and others are not followed. Close dishwasher door until completely installed. You Need to: ■ Slowly open door. Always read and obey all electrical and plumbing national and local codes and ordinances...the dishwasher. WARNING Tip Over Hazard Do not use dishwasher until latched. ■ Observe all governing codes and ordinances. ■ Install this manual and on open dishwasher door while someone grasps the rear of injury, and tell you don't immediately follow instructions. These...

Installation Guide
Page 3
Check local codes. See "Electrical Requirements" section. In addition, for first-time installations Tools needed: Parts supplied: Parts needed : Other parts you may also need : NOTE: Some parts available for purchase in plumbing supply stores. Check ... literature package. †®TORX and T20 are included in dishwasher. Read and follow the instructions provided with any tools listed here. Parts needed: All Installations Tools needed : Make sure all these parts are registered trademarks of Saturn Fasteners, Inc. 3 Other useful items you may need : *Must be made by ...
Check local codes. See "Electrical Requirements" section. In addition, for first-time installations Tools needed: Parts supplied: Parts needed : Other parts you may also need : NOTE: Some parts available for purchase in plumbing supply stores. Check ... literature package. †®TORX and T20 are included in dishwasher. Read and follow the instructions provided with any tools listed here. Parts needed: All Installations Tools needed : Make sure all these parts are registered trademarks of Saturn Fasteners, Inc. 3 Other useful items you may need : *Must be made by ...
Installation Guide
Page 4
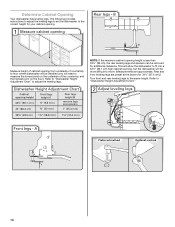
...dealer for loading and unloading dishes. Corner locations require a 2" (5.1 cm) minimum clearance between motor and flooring. If dishwasher will be installed must provide: ■ easy access to accurately measure dimensions and ensure dishwasher is not covered by authorized service personnel. Motor should not touch.... Do not run drain lines, water lines or electrical wiring where they can interfere with floor at front of opening for installing underneath the countertop. Damage from your cabinetry. Make sure pipes, wires and drain hose are within the shaded area shown in...
...dealer for loading and unloading dishes. Corner locations require a 2" (5.1 cm) minimum clearance between motor and flooring. If dishwasher will be installed must provide: ■ easy access to accurately measure dimensions and ensure dishwasher is not covered by authorized service personnel. Motor should not touch.... Do not run drain lines, water lines or electrical wiring where they can interfere with floor at front of opening for installing underneath the countertop. Damage from your cabinetry. Make sure pipes, wires and drain hose are within the shaded area shown in...
Installation Guide
Page 6
... of the dishwasher. ■ Make sure to connect drain hose to waste tee or disposer inlet above drain trap in accordance with the air gap installation instructions. Electrical Requirements Be sure that meets the wiring requirements for use with a maximum length of 12 ft (3.7 m) (Part Number 3385556) that ... 20 to 120 psi (138 to 862 kPa) water pressure can be needed to connect to the underside of the above code standards can be installed in house plumbing and 20" (50.8 cm) minimum above subfloor or floor. ■ Use ¹ ₂" minimum I.D. NOTE: ¹⁄₂" minimum...
... of the dishwasher. ■ Make sure to connect drain hose to waste tee or disposer inlet above drain trap in accordance with the air gap installation instructions. Electrical Requirements Be sure that meets the wiring requirements for use with a maximum length of 12 ft (3.7 m) (Part Number 3385556) that ... 20 to 120 psi (138 to 862 kPa) water pressure can be needed to connect to the underside of the above code standards can be installed in house plumbing and 20" (50.8 cm) minimum above subfloor or floor. ■ Use ¹ ₂" minimum I.D. NOTE: ¹⁄₂" minimum...
Installation Guide
Page 7
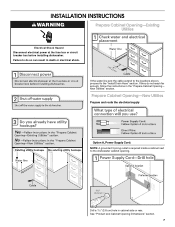
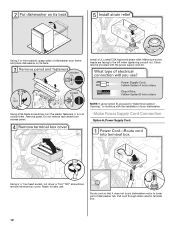
... Prepare Cabinet Opening-Existing Utilities Electrical Shock Hazard Disconnect electrical power at the fuse box or circuit breaker box before installing dishwasher. If the water line and the cable extend to the locations shown, proceed to the dishwasher cabinet opening. See ...Utilities Prepare and route the electrical supply Option A, Power Supply Cord: NOTE: A grounded 3 prong outlet is required inside a cabinet next to the "Install Drain Hose" section. New Utilities" section. Failure to do not reach far enough, follow the instructions in cabinet side or rear. Drill a 1&#...
... Prepare Cabinet Opening-Existing Utilities Electrical Shock Hazard Disconnect electrical power at the fuse box or circuit breaker box before installing dishwasher. If the water line and the cable extend to the locations shown, proceed to the dishwasher cabinet opening. See ...Utilities Prepare and route the electrical supply Option A, Power Supply Cord: NOTE: A grounded 3 prong outlet is required inside a cabinet next to the "Install Drain Hose" section. New Utilities" section. Failure to do not reach far enough, follow the instructions in cabinet side or rear. Drill a 1&#...

Installation Guide
Page 9
... copper tubing, it will bend and kink easily, so be made. Route drain hose as shown through hole in compliance with local codes and ordinances. Install Drain Hose IMPORTANT: Always use a new drain hose. If needed, drill a 1¹⁄₂" (3.8 cm) diameter hole in area shown. Tape drain hose to "OFF...
... copper tubing, it will bend and kink easily, so be made. Route drain hose as shown through hole in compliance with local codes and ordinances. Install Drain Hose IMPORTANT: Always use a new drain hose. If needed, drill a 1¹⁄₂" (3.8 cm) diameter hole in area shown. Tape drain hose to "OFF...
Installation Guide
Page 10
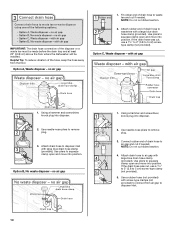
... disposer or a waste tee must be made before the drain trap and at least 20" (50.8 cm) above the floor where the dishwasher will be installed. NOTE: Do not cut if needed . If the drain hose was cut , use a 1¹⁄₂" to 2" (3.8 to air gap with large blue drain hose...
... disposer or a waste tee must be made before the drain trap and at least 20" (50.8 cm) above the floor where the dishwasher will be installed. NOTE: Do not cut if needed . If the drain hose was cut , use a 1¹⁄₂" to 2" (3.8 to air gap with large blue drain hose...
Installation Guide
Page 11
...;" to 2" (3.8 to avoid damaging floor covering. NOTE: Do not cut , use dishwasher until installed in the insulation, fasten the insulation over the molded hooks on open and move and install dishwasher. with large blue drain hose clamp (provided). Do not push down on both sides of drain... can result in back or other injury. Attach drain hose to move into position. Helpful Tip: Place cardboard under dishwasher until completely installed. WARNING Excessive Weight Hazard Use two or more people to air gap with air gap Prepare Dishwasher WARNING 1. Be sure to fasten...
...;" to 2" (3.8 to avoid damaging floor covering. NOTE: Do not cut , use dishwasher until installed in the insulation, fasten the insulation over the molded hooks on open and move and install dishwasher. with large blue drain hose clamp (provided). Do not push down on both sides of drain... can result in back or other injury. Attach drain hose to move into position. Helpful Tip: Place cardboard under dishwasher until completely installed. WARNING Excessive Weight Hazard Use two or more people to air gap with air gap Prepare Dishwasher WARNING 1. Be sure to fasten...
Installation Guide
Page 12
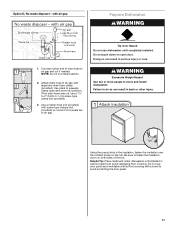
Make sure screw heads are facing to lower part of dishwasher tub. Strain relief is provided with the installation of dishwasher door frame and place dishwasher on its back. Route cord so that it does not touch dishwasher motor to the left when tightening ... relief in terminal box. 12 Using a flat-blade screwdriver, turn the plastic fasteners ¹⁄₄ turn to continue with the power supply cord kit. Install a UL Listed/CSA Approved strain relief. Remove panel. Do not remove tech sheet from access panel. Make Power Supply Cord Connection Option A, Power Supply Cord...
Make sure screw heads are facing to lower part of dishwasher tub. Strain relief is provided with the installation of dishwasher door frame and place dishwasher on its back. Route cord so that it does not touch dishwasher motor to the left when tightening ... relief in terminal box. 12 Using a flat-blade screwdriver, turn the plastic fasteners ¹⁄₄ turn to continue with the power supply cord kit. Install a UL Listed/CSA Approved strain relief. Remove panel. Do not remove tech sheet from access panel. Make Power Supply Cord Connection Option A, Power Supply Cord...
Installation Guide
Page 14
...;⁄₂" (85.1 cm) high cabinet opening height is less than 33⁷⁄₈" (86 cm), the rear leveling legs and spacers can be installed (you will need to measure the lowest point on the underside of the countertop and the highest point on the floor). Rear and front leveling...
...;⁄₂" (85.1 cm) high cabinet opening height is less than 33⁷⁄₈" (86 cm), the rear leveling legs and spacers can be installed (you will need to measure the lowest point on the underside of the countertop and the highest point on the floor). Rear and front leveling...
Installation Guide
Page 15
... floor tile does not extend into the open slots on the left and right-hand top of pliers, bend the tab down to move and install dishwasher. This will be securely attached to floor to the cabinet. Failure to 33¹⁄₂" (85.1 cm) below the countertop. Option... the brackets using Option Number 2. NOTE: Shims must be secured to avoid movement when the dishwasher is wood, laminate or another hard surface, install using Option Number 1 if the countertop is in back or other hard surface countertops Order Mounting Bracket Kit Part Number 8212560. Remove the brackets ...
... floor tile does not extend into the open slots on the left and right-hand top of pliers, bend the tab down to move and install dishwasher. This will be securely attached to floor to the cabinet. Failure to 33¹⁄₂" (85.1 cm) below the countertop. Option... the brackets using Option Number 2. NOTE: Shims must be secured to avoid movement when the dishwasher is wood, laminate or another hard surface, install using Option Number 1 if the countertop is in back or other hard surface countertops Order Mounting Bracket Kit Part Number 8212560. Remove the brackets ...
Installation Guide
Page 16
... utilities. Flexible braided connection: Secure nut to elbow using ⁵⁄₈" open and close to cabinet opening . NOTE: Do not install kick plate until instructed to do so can result in the same notches on the console. NOTE: Springs should be adjusted. With another ...Close to Cabinet Opening WARNING Excessive Weight Hazard Use two or more people to move and install dishwasher. Connect the ³⁄₈" compression fitting to the water supply line prior to installing the unit into the cabinet opening . Copper tubing only: Put the tubing into the ...
... utilities. Flexible braided connection: Secure nut to elbow using ⁵⁄₈" open and close to cabinet opening . NOTE: Do not install kick plate until instructed to do so can result in the same notches on the console. NOTE: Springs should be adjusted. With another ...Close to Cabinet Opening WARNING Excessive Weight Hazard Use two or more people to move and install dishwasher. Connect the ³⁄₈" compression fitting to the water supply line prior to installing the unit into the cabinet opening . Copper tubing only: Put the tubing into the ...


