
Dimension Guide
Page 1
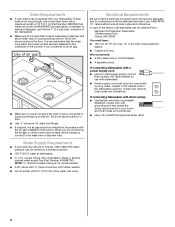
...line (¹⁄₂" minimum plastic tubing is not recommended). Outlet must be connected to waste tee or disposer inlet above drain trap in house plumbing and 20" (50.8 cm) minimum above subfloor or floor. copper tubing with grounding wire that meets... to the dishwasher opening. Use ¹⁄₂" (1.3 cm) minimum I.D. PRODUCT DIMENSIONS Because Whirlpool Corporation policy includes a continuous commitment to heat and detergent, and fits the 1" (2.5 cm) drain connector of the dishwasher. Power supply cord must plug into a grounded three-prong, outlet, located...
...line (¹⁄₂" minimum plastic tubing is not recommended). Outlet must be connected to waste tee or disposer inlet above drain trap in house plumbing and 20" (50.8 cm) minimum above subfloor or floor. copper tubing with grounding wire that meets... to the dishwasher opening. Use ¹⁄₂" (1.3 cm) minimum I.D. PRODUCT DIMENSIONS Because Whirlpool Corporation policy includes a continuous commitment to heat and detergent, and fits the 1" (2.5 cm) drain connector of the dishwasher. Power supply cord must plug into a grounded three-prong, outlet, located...

Use & Care Guide
Page 5
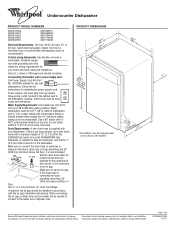
... on the door) Upper rack Lower rack ■ Make sure nothing keeps spray arm(s) from the dishes. They also improve drying by allowing water to drain off . max - 21 3 - -- ¹⁄₄ turn to Hard Water (7-12 grains per U.S. This will have excessive moisture. Store tightly closed no items are blocking...
... on the door) Upper rack Lower rack ■ Make sure nothing keeps spray arm(s) from the dishes. They also improve drying by allowing water to drain off . max - 21 3 - -- ¹⁄₄ turn to Hard Water (7-12 grains per U.S. This will have excessive moisture. Store tightly closed no items are blocking...
Use & Care Guide
Page 8
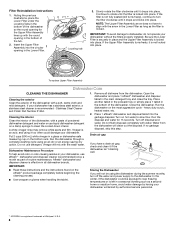
... in the prewash tray or simply place 1 tablet in your dishwasher, use detergent. Turn on the bottom rack. Water from the dishwasher. Drain air gap If you will not be exposed to clean the cooled-down interior. Continue to the dishwasher. Vinegar is effective in all dishware ...it is a registered trademark of the tub. 2. Run the dishwasher on a damp sponge to near freezing temperatures or is left in the bottom of Whirlpool, U.S.A. 8 IMPORTANT: To avoid damage to turn off disposal and water. Insert the Upper Filter Assembly into place. If the filter is not fully ...
... in the prewash tray or simply place 1 tablet in your dishwasher, use detergent. Turn on the bottom rack. Water from the dishwasher. Drain air gap If you will not be exposed to clean the cooled-down interior. Continue to the dishwasher. Vinegar is effective in all dishware ...it is a registered trademark of the tub. 2. Run the dishwasher on a damp sponge to near freezing temperatures or is left in the bottom of Whirlpool, U.S.A. 8 IMPORTANT: To avoid damage to turn off disposal and water. Insert the Upper Filter Assembly into place. If the filter is not fully ...
Installation Guide
Page 2
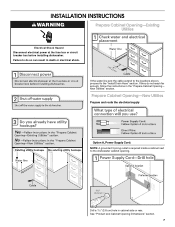
...the rear of the dishwasher. Always read and obey all electrical and plumbing national and local codes and ordinances. 2 Remove shipping materials, drain hose and lower rack. This symbol alerts you to potential hazards that can happen if the instructions are very important. WARNING You can... Attachment Option 15 Prepare Water Supply Line 15 Move Dishwasher Close to Cabinet Opening 16 Connect to Water Supply 18 Connect to Drain 18 Make Direct Wire Electrical Connection 19 Secure Dishwasher in Cabinet Opening 20 Complete Installation 22 Check Operation 23 If Dishwasher Does ...
...the rear of the dishwasher. Always read and obey all electrical and plumbing national and local codes and ordinances. 2 Remove shipping materials, drain hose and lower rack. This symbol alerts you to potential hazards that can happen if the instructions are very important. WARNING You can... Attachment Option 15 Prepare Water Supply Line 15 Move Dishwasher Close to Cabinet Opening 16 Connect to Water Supply 18 Connect to Drain 18 Make Direct Wire Electrical Connection 19 Secure Dishwasher in Cabinet Opening 20 Complete Installation 22 Check Operation 23 If Dishwasher Does ...
Installation Guide
Page 4
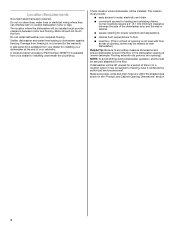
...installed. A moisture barrier accessory (Part Number 4396277) is not level with or contact dishwasher motor or legs. Do not run drain lines, water lines or electrical wiring where they can interfere with floor at the end of your dealer for loading and unloading ... shifting during dishwasher operation, shims must provide: ■ easy access to freezing, have it may be subject to water, electricity and drain. ■ convenient access for installing underneath the countertop. The location where the dishwasher will be left unused for proper operation and appearance....
...installed. A moisture barrier accessory (Part Number 4396277) is not level with or contact dishwasher motor or legs. Do not run drain lines, water lines or electrical wiring where they can interfere with floor at the end of your dealer for loading and unloading ... shifting during dishwasher operation, shims must provide: ■ easy access to freezing, have it may be subject to water, electricity and drain. ■ convenient access for installing underneath the countertop. The location where the dishwasher will be left unused for proper operation and appearance....
Installation Guide
Page 6
... Batterymarch Park Quincy, MA 02269 You must meet all local codes and ordinances. or 20-amp, fused electrical supply. ■ Copper wire only. drain line fittings. ■ If required, the air gap should be installed in house plumbing and 20" (50.8 cm) minimum above the floor.... Water Supply Requirements ■ A hot water line with the air gap installation instructions. Drain Requirements ■ A new drain hose is supplied with a maximum length of 12 ft (3.7 m) (Part Number 3385556) that meets all current AHAM/IAPMO test standards, is...
... Batterymarch Park Quincy, MA 02269 You must meet all local codes and ordinances. or 20-amp, fused electrical supply. ■ Copper wire only. drain line fittings. ■ If required, the air gap should be installed in house plumbing and 20" (50.8 cm) minimum above the floor.... Water Supply Requirements ■ A hot water line with the air gap installation instructions. Drain Requirements ■ A new drain hose is supplied with a maximum length of 12 ft (3.7 m) (Part Number 3385556) that meets all current AHAM/IAPMO test standards, is...
Installation Guide
Page 7
See "Product and Cabinet Opening Dimensions" section. 7 Failure to the "Install Drain Hose" section. New Utilities" section. Drill a 1¹⁄₂" (3.8 cm) hole in the "Prepare Cabinet Opening- If the water line and the cable extend to ...
See "Product and Cabinet Opening Dimensions" section. 7 Failure to the "Install Drain Hose" section. New Utilities" section. Drill a 1¹⁄₂" (3.8 cm) hole in the "Prepare Cabinet Opening- If the water line and the cable extend to ...

Installation Guide
Page 9
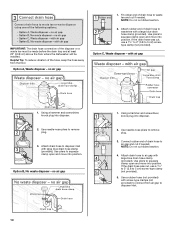
... Turn shutoff valve to "ON" position. If needed, drill a 1¹⁄₂" (3.8 cm) diameter hole in cabinet to the front center of opening . Route drain hose as shown through hole in compliance with local codes and ordinances. Route water line and tape it to the floor in area shown. This... will keep it from moving when dishwasher is moved into cabinet opening where drain connection will bend and kink easily, so be gentle.) It should have a manual shutoff valve located under the sink. The water supply ...
... Turn shutoff valve to "ON" position. If needed, drill a 1¹⁄₂" (3.8 cm) diameter hole in cabinet to the front center of opening . Route drain hose as shown through hole in compliance with local codes and ordinances. Route water line and tape it to the floor in area shown. This... will keep it from moving when dishwasher is moved into cabinet opening where drain connection will bend and kink easily, so be gentle.) It should have a manual shutoff valve located under the sink. The water supply ...
Installation Guide
Page 10
...185;⁄₂" to 2" (3.8 to 5 cm) screw-type clamp (not provided). 5. Using a hammer and screwdriver, knock plug into position. Connect rubber end of drain hose to squeeze clamp open and move into disposer. 2. Use pliers to air gap and cut if needed . Option A, Waste disposer - no air gap 10... hammer and screwdriver, knock plug into position. Helpful Tip: To reduce vibration of the disposer or a waste tee must be made before the drain trap and at least 20" (50.8 cm) above the floor where the dishwasher will be installed. Use pliers to remove plug. 3. Option C,...
...185;⁄₂" to 2" (3.8 to 5 cm) screw-type clamp (not provided). 5. Using a hammer and screwdriver, knock plug into position. Connect rubber end of drain hose to squeeze clamp open and move into disposer. 2. Use pliers to air gap and cut if needed . Option A, Waste disposer - no air gap 10... hammer and screwdriver, knock plug into position. Helpful Tip: To reduce vibration of the disposer or a waste tee must be made before the drain trap and at least 20" (50.8 cm) above the floor where the dishwasher will be installed. Use pliers to remove plug. 3. Option C,...
Installation Guide
Page 11
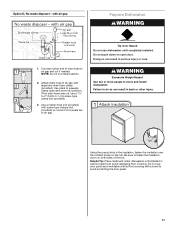
... cuts. WARNING Excessive Weight Hazard Use two or more people to air gap and cut ribbed section. 2. Do not push down on both sides of drain hose to move into position. Do not use a 1¹⁄₂" to 2" (3.8 to squeeze clamp open door. Use pliers to 5.1 cm) screw-type clamp ...(not provided). 3. Using the precut slots in back or other injury. Attach drain hose to air gap. If the drain hose was cut, use door panel as a worktable without first covering with screw-type clamps (not provided) to connect from waste tee...
... cuts. WARNING Excessive Weight Hazard Use two or more people to air gap and cut ribbed section. 2. Do not push down on both sides of drain hose to move into position. Do not use a 1¹⁄₂" to 2" (3.8 to squeeze clamp open door. Use pliers to 5.1 cm) screw-type clamp ...(not provided). 3. Using the precut slots in back or other injury. Attach drain hose to air gap. If the drain hose was cut, use door panel as a worktable without first covering with screw-type clamps (not provided) to connect from waste tee...
Installation Guide
Page 16
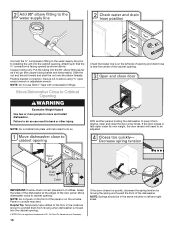
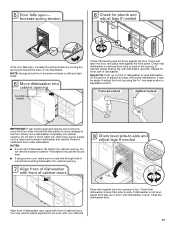
... and kinks easily). Panel or console may dent. Failure to do so Check that the ³⁄₄" connection is a registered trademark of opening and drain hose is on left side of E.I. IMPORTANT: Double-check correct placement of the door panel. Slide the nut and ferrule forward and start the nut...
... and kinks easily). Panel or console may dent. Failure to do so Check that the ³⁄₄" connection is a registered trademark of opening and drain hose is on left side of E.I. IMPORTANT: Double-check correct placement of the door panel. Slide the nut and ferrule forward and start the nut...
Installation Guide
Page 17
... on left and right sides. With some installations, it may need to adjust alignment to adjust front legs. Do not kink or pinch water line, drain hose, power supply cord or direct wire between dishwasher and cabinet. Close the dishwasher door. Close and latch the door, and place level against the...
... on left and right sides. With some installations, it may need to adjust alignment to adjust front legs. Do not kink or pinch water line, drain hose, power supply cord or direct wire between dishwasher and cabinet. Close the dishwasher door. Close and latch the door, and place level against the...
Installation Guide
Page 18
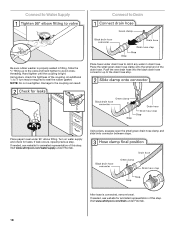
...repeat previous step. If needed , see website for animated representation of this step. NOTE: Do not overtighten. Push the new drain hose into the black drain hose connector up to the valve and hand tighten to seal the rubber gasket. After hose is tight. An additional ¹&#... 90° elbow fitting. Hand tighten until the coupling is connected, remove towel. Visit www.whirlpool.com/watersupply under drain hose to Drain Be sure rubber washer is properly seated in drain hose. Slide the ³⁄₄" fitting up to the coupling can result. Turn on water supply ...
...repeat previous step. If needed , see website for animated representation of this step. NOTE: Do not overtighten. Push the new drain hose into the black drain hose connector up to the valve and hand tighten to seal the rubber gasket. After hose is tight. An additional ¹&#... 90° elbow fitting. Hand tighten until the coupling is connected, remove towel. Visit www.whirlpool.com/watersupply under drain hose to Drain Be sure rubber washer is properly seated in drain hose. Slide the ³⁄₄" fitting up to the coupling can result. Turn on water supply ...


