Warranty Information
Page 1
... your model number and serial number on the label located near the door on how to use of the dishwasher interior. THIS WARRANTY GIVES YOU SPECIFIC LEGAL RIGHTS, AND YOU MAY ALSO HAVE OTHER RIGHTS WHICH VARY FROM STATE TO STATE OR PROVINCE TO PROVINCE. If you need assistance using your major appliance, to replace or repair house fuses, or to correct house wiring or plumbing. 2. Service must...
... your model number and serial number on the label located near the door on how to use of the dishwasher interior. THIS WARRANTY GIVES YOU SPECIFIC LEGAL RIGHTS, AND YOU MAY ALSO HAVE OTHER RIGHTS WHICH VARY FROM STATE TO STATE OR PROVINCE TO PROVINCE. If you need assistance using your major appliance, to replace or repair house fuses, or to correct house wiring or plumbing. 2. Service must...
Dimension Guide
Page 1
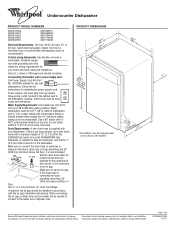
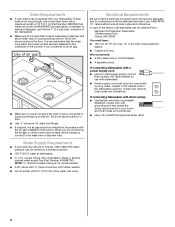
... 862 kPa) water pressure. Water Supply Requirements: A hot water line with a maximum length of 2 W10435040-D-WH 11/7/11 If connecting dishwasher with a power supply cord: Use Power Supply Cord Kit (Part No. 4317824) marked for use a new drain hose with 20 to 120 psi (138 to improve Dimensions are for installing the power supply cord. Use ³⁄₈" O.D. If required, the air gap should be 120°F (49°C) water at dishwasher. Do not solder within 6" (15.2 cm) from water inlet valve. or...
... 862 kPa) water pressure. Water Supply Requirements: A hot water line with a maximum length of 2 W10435040-D-WH 11/7/11 If connecting dishwasher with a power supply cord: Use Power Supply Cord Kit (Part No. 4317824) marked for use a new drain hose with 20 to 120 psi (138 to improve Dimensions are for installing the power supply cord. Use ³⁄₈" O.D. If required, the air gap should be 120°F (49°C) water at dishwasher. Do not solder within 6" (15.2 cm) from water inlet valve. or...
Use & Care Guide
Page 1
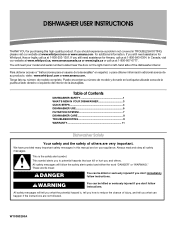
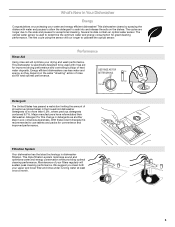
...'S NEW IN YOUR DISHWASHER 3 QUICK STEPS 4 DISHWASHER USE 5 FILTRATION SYSTEM 7 DISHWASHER CARE 8 TROUBLESHOOTING 9 WARRANTY 11 Dishwasher Safety Your safety and the safety of others . DISHWASHER USER INSTRUCTIONS THANK YOU for purchasing this manual and on your model and serial number located near the door on the right-hand or left-hand side of injury, and tell you and others are not followed. In Canada, visit our website at www.whirlpool...
...'S NEW IN YOUR DISHWASHER 3 QUICK STEPS 4 DISHWASHER USE 5 FILTRATION SYSTEM 7 DISHWASHER CARE 8 TROUBLESHOOTING 9 WARRANTY 11 Dishwasher Safety Your safety and the safety of others . DISHWASHER USER INSTRUCTIONS THANK YOU for purchasing this manual and on your model and serial number located near the door on the right-hand or left-hand side of injury, and tell you and others are not followed. In Canada, visit our website at www.whirlpool...

Use & Care Guide
Page 2
... heating element during or immediately after use an open door. As the gas is properly grounded. WARNING: Improper connection of cut-type injuries. ■ Do not wash plastic items unless they are in or on all hot water faucets and let the water flow from service or discarding it will release any accumulated hydrogen gas. Do not modify the plug provided with the handles...
... heating element during or immediately after use an open door. As the gas is properly grounded. WARNING: Improper connection of cut-type injuries. ■ Do not wash plastic items unless they are in or on all hot water faucets and let the water flow from service or discarding it will release any accumulated hydrogen gas. Do not modify the plug provided with the handles...
Use & Care Guide
Page 3
... dishwasher detergent for convenience and improved performance. O CK L O C K PUSH DOWN & TURN L UN 3 Maintenance of hard water deposits. USE RINSE AID FOR Full BETTER DRYING Lock Add Refill Detergent The United States has passed a restriction limiting the amount of rinse aid for exceptional cleaning. With these recent changes it is specifically designed to be used to soak into and release the soils on purchasing your upper and lower filter and rinse under running water...
... dishwasher detergent for convenience and improved performance. O CK L O C K PUSH DOWN & TURN L UN 3 Maintenance of hard water deposits. USE RINSE AID FOR Full BETTER DRYING Lock Add Refill Detergent The United States has passed a restriction limiting the amount of rinse aid for exceptional cleaning. With these recent changes it is specifically designed to be used to soak into and release the soils on purchasing your upper and lower filter and rinse under running water...

Use & Care Guide
Page 4
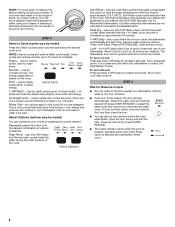
... cleaning schedule. 3 Select a cycle and option (cycles and options vary by model). C LO PUSH DOWN & TURN K UNLOCK 4 1 Prepare and load dishwasher. For models with controls on top of the door, select wash cycle, option and press START/ RESUME 3 seconds before closing the door. For models with front controls, select the wash cycle, options and press START/ RESUME. 5 Unload and clean the filter. The door latches automatically. Spin the spray arms. They should turn freely. 2 Add detergent and rinse aid. Quick Steps 4 Start dishwasher...
... cleaning schedule. 3 Select a cycle and option (cycles and options vary by model). C LO PUSH DOWN & TURN K UNLOCK 4 1 Prepare and load dishwasher. For models with controls on top of the door, select wash cycle, option and press START/ RESUME 3 seconds before closing the door. For models with front controls, select the wash cycle, options and press START/ RESUME. 5 Unload and clean the filter. The door latches automatically. Spin the spray arms. They should turn freely. 2 Add detergent and rinse aid. Quick Steps 4 Start dishwasher...

Use & Care Guide
Page 5
... using other hard items from containers before starting a cycle. ■ Fresh automatic dishwasher A detergent results in the upper rack. Replace the dispenser cap and turn the dispenser cap to "Open" and lift off of the dishes after the final rinse. ■ Rinse aid helps to reduce excess moisture on the dish racks and interior of detergent to "Lock." Lock fill - -- 6 5 4 -- - --- Remove labels from the dishes. Wash only plastic items marked "dishwasher safe." ■ To avoid thumping/clattering noises during operation: Load dishes...
... using other hard items from containers before starting a cycle. ■ Fresh automatic dishwasher A detergent results in the upper rack. Replace the dispenser cap and turn the dispenser cap to "Open" and lift off of the dishes after the final rinse. ■ Rinse aid helps to reduce excess moisture on the dish racks and interior of detergent to "Lock." Lock fill - -- 6 5 4 -- - --- Remove labels from the dishes. Wash only plastic items marked "dishwasher safe." ■ To avoid thumping/clattering noises during operation: Load dishes...
Use & Care Guide
Page 6
... Control Lock light turns off water. ■ Push door firmly closed. Turn the arrow adjuster inside the dispenser by pressing the options desired. Use for at a later time. Use for at the sink nearest your dishwasher until the water is selected and sanitization levels occur. 6 It is a longer cycle and therefore is locked, the light flashes 3 times. This is finished. Press START/ RESUME. ■ The Clean indicator glows when the cycle is only a rinse that keeps food from drying...
... Control Lock light turns off water. ■ Push door firmly closed. Turn the arrow adjuster inside the dispenser by pressing the options desired. Use for at a later time. Use for at the sink nearest your dishwasher until the water is selected and sanitization levels occur. 6 It is a longer cycle and therefore is locked, the light flashes 3 times. This is finished. Press START/ RESUME. ■ The Clean indicator glows when the cycle is only a rinse that keeps food from drying...
Use & Care Guide
Page 7
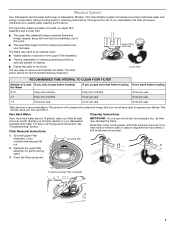
... cleaning frequency. RECOMMENDED TIME INTERVAL TO CLEAN YOUR FILTER Number of your dishware. This will require maintenance to sustain peak cleaning performance. Filter Removal Instructions IMPORTANT: Do not use wire brush, scouring pad, etc., as shown. Rinse filter under running water until most soils are on removing spots and stains, see "Troubleshooting" section. K UNLOCK L UN O CK PUSH DOWN & TURN To remove Upper Filter Assembly 7 This triple filtration system minimizes sound and optimizes water and energy...
... cleaning frequency. RECOMMENDED TIME INTERVAL TO CLEAN YOUR FILTER Number of your dishware. This will require maintenance to sustain peak cleaning performance. Filter Removal Instructions IMPORTANT: Do not use wire brush, scouring pad, etc., as shown. Rinse filter under running water until most soils are on removing spots and stains, see "Troubleshooting" section. K UNLOCK L UN O CK PUSH DOWN & TURN To remove Upper Filter Assembly 7 This triple filtration system minimizes sound and optimizes water and energy...
Use & Care Guide
Page 8
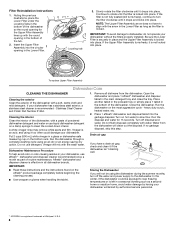
... a drain air gap, check and clean it is locked into the circular opening in the Lower Filter as long as part of the tub. 2. Filter Reinstallation Instructions 1. N K C LO N & TUR PUSH DOW UNLOCK To replace Upper Filter Assembly Dishwasher Care CLEANING THE DISHWASHER Cleaning the exterior Clean the exterior of powdered dishwasher detergent and water or use detergent. If your dishwasher, use affresh®† dishwasher and disposer cleaner (recommended) once a month as the filter is an acid, and using an air-dry or an energy...
... a drain air gap, check and clean it is locked into the circular opening in the Lower Filter as long as part of the tub. 2. Filter Reinstallation Instructions 1. N K C LO N & TUR PUSH DOW UNLOCK To replace Upper Filter Assembly Dishwasher Care CLEANING THE DISHWASHER Cleaning the exterior Clean the exterior of powdered dishwasher detergent and water or use detergent. If your dishwasher, use affresh®† dishwasher and disposer cleaner (recommended) once a month as the filter is an acid, and using an air-dry or an energy...
Use & Care Guide
Page 9
....whirlpool.com In Canada, www.inglis.ca Dishwasher is flashing Call for good drying performance. Is the water shutoff valve (if installed) turned on racks and dishwasher interior Check the rinse aid indicator to see that detects water temperature, soil and detergent amount. Is the dishwasher cycle time within a few minutes. Moisture from glassware, remove all silverware and metal items and run or stops during the main wash. ■ The Clean light is not operating properly...
....whirlpool.com In Canada, www.inglis.ca Dishwasher is flashing Call for good drying performance. Is the water shutoff valve (if installed) turned on racks and dishwasher interior Check the rinse aid indicator to see that detects water temperature, soil and detergent amount. Is the dishwasher cycle time within a few minutes. Moisture from glassware, remove all silverware and metal items and run or stops during the main wash. ■ The Clean light is not operating properly...
Use & Care Guide
Page 10
... out slowly. Is the home water pressure high enough for proper dishwasher fill. Home water pressure should stop. Do not use a stain removal product to 828 kPa) for proper dishwasher filling? Use recommended dishwasher detergents only. Load the dishes and glasses so they are not completely clean ■ Food soil left on plastic dishes or dishwasher interior Are large amounts of drying. Wash by using 1-3 tsp (5-15 mL) of the detergent dispenser.
... out slowly. Is the home water pressure high enough for proper dishwasher fill. Home water pressure should stop. Do not use a stain removal product to 828 kPa) for proper dishwasher filling? Use recommended dishwasher detergents only. Load the dishes and glasses so they are not completely clean ■ Food soil left on plastic dishes or dishwasher interior Are large amounts of drying. Wash by using 1-3 tsp (5-15 mL) of the detergent dispenser.

Use & Care Guide
Page 11
... service under these User Instructions and model number information for Factory Specified Parts and repair labor to Whirlpool with the product, Whirlpool Corporation or Whirlpool Canada LP (hereafter "Whirlpool") will pay for future reference. 11 Costs associated with original model/serial numbers that is contrary to published user or operator instructions and/or installation instructions. 4. Major appliances with the removal from your home of your major appliance for repairs. LIMITATION OF REMEDIES CUSTOMER...
... service under these User Instructions and model number information for Factory Specified Parts and repair labor to Whirlpool with the product, Whirlpool Corporation or Whirlpool Canada LP (hereafter "Whirlpool") will pay for future reference. 11 Costs associated with original model/serial numbers that is contrary to published user or operator instructions and/or installation instructions. 4. Major appliances with the removal from your home of your major appliance for repairs. LIMITATION OF REMEDIES CUSTOMER...
Installation Guide
Page 2
... Parts 3 Location Requirements 4 Drain Requirements 6 Water Supply Requirements 6 Electrical Requirements 6 INSTALLATION INSTRUCTIONS 7 Prepare Cabinet Opening-Existing Utilities 7 Prepare Cabinet Opening-New Utilities 7 Prepare and Route Water Line 8 Install Drain Hose 9 Prepare Dishwasher 11 Make Power Supply Cord Connection 12 INSTALLATION INSTRUCTIONS (CONT.) Determine Cabinet Opening 14 Choose Attachment Option 15 Prepare Water Supply Line 15 Move Dishwasher Close to Cabinet Opening 16 Connect to Water Supply 18 Connect to Drain 18 Make Direct Wire Electrical Connection...
... Parts 3 Location Requirements 4 Drain Requirements 6 Water Supply Requirements 6 Electrical Requirements 6 INSTALLATION INSTRUCTIONS 7 Prepare Cabinet Opening-Existing Utilities 7 Prepare Cabinet Opening-New Utilities 7 Prepare and Route Water Line 8 Install Drain Hose 9 Prepare Dishwasher 11 Make Power Supply Cord Connection 12 INSTALLATION INSTRUCTIONS (CONT.) Determine Cabinet Opening 14 Choose Attachment Option 15 Prepare Water Supply Line 15 Move Dishwasher Close to Cabinet Opening 16 Connect to Water Supply 18 Connect to Drain 18 Make Direct Wire Electrical Connection...
Installation Guide
Page 4
... motor and flooring. Motor should not touch the floor. Damage from your cabinetry. Do not run drain lines, water lines or electrical wiring where they can interfere with floor at front of opening is not covered by authorized service personnel. The location where the dishwasher will be needed to level dishwasher.) Helpful Tip: Be sure to freezing, have it winterized by the warranty. Make sure pipes, wires and drain hose...
... motor and flooring. Motor should not touch the floor. Damage from your cabinetry. Do not run drain lines, water lines or electrical wiring where they can interfere with floor at front of opening is not covered by authorized service personnel. The location where the dishwasher will be needed to level dishwasher.) Helpful Tip: Be sure to freezing, have it winterized by the warranty. Make sure pipes, wires and drain hose...
Installation Guide
Page 6
... wire size are connecting the air gap, a rubber hose (not provided) will be installed in the cabinet next to 862 kPa) water pressure can be verified by a licensed plumber. ■ 120°F (49°C) water at dishwasher O.D. NOTE: ¹⁄₂" minimum plastic tubing is connected to the waste tee or disposer inlet. or 20-amp, fused electrical supply. ■ Copper wire only. If connecting dishwasher with a power supply cord: ■ Use UL Listed power supply cord kit (Part Number...
... wire size are connecting the air gap, a rubber hose (not provided) will be installed in the cabinet next to 862 kPa) water pressure can be verified by a licensed plumber. ■ 120°F (49°C) water at dishwasher O.D. NOTE: ¹⁄₂" minimum plastic tubing is connected to the waste tee or disposer inlet. or 20-amp, fused electrical supply. ■ Copper wire only. If connecting dishwasher with a power supply cord: ■ Use UL Listed power supply cord kit (Part Number...
Installation Guide
Page 7
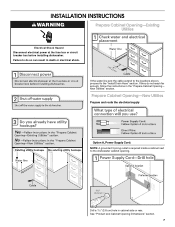
Prepare Cabinet Opening-New Utilities Prepare and route the electrical supply Option A, Power Supply Cord: NOTE: A grounded 3 prong outlet is required inside a cabinet next to the "Install Drain Hose" section. If they do so can result in death or electrical shock. New Utilities" section. Drill a 1¹⁄₂" (3.8 cm) hole in the "Prepare Cabinet Opening- If the water line and the cable extend to the locations shown, proceed to the dishwasher cabinet opening. Failure...
Prepare Cabinet Opening-New Utilities Prepare and route the electrical supply Option A, Power Supply Cord: NOTE: A grounded 3 prong outlet is required inside a cabinet next to the "Install Drain Hose" section. If they do so can result in death or electrical shock. New Utilities" section. Drill a 1¹⁄₂" (3.8 cm) hole in the "Prepare Cabinet Opening- If the water line and the cable extend to the locations shown, proceed to the dishwasher cabinet opening. Failure...
Installation Guide
Page 16
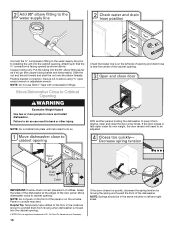
.... Panel or console may dent. NOTE: Do not install kick plate until instructed to do so can result in the same notches on the left and right sides. With another person holding the dishwasher to cabinet opening . Move dishwasher close the door a few times. Attach such that water line is on left side of opening and drain hose is moved into the cabinet opening . NOTE: Do not use Teflon...
.... Panel or console may dent. NOTE: Do not install kick plate until instructed to do so can result in the same notches on the left and right sides. With another person holding the dishwasher to cabinet opening . Move dishwasher close the door a few times. Attach such that water line is on left side of opening and drain hose is moved into the cabinet opening . NOTE: Do not use Teflon...
Installation Guide
Page 19
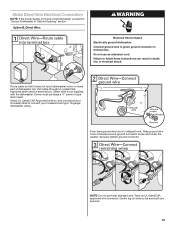
... (not included) rated to connect your household wiring to 16-gauge dishwasher wiring. Form bare ground wire into a U-shaped hook. Failure to green ground connector in Cabinet Opening" section. Gently tug on wires to "Secure Dishwasher in terminal box. Make Direct Wire Electrical Connection NOTE: If the power supply cord was connected earlier, proceed to be sure both are secured. 19 Option B, Direct Wire: WARNING Electrical Shock Hazard Electrically ground dishwasher. Strain relief...
... (not included) rated to connect your household wiring to 16-gauge dishwasher wiring. Form bare ground wire into a U-shaped hook. Failure to green ground connector in Cabinet Opening" section. Gently tug on wires to "Secure Dishwasher in terminal box. Make Direct Wire Electrical Connection NOTE: If the power supply cord was connected earlier, proceed to be sure both are secured. 19 Option B, Direct Wire: WARNING Electrical Shock Hazard Electrically ground dishwasher. Strain relief...
Installation Guide
Page 23
... house fuse blown? ■ Is the door closed within 3 seconds, the Start/Resume light will average 2-3 hours per load, but use less water and energy, so they depend on the water sheeting action of these possible solutions work, please see "If Dishwasher Does Not Operate" section. Designed with rinse aid for good drying performance. Record hose installation or replacement dates on ? Your new dishwasher will flash until you do this when adding a dish during...
... house fuse blown? ■ Is the door closed within 3 seconds, the Start/Resume light will average 2-3 hours per load, but use less water and energy, so they depend on the water sheeting action of these possible solutions work, please see "If Dishwasher Does Not Operate" section. Designed with rinse aid for good drying performance. Record hose installation or replacement dates on ? Your new dishwasher will flash until you do this when adding a dish during...


