Installation Guide
Page 2
... OF CONTENTS DISHWASHER SAFETY 3 INSTALLATION REQUIREMENTS 4 Tools and Parts 4 Location Requirements 6 Product and Cabinet Opening Dimensions 7 Drain Requirements 8 Water Supply Requirements 8 Electrical Requirements 8 INSTALLATION INSTRUCTIONS 9 Prepare Cabinet Opening - New Utilities 9 Install Optional Moisture Barrier 9 Electrical Connection 10 Prepare Dishwasher 11 Remove Access Panel 11 Connect Water Line to Fill Valve 12 Connect Fill Hose to Fill Valve 13 Drain Hose Connection 14 Power Cord Connection 14 Install Door Handle 16 Place Dishwasher in Cabinet 16 Choose...
... OF CONTENTS DISHWASHER SAFETY 3 INSTALLATION REQUIREMENTS 4 Tools and Parts 4 Location Requirements 6 Product and Cabinet Opening Dimensions 7 Drain Requirements 8 Water Supply Requirements 8 Electrical Requirements 8 INSTALLATION INSTRUCTIONS 9 Prepare Cabinet Opening - New Utilities 9 Install Optional Moisture Barrier 9 Electrical Connection 10 Prepare Dishwasher 11 Remove Access Panel 11 Connect Water Line to Fill Valve 12 Connect Fill Hose to Fill Valve 13 Drain Hose Connection 14 Power Cord Connection 14 Install Door Handle 16 Place Dishwasher in Cabinet 16 Choose...
Installation Guide
Page 3
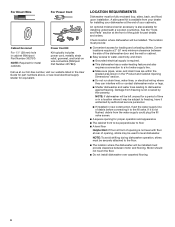
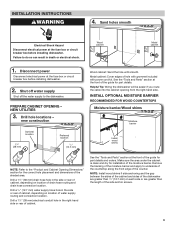
... or cuts. Remove shipping materials and drain hose. Close dishwasher door until completely installed. WARNING You can be installed to persons, the installer must be killed or seriously injured if you and others are not followed. You Need to the power cord. All safety messages will tell you don't follow instructions. Always read and obey all governing codes and ordinances. ■■ Install this manual and on open dishwasher door...
... or cuts. Remove shipping materials and drain hose. Close dishwasher door until completely installed. WARNING You can be installed to persons, the installer must be killed or seriously injured if you and others are not followed. You Need to the power cord. All safety messages will tell you don't follow instructions. Always read and obey all governing codes and ordinances. ■■ Install this manual and on open dishwasher door...
Installation Guide
Page 4
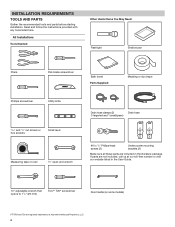
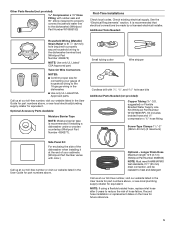
... drivers or hex sockets Small level Measuring tape or ruler 5/8" open-end wrench Drain hose clamps (2) Drain hose (1 large/red and 1 small/green) #10 x 1/2" Phillips-head screws (2) Undercounter mounting brackets (2) Make sure all these parts are registred trademarks of Acument Intellectual Properties, LLC. 4 If parts are not included, call us at our toll-free number or visit our website listed in the User Guide. 10" adjustable wrench that opens...
... drivers or hex sockets Small level Measuring tape or ruler 5/8" open-end wrench Drain hose clamps (2) Drain hose (1 large/red and 1 small/green) #10 x 1/2" Phillips-head screws (2) Undercounter mounting brackets (2) Make sure all these parts are registred trademarks of Acument Intellectual Properties, LLC. 4 If parts are not included, call us at our toll-free number or visit our website listed in the User Guide. 10" adjustable wrench that opens...
Installation Guide
Page 5
... wiring to the dishwasher) (Whirlpool Part Number W10685193) First-Time Installations Check local codes. Kit includes braided hose and 3/8" compression x 3/4" hose fitting. NOTE: If using a flexible braided hose, replace inlet hose after 5 years to reduce the risk of household wiring to heat and detergent Call us at our toll-free number or visit our website listed in the User Guide for part numbers above, or see local plumbing supply retailer for equivalent. Check existing electrical supply. Optional - Twist-On Wire...
... wiring to the dishwasher) (Whirlpool Part Number W10685193) First-Time Installations Check local codes. Kit includes braided hose and 3/8" compression x 3/4" hose fitting. NOTE: If using a flexible braided hose, replace inlet hose after 5 years to reduce the risk of household wiring to heat and detergent Call us at our toll-free number or visit our website listed in the User Guide for part numbers above, or see local plumbing supply retailer for equivalent. Check existing electrical supply. Optional - Twist-On Wire...
Installation Guide
Page 6
... cabinets Power Cord Kit Kit typically includes power cord, metallic strain relief, grommet, and twist-on wire connectors (Whirlpool Part Number 4317824). Check location where dishwasher will be subject to freezing, have it winterized by the warranty. NOTE: If dishwasher will be installed must be used to a hot water supply line. ■■ Make sure pipes, wires, and drain hose are within the shaded area shown in the "Product and Cabinet Opening Dimensions" section. ■■ Do not run drain lines, water lines...
... cabinets Power Cord Kit Kit typically includes power cord, metallic strain relief, grommet, and twist-on wire connectors (Whirlpool Part Number 4317824). Check location where dishwasher will be subject to freezing, have it winterized by the warranty. NOTE: If dishwasher will be installed must be used to a hot water supply line. ■■ Make sure pipes, wires, and drain hose are within the shaded area shown in the "Product and Cabinet Opening Dimensions" section. ■■ Do not run drain lines, water lines...
Installation Guide
Page 7
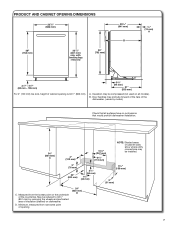
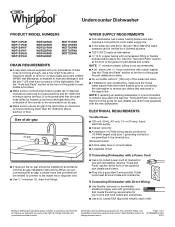
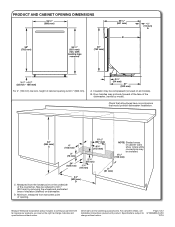
PRODUCT AND CABINET OPENING DIMENSIONS 30" (762 mm) 251/4" (641 mm) B 3/4" (19 mm) A For 4" (100 mm) toe kick, height of the dishwasher, (varies by removing the wheels and perforated area of opening is 341/2" (863 mm). 33/4" (94 mm) 21" (533 mm) A. Door handles may protrude forward of the face of cabinet opening 24" (620 mm) D 7 D. B. May be reduced to 331/2" (851 mm...
PRODUCT AND CABINET OPENING DIMENSIONS 30" (762 mm) 251/4" (641 mm) B 3/4" (19 mm) A For 4" (100 mm) toe kick, height of the dishwasher, (varies by removing the wheels and perforated area of opening is 341/2" (863 mm). 33/4" (94 mm) 21" (533 mm) A. Door handles may protrude forward of the face of cabinet opening 24" (620 mm) D 7 D. B. May be reduced to 331/2" (851 mm...
Installation Guide
Page 8
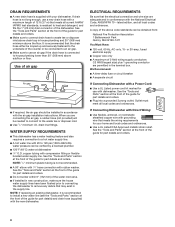
... water supply lines have been flushed prior to connecting the dishwasher to use a new drain hose with a Power Cord: ■■ Use a UL Listed power cord kit marked for your dishwasher. drain line fittings. NOTE: If replacing an existing dishwasher, it is resistant to heat and detergent, and fits the 1" (25 mm) drain connector of the water inlet valve. ■■ If installed in the supply line. or 20-amp, fused electrical supply ■■ Copper wire only ■■ A maximum of the guide for part...
... water supply lines have been flushed prior to connecting the dishwasher to use a new drain hose with a Power Cord: ■■ Use a UL Listed power cord kit marked for your dishwasher. drain line fittings. NOTE: If replacing an existing dishwasher, it is resistant to heat and detergent, and fits the 1" (25 mm) drain connector of the water inlet valve. ■■ If installed in the supply line. or 20-amp, fused electrical supply ■■ Copper wire only ■■ A maximum of the guide for part...
Installation Guide
Page 9
... Tip: Wiring the dishwasher will be easier if you route the cable into the cabinet opening from the right-hand side. See the "Tools and Parts" section at the front of the guide for installation of drain hose routing and drain hose connection location. INSTALLATION INSTRUCTIONS WARNING 4. Metal cabinet: Cover edges of the counter. Shut off water supply Shut off the water supply to the "Product and Cabinet Opening Dimensions" section for part details and orders. INSTALL OPTIONAL...
... Tip: Wiring the dishwasher will be easier if you route the cable into the cabinet opening from the right-hand side. See the "Tools and Parts" section at the front of the guide for installation of drain hose routing and drain hose connection location. INSTALLATION INSTRUCTIONS WARNING 4. Metal cabinet: Cover edges of the counter. Shut off water supply Shut off the water supply to the "Product and Cabinet Opening Dimensions" section for part details and orders. INSTALL OPTIONAL...

Installation Guide
Page 10
... you will need to transfer the power cord to the new dishwasher. ■■ Direct wire connection to the dishwasher will prohibit cable from power supply through cabinet hole. (Cable must be done until Step 22 7. route cable Built-up floors - for cabinet opening height of cabinet opening 's floor - Direct wire - If installing into the cabinet opening . For other cabinet opening If installing with Step 7 - Route cable from moving when dishwasher is in area shown. Cut insulation...
... you will need to transfer the power cord to the new dishwasher. ■■ Direct wire connection to the dishwasher will prohibit cable from power supply through cabinet hole. (Cable must be done until Step 22 7. route cable Built-up floors - for cabinet opening height of cabinet opening 's floor - Direct wire - If installing into the cabinet opening . For other cabinet opening If installing with Step 7 - Route cable from moving when dishwasher is in area shown. Cut insulation...
Installation Guide
Page 11
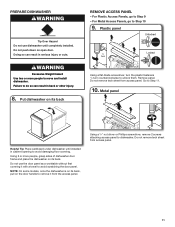
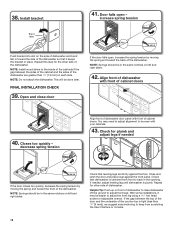
... dishwasher on the door handle to remove it with a towel to Step 10 9. For Plastic Access Panels, go to avoid scratching the door panel. Plastic panel 1/4 turn Using a flat-blade screwdriver, turn the plastic fasteners 1/4 turn counterclockwise to Step 11. 10. Do not use dishwasher until installed in cabinet opening to dishwasher. Using a 1/4" nut driver or Phillips screwdriver, remove 2 screws attaching access panel to avoid damaging floor covering. Do not remove tech sheet from access panel...
... dishwasher on the door handle to remove it with a towel to Step 10 9. For Plastic Access Panels, go to avoid scratching the door panel. Plastic panel 1/4 turn Using a flat-blade screwdriver, turn the plastic fasteners 1/4 turn counterclockwise to Step 11. 10. Do not use dishwasher until installed in cabinet opening to dishwasher. Using a 1/4" nut driver or Phillips screwdriver, remove 2 screws attaching access panel to avoid damaging floor covering. Do not remove tech sheet from access panel...

Installation Guide
Page 14
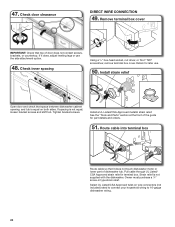
... a power cord, you will need to transfer the power cord to the drain hose stop Using pliers, squeeze open the small drain hose clamp, and slide it does not touch dishwasher motor or lower part of 2 power cord supply conductors (12 AWG largest size) plus 1 grounding conductor are facing to catch any water in drain hose. Remove terminal box cover Using a 1/4" hex-head socket, nut driver, or Torx® T20® screwdriver, remove terminal box cover. DRAIN HOSE CONNECTION 19. Connect drain hose Small...
... a power cord, you will need to transfer the power cord to the drain hose stop Using pliers, squeeze open the small drain hose clamp, and slide it does not touch dishwasher motor or lower part of 2 power cord supply conductors (12 AWG largest size) plus 1 grounding conductor are facing to catch any water in drain hose. Remove terminal box cover Using a 1/4" hex-head socket, nut driver, or Torx® T20® screwdriver, remove terminal box cover. DRAIN HOSE CONNECTION 19. Connect drain hose Small...
Installation Guide
Page 16
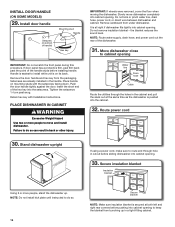
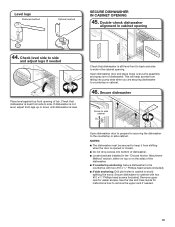
... instructed to route end through the holes in bottom of the dishwasher. 31. IMPORTANT: If wheels were removed, cover the floor when moving the dishwasher. Remove cardboard from under dishwasher. Do not kink or pinch water line, drain hose, power cord, or direct wire between dishwasher and cabinet. Route power cord 30. Push the door handle tightly against the door. the blanket reduces the sound level. Place handle on its back. INSTALL DOOR HANDLE (ON SOME MODELS) 29. Install door handle...
... instructed to route end through the holes in bottom of the dishwasher. 31. IMPORTANT: If wheels were removed, cover the floor when moving the dishwasher. Remove cardboard from under dishwasher. Do not kink or pinch water line, drain hose, power cord, or direct wire between dishwasher and cabinet. Route power cord 30. Push the door handle tightly against the door. the blanket reduces the sound level. Place handle on its back. INSTALL DOOR HANDLE (ON SOME MODELS) 29. Install door handle...
Installation Guide
Page 17
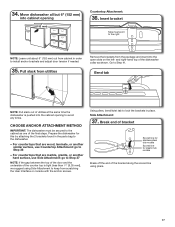
... scored line using Side Attachment to the dishwasher. - Prepare the dishwasher for plastic tub models Break off the end of utilities at the same time the dishwasher is tight (less than 1/4" [6,35 mm]), we suggest using pliers. 17 Break end of bracket SSccoorree lliinnee ffoorr ppllaassttiicc ttuubb mmooddeellss Scored line for stainless steel tub models Scored line for this by attaching the 2 brackets found in the parts bag...
... scored line using Side Attachment to the dishwasher. - Prepare the dishwasher for plastic tub models Break off the end of utilities at the same time the dishwasher is tight (less than 1/4" [6,35 mm]), we suggest using pliers. 17 Break end of bracket SSccoorree lliinnee ffoorr ppllaassttiicc ttuubb mmooddeellss Scored line for stainless steel tub models Scored line for this by attaching the 2 brackets found in the parts bag...
Installation Guide
Page 18
... adjust legs if needed , adjust leveling leg until dishwasher is centered from scratching the User Interface or console. 18 Helpful Tip: Push up on left and right sides. decrease spring tension Align front of dishwasher door panel with front of dishwasher to raise dishwasher off the ground to back in the same notches on front of cabinet doors. Install bracket Bend tabs 41. Check that dishwasher...
... adjust legs if needed , adjust leveling leg until dishwasher is centered from scratching the User Interface or console. 18 Helpful Tip: Push up on left and right sides. decrease spring tension Align front of dishwasher door panel with front of dishwasher to raise dishwasher off the ground to back in the same notches on front of cabinet doors. Install bracket Bend tabs 41. Check that dishwasher...
Installation Guide
Page 19
... dishwasher to remove the upper rack if needed Place level against top front opening 44. See the Use and Care Guide for easier access. Check level side to the countertop with two #10 x1/2" Phillips-head screws (included). Open dishwasher door and place towel over pump assembly and spray arm of tub. This will keep it from shifting when the door is level from falling into bottom of dishwasher. ■■ Locate brackets installed...
... dishwasher to remove the upper rack if needed Place level against top front opening 44. See the Use and Care Guide for easier access. Check level side to the countertop with two #10 x1/2" Phillips-head screws (included). Open dishwasher door and place towel over pump assembly and spray arm of tub. This will keep it from shifting when the door is level from falling into bottom of dishwasher. ■■ Locate brackets installed...
Installation Guide
Page 20
... option. 48. Install a UL Listed/CSA Approved metallic strain relief. Tighten bracket screws. Route cable into terminal box Route cable so that top of dishwasher tub. Remove terminal box cover IMPORTANT: Check that it does, adjust leveling legs or use . 50. If it does not touch dishwasher motor or lower part of door does not contact screws, brackets, or countertop. Check door clearance DIRECT WIRE CONNECTION 49. 47.
... option. 48. Install a UL Listed/CSA Approved metallic strain relief. Tighten bracket screws. Route cable into terminal box Route cable so that top of dishwasher tub. Remove terminal box cover IMPORTANT: Check that it does, adjust leveling legs or use . 50. If it does not touch dishwasher motor or lower part of door does not contact screws, brackets, or countertop. Check door clearance DIRECT WIRE CONNECTION 49. 47.

Installation Guide
Page 24
... end of drain hose to squeeze clamp open door. Use pliers to air gap and cut if needed. NOTE: With the access panel off, start the dishwasher and allow it to 50 mm) screw-type clamp (not provided). 3. Check that the power supply wire or cord does not touch dishwasher motor or the lower part of the dishwasher tub. Attach drain hose to air gap with screw-type clamps (not provided) to connect from waste tee to air gap...
... end of drain hose to squeeze clamp open door. Use pliers to air gap and cut if needed. NOTE: With the access panel off, start the dishwasher and allow it to 50 mm) screw-type clamp (not provided). 3. Check that the power supply wire or cord does not touch dishwasher motor or the lower part of the dishwasher tub. Attach drain hose to air gap with screw-type clamps (not provided) to connect from waste tee to air gap...
Installation Guide
Page 26
... door within 3 seconds. If the dishwasher is closed tightly and latched? ■■ Has the cycle been set correctly to start the dishwasher? ■■ Is the water turned on the water sheeting action of these possible solutions work, please see the User Guide for service contact information. CHECK OPERATION ■■ Read the dishwasher User Guide that came with your dishwasher washes longer to ensure exceptional cleaning. Selecting certain options could increase cycle time...
... door within 3 seconds. If the dishwasher is closed tightly and latched? ■■ Has the cycle been set correctly to start the dishwasher? ■■ Is the water turned on the water sheeting action of these possible solutions work, please see the User Guide for service contact information. CHECK OPERATION ■■ Read the dishwasher User Guide that came with your dishwasher washes longer to ensure exceptional cleaning. Selecting certain options could increase cycle time...
Dimension Guide
Page 1
...; A time-delay fuse or circuit breaker ■■ A separate circuit If Connecting Dishwasher with a Power Cord: ■■ Use a UL Listed power cord kit marked for your dishwasher. Page 1 of the guide for part details and orders. ■■ Make sure to connect drain hose to remove any debris that meets the wiring requirements for use an air gap if the drain hose is recommended to install a new water line (see Installation Instructions packed with compression fitting or flexible braided water supply line. See...
...; A time-delay fuse or circuit breaker ■■ A separate circuit If Connecting Dishwasher with a Power Cord: ■■ Use a UL Listed power cord kit marked for your dishwasher. Page 1 of the guide for part details and orders. ■■ Make sure to connect drain hose to remove any debris that meets the wiring requirements for use an air gap if the drain hose is recommended to install a new water line (see Installation Instructions packed with compression fitting or flexible braided water supply line. See...
Dimension Guide
Page 2
... Installation Instructions packed with product. Door handles may protrude forward of the face of the dishwasher, (varies by removing the wheels and perforated area of insulation (blanket) on dishwasher. Page 2 of the countertop. Measured from narrowest point of opening is 341/2" (863 mm). 33/4" (94 mm) 21" (533 mm) A. Minimum, measured from the lowest point on all models). B. Specifications subject to change...
... Installation Instructions packed with product. Door handles may protrude forward of the face of the dishwasher, (varies by removing the wheels and perforated area of insulation (blanket) on dishwasher. Page 2 of the countertop. Measured from narrowest point of opening is 341/2" (863 mm). 33/4" (94 mm) 21" (533 mm) A. Minimum, measured from the lowest point on all models). B. Specifications subject to change...

