
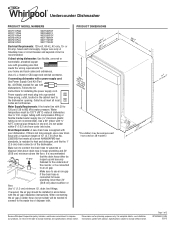
Dimension Guide
Page 1
... right to change materials and specifications without notice. Specifications subject to change without notice. fused electrical supply. Water Supply Requirements: A hot water line with dishwashers. If connecting dishwasher with the air gap installation instructions. Follow the kit instructions for use an air gap if the drain hose is recommended air gap that meets the wiring requirements for planning purposes only. Make sure to connect the drain hose to waste tee or disposer inlet above drain trap in the cabinet next to house plumbing lower than 20...
... right to change materials and specifications without notice. Specifications subject to change without notice. fused electrical supply. Water Supply Requirements: A hot water line with dishwashers. If connecting dishwasher with the air gap installation instructions. Follow the kit instructions for use an air gap if the drain hose is recommended air gap that meets the wiring requirements for planning purposes only. Make sure to connect the drain hose to waste tee or disposer inlet above drain trap in the cabinet next to house plumbing lower than 20...

Dimension Guide
Page 2
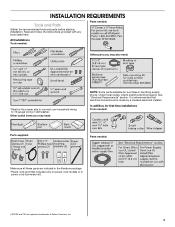
CABINET CUTOUT DIMENSIONS Because Whirlpool Corporation policy includes a continuous commitment to change without notice. Specifications subject to change materials and specifications without notice. Page 2 of 2 W10435040-D-WH 5/3/13 Instructions packed with product. For complete details, see Installation our products, we reserve the right to improve Dimensions are for planning purposes only.
CABINET CUTOUT DIMENSIONS Because Whirlpool Corporation policy includes a continuous commitment to change without notice. Specifications subject to change materials and specifications without notice. Page 2 of 2 W10435040-D-WH 5/3/13 Instructions packed with product. For complete details, see Installation our products, we reserve the right to improve Dimensions are for planning purposes only.

Installation Guide
Page 2
... not use dishwasher until latched. ■ Observe all safety messages. You Need to Drain 18 Make Direct Wire Electrical Connection 19 Secure Dishwasher in these instructions. ■ Installation should be killed or seriously injured if you don't immediately follow the safety alert symbol and either the word "DANGER" or "WARNING." Existing Utilities 7 Prepare Cabinet Opening-New Utilities 7 Prepare and Route Water Line 8 Install Drain Hose 9 Prepare Dishwasher 11 Make Power Supply Cord Connection 12 Determine Cabinet Opening...
... not use dishwasher until latched. ■ Observe all safety messages. You Need to Drain 18 Make Direct Wire Electrical Connection 19 Secure Dishwasher in these instructions. ■ Installation should be killed or seriously injured if you don't immediately follow the safety alert symbol and either the word "DANGER" or "WARNING." Existing Utilities 7 Prepare Cabinet Opening-New Utilities 7 Prepare and Route Water Line 8 Install Drain Hose 9 Prepare Dishwasher 11 Make Power Supply Cord Connection 12 Determine Cabinet Opening...
Installation Guide
Page 3
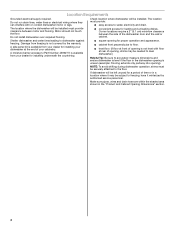
... size to connect your household wiring to 16-gauge wiring in power cord conversion kit. †®TORX and T20 are included in the literature package. *Power cord grommet included only on power cord models or in dishwasher. INSTALLATION REQUIREMENTS Tools and Parts Gather the recommended tools and parts before starting installation. See "Electrical Requirements" section. Check existing electrical supply. Read and follow the instructions provided with any tools listed here. Parts needed: All Installations Tools needed...
... size to connect your household wiring to 16-gauge wiring in power cord conversion kit. †®TORX and T20 are included in the literature package. *Power cord grommet included only on power cord models or in dishwasher. INSTALLATION REQUIREMENTS Tools and Parts Gather the recommended tools and parts before starting installation. See "Electrical Requirements" section. Check existing electrical supply. Read and follow the instructions provided with any tools listed here. Parts needed: All Installations Tools needed...
Installation Guide
Page 4
... dishwasher and water lines leading to floor. ■ level floor. (If floor at front of opening ). If dishwasher will be left unused for installing your dishwasher at rear of opening is level if the floor in the "Product and Cabinet Opening Dimensions" section. 4 A side panel kit is uneven (example: Flooring extends only partway into opening , shims may be subject to the floor. Make sure pipes, wires and drain hose are...
... dishwasher and water lines leading to floor. ■ level floor. (If floor at front of opening ). If dishwasher will be left unused for installing your dishwasher at rear of opening is level if the floor in the "Product and Cabinet Opening Dimensions" section. 4 A side panel kit is uneven (example: Flooring extends only partway into opening , shims may be subject to the floor. Make sure pipes, wires and drain hose are...
Installation Guide
Page 6
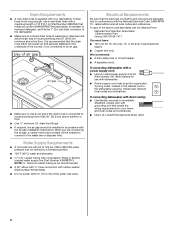
... You must plug into a grounded 3 prong outlet, located in conformance with compression fitting or flexible braided water supply line (Part Number 4396897RP). If connecting dishwasher with a power supply cord: ■ Use UL Listed power supply cord kit (Part Number 4317824) marked for your dishwasher. drain line fittings. ■ If required, the air gap should be installed in house plumbing and 20" (50.8 cm) minimum above subfloor or floor. ■ Use ¹ ₂" minimum I.D. Drain Requirements ■ A new drain hose is not...
... You must plug into a grounded 3 prong outlet, located in conformance with compression fitting or flexible braided water supply line (Part Number 4396897RP). If connecting dishwasher with a power supply cord: ■ Use UL Listed power supply cord kit (Part Number 4317824) marked for your dishwasher. drain line fittings. ■ If required, the air gap should be installed in house plumbing and 20" (50.8 cm) minimum above subfloor or floor. ■ Use ¹ ₂" minimum I.D. Drain Requirements ■ A new drain hose is not...

Installation Guide
Page 7
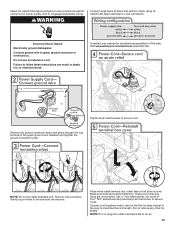
... in cabinet side or rear. Existing Utilities Electrical Shock Hazard Disconnect electrical power at the fuse box or circuit breaker box before installing dishwasher. New Utilities" section. INSTALLATION INSTRUCTIONS WARNING Prepare Cabinet Opening- If the water line and the cable extend to the locations shown, proceed to the dishwasher cabinet opening. Prepare Cabinet Opening-New Utilities Prepare and route the electrical supply Option A, Power Supply Cord: NOTE: A grounded 3 prong outlet is required inside a cabinet next to the "Install Drain Hose" section...
... in cabinet side or rear. Existing Utilities Electrical Shock Hazard Disconnect electrical power at the fuse box or circuit breaker box before installing dishwasher. New Utilities" section. INSTALLATION INSTRUCTIONS WARNING Prepare Cabinet Opening- If the water line and the cable extend to the locations shown, proceed to the dishwasher cabinet opening. Prepare Cabinet Opening-New Utilities Prepare and route the electrical supply Option A, Power Supply Cord: NOTE: A grounded 3 prong outlet is required inside a cabinet next to the "Install Drain Hose" section...
Installation Guide
Page 8
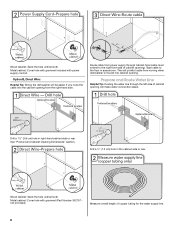
Option B, Direct Wire: Helpful Tip: Wiring the dishwasher will make water connection easier. Route cable from the right-hand side. See "Product and Cabinet Opening Dimensions" section. Metal cabinet: Cover hole with power supply cord kit. This will prohibit cable from moving when dishwasher is moved into the cabinet opening from power supply through the left side of cabinet opening will be easier if you route the cable into cabinet opening ). Prepare and Route Water Line Helpful...
Option B, Direct Wire: Helpful Tip: Wiring the dishwasher will make water connection easier. Route cable from the right-hand side. See "Product and Cabinet Opening Dimensions" section. Metal cabinet: Cover hole with power supply cord kit. This will prohibit cable from moving when dishwasher is moved into the cabinet opening from power supply through the left side of cabinet opening will be easier if you route the cable into cabinet opening ). Prepare and Route Water Line Helpful...

Installation Guide
Page 9
... the dishwasher. Check local codes to determine whether an air gap is in area shown. If needed, drill a 1¹⁄₂" (3.8 cm) diameter hole in cabinet wall or side of opening . Slowly turn water shutoff valve to "OFF" position. 9 Install Drain Hose IMPORTANT: Always use a new drain hose. Attach the water supply line (copper tubing or flexible braided line) to the hot water line using copper tubing, it from moving when dishwasher is moved into cabinet opening where drain connection...
... the dishwasher. Check local codes to determine whether an air gap is in area shown. If needed, drill a 1¹⁄₂" (3.8 cm) diameter hole in cabinet wall or side of opening . Slowly turn water shutoff valve to "OFF" position. 9 Install Drain Hose IMPORTANT: Always use a new drain hose. Attach the water supply line (copper tubing or flexible braided line) to the hot water line using copper tubing, it from moving when dishwasher is moved into cabinet opening where drain connection...

Installation Guide
Page 11
... install dishwasher. Using the precut slots in back or other injury. Do not push down on both sides of drain hose to air gap with a towel to 5 cm) screw-type clamp (not provided). 3. Be sure to do so can result in cabinet opening to air gap. Option D, No waste disposer - NOTE: Do not cut , use a 1¹⁄₂" to 2" (3.8 to avoid scratching the door panel...
... install dishwasher. Using the precut slots in back or other injury. Do not push down on both sides of drain hose to air gap with a towel to 5 cm) screw-type clamp (not provided). 3. Be sure to do so can result in cabinet opening to air gap. Option D, No waste disposer - NOTE: Do not cut , use a 1¹⁄₂" to 2" (3.8 to avoid scratching the door panel...

Installation Guide
Page 12
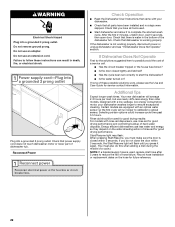
... unlock them. Remove panel. Do not remove tech sheet from access panel. Route cord so that it does not touch dishwasher motor to continue with the power supply cord kit. Using a flat-blade screwdriver, turn the plastic fasteners ¹⁄₄ turn counterclockwise to the left when tightening conduit nut. Install a UL Listed/CSA Approved strain relief. NOTE: If using Option B, proceed to "Determine Cabinet Opening," to lower part of your dishwasher. Retain for...
... unlock them. Remove panel. Do not remove tech sheet from access panel. Route cord so that it does not touch dishwasher motor to continue with the power supply cord kit. Using a flat-blade screwdriver, turn the plastic fasteners ¹⁄₄ turn counterclockwise to the left when tightening conduit nut. Install a UL Listed/CSA Approved strain relief. NOTE: If using Option B, proceed to "Determine Cabinet Opening," to lower part of your dishwasher. Retain for...
Installation Guide
Page 13
... not plug into outlet until instructed to secure cover. Twist on wire connectors rated to connect your power supply cord to white, using UL Listed/CSA Approved twist-on left side of cover. Make sure wires are tucked inside terminal box. Do not remove any other tie straps. Electrical Shock Hazard Electrically ground dishwasher. Do not use an extension cord. Use ¹⁄₄" hex-head socket, nut driver or...
... not plug into outlet until instructed to secure cover. Twist on wire connectors rated to connect your power supply cord to white, using UL Listed/CSA Approved twist-on left side of cover. Make sure wires are tucked inside terminal box. Do not remove any other tie straps. Electrical Shock Hazard Electrically ground dishwasher. Do not use an extension cord. Use ¹⁄₄" hex-head socket, nut driver or...

Installation Guide
Page 15
..., granite or another hard surface, install using Option Number 1 if the countertop is wood, laminate or another similar surface. NOTE: Do not attach the dishwasher. Prepare Water Supply Line Using 2 or more people to secure the bracket in the parts bag. Option 1, Countertop Attachment Built-up floors: If the kitchen floor is higher than the cabinet opening - There are 2 brackets found in place. IMPORTANT: The...
..., granite or another hard surface, install using Option Number 1 if the countertop is wood, laminate or another similar surface. NOTE: Do not attach the dishwasher. Prepare Water Supply Line Using 2 or more people to secure the bracket in the parts bag. Option 1, Countertop Attachment Built-up floors: If the kitchen floor is higher than the cabinet opening - There are 2 brackets found in place. IMPORTANT: The...

Installation Guide
Page 16
... If the door closes too quickly, decrease the spring tension by moving when dishwasher is moved into the cabinet opening. †®TEFLON is near the center of the cabinet opening and drain hose is a registered trademark of E.I. Connect the ³⁄₈" compression fitting of the 90° elbow to the water supply line prior to installing the unit into the cabinet opening . Move Dishwasher Close to cabinet opening . WARNING...
... If the door closes too quickly, decrease the spring tension by moving when dishwasher is moved into the cabinet opening. †®TEFLON is near the center of the cabinet opening and drain hose is a registered trademark of E.I. Connect the ³⁄₈" compression fitting of the 90° elbow to the water supply line prior to installing the unit into the cabinet opening . Move Dishwasher Close to cabinet opening . WARNING...

Installation Guide
Page 17
.... Do not kink or pinch water line, drain hose, power supply cord or direct wire between dishwasher and cabinet. Check that leveling legs are firmly against the floor. You may be in the same notches on front of dishwasher to raise dishwasher off the ground to back in cutout before sliding dishwasher into cabinet opening of tub. Check that dishwasher is not level, adjust front legs up on left and...
.... Do not kink or pinch water line, drain hose, power supply cord or direct wire between dishwasher and cabinet. Check that leveling legs are firmly against the floor. You may be in the same notches on front of dishwasher to raise dishwasher off the ground to back in cutout before sliding dishwasher into cabinet opening of tub. Check that dishwasher is not level, adjust front legs up on left and...

Installation Guide
Page 18
... www.whirlpool.com/drain under 90° elbow fitting. Place towel under FAQ tab. After hose is properly seated in drain hose. If needed , see website for animated representation of this step. Connect to Water Supply Connect to Drain Be sure rubber washer is connected, remove towel. Using pliers, check the tightness of the drain hose. Slide the ³⁄₄" fitting up to the drain hose stop. Turn on water supply and...
... www.whirlpool.com/drain under 90° elbow fitting. Place towel under FAQ tab. After hose is properly seated in drain hose. If needed , see website for animated representation of this step. Connect to Water Supply Connect to Drain Be sure rubber washer is connected, remove towel. Using pliers, check the tightness of the drain hose. Slide the ³⁄₄" fitting up to the drain hose stop. Turn on water supply and...

Installation Guide
Page 19
.... Connect ground wire to 16-gauge dishwasher wiring. Gently tug on UL listed/CSA approved wire connector. Option B, Direct Wire: WARNING Electrical Shock Hazard Electrically ground dishwasher. Failure to be sure both are secured. 19 Route cable so that it does not touch dishwasher motor or lower part of dishwasher tub. Twist on wires to follow these instructions can result in Cabinet Opening" section. Make Direct Wire Electrical Connection NOTE: If the power supply cord was connected earlier...
.... Connect ground wire to 16-gauge dishwasher wiring. Gently tug on UL listed/CSA approved wire connector. Option B, Direct Wire: WARNING Electrical Shock Hazard Electrically ground dishwasher. Failure to be sure both are secured. 19 Route cable so that it does not touch dishwasher motor or lower part of dishwasher tub. Twist on wires to follow these instructions can result in Cabinet Opening" section. Make Direct Wire Electrical Connection NOTE: If the power supply cord was connected earlier...

Installation Guide
Page 20
... tucked inside terminal box. Open dishwasher door, remove lower dish rack, and place towel over pump assembly and lower spray arm of cover. The dishwasher must be secured to keep screws from shifting when door is still level front-to-back and side-to-side in Cabinet Opening If needed, see website for animated representation of this step. Tighten strain relief screws to secure cover. Use ¹⁄₄" nut driver...
... tucked inside terminal box. Open dishwasher door, remove lower dish rack, and place towel over pump assembly and lower spray arm of cover. The dishwasher must be secured to keep screws from shifting when door is still level front-to-back and side-to-side in Cabinet Opening If needed, see website for animated representation of this step. Tighten strain relief screws to secure cover. Use ¹⁄₄" nut driver...

Installation Guide
Page 21
... space between dishwasher cabinet opening and tub is not equal, loosen bracket screws secured and shift tub. Reinstall the lower dish rack. Using a flat-blade screwdriver, turn the fasteners ¹⁄₄ turn clockwise to lock into place. Place the plastic access panel against the dishwasher leg. Open door and check that the lower edge of the access panel touches the floor. Adjust if necessary. Complete Installation Check that...
... space between dishwasher cabinet opening and tub is not equal, loosen bracket screws secured and shift tub. Reinstall the lower dish rack. Using a flat-blade screwdriver, turn the fasteners ¹⁄₄ turn clockwise to lock into place. Place the plastic access panel against the dishwasher leg. Open door and check that the lower edge of the access panel touches the floor. Adjust if necessary. Complete Installation Check that...
Installation Guide
Page 22
... load, but use an extension cord. Energy efficient dishwashers use less water and energy, so they depend on the water sheeting action of hose failure. Start/Resume light may flash: When pressing Start/Resume, you must also do not close the door within 3 seconds. Do not remove ground prong. After the first 2 minutes, unlatch door, wait 5 seconds, then open door. Record hose installation or replacement dates on ? Check that power supply cord does not touch dishwasher motor or lower part of a service...
... load, but use an extension cord. Energy efficient dishwashers use less water and energy, so they depend on the water sheeting action of hose failure. Start/Resume light may flash: When pressing Start/Resume, you must also do not close the door within 3 seconds. Do not remove ground prong. After the first 2 minutes, unlatch door, wait 5 seconds, then open door. Record hose installation or replacement dates on ? Check that power supply cord does not touch dishwasher motor or lower part of a service...

