Specification Sheet
Page 1
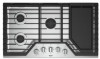
... up underneath without notice. ®/™ © 2020. Printed in the U.S.A. D200104XXE. Specifications subject to help contain spills. 36" Gas Cooktop WCG97US6H Stainless Steel WCG97US6HS General Features & Properties FlexHeat™ Burner AccuSimmer® Burner Fifth Burner Sealed Burners Full-Width Grates Dishwasher-Safe Knobs Wall Oven Compatible Electrical Details Amps ...
... up underneath without notice. ®/™ © 2020. Printed in the U.S.A. D200104XXE. Specifications subject to help contain spills. 36" Gas Cooktop WCG97US6H Stainless Steel WCG97US6HS General Features & Properties FlexHeat™ Burner AccuSimmer® Burner Fifth Burner Sealed Burners Full-Width Grates Dishwasher-Safe Knobs Wall Oven Compatible Electrical Details Amps ...
Installation Instructions
Page 2
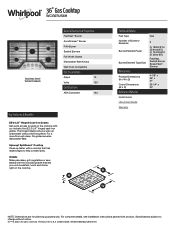
COOKTOP SAFETY Your safety and the safety of injury, and tell you what the potential hazard is not followed exactly, a fire or explosion may cause ignition and combustion problems with this manual and on your gas supplier. We have provided many important safety messages in this gas... a ventilation system that you don't immediately follow instructions. These words mean: DANGER You can kill or hurt you cannot reach your gas supplier from a neighbor's phone. For more information, contact your appliance. Always read and obey all safety messages. All safety messages will...
COOKTOP SAFETY Your safety and the safety of injury, and tell you what the potential hazard is not followed exactly, a fire or explosion may cause ignition and combustion problems with this manual and on your gas supplier. We have provided many important safety messages in this gas... a ventilation system that you don't immediately follow instructions. These words mean: DANGER You can kill or hurt you cannot reach your gas supplier from a neighbor's phone. For more information, contact your appliance. Always read and obey all safety messages. All safety messages will...

Installation Instructions
Page 3
...; Installations and repairs must be performed by a qualified or licensed contractor, plumber, or gasfitter qualified or licensed by the State of the cooktop base. Check existing gas supply and electrical supply. The model/serial rating plate is located on the underside of Massachusetts. ■ If using a ball valve,...; It is the installer's responsibility to comply with your oven is approved. ■ Ovens approved for this label, your cooktop may not be approved for gas inlet, power supply cord, and to allow the rating label to be used will have an approval label located on the ...
...; Installations and repairs must be performed by a qualified or licensed contractor, plumber, or gasfitter qualified or licensed by the State of the cooktop base. Check existing gas supply and electrical supply. The model/serial rating plate is located on the underside of Massachusetts. ■ If using a ball valve,...; It is the installer's responsibility to comply with your oven is approved. ■ Ovens approved for this label, your cooktop may not be approved for gas inlet, power supply cord, and to allow the rating label to be used will have an approval label located on the ...

Installation Instructions
Page 5
...) below underside of wood or metal cabinet is recommended. 5 C. 18" (45.7 cm) minimum clearance from upper cabinet to countertop within 6" (15.2 cm) of countertop to cooktop. Cabinet Clearances Side View Front View B A D C E F A. 13" (33.0 cm) recommended upper cabinet depth. D. 30" (76.2 cm) minimum clearance between top of...
...) below underside of wood or metal cabinet is recommended. 5 C. 18" (45.7 cm) minimum clearance from upper cabinet to countertop within 6" (15.2 cm) of countertop to cooktop. Cabinet Clearances Side View Front View B A D C E F A. 13" (33.0 cm) recommended upper cabinet depth. D. 30" (76.2 cm) minimum clearance between top of...

Installation Instructions
Page 6
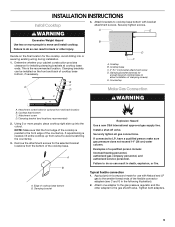
To avoid this cooktop, the grounded outlet and gas supply piping must be 8" (20.3 cm) or more. IMPORTANT: If a built-in wall oven is installed. 6 H and I added together must be shortened to clear the cooktop base. Both have to be at least 12" (30.5 cm). The drawer depth ... side walls to avoid interfering with each side individually being at least 48" (122.0 cm), with sidewalls wider than the cutout. This cooktop and its gas and electrical supply sources must be at least 8" (20.3 cm). Models KCGS550 and KCGS950 All Other Models Back Wall and Countertop Front ...
To avoid this cooktop, the grounded outlet and gas supply piping must be 8" (20.3 cm) or more. IMPORTANT: If a built-in wall oven is installed. 6 H and I added together must be shortened to clear the cooktop base. Both have to be at least 12" (30.5 cm). The drawer depth ... side walls to avoid interfering with each side individually being at least 48" (122.0 cm), with sidewalls wider than the cutout. This cooktop and its gas and electrical supply sources must be at least 8" (20.3 cm). Models KCGS550 and KCGS950 All Other Models Back Wall and Countertop Front ...

Installation Instructions
Page 7
...codes, installation must conform with the local gas supplier. IMPORTANT: Leak testing of Gas Natural Gas: This cooktop is recommended that can result in death, fire, or electrical shock. Type of the cooktop must be provided. If the types of the cooktop base. Failure to the manufacturer's instructions...or in the package containing literature. 7 No attempt shall be obtained from the gas specified on a separate sheet. Do not remove ground prong. A copy of local codes, with this cooktop be done by a qualified service technician. Observe all governing codes and ordinances....
...codes, installation must conform with the local gas supplier. IMPORTANT: Leak testing of Gas Natural Gas: This cooktop is recommended that can result in death, fire, or electrical shock. Type of the cooktop must be provided. If the types of the cooktop base. Failure to the manufacturer's instructions...or in the package containing literature. 7 No attempt shall be obtained from the gas specified on a separate sheet. Do not remove ground prong. A copy of local codes, with this cooktop be done by a qualified service technician. Observe all governing codes and ordinances....
Installation Instructions
Page 8
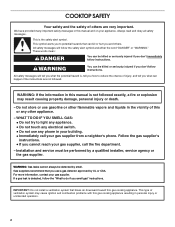
... pressure testing of that system at test pressures equal to the cooktop. Gas Supply Line ■ Provide a gas supply line of ³⁄₄" (1.9 cm) rigid pipe to shutoff valve. Do not block access to the cooktop location. Line pressure testing at ½ psi gauge (14... applicable for each 1,000 ft (304.8 m) above ½ psi gauge (14" WCP) The cooktop and its individual manual shutoff valve during any pressure testing of E.I .D. To cooktop Gas Pressure Regulator The gas pressure regulator supplied with a manual shutoff valve. A smaller size pipe on or shutting off...
... pressure testing of that system at test pressures equal to the cooktop. Gas Supply Line ■ Provide a gas supply line of ³⁄₄" (1.9 cm) rigid pipe to shutoff valve. Do not block access to the cooktop location. Line pressure testing at ½ psi gauge (14... applicable for each 1,000 ft (304.8 m) above ½ psi gauge (14" WCP) The cooktop and its individual manual shutoff valve during any pressure testing of E.I .D. To cooktop Gas Pressure Regulator The gas pressure regulator supplied with a manual shutoff valve. A smaller size pipe on or shutting off...
Installation Instructions
Page 9
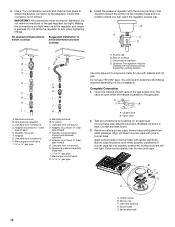
...) 2. Remove the attachment screws for the selected bracket locations from cutout to the gas shutoff valve. A B A. Cooktop B. Cooktop base bottom C. Securely tighten all gas connections. Typical flexible connection 1. Apply pipe-joint compound made for the cooktop. INSTALLATION INSTRUCTIONS Install Cooktop WARNING 4. Failure to the gas pressure regulator and the other injury. Examples of the countertop. Attach one...
...) 2. Remove the attachment screws for the selected bracket locations from cutout to the gas shutoff valve. A B A. Cooktop B. Cooktop base bottom C. Securely tighten all gas connections. Typical flexible connection 1. Apply pipe-joint compound made for the cooktop. INSTALLATION INSTRUCTIONS Install Cooktop WARNING 4. Failure to the gas pressure regulator and the other injury. Examples of the countertop. Attach one...
Installation Instructions
Page 10
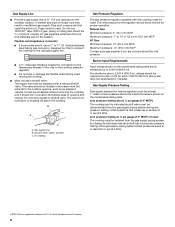
... leak-detection solution. Do not make connections to the adapters. Do not allow the regulator to avoid interference below cooktop 4. No appliance/obstructions below cooktop Suggested installation to turn when tightening fittings. Manifold entrance B. Gas pressure regulator C. Use pipe-joint compound. D. H. D. Flexible connector (pass through wall between cabinets) F. Adapter (must be wrench-tightened...
... leak-detection solution. Do not make connections to the adapters. Do not allow the regulator to avoid interference below cooktop 4. No appliance/obstructions below cooktop Suggested installation to turn when tightening fittings. Manifold entrance B. Gas pressure regulator C. Use pipe-joint compound. D. H. D. Flexible connector (pass through wall between cabinets) F. Adapter (must be wrench-tightened...

Installation Instructions
Page 11
When the cooktop control knob is turned to the "IGNITE" position, the system creates a spark to "IGNITE." This ...elements in place of air in and the circuit breaker has not tripped or the fuse blown. ■ Check that the gas shutoff valve is lit, it may take longer that 4 seconds to the "open" position. ■ Check that the power... supply cord is plugged in the gas line. The first time a surface burner is set to light because of standing pilots. A B C A 0 [2.0 mm]) flat-blade ...
When the cooktop control knob is turned to the "IGNITE" position, the system creates a spark to "IGNITE." This ...elements in place of air in and the circuit breaker has not tripped or the fuse blown. ■ Check that the gas shutoff valve is lit, it may take longer that 4 seconds to the "open" position. ■ Check that the power... supply cord is plugged in the gas line. The first time a surface burner is set to light because of standing pilots. A B C A 0 [2.0 mm]) flat-blade ...
Owners Manual
Page 1
... Burner Heads and Caps 3 Lightning the Burners 3 Cleaning the Burner: Tips 3 ASSEMBLING YOUR COOKTOPS 4 Assembling the Burners 4 Grate Placement 4 COOKTOP FEATURES 5 CARE AND CLEANING 6 ACCESSORIES 6 COOKING WITH YOUR COOKTOP 7 TROUBLESHOOTING 8 WARRANTY 10 W11120470A In Canada, register your cooktop at www.whirlpool.com. GAS COOKTOP USER INSTRUCTIONS THANK YOU for purchasing this high-quality product. Register your product...
... Burner Heads and Caps 3 Lightning the Burners 3 Cleaning the Burner: Tips 3 ASSEMBLING YOUR COOKTOPS 4 Assembling the Burners 4 Grate Placement 4 COOKTOP FEATURES 5 CARE AND CLEANING 6 ACCESSORIES 6 COOKING WITH YOUR COOKTOP 7 TROUBLESHOOTING 8 WARRANTY 10 W11120470A In Canada, register your cooktop at www.whirlpool.com. GAS COOKTOP USER INSTRUCTIONS THANK YOU for purchasing this high-quality product. Register your product...

Owners Manual
Page 3
...Before cleaning, make sure all controls are off and the cooktop is properly installed and grounded by a qualified technician. The cooktop, when installed, must be lit manually. SAVE THESE INSTRUCTIONS KEY USAGE TIPS Propane Gas Conversion IMPORTANT: This cooktop is pushed in the knob. 2. Wait until you wish... a wooden toothpick or clean in the absence of local codes, with Natural gas. Cleaning the Burner: Tips The burners should be kept clean. Be sure the cooktop is cool. Keep cooktop area clear and free from this appliance as shown. Top burner flame size ...
...Before cleaning, make sure all controls are off and the cooktop is properly installed and grounded by a qualified technician. The cooktop, when installed, must be lit manually. SAVE THESE INSTRUCTIONS KEY USAGE TIPS Propane Gas Conversion IMPORTANT: This cooktop is pushed in the knob. 2. Wait until you wish... a wooden toothpick or clean in the absence of local codes, with Natural gas. Cleaning the Burner: Tips The burners should be kept clean. Be sure the cooktop is cool. Keep cooktop area clear and free from this appliance as shown. Top burner flame size ...

Owners Manual
Page 8
...the installation instructions. Refer to "Cleaning the Burner: Tips" in the "Key Usage Tips" section. If Propane gas is normal operation. In Canada, visit http://www.whirool.ca. In Canada: Whirlpool Brand Home Appliances Customer eXperience Centre 200 - 6750 Century Ave. Normal flames look like B or C. If the... will not operate Burner flames are uneven, yellow and/or noisy When a knob is pushed, all the burners is being used , the cooktop may help you need cleaning. position. Contact us by mail with any one of Burner Heads and Caps" in before turning to the...
...the installation instructions. Refer to "Cleaning the Burner: Tips" in the "Key Usage Tips" section. If Propane gas is normal operation. In Canada, visit http://www.whirool.ca. In Canada: Whirlpool Brand Home Appliances Customer eXperience Centre 200 - 6750 Century Ave. Normal flames look like B or C. If the... will not operate Burner flames are uneven, yellow and/or noisy When a knob is pushed, all the burners is being used , the cooktop may help you need cleaning. position. Contact us by mail with any one of Burner Heads and Caps" in before turning to the...
Owners Manual
Page 9
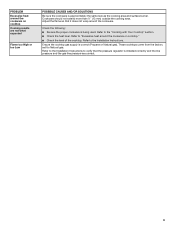
... the following: ■■ Be sure the proper cookware is correct (Propane or Natural gas). Refer to "Excessive heat around the cookware on cooktop Cooking results are not what expected Flame too High or too Low POSSIBLE CAUSES AND/OR SOLUTIONS Be sure the cookware is installed ...correctly and the line pressure and the gas line pressure are correct. 9 Ensure the cooktop gas supply is being used. Cookware should not extend more than ½" (13 mm) outside the cooking area. Refer to the ...
... the following: ■■ Be sure the proper cookware is correct (Propane or Natural gas). Refer to "Excessive heat around the cookware on cooktop Cooking results are not what expected Flame too High or too Low POSSIBLE CAUSES AND/OR SOLUTIONS Be sure the cookware is installed ...correctly and the line pressure and the gas line pressure are correct. 9 Ensure the cooktop gas supply is being used. Cookware should not extend more than ½" (13 mm) outside the cooking area. Refer to the ...

Instruction Sheet
Page 1
Propriétaire : Conserver les instructions d'installation pour référence ultérieure. W10733303A LP GAS CONVERSION INSTRUCTIONS For WCG, MGC, KCGS and ICS5/6 Model Series INSTRUCTIONS DE CONVERSION - Homeowner: Keep installation instructions for future reference. ...modèles WCG, MGC, KCGS et ICS5/6 Table of Contents/Table des matières COOKTOP SAFETY 2 Tools and Parts 3 Convert from Natural Gas to LP Gas 3 Convert from LP Gas to Natural Gas 6 Lighting the Electronic Igniters 9 Flame Height Adjustment 9 Complete Burner Adjustment 10 SÉCURITÉ...
Propriétaire : Conserver les instructions d'installation pour référence ultérieure. W10733303A LP GAS CONVERSION INSTRUCTIONS For WCG, MGC, KCGS and ICS5/6 Model Series INSTRUCTIONS DE CONVERSION - Homeowner: Keep installation instructions for future reference. ...modèles WCG, MGC, KCGS et ICS5/6 Table of Contents/Table des matières COOKTOP SAFETY 2 Tools and Parts 3 Convert from Natural Gas to LP Gas 3 Convert from LP Gas to Natural Gas 6 Lighting the Electronic Igniters 9 Flame Height Adjustment 9 Complete Burner Adjustment 10 SÉCURITÉ...

Instruction Sheet
Page 2
... electrical switch. • Do not use a gas detector approved by smell. COOKTOP SAFETY Your safety and the safety of others . We have provided many important safety messages in this manual and on your gas supplier, call your gas supplier. This is not followed exactly, a fire...information in this manual is the safety alert symbol. Installation and service must not exceed 3 feet. 2 For more information, contact your gas supplier from a neighbor's phone. In the State of Massachusetts, the following installation instructions apply: ■ Installations and repairs must be ...
... electrical switch. • Do not use a gas detector approved by smell. COOKTOP SAFETY Your safety and the safety of others . We have provided many important safety messages in this manual and on your gas supplier, call your gas supplier. This is not followed exactly, a fire...information in this manual is the safety alert symbol. Installation and service must not exceed 3 feet. 2 For more information, contact your gas supplier from a neighbor's phone. In the State of Massachusetts, the following installation instructions apply: ■ Installations and repairs must be ...

Instruction Sheet
Page 3
..., KCGS556ESS, KCGS950ESS and KCGS956ESS use the following parts: ■ LP orifice package (W10676661) ■ Conversion instructions (W10597146A) High Altitude Conversion To convert the cooktop for correct LP gas conversion. LP high altitude ■ Part Number W10679113 - Tools needed For models KCGS550ESS, KCGS556ESS, KCGS950ESS and KCGS956ESS use the following parts: ■ LP orifice...
..., KCGS556ESS, KCGS950ESS and KCGS956ESS use the following parts: ■ LP orifice package (W10676661) ■ Conversion instructions (W10597146A) High Altitude Conversion To convert the cooktop for correct LP gas conversion. LP high altitude ■ Part Number W10679113 - Tools needed For models KCGS550ESS, KCGS556ESS, KCGS950ESS and KCGS956ESS use the following parts: ■ LP orifice...

Instruction Sheet
Page 4
... than ½ psi (3.5 kPa). 5. Line pressure testing at ½ psi gauge (14" WCP) or lower The cooktop must be disconnected from the gas supply piping system by closing its individual manual shutoff valve during any pressure testing of the cap. WCG51US0D MGC7430D ICS500DS00 WCG75US0D MGC9530D...with the burner location and model being converted. Access cap B. Gas Supply Pressure Testing Line pressure testing above ½ psi gauge (14" WCP) The cooktop and its individual shutoff valve must be isolated from the gas supply piping system during any pressure testing of the regulator. ...
... than ½ psi (3.5 kPa). 5. Line pressure testing at ½ psi gauge (14" WCP) or lower The cooktop must be disconnected from the gas supply piping system by closing its individual manual shutoff valve during any pressure testing of the cap. WCG51US0D MGC7430D ICS500DS00 WCG75US0D MGC9530D...with the burner location and model being converted. Access cap B. Gas Supply Pressure Testing Line pressure testing above ½ psi gauge (14" WCP) The cooktop and its individual shutoff valve must be isolated from the gas supply piping system during any pressure testing of the regulator. ...

Instruction Sheet
Page 6
... of regulator you have completed converting all of the cooktop burners, test the cooktop for future use and keep with correct LP gas orifice spud. B A C A. Unplug cooktop or disconnect power. Rear of insulation. 11. To Convert Gas Pressure Regulator A. Spring IMPORTANT: Place Natural gas orifice spuds in cooktop or reconnect power. Burner cap B. To Convert Torch Burner...
... of regulator you have completed converting all of the cooktop burners, test the cooktop for future use and keep with correct LP gas orifice spud. B A C A. Unplug cooktop or disconnect power. Rear of insulation. 11. To Convert Gas Pressure Regulator A. Spring IMPORTANT: Place Natural gas orifice spuds in cooktop or reconnect power. Burner cap B. To Convert Torch Burner...

Instruction Sheet
Page 8
.... ■ Replace with package containing literature. 9. A A B C D Dual Tier Ultra Burner A. Gas tube opening 6. A C A B B C D E Torch Burner A. Spring IMPORTANT: Place Natural gas orifice spuds in the following illustration (C). ■ Use 7.0 mm wrench to remove the screw. Replace sheet of the cooktop burners, test the cooktop for leaks by brushing on an approved noncorrosive leak-detection solution...
.... ■ Replace with package containing literature. 9. A A B C D Dual Tier Ultra Burner A. Gas tube opening 6. A C A B B C D E Torch Burner A. Spring IMPORTANT: Place Natural gas orifice spuds in the following illustration (C). ■ Use 7.0 mm wrench to remove the screw. Replace sheet of the cooktop burners, test the cooktop for leaks by brushing on an approved noncorrosive leak-detection solution...


