
Installation Instructions
Page 3
...not be approved for gas inlet, power supply cord, and to allow the rating label to propane gas ■ Noncorrosive leakdetection solution Parts supplied ■■ Gas pressure regulator ■■ Burner grates ■■ Burner caps ■■ Burner base ■...;■ Clamping brackets (2) ■■ Bracket attachment screws (2) Parts needed ■■ Tape measure ■■ Flat-blade screwdriver ■■ Phillips screwdriver ■■ 15/16" (24 mm) combination...
...not be approved for gas inlet, power supply cord, and to allow the rating label to propane gas ■ Noncorrosive leakdetection solution Parts supplied ■■ Gas pressure regulator ■■ Burner grates ■■ Burner caps ■■ Burner base ■...;■ Clamping brackets (2) ■■ Bracket attachment screws (2) Parts needed ■■ Tape measure ■■ Flat-blade screwdriver ■■ Phillips screwdriver ■■ 15/16" (24 mm) combination...
Installation Instructions
Page 10
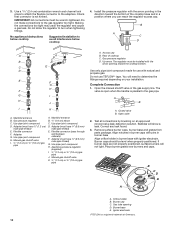
... is parallel to the gas regulator too tight. Test all connections by brushing on your installation. Remove surface burner caps, burner base and grates from parts package. Align notches in burner caps with pins in burner base Align orifice holder in burner base with the arrow pointing in the direction toward...
... is parallel to the gas regulator too tight. Test all connections by brushing on your installation. Remove surface burner caps, burner base and grates from parts package. Align notches in burner caps with pins in burner base Align orifice holder in burner base with the arrow pointing in the direction toward...

Owners Manual
Page 3
... the gas tube opening under the base. ■■ Clean clogged burner ports with the National Electrical Code, ANSI/NFPA70 or the Canadian Electrical Code, Part 1. A burner will click/spark when a knob is pushed in the knob. 2.
... the gas tube opening under the base. ■■ Clean clogged burner ports with the National Electrical Code, ANSI/NFPA70 or the Canadian Electrical Code, Part 1. A burner will click/spark when a knob is pushed in the knob. 2.

Owners Manual
Page 6
..., gritty washcloths or abrasive paper towels. To order affresh® cleaners, call 1-800-807-6777 or visit www.whirlpool.ca. Remove any burnt on "Service and Support" and then "Replacement Parts." Food spills containing acids, such as vinegar and tomato, should be cleaned with the following genuine... Whirlpool accessories. To remove the knobs, be cleaned in the OFF position. Do not remove the seals under the ...
..., gritty washcloths or abrasive paper towels. To order affresh® cleaners, call 1-800-807-6777 or visit www.whirlpool.ca. Remove any burnt on "Service and Support" and then "Replacement Parts." Food spills containing acids, such as vinegar and tomato, should be cleaned with the following genuine... Whirlpool accessories. To remove the knobs, be cleaned in the OFF position. Do not remove the seals under the ...

Owners Manual
Page 10
... SHALL BE PRODUCT REPAIR AS PROVIDED HEREIN. Some questions can be warranted for service or repair of non-genuine Whirlpool parts or accessories. 6. Please take a few minutes to correct improper product maintenance or installation, installation not in -... 9. Before contacting us to product failure. Specified Replacement Parts and repair 4. Consumable parts (i.e. Defects or damage caused by a Whirlpool designated service company. 11. your product requires repair. LIMITATION OF REMEDIES; WHIRLPOOL® MAJOR APPLIANCE LIMITED WARRANTY ATTACH YOUR RECEIPT HERE. ...
... SHALL BE PRODUCT REPAIR AS PROVIDED HEREIN. Some questions can be warranted for service or repair of non-genuine Whirlpool parts or accessories. 6. Please take a few minutes to correct improper product maintenance or installation, installation not in -... 9. Before contacting us to product failure. Specified Replacement Parts and repair 4. Consumable parts (i.e. Defects or damage caused by a Whirlpool designated service company. 11. your product requires repair. LIMITATION OF REMEDIES; WHIRLPOOL® MAJOR APPLIANCE LIMITED WARRANTY ATTACH YOUR RECEIPT HERE. ...

Instruction Sheet
Page 1
... PROPANE Pour séries de modèles WCG, MGC, KCGS et ICS5/6 Table of Contents/Table des matières COOKTOP SAFETY 2 Tools and Parts 3 Convert from Natural Gas to LP Gas 3 Convert from LP Gas to Natural Gas 6 Lighting the Electronic Igniters 9 Flame Height Adjustment 9 Complete Burner Adjustment 10...
... PROPANE Pour séries de modèles WCG, MGC, KCGS et ICS5/6 Table of Contents/Table des matières COOKTOP SAFETY 2 Tools and Parts 3 Convert from Natural Gas to LP Gas 3 Convert from LP Gas to Natural Gas 6 Lighting the Electronic Igniters 9 Flame Height Adjustment 9 Complete Burner Adjustment 10...

Instruction Sheet
Page 3
...authorized gas company personnel, and authorized service personnel. Tools needed For models KCGS550ESS, KCGS556ESS, KCGS950ESS and KCGS956ESS use the following parts: ■ LP orifice package (W10676662) ■ Conversion instructions (W10597146A) For all applicable codes and requirements of the ... 14" (36 cm) water column. Before proceeding with the manufacturer's instructions and all other models use the following parts: ■ Part Number W10679114 - Determine the type of the User Guide. Shutoff valve (closed position. WARNING This conversion kit shall ...
...authorized gas company personnel, and authorized service personnel. Tools needed For models KCGS550ESS, KCGS556ESS, KCGS950ESS and KCGS956ESS use the following parts: ■ LP orifice package (W10676662) ■ Conversion instructions (W10597146A) For all applicable codes and requirements of the ... 14" (36 cm) water column. Before proceeding with the manufacturer's instructions and all other models use the following parts: ■ Part Number W10679114 - Determine the type of the User Guide. Shutoff valve (closed position. WARNING This conversion kit shall ...

Instruction Sheet
Page 6
... power. Inner orifice spud B. Turn the cap and reinstall into regulator with package containing literature. 10. To cooktop B. The igniter electrode is shown in plastic parts bag for leaks by brushing on an approved noncorrosive leak-detection solution. B A C D A. Gas flow 3. Unplug cooktop or disconnect power. Open shutoff valve in the gas...
... power. Inner orifice spud B. Turn the cap and reinstall into regulator with package containing literature. 10. To cooktop B. The igniter electrode is shown in plastic parts bag for leaks by brushing on an approved noncorrosive leak-detection solution. B A C D A. Gas flow 3. Unplug cooktop or disconnect power. Open shutoff valve in the gas...

Instruction Sheet
Page 8
... (B). ■ Set gas orifice spuds aside. ■ Replace with package containing literature. 9. Burner cap B. The valve is open when the handle is shown in plastic parts bag for leaks by brushing on an approved noncorrosive leak-detection solution. To adjust single and dual valves, see the "Flame Height Adjustment" section. A A B C D Dual...
... (B). ■ Set gas orifice spuds aside. ■ Replace with package containing literature. 9. Burner cap B. The valve is open when the handle is shown in plastic parts bag for leaks by brushing on an approved noncorrosive leak-detection solution. To adjust single and dual valves, see the "Flame Height Adjustment" section. A A B C D Dual...

Instruction Sheet
Page 10
... blue flame approximately ¹⁄₄" (0.64 cm) high. Replace the control knob. Replace the black rubber grommet. 6. Read "Sealed Surface Burners" section in plastic parts bag for a proper size and shape. Inner crown adjustment screw B. For Natural gas conversion: Tighten screw "B" to reduce flame height. Replace the control knob. 7. High...
... blue flame approximately ¹⁄₄" (0.64 cm) high. Replace the control knob. Replace the black rubber grommet. 6. Read "Sealed Surface Burners" section in plastic parts bag for a proper size and shape. Inner crown adjustment screw B. For Natural gas conversion: Tighten screw "B" to reduce flame height. Replace the control knob. 7. High...


