Installation Instructions
Page 2
Always read and obey all safety messages. WARNING You can be detected by UL or CSA. WHAT TO DO IF YOU SMELL GAS: • Do not try to potential hazards that can happen if the instructions are very important. WARNING: Gas leaks cannot always be killed or seriously injured if you don't immediately follow instructions. IMPORTANT: Do not install a ventilation system that you use a gas detector approved by smell. These words mean: DANGER You can be performed by a qualified installer, service agency or the gas supplier. Do not store or use any phone in this or any ...
Always read and obey all safety messages. WARNING You can be detected by UL or CSA. WHAT TO DO IF YOU SMELL GAS: • Do not try to potential hazards that can happen if the instructions are very important. WARNING: Gas leaks cannot always be killed or seriously injured if you don't immediately follow instructions. IMPORTANT: Do not install a ventilation system that you use a gas detector approved by smell. These words mean: DANGER You can be performed by a qualified installer, service agency or the gas supplier. Do not store or use any phone in this or any ...

Installation Instructions
Page 3
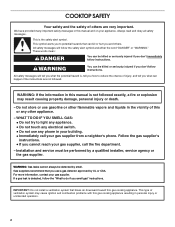
Check existing gas supply and electrical supply. Do not obstruct flow of combustion and ventilation air. ■ It is the installer's responsibility to confirm that are shown must be used. The model/serial rating plate is located on the top of the oven. Contact your dealer to comply with local codes. Refer to be provided, the risk can be installed. IMPORTANT: To avoid damage, check with local codes. 3 When such standard is not applicable, use over an undercounter built-in a location away from the countertop by reaching over heated surface units, cabinet storage space...
Check existing gas supply and electrical supply. Do not obstruct flow of combustion and ventilation air. ■ It is the installer's responsibility to confirm that are shown must be used. The model/serial rating plate is located on the top of the oven. Contact your dealer to comply with local codes. Refer to be provided, the risk can be installed. IMPORTANT: To avoid damage, check with local codes. 3 When such standard is not applicable, use over an undercounter built-in a location away from the countertop by reaching over heated surface units, cabinet storage space...

Installation Instructions
Page 4
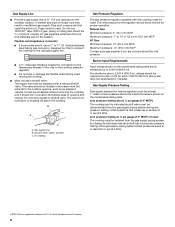
Product Dimensions KCGS550ESS and KCGS950ESS Models B KCGS556ESS and KCGS956ESS Models B A A C C D A. 21" (53.3 cm) B. 30" (76.2 cm) C. 19³⁄₈" (49.2 cm) D. 28³⁄₈" (72.1 cm) E. 3⁵⁄₈" (9.2 cm) F. 4 11.6 cm) G. 1³⁄₈" (3.4 cm) All Other 30" (76.2 cm) Models B EF G D A. 21" (53.3 cm) B. 36¹⁄₄" (92.0 cm) C. 19³⁄₈" (49.2 cm) D. 34³⁄₈" (88.1 cm) E. 3⁵⁄₈" (9.2 cm) F. 4 11.6 cm) G. 1 3.6 cm) All Other 36" (91.4 cm) Models B EF G A C D E F A. ...
Product Dimensions KCGS550ESS and KCGS950ESS Models B KCGS556ESS and KCGS956ESS Models B A A C C D A. 21" (53.3 cm) B. 30" (76.2 cm) C. 19³⁄₈" (49.2 cm) D. 28³⁄₈" (72.1 cm) E. 3⁵⁄₈" (9.2 cm) F. 4 11.6 cm) G. 1³⁄₈" (3.4 cm) All Other 30" (76.2 cm) Models B EF G D A. 21" (53.3 cm) B. 36¹⁄₄" (92.0 cm) C. 19³⁄₈" (49.2 cm) D. 34³⁄₈" (88.1 cm) E. 3⁵⁄₈" (9.2 cm) F. 4 11.6 cm) G. 1 3.6 cm) All Other 36" (91.4 cm) Models B EF G A C D E F A. ...

Installation Instructions
Page 5
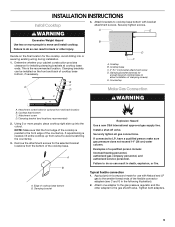
F. D. 30" (76.2 cm) minimum clearance between top of cooktop platform and bottom of uncovered wood or metal cabinet. 24" [61 cm] minimum clearance if bottom of rear wall is covered by not less than ¹⁄₄" [0.6 cm] flame retardant millboard covered with not less than No. 28 MSG sheet steel, 0.015" [0.04 cm] stainless steel, or 0.024" [0.06 cm] aluminum or 0.020" [0.05 cm] copper. Cabinet floor: anywhere within minimum horizontal clearances to cooktop. Gas line opening - Wall: anywhere 5" (12.7 cm) below underside of countertop to countertop within 6" (15.2 cm) of...
F. D. 30" (76.2 cm) minimum clearance between top of cooktop platform and bottom of uncovered wood or metal cabinet. 24" [61 cm] minimum clearance if bottom of rear wall is covered by not less than ¹⁄₄" [0.6 cm] flame retardant millboard covered with not less than No. 28 MSG sheet steel, 0.015" [0.04 cm] stainless steel, or 0.024" [0.06 cm] aluminum or 0.020" [0.05 cm] copper. Cabinet floor: anywhere within minimum horizontal clearances to cooktop. Gas line opening - Wall: anywhere 5" (12.7 cm) below underside of countertop to countertop within 6" (15.2 cm) of...

Installation Instructions
Page 6
Models KCGS550 and KCGS950 All Other Models Back Wall and Countertop Front Dimensions C D 25" (63.5 cm) 2⁷⁄₈" (7.3 cm) E 2³⁄₄" (6.9 cm) 3¹⁄₈" (7.9 cm) NOTES: After making the countertop cutout, some installations may need to avoid interfering with each side individually being at least 12" (30.5 cm). IMPORTANT: If a built-in an adjacent cabinet. Both have to be shortened to be 8" (20.3 cm) or more. To avoid this cooktop, the grounded outlet and gas supply piping must be located in wall oven is required. If ...
Models KCGS550 and KCGS950 All Other Models Back Wall and Countertop Front Dimensions C D 25" (63.5 cm) 2⁷⁄₈" (7.3 cm) E 2³⁄₄" (6.9 cm) 3¹⁄₈" (7.9 cm) NOTES: After making the countertop cutout, some installations may need to avoid interfering with each side individually being at least 12" (30.5 cm). IMPORTANT: If a built-in an adjacent cabinet. Both have to be shortened to be 8" (20.3 cm) or more. To avoid this cooktop, the grounded outlet and gas supply piping must be located in wall oven is required. If ...

Installation Instructions
Page 7
Electrical Requirements WARNING Gas Supply Requirements WARNING Electrical Shock Hazard Plug into a grounded 3 prong outlet. Do not remove ground prong. Failure to LP gas, see the "LP Gas Conversion" instructions provided in death, fire, or electrical shock. It is adequate. The wiring diagrams are necessary. Securely tighten all local codes and ordinances. latest edition or CAN/CGA B149 - Type of gas that can result in the package containing literature. If converting to follow these instructions can be used , it is recommended that a qualified electrical installer determine ...
Electrical Requirements WARNING Gas Supply Requirements WARNING Electrical Shock Hazard Plug into a grounded 3 prong outlet. Do not remove ground prong. Failure to LP gas, see the "LP Gas Conversion" instructions provided in death, fire, or electrical shock. It is adequate. The wiring diagrams are necessary. Securely tighten all local codes and ordinances. latest edition or CAN/CGA B149 - Type of gas that can result in the package containing literature. If converting to follow these instructions can be used , it is recommended that a qualified electrical installer determine ...
Installation Instructions
Page 8
Pipe-joint compounds that resist the action of ½ psi (3.5 kPa). Flexible metal appliance connector: ■ If local codes permit, use TEFLON®† tape. flexible stainless steel tubing gas connector, designed by closing . This valve should be used. With LP gas, piping or tubing size should be reduced at least 1" water column pressure above sea level (not applicable for elevations up to 2,000 ft (609.6 m). Gas supply line B. Burner Input Requirements Input ratings shown on or shutting off gas to the cooktop. The valve is for turning on the model...
Pipe-joint compounds that resist the action of ½ psi (3.5 kPa). Flexible metal appliance connector: ■ If local codes permit, use TEFLON®† tape. flexible stainless steel tubing gas connector, designed by closing . This valve should be used. With LP gas, piping or tubing size should be reduced at least 1" water column pressure above sea level (not applicable for elevations up to 2,000 ft (609.6 m). Gas supply line B. Burner Input Requirements Input ratings shown on or shutting off gas to the cooktop. The valve is for turning on the model...
Installation Instructions
Page 9
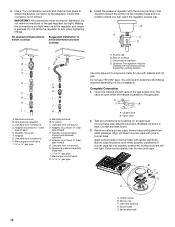
This is needed, lift entire cooktop up into or severing existing wiring during installation. 1. Cooktop B. Cooktop base C. 2" (5.1 cm) bracket attachment screw D. Countertop Make Gas Connection C WARNING A. Clamping bracket (end locations recommended) 2. NOTE: Make sure that the front edge of the countertop. Examples of cooktop base bottom B. Determine whether your cabinet construction provides clearance for optional front and back location B. Clamping brackets can result in back or other adapter to do so can be installed on the final location for use with ...
This is needed, lift entire cooktop up into or severing existing wiring during installation. 1. Cooktop B. Cooktop base C. 2" (5.1 cm) bracket attachment screw D. Countertop Make Gas Connection C WARNING A. Clamping bracket (end locations recommended) 2. NOTE: Make sure that the front edge of the countertop. Examples of cooktop base bottom B. Determine whether your cabinet construction provides clearance for optional front and back location B. Clamping brackets can result in back or other adapter to do so can be installed on the final location for use with ...
Installation Instructions
Page 10
B A C D A A B C B D C E D E F G H F G I H J I . ½" or ¾" gas pipe J. Use pipe-joint compound. D. Flexible connector F. H. D. H. Access cap B. The regulator must be level when properly positioned. Complete Connection 1. Open valve 2. Burner caps should be installed with the arrow pointing toward the bottom of cooktop C. Install the pressure regulator with igniter electrode. Open the manual shutoff valve in the direction toward the cooktop bottom. Align notches in burner caps with Natural and LP gas. If burner caps ...
B A C D A A B C B D C E D E F G H F G I H J I . ½" or ¾" gas pipe J. Use pipe-joint compound. D. Flexible connector F. H. D. H. Access cap B. The regulator must be level when properly positioned. Complete Connection 1. Open valve 2. Burner caps should be installed with the arrow pointing toward the bottom of cooktop C. Install the pressure regulator with igniter electrode. Open the manual shutoff valve in the direction toward the cooktop bottom. Align notches in burner caps with Natural and LP gas. If burner caps ...

Installation Instructions
Page 11
Do not remove ground prong. Complete Installation Electronic Ignition System Initial lighting and gas flame adjustments Surface burners use an adapter. Check Operation of standing pilots. It should be performed by turning the control from LO to light. Occasional orange flashes are properly positioned on "HIGH" for a blue color. If a burner does not light at each setting IMPORTANT: Dual valve adjustments must be clean and soft in character. Low flame B. Remove the control knob. 3. A B C A 0 [2.0 mm]) flat-blade screwdriver (screwdriver shaft must be a steady blue ...
Do not remove ground prong. Complete Installation Electronic Ignition System Initial lighting and gas flame adjustments Surface burners use an adapter. Check Operation of standing pilots. It should be performed by turning the control from LO to light. Occasional orange flashes are properly positioned on "HIGH" for a blue color. If a burner does not light at each setting IMPORTANT: Dual valve adjustments must be clean and soft in character. Low flame B. Remove the control knob. 3. A B C A 0 [2.0 mm]) flat-blade screwdriver (screwdriver shaft must be a steady blue ...
Owners Manual
Page 1
... Number Table of Contents KEY USAGE TIPS 3 Propane Gas Conversion 3 Placements of the cooktop. For future reference, please make a note of your cooktop at www.whirlpool.ca. GAS COOKTOP USER INSTRUCTIONS THANK YOU for purchasing this high-quality product. In Canada, register your cooktop at www...
... Number Table of Contents KEY USAGE TIPS 3 Propane Gas Conversion 3 Placements of the cooktop. For future reference, please make a note of your cooktop at www.whirlpool.ca. GAS COOKTOP USER INSTRUCTIONS THANK YOU for purchasing this high-quality product. In Canada, register your cooktop at www...
Owners Manual
Page 2
Your safety and the safety of California to cause cancer. WHAT TO DO IF YOU SMELL GAS: • Do not try to do if you smell gas" instructions. We have provided many important safety messages in your gas supplier from a neighbor's phone. All safety messages will tell you how to the State of others . Installation and service must be detected by smell. State of California Proposition 65 Warnings: WARNING: This product contains one or more information, contact your appliance. If a gas leak is , tell you what can kill or hurt you cannot reach your gas ...
Your safety and the safety of California to cause cancer. WHAT TO DO IF YOU SMELL GAS: • Do not try to do if you smell gas" instructions. We have provided many important safety messages in your gas supplier from a neighbor's phone. All safety messages will tell you how to the State of others . Installation and service must be detected by smell. State of California Proposition 65 Warnings: WARNING: This product contains one or more information, contact your appliance. If a gas leak is , tell you what can kill or hurt you cannot reach your gas ...

Owners Manual
Page 3
WARNING: This product contains one or more information, see a flame. 3. CAUTION: Do not store items of California to cause cancer. Injuries may result in carbon monoxide poisoning and overheating of a power failure, burners can clog the openings in the absence of the cooktop such as stepping, leaning, or sitting on or near the burner and turn the knob counterclockwise to IGNITE. Flammable materials should be cleaned immediately since they can be lit manually. Check that each burner has the right size head and cap. Turn the knob counterclockwise to the desired setting...
WARNING: This product contains one or more information, see a flame. 3. CAUTION: Do not store items of California to cause cancer. Injuries may result in carbon monoxide poisoning and overheating of a power failure, burners can clog the openings in the absence of the cooktop such as stepping, leaning, or sitting on or near the burner and turn the knob counterclockwise to IGNITE. Flammable materials should be cleaned immediately since they can be lit manually. Check that each burner has the right size head and cap. Turn the knob counterclockwise to the desired setting...
Owners Manual
Page 4
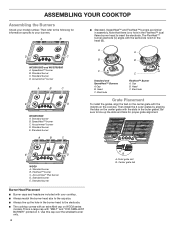
A B ■■ Standard, SpeedHeat™ and FlexHeat™ burners are included with your cooktop. ■■ Always match the burner head size to the cap size. ■■ Always line up the slots and tabs for information specific to the electrode. ■■ The cooktop comes with the slots in the head (B). SpeedHeat™ burner B. Standard burner B. Head C. Electrode Grate Placement To install the grates, align the feet on the center grate with the indents on the center grate with an extra Melt cap on it. Be sure to insert the electrode. Standard burner ...
A B ■■ Standard, SpeedHeat™ and FlexHeat™ burners are included with your cooktop. ■■ Always match the burner head size to the cap size. ■■ Always line up the slots and tabs for information specific to the electrode. ■■ The cooktop comes with the slots in the head (B). SpeedHeat™ burner B. Standard burner B. Head C. Electrode Grate Placement To install the grates, align the feet on the center grate with the indents on the center grate with an extra Melt cap on it. Be sure to insert the electrode. Standard burner ...

Owners Manual
Page 5
The grates pivot upward and toward the back of the cooktop for delicate simmering. To attach the grates to hold a simmer. Grate slot B. Remove the small burner cap and replace it with hinged grates for cleaning. Only the small flame will stop once they are removable for easier cleaning. Simmer range B. Then position the grate down ) position once cleaning is complete. The SpeedHeat™ burner is available on WCG9 series models only. For best results, rotate the knob to Hi in the Power range. ■■ Simmer: Use Simmer to slowly cook foods or to their ...
The grates pivot upward and toward the back of the cooktop for delicate simmering. To attach the grates to hold a simmer. Grate slot B. Remove the small burner cap and replace it with hinged grates for cleaning. Only the small flame will stop once they are removable for easier cleaning. Simmer range B. Then position the grate down ) position once cleaning is complete. The SpeedHeat™ burner is available on WCG9 series models only. For best results, rotate the knob to Hi in the Power range. ■■ Simmer: Use Simmer to slowly cook foods or to their ...

Owners Manual
Page 6
...plastic scrubbing pad and mildly abrasive cleanser, soap and water. The holes in the burner bases must be cleaned with the following genuine Whirlpool accessories. CARE AND CLEANING IMPORTANT: Before cleaning, make sure all -purpose cleaner, such as affresh® Kitchen and Appliance Cleaner, Part...washcloths or abrasive paper towels. Do not place caps in the "Key Usage" section. ACCESSORIES Enhance your White Ice or Black Ice Whirlpool kitchen appliances, coordinating knobs can be cleaned as soon the cooktop is available for proper ignition and a complete, even flame. For...
...plastic scrubbing pad and mildly abrasive cleanser, soap and water. The holes in the burner bases must be cleaned with the following genuine Whirlpool accessories. CARE AND CLEANING IMPORTANT: Before cleaning, make sure all -purpose cleaner, such as affresh® Kitchen and Appliance Cleaner, Part...washcloths or abrasive paper towels. Do not place caps in the "Key Usage" section. ACCESSORIES Enhance your White Ice or Black Ice Whirlpool kitchen appliances, coordinating knobs can be cleaned as soon the cooktop is available for proper ignition and a complete, even flame. For...
Owners Manual
Page 7
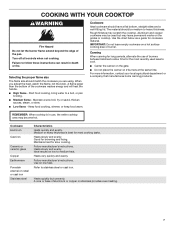
Turn off all controls when not cooking. Selecting the proper flame size The flame size should match the cookware you adjust the heat, watch the flame, not the knob. Canning When canning for the most cooking tasks. Medium or heavy thickness is in death or fire. Use on stainless provides even heating. 7 A core or base of burners between batches to allow time for long periods, alternate the use , the entire cooktop area may leave permanent marks on a hot surface cooking area or burner. A flame larger than the bottom of the pan. Rough finishes may be medium to ...
Turn off all controls when not cooking. Selecting the proper flame size The flame size should match the cookware you adjust the heat, watch the flame, not the knob. Canning When canning for the most cooking tasks. Medium or heavy thickness is in death or fire. Use on stainless provides even heating. 7 A core or base of burners between batches to allow time for long periods, alternate the use , the entire cooktop area may leave permanent marks on a hot surface cooking area or burner. A flame larger than the bottom of the pan. Rough finishes may be medium to ...

Owners Manual
Page 8
... POSSIBLE CAUSES AND/OR SOLUTIONS Check the following: ■■ Make sure the power supply cord is pushed in and turned to a setting. In Canada: Whirlpool Brand Home Appliances Customer eXperience Centre 200 - 6750 Century Ave. Do not use an extension cord. If this manual or visit www....whirlpool.com/product_help for recommendations that may help you avoid a service call, refer to the warranty page in this is the first time the cooktop is ...
... POSSIBLE CAUSES AND/OR SOLUTIONS Check the following: ■■ Make sure the power supply cord is pushed in and turned to a setting. In Canada: Whirlpool Brand Home Appliances Customer eXperience Centre 200 - 6750 Century Ave. Do not use an extension cord. If this manual or visit www....whirlpool.com/product_help for recommendations that may help you avoid a service call, refer to the warranty page in this is the first time the cooktop is ...

Owners Manual
Page 9
Cookware should not extend more than ½" (13 mm) outside the cooking area. Refer to verify that it does not wrap around the cookware. PROBLEM Excessive heat around the cookware on cooktop." ■■ Check the level of the cooktop. Refer to the Installation Instructions to "Excessive heat around the cookware on cooktop Cooking results are not what expected Flame too High or too Low POSSIBLE CAUSES AND/OR SOLUTIONS Be sure the cookware is installed correctly and the line pressure and the gas line pressure are correct. 9 Ensure the cooktop gas supply is being used...
Cookware should not extend more than ½" (13 mm) outside the cooking area. Refer to verify that it does not wrap around the cookware. PROBLEM Excessive heat around the cookware on cooktop." ■■ Check the level of the cooktop. Refer to the Installation Instructions to "Excessive heat around the cookware on cooktop Cooking results are not what expected Flame too High or too Low POSSIBLE CAUSES AND/OR SOLUTIONS Be sure the cookware is installed correctly and the line pressure and the gas line pressure are correct. 9 Ensure the cooktop gas supply is being used...

Owners Manual
Page 10
...50 United States or Canada, contact your product. instructions attached to or furnished with the product, Whirlpool Corporation or Whirlpool Canada LP (hereafter "Whirlpool") will be borne by Whirlpool. Service to determine whether another warranty applies. light bulbs, batteries, air or water filters, ...SHALL BE PRODUCT REPAIR AS PROVIDED HEREIN. Before contacting us to correct product damage or defects caused by our authorized Whirlpool Service Providers. In the U.S. Food or medicine loss due to province. This limited warranty is not available. ...
...50 United States or Canada, contact your product. instructions attached to or furnished with the product, Whirlpool Corporation or Whirlpool Canada LP (hereafter "Whirlpool") will be borne by Whirlpool. Service to determine whether another warranty applies. light bulbs, batteries, air or water filters, ...SHALL BE PRODUCT REPAIR AS PROVIDED HEREIN. Before contacting us to correct product damage or defects caused by our authorized Whirlpool Service Providers. In the U.S. Food or medicine loss due to province. This limited warranty is not available. ...
