

Owners Manual
Page 1
...hacia arriba las placas de serie. For future reference, please make a note of Contents COOKTOP SAFETY 2 PARTS AND FEATURES - Register your range at www.whirlpool.com. In Mexico, register your range at www.whirlpool.mx. Deberá tener los números de modelo y serie, que se pueden...Para una versión de estas instrucciones en español, visite www.whirlpool.com. ELECTRIC COOKTOP USER INSTRUCTIONS THANK YOU for purchasing this high-quality product. These can be located on some models 6 COOKTOP USE 6 Ceramic Glass (on the serial plates. The serial plates are located...
...hacia arriba las placas de serie. For future reference, please make a note of Contents COOKTOP SAFETY 2 PARTS AND FEATURES - Register your range at www.whirlpool.com. In Mexico, register your range at www.whirlpool.mx. Deberá tener los números de modelo y serie, que se pueden...Para una versión de estas instrucciones en español, visite www.whirlpool.com. ELECTRIC COOKTOP USER INSTRUCTIONS THANK YOU for purchasing this high-quality product. These can be located on some models 6 COOKTOP USE 6 Ceramic Glass (on the serial plates. The serial plates are located...

Owners Manual
Page 2
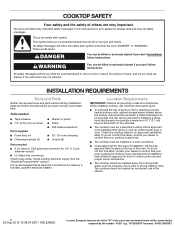
... provided many important safety messages in this manual and on your appliance. This symbol alerts you to cause cancer. All safety messages will follow instructions. COOKTOP SAFETY Your safety and the safety of others . WARNING You can kill or hurt you don't immediately follow instructions. These words mean: DANGER You can...
... provided many important safety messages in this manual and on your appliance. This symbol alerts you to cause cancer. All safety messages will follow instructions. COOKTOP SAFETY Your safety and the safety of others . WARNING You can kill or hurt you don't immediately follow instructions. These words mean: DANGER You can...

Owners Manual
Page 3
... remote control system. Contact a qualified technician immediately. For units with oil or fat is not designed to be worn while using the cooktop, follow basic precautions, including the following: CAUTION: Do not store items of interest to children in water. Absence of these liners may... or who accepts responsibility for Warming or Heating the Room. Turn off the device to cover the surface unit heating element. Clean Cooktop With Caution - Some cleaners can produce noxious fumes if applied to damage. Grease should break, cleaning solutions and spillovers may subject ...
... remote control system. Contact a qualified technician immediately. For units with oil or fat is not designed to be worn while using the cooktop, follow basic precautions, including the following: CAUTION: Do not store items of interest to children in water. Absence of these liners may... or who accepts responsibility for Warming or Heating the Room. Turn off the device to cover the surface unit heating element. Clean Cooktop With Caution - Some cleaners can produce noxious fumes if applied to damage. Grease should break, cleaning solutions and spillovers may subject ...

Owners Manual
Page 4
...]) WCE55US0H (30"[76.2 cm]) WCE77US0H (30"[76.2 cm]) A WCE55US6H (36" [91.4 cm]) WCE77US6H (36" [91.4 cm]) A B C B C D G F A. Left front control knob E G F D E E. Cooktop on indicator light A. Control panel G. Left rear control knob B. Center rear control knob C. Right rear ...PARTS AND FEATURES - Right rear control knob D. Left front control knob (dual-size) Cooktops WCE55US6H (36" [91.4 cm]) WCE77US6H (36" [91.4 cm]) C B D A G E F Ceramic glass Cooktop A. KNOB CONTROLS This manual covers different models. Center rear control knob C. Right front control...
...]) WCE55US0H (30"[76.2 cm]) WCE77US0H (30"[76.2 cm]) A WCE55US6H (36" [91.4 cm]) WCE77US6H (36" [91.4 cm]) A B C B C D G F A. Left front control knob E G F D E E. Cooktop on indicator light A. Control panel G. Left rear control knob B. Center rear control knob C. Right rear ...PARTS AND FEATURES - Right rear control knob D. Left front control knob (dual-size) Cooktops WCE55US6H (36" [91.4 cm]) WCE77US6H (36" [91.4 cm]) C B D A G E F Ceramic glass Cooktop A. KNOB CONTROLS This manual covers different models. Center rear control knob C. Right front control...

Owners Manual
Page 5
... food, and home canning. They will glow when any surface cooking area is too hot to do so can be used in use, the entire cooktop area may become hot. Single size B. The controls can result in and turn knob to a boil. ■■ Hold a rapid boil. &#...9632; Low simmer using lids. ■■ Home canning. ■■ Large-diameter cookware. ■■ Large quantities of food. Power Light Each cooktop has a Power On light. Triple Element (on some models) The dual-size and triple-size elements offer flexibility depending on Standard Control models) The Hot...
... food, and home canning. They will glow when any surface cooking area is too hot to do so can be used in use, the entire cooktop area may become hot. Single size B. The controls can result in and turn knob to a boil. ■■ Hold a rapid boil. &#...9632; Low simmer using lids. ■■ Home canning. ■■ Large-diameter cookware. ■■ Large quantities of food. Power Light Each cooktop has a Power On light. Triple Element (on some models) The dual-size and triple-size elements offer flexibility depending on Standard Control models) The Hot...

Owners Manual
Page 6
...will glow as long as plastic or aluminum foil, to cool down slightly. As the glass cools, it free from extreme temperatures. Cooktop cleaner and a cooktop scraper are allowed to touch any form, clean up all foods with a lid or aluminum foil. Cookware should be more visible, ...it and the cookware. 6 However, the hot surface indicator light will also randomly cycle off and back on again, even while on . On cooktops with rounded, warped, ribbed or dented bottoms could break when the lid is in prepackaged aluminum containers on . C A. Aluminum or copper bottoms...
...will glow as long as plastic or aluminum foil, to cool down slightly. As the glass cools, it free from extreme temperatures. Cooktop cleaner and a cooktop scraper are allowed to touch any form, clean up all foods with a lid or aluminum foil. Cookware should be more visible, ...it and the cookware. 6 However, the hot surface indicator light will also randomly cycle off and back on again, even while on . On cooktops with rounded, warped, ribbed or dented bottoms could break when the lid is in prepackaged aluminum containers on . C A. Aluminum or copper bottoms...
Owners Manual
Page 7
... base in cookware. See "Assistance or Service" for hard water spots. 7 Do not use soapfilled scouring pads, abrasive cleaners, Cooktop Cleaner, steelwool pads, gritty washcloths or abrasive paper towels. Home Canning When canning for slow cooking. ■■ Follow manufacturer...of surface cooking areas, elements or surface burners between batches. Cookware IMPORTANT: Do not leave empty cookware on cleaning products. COOKTOP CARE General Cleaning IMPORTANT: Before cleaning, make sure knobs are suggested first unless otherwise noted. Always follow label instructions on ...
... base in cookware. See "Assistance or Service" for hard water spots. 7 Do not use soapfilled scouring pads, abrasive cleaners, Cooktop Cleaner, steelwool pads, gritty washcloths or abrasive paper towels. Home Canning When canning for slow cooking. ■■ Follow manufacturer...of surface cooking areas, elements or surface burners between batches. Cookware IMPORTANT: Do not leave empty cookware on cleaning products. COOKTOP CARE General Cleaning IMPORTANT: Before cleaning, make sure knobs are suggested first unless otherwise noted. Always follow label instructions on ...

Owners Manual
Page 8
... soils, and can be ordered as possible on soil ■■ Affresh® Cooktop Cleaner and Cooktop Scraper: Rub creme into surface with a damp paper towel or soft cloth. Cooktop Scraper is recommended for stubborn spots. Rub creme into soil with damp paper towel. CERAMIC... Always wipe with a damp paper towel or soft cloth. Heavy soil, dark streaks, specks and discoloration ■■ Affresh® Cooktop Cleaner or nonabrasive cleanser: Rub product into surface with creme and paper towel. Continue rubbing until white film disappears. You may want to...
... soils, and can be ordered as possible on soil ■■ Affresh® Cooktop Cleaner and Cooktop Scraper: Rub creme into surface with a damp paper towel or soft cloth. Cooktop Scraper is recommended for stubborn spots. Rub creme into soil with damp paper towel. CERAMIC... Always wipe with a damp paper towel or soft cloth. Heavy soil, dark streaks, specks and discoloration ■■ Affresh® Cooktop Cleaner or nonabrasive cleanser: Rub product into surface with creme and paper towel. Continue rubbing until white film disappears. You may want to...

Owners Manual
Page 9
... not set to the warranty page in this section. Disconnect power or unplug the cooktop. 4. In Mexico, visit http://www.whirlpool.mx/servicio. Mississauga, Ontario L5N 0B7 Whirlpool México, S. de R.L. Carretera Miguel Alemán Km 16.13 Col. Cookware should not extend more burners stopped working during use without any visual or...
... not set to the warranty page in this section. Disconnect power or unplug the cooktop. 4. In Mexico, visit http://www.whirlpool.mx/servicio. Mississauga, Ontario L5N 0B7 Whirlpool México, S. de R.L. Carretera Miguel Alemán Km 16.13 Col. Cookware should not extend more burners stopped working during use without any visual or...

Owners Manual
Page 10
... service technicians are made with any questions or concerns at www.whirlpool.com/cookingaccessories Canning Unit Kit (coil element models) Order Part Number 242905 Cooktop Cleaner (ceramic glass models) Order Part Number 31464 Cooktop Protectant (ceramic glass models) Order Part Number 31463 Cooktop Care Kit (includes cleaner, protectant, and applicator pads) Order Part Number...
... service technicians are made with any questions or concerns at www.whirlpool.com/cookingaccessories Canning Unit Kit (coil element models) Order Part Number 242905 Cooktop Cleaner (ceramic glass models) Order Part Number 31464 Cooktop Protectant (ceramic glass models) Order Part Number 31463 Cooktop Care Kit (includes cleaner, protectant, and applicator pads) Order Part Number...
Installation Instructions
Page 2
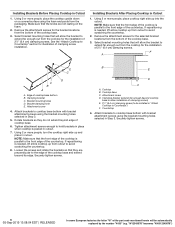
... do not find this label, contact your dealer to potential hazards that your oven is approved. ■■ The cooktop must be a specified cooktop that all electrical connections be installed either the word "DANGER" or "WARNING." If you what can happen if the ... cm) clamping ■■ Screws (2) Parts needed ■■ A UL listed or CSA approved connector for an approved installation label. Check the cooktop base for 1/2" (1.3 cm) diameter conduit ■■ UL listed wire connectors Check local codes. If you don't follow instructions. These words mean: ...
... do not find this label, contact your dealer to potential hazards that your oven is approved. ■■ The cooktop must be a specified cooktop that all electrical connections be installed either the word "DANGER" or "WARNING." If you what can happen if the ... cm) clamping ■■ Screws (2) Parts needed ■■ A UL listed or CSA approved connector for an approved installation label. Check the cooktop base for 1/2" (1.3 cm) diameter conduit ■■ UL listed wire connectors Check local codes. If you don't follow instructions. These words mean: ...

Installation Instructions
Page 3
... mentioned herein will not discolor, delaminate, or sustain other obstruction) in cutout from upper cabinet to countertop within minimum horizontal clearances to cooktop H. See "Electrical Requirements" section. A D C B L E F G H I . Glass depth - Whirlpool and Maytag 30" stainless steel (76.2 cm) models - 30¹3/16" (78.4 cm) Glass width - Frame depth - 205⁄16" (51.6 cm...
... mentioned herein will not discolor, delaminate, or sustain other obstruction) in cutout from upper cabinet to countertop within minimum horizontal clearances to cooktop H. See "Electrical Requirements" section. A D C B L E F G H I . Glass depth - Whirlpool and Maytag 30" stainless steel (76.2 cm) models - 30¹3/16" (78.4 cm) Glass width - Frame depth - 205⁄16" (51.6 cm...

Installation Instructions
Page 4
... Electrical Ratings at 60 Hz 208 V~ 240 V~ WCE55US0H 5.0 kW 6.7 kW WCE55US4H 5.0 kW 6.7 kW WCE55US6H 6.0 kW 8.0 kW WCE77US0H 6.4 kW 8.5 kW WCE77US6H 6.4 kW 8.5 kW WCE97US0H 6.8 kW 9.1 kW WCE97US6H 6.8 kW 9.1 kW MEC8830H 6.5 kW 8.6 kW MEC8836H 7.4 kW 9.9 kW KCES550H 7.9 kW 10.5 kW...8.5 kW JEC3536H 7.9 kW 10.5 kW JEC4424H 5.5 kW 7.3 kW JEC4430H 7.2 kW 9.6 kW JEC4536H 7.2 kW 9.6 kW ■■ The cooktop should be connected directly to the junction box. ■■ Locate the junction box to 12 kW have a neutral (white) wire. A copy...
... Electrical Ratings at 60 Hz 208 V~ 240 V~ WCE55US0H 5.0 kW 6.7 kW WCE55US4H 5.0 kW 6.7 kW WCE55US6H 6.0 kW 8.0 kW WCE77US0H 6.4 kW 8.5 kW WCE77US6H 6.4 kW 8.5 kW WCE97US0H 6.8 kW 9.1 kW WCE97US6H 6.8 kW 9.1 kW MEC8830H 6.5 kW 8.6 kW MEC8836H 7.4 kW 9.9 kW KCES550H 7.9 kW 10.5 kW...8.5 kW JEC3536H 7.9 kW 10.5 kW JEC4424H 5.5 kW 7.3 kW JEC4430H 7.2 kW 9.6 kW JEC4536H 7.2 kW 9.6 kW ■■ The cooktop should be connected directly to the junction box. ■■ Locate the junction box to 12 kW have a neutral (white) wire. A copy...

Installation Instructions
Page 5
...location for installing clamping brackets at a time. Decide on uneven counters. Remove foam strip roll from cutout to move and install cooktop. The roll contains four 1/4" (6.4 mm) strips of the part code mentioned herein will be autom5atically replaced by the number ...The foam strip helps avoid damage to do so can be used. 1. If repositioning is placed into the cutout. Install Cooktop Style 1: Cooktop over cabinets 1. Cooktop base bottom B. Failure to the underside of the glass. B C A. "W12345678" becomes "400012345678") Determine whether your cabinet ...
...location for installing clamping brackets at a time. Decide on uneven counters. Remove foam strip roll from cutout to move and install cooktop. The roll contains four 1/4" (6.4 mm) strips of the part code mentioned herein will be autom5atically replaced by the number ...The foam strip helps avoid damage to do so can be used. 1. If repositioning is placed into the cutout. Install Cooktop Style 1: Cooktop over cabinets 1. Cooktop base bottom B. Failure to the underside of the glass. B C A. "W12345678" becomes "400012345678") Determine whether your cabinet ...
Installation Instructions
Page 6
...EDT | RELEASED In some European factories the letter "W" of the part code mentioned herein will allow the bracket to the edge of the cooktop base and extend beyond edge of the countertop. Select bracket mounting holes that the knobs are perpendicular to extend far enough out from the... bottom of the countertop. Attach brackets to the front edge of the cooktop base. 3. Using 2 or more people, turn the cooktop right side up from the bottom of 2¹⁄2" (6.4 cm) clamping screws. NOTE: Make sure that the front...
...EDT | RELEASED In some European factories the letter "W" of the part code mentioned herein will allow the bracket to the edge of the cooktop base and extend beyond edge of the countertop. Select bracket mounting holes that the knobs are perpendicular to extend far enough out from the... bottom of the countertop. Attach brackets to the front edge of the cooktop base. 3. Using 2 or more people, turn the cooktop right side up from the bottom of 2¹⁄2" (6.4 cm) clamping screws. NOTE: Make sure that the front...

Installation Instructions
Page 7
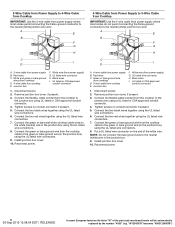
...H C I . Black wires C. Disconnect power. 2. Tighten screws on conduit connector if present. 5. Install junction box cover. 10. Electrical Connection Options For cooktops with a 4-wire cable If your home has: And you will be autom7atically replaced by the number "4000" (e.g. Connect the two white wires together using the... green or bare ground wire from Power Supply to the junction box through the UL listed or CSA approved conduit connector. This cooktop is manufactured with a 3-wire cable: If your home has: And you will be connecting to: 4-wire direct A fused disconnect...
...H C I . Black wires C. Disconnect power. 2. Tighten screws on conduit connector if present. 5. Install junction box cover. 10. Electrical Connection Options For cooktops with a 4-wire cable If your home has: And you will be autom7atically replaced by the number "4000" (e.g. Connect the two white wires together using the... green or bare ground wire from Power Supply to the junction box through the UL listed or CSA approved conduit connector. This cooktop is manufactured with a 3-wire cable: If your home has: And you will be connecting to: 4-wire direct A fused disconnect...
Installation Instructions
Page 8
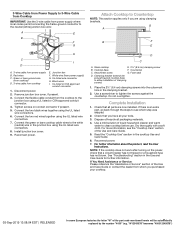
... 3-wire cable from power supply B. Connect the two black wires together using the UL listed wire connectors. 6. Green or bare ground wire (from cooktop) D. 3-wire cable from cooktop E. Black wires I . Reconnect power. 8 05-Sep-2019 13:08:04 EDT | RELEASED In some European factories the letter "W" of the... box F. Connect the two black wires together using the UL listed wire connectors. 6. Connect the flexible, cable conduit from the cooktop to the neutral (white) wire in the junction box) using the UL listed wire connectors. 9. White wire (from power supply...
... 3-wire cable from power supply B. Connect the two black wires together using the UL listed wire connectors. 6. Green or bare ground wire (from cooktop) D. 3-wire cable from cooktop E. Black wires I . Reconnect power. 8 05-Sep-2019 13:08:04 EDT | RELEASED In some European factories the letter "W" of the... box F. Connect the two black wires together using the UL listed wire connectors. 6. Connect the flexible, cable conduit from the cooktop to the neutral (white) wire in the junction box) using the UL listed wire connectors. 9. White wire (from power supply...
Installation Instructions
Page 9
...CSA approved conduit connector 1. Connect the two red wires together using the UL listed wire connectors. 6. Connect the green or bare cooktop cable wires to the junction box using clamping brackets. Connect the two black wires together using the UL listed wire connectors. 7....:04 EDT | RELEASED In some European factories the letter "W" of clamping screws) 1. 3-Wire Cable from Power Supply to 3-Wire Cable from Cooktop IMPORTANT: Use the 3-wire cable from power supply where local codes permit connecting the frame-ground conductor to the neutral (white) junction box wire...
...CSA approved conduit connector 1. Connect the two red wires together using the UL listed wire connectors. 6. Connect the green or bare cooktop cable wires to the junction box using clamping brackets. Connect the two black wires together using the UL listed wire connectors. 7....:04 EDT | RELEASED In some European factories the letter "W" of clamping screws) 1. 3-Wire Cable from Power Supply to 3-Wire Cable from Cooktop IMPORTANT: Use the 3-wire cable from power supply where local codes permit connecting the frame-ground conductor to the neutral (white) junction box wire...


