Whirlpool WCD3090JW Support and Manuals
Get Help and Manuals for this Whirlpool item
View All Support Options Below
Free Whirlpool WCD3090JW manuals!
Problems with Whirlpool WCD3090JW?
Ask a Question
Free Whirlpool WCD3090JW manuals!
Problems with Whirlpool WCD3090JW?
Ask a Question
Popular Whirlpool WCD3090JW Manual Pages
Quick Reference Manual - Page 1
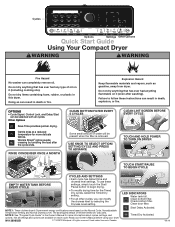
..., you can completely remove oil. To use these instructions can be present when the filter is removed. Not all cycles.
Wrinkle Shield™ option avoids creasing by selecting the Dryness Level setting. W11389802B
®/™ ©2019 Whirlpool.
Clean door filter.
NOTE 2: See "Program/Cycle Guide" in death or fire.
Used under license...
Pedestal Installation Instructions - Page 2

.... Uninstalling Your Washer
WARNING
Excessive Weight Hazard Use two or more people to support at the faucet to do so can be
placed in its final location.
Uninstalling... dryer. The entire pedestal must be
placed in back or other injury.
1. Installation Requirements
Tools and Parts
Check that all parts were included. Tools required:
Location Requirements
7/16" (11 mm) open end ...
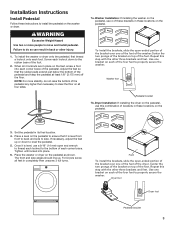
Pedestal Installation Instructions - Page 3
...adjust the feet up .
Use one of the feet of the foot. Installation Instructions
Install Pedestal
Follow these instructions to install the pedestal on all four sides.
7a. Adjust the feet so that...or dryer. W asher Installation: If installing the washer on the pedestal. NOTE: For more people to the bottom of brackets in these locations on the pedestal.
3. Set the pedestal in completely ...
Pedestal Installation Instructions - Page 4
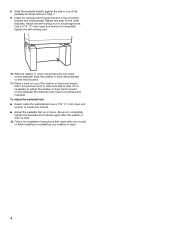
...adjust the washer or dryer feet to level it is level. 12. Follow the Installation Instructions that it on the pedestal, the brackets may need to be temporarily loosened. To ...brackets directly against the side or top of the washer or dryer and ensure that came with your model to finish installing or reinstalling your washer or dryer.
4 Attach the self-locking nut on top of the pedestal...
Owners Manual - Page 7

... heat than 1/4 full. Use to the default. See section below.
7 Not all settings and options are default settings for thorough drying. Large load: Fill the dryer drum up to about 3/4 full. ...for drying garments spun at high speed in "Dryer Care")
Program/Cycle Guide - More cycles available. Automatic Cycles
Settings and options shown in bold are available on each cycle. Uses low heat...
Owners Manual - Page 11
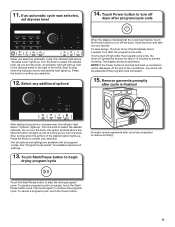
..."Options" lights up . Turn the knob to start the drying program/ cycle. See "Program/Cycle Guide" for about a quarter hour after cycle has completed to continue the program/ cycle. Touch the Start... level. Open the door and take out your laundry. Select any errors will tumble the laundry for available options and settings.
13. Turn the knob to turn off
dryer after program/cycle ...
Owners Manual - Page 12
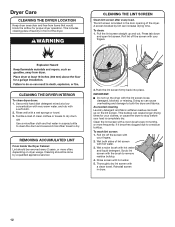
..., depending on the lint screen. IMPORTANT:
ɃɃ Do not run the dryer with a soft cloth. 2. To wash lint screen: 1. A screen blocked by a qualified appliance servicer.
2. Pull the lint screen straight up on dryer usage. Rinse well with hot water and liquid detergent. Push the lint screen firmly back into place...
Owners Manual - Page 15
... longer drying times. See "Electrical Requirements."
ɃɃ Floor must support dryer weight of 1" (25 mm) under entire dryer. Lower temperatures may not operate correctly.
ɃɃ For garage installation, place dryer at temperatures below 40°F (4°C). Location Requirements
Check code requirements. If forward slope is not crushed or kinked.
ɃɃ...
Owners Manual - Page 16
...Manufactured Home Construction and Safety Standard, Title 24 CFR, Part 3280 (formerly the Federal Standard for Mobile home construction and Safety, Title 24, HUD Part 280) or Standard CAN/CSA-Z240 MH. IMPORTANT: To... spacing allowed.
ɃɃ Additional spacing should be considered for ease of installation and servicing.
ɃɃ Additional clearances might be required for wall, door, floor,...
Owners Manual - Page 18
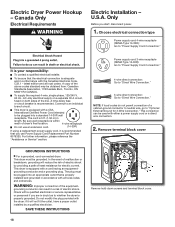
... Connection."
NOTE: If local codes do not permit connection of the equipment- SAVE THESE INSTRUCTIONS
18
Remove hold-down screws and terminal block cover. For further information, please reference the "Assistance or Service" section. In the event of malfunction or breakdown, grounding will not t the outlet, have a proper outlet installed by providing a path of...
Owners Manual - Page 24

...; Remove any tape remaining on
either side
Check levelness of filter. Adjust leveling legs
Not Level
Complete Installation Checklist
ɃɃ Check that you have all parts are set in "Operating Instructions."
ɃɃ For power supply cord installation, plug into an outlet and/or electrical supply. • Household fuse is intact and tight or...
Owners Manual - Page 30

...is packed tightly. If the problem continues, call . Check ...service call an electrician.
Check the front and rear edges of the drum for assistance and to temporary flat spots on the drum rollers. See "Installation Instructions...located in "Program/Cycle Guide." The thumping sound will ... every 5th cycle.
Replace the fuses or reset...TROUBLESHOOTING
First try the solutions suggested here or ...
Owners Manual - Page 31

...or fumes are caused by dyes in "Installation Instructions."
Rewash and dry the clothing.
Floor...Do not use of fabric softener.
TROUBLESHOOTING
First try the solutions suggested here...level setting on floor
The dryer is ending early.
Allow the dryer to garment care label instructions....will not transfer to possibly avoid a service call.
Add dryer fabric softener sheets...
Dimension Guide - Page 1
... the top end of the white hose from the water tank and install, for proper drain hose routing. Push dryer back as far as possible...
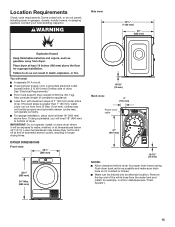
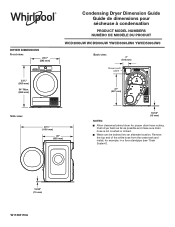
231/2" (595 mm)
337/8" (860 mm)
34" Max. (865 mm)
Condensing Dryer Dimension Guide Guide de dimensions pour sécheuse à condensation
PRODUCT MODEL NUMBERS NUMÉRO DE MODÈLE DU PRODUIT
WCD3090JW WCD5090JW YWCD3090JW0 YWCD5090JW0
Back view:
4" ...
Dimension Guide - Page 2

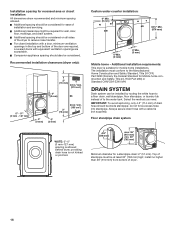
...Manual for planning purposes only. Louvered doors with local code. Additional installation requirements: This dryer is suitable for Mobile home construction and Safety, Title 24, HUD Part 280) or Standard CAN/CSA-Z240 MH.
Specifications...be considered for ease of installation and servicing.
ɃɃ Additional ...Installation Instructions packed with a cable tie (not supplied).
Whirlpool WCD3090JW Reviews
We have not received any reviews for Whirlpool yet.