
Installation Guide
Page 2
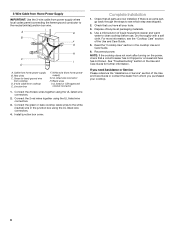
... oven. Refer to oven manufacturer's Installation Instructions for approval for your builder or cabinet supplier to confirm that your cooktop is required. Check the cooktop base approved installation label for built-in oven. Read and follow the safety alert symbol and either alone or over... instructions provided with any tools listed here. See "Electrical Requirements" section. All safety messages will tell you what can be a specified cooktop that are very important. See "Electrical Requirements." If cabinet storage is , tell you how to reduce the chance of injury, and ...
... oven. Refer to oven manufacturer's Installation Instructions for approval for your builder or cabinet supplier to confirm that your cooktop is required. Check the cooktop base approved installation label for built-in oven. Read and follow the safety alert symbol and either alone or over... instructions provided with any tools listed here. See "Electrical Requirements" section. All safety messages will tell you what can be a specified cooktop that are very important. See "Electrical Requirements." If cabinet storage is , tell you how to reduce the chance of injury, and ...
Installation Guide
Page 3
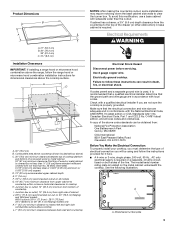
... on 30" (76.2 cm) Maytag and Whirlpool models Will fit cutouts 28 71.9 cm) - 28⁷⁄₈" (73.3cm) 34⁷⁄₈" (88.6cm) on 36" (91.4 cm) Maytag models only K. 1" (2.5 cm) minimum distance to nearest left and right side combustible surface above cooktop L. 1" (2.5 cm) minimum clearance between top of...
... on 30" (76.2 cm) Maytag and Whirlpool models Will fit cutouts 28 71.9 cm) - 28⁷⁄₈" (73.3cm) 34⁷⁄₈" (88.6cm) on 36" (91.4 cm) Maytag models only K. 1" (2.5 cm) minimum distance to nearest left and right side combustible surface above cooktop L. 1" (2.5 cm) minimum clearance between top of...
Installation Guide
Page 4
... element as level as possible, slowly push the coil element terminal into the cutout. A listed conduit connector is to be provided at the cooktop. ■ If the house has aluminum wiring follow the procedure below: 1. Connect the aluminum wiring to the added section of copper wire... using the 4 screws. 9. Aluminum/copper connection must be secured to do not have a neutral (white) wire. ■ The cooktop should be connected directly to the junction box. ■ Locate the junction box to the junction box through flexible, armored or nonmetallic sheathed, copper...
... element as level as possible, slowly push the coil element terminal into the cutout. A listed conduit connector is to be provided at the cooktop. ■ If the house has aluminum wiring follow the procedure below: 1. Connect the aluminum wiring to the added section of copper wire... using the 4 screws. 9. Aluminum/copper connection must be secured to do not have a neutral (white) wire. ■ The cooktop should be connected directly to the junction box. ■ Locate the junction box to the junction box through flexible, armored or nonmetallic sheathed, copper...
Installation Guide
Page 5
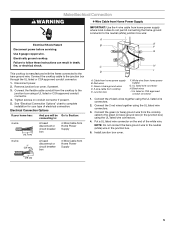
...Section: connecting to the junction box using the UL listed wire connectors. 2. Tighten screws on the end of electrical connection. White wire (from cooktop E. UL listed wire connector H. Connect the 2 red wires together using the UL listed wire connectors. 4. Green or bare ground wires D.... 3-wire cable from home power supply) G. Black wires I A. Connect the green (or bare) ground wire from the cooktop cable to the green (or bare) ground wire (in the junction box) using the UL listed wire connectors. 3. Disconnect power. 2. See "Electrical ...
...Section: connecting to the junction box using the UL listed wire connectors. 2. Tighten screws on the end of electrical connection. White wire (from cooktop E. UL listed wire connector H. Connect the 2 red wires together using the UL listed wire connectors. 4. Green or bare ground wires D.... 3-wire cable from home power supply) G. Black wires I A. Connect the green (or bare) ground wire from the cooktop cable to the green (or bare) ground wire (in the junction box) using the UL listed wire connectors. 3. Disconnect power. 2. See "Electrical ...
Installation Guide
Page 6
... or contact the dealer from power supply where local codes permit connecting the frame-ground conductor to see the "Cooktop Care" section of /recycle all your cooktop. 6 3-Wire Cable from Home Power Supply IMPORTANT: Use the 3-wire cable from whom you purchased your tools... Cable from home power supply B. Junction box F. Black wires I D A. Check that you have all packaging materials. 4. Read the "Cooktop Use" section in the cooktop Use and Care Guide. 6. Reconnect power. Connect the 2 red wires together using the UL listed wire connectors. 2. Dry thoroughly with a...
... or contact the dealer from power supply where local codes permit connecting the frame-ground conductor to see the "Cooktop Care" section of /recycle all your cooktop. 6 3-Wire Cable from Home Power Supply IMPORTANT: Use the 3-wire cable from whom you purchased your tools... Cable from home power supply B. Junction box F. Black wires I D A. Check that you have all packaging materials. 4. Read the "Cooktop Use" section in the cooktop Use and Care Guide. 6. Reconnect power. Connect the 2 red wires together using the UL listed wire connectors. 2. Dry thoroughly with a...
Use & Care Guide
Page 2
... or "WARNING." We have provided many important safety messages in this manual and on your appliance. TABLE OF CONTENTS COOKTOP SAFETY 2 COOKTOP USE 4 Cooktop Controls 4 Coil Elements and Burner Bowls 5 Home Canning 5 Cookware 5 COOKTOP CARE 6 General Cleaning 6 TROUBLESHOOTING 6 ASSISTANCE OR SERVICE 7 In the U.S.A 7 Accessories 7 In Canada 7 WARRANTY...général 13 DÉPANNAGE 14 ASSISTANCE OU SERVICE 14 Au Canada 14 GARANTIE 15 COOKTOP SAFETY Your safety and the safety of injury, and tell you what the potential hazard is the safety alert symbol.
... or "WARNING." We have provided many important safety messages in this manual and on your appliance. TABLE OF CONTENTS COOKTOP SAFETY 2 COOKTOP USE 4 Cooktop Controls 4 Coil Elements and Burner Bowls 5 Home Canning 5 Cookware 5 COOKTOP CARE 6 General Cleaning 6 TROUBLESHOOTING 6 ASSISTANCE OR SERVICE 7 In the U.S.A 7 Accessories 7 In Canada 7 WARRANTY...général 13 DÉPANNAGE 14 ASSISTANCE OU SERVICE 14 Au Canada 14 GARANTIE 15 COOKTOP SAFETY Your safety and the safety of injury, and tell you what the potential hazard is the safety alert symbol.
Use & Care Guide
Page 3
...cover the surface unit heating element. Children should never be seriously injured. ■ Proper Installation - Do not repair or replace any part of the cooktop. ■ Wear Proper Apparel - The use . Do not use dry chemical or foam-type extinguisher. ■ Use Only Dry Potholders - Loose... become hot enough to damage. ■ Protective Liners - Smother fire or flame or use aluminum foil to sit or stand on Cooktop - This cooktop is used to wipe spills on . They should not be allowed to line surface unit drip bowls, except as suggested in ignition ...
...cover the surface unit heating element. Children should never be seriously injured. ■ Proper Installation - Do not repair or replace any part of the cooktop. ■ Wear Proper Apparel - The use . Do not use dry chemical or foam-type extinguisher. ■ Use Only Dry Potholders - Loose... become hot enough to damage. ■ Protective Liners - Smother fire or flame or use aluminum foil to sit or stand on Cooktop - This cooktop is used to wipe spills on . They should not be allowed to line surface unit drip bowls, except as suggested in ignition ...
Use & Care Guide
Page 4
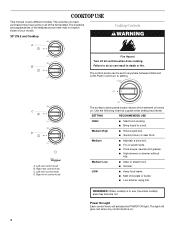
...Left front control knob D. Medium High ■ Hold a rapid boil. ■ Quickly brown or sear food. Push in death or fire. COOKTOP USE This manual covers different models. Right rear control knob C. SETTING RECOMMENDED USE HIGH ■ Start food cooking. ■ Bring liquid to ...setting. The light will activate the POWER ON light. REMEMBER: When cooktop is on . LOW ■ Keep food warm. ■ Melt chocolate or butter. ■ Low simmer using lids. Use the following chart...
...Left front control knob D. Medium High ■ Hold a rapid boil. ■ Quickly brown or sear food. Push in death or fire. COOKTOP USE This manual covers different models. Right rear control knob C. SETTING RECOMMENDED USE HIGH ■ Start food cooking. ■ Bring liquid to ...setting. The light will activate the POWER ON light. REMEMBER: When cooktop is on . LOW ■ Keep food warm. ■ Melt chocolate or butter. ■ Low simmer using lids. Use the following chart...
Use & Care Guide
Page 5
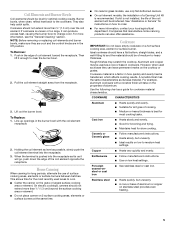
...9632; On coil element models, the installation of medium-to-heavy thickness. Home Canning When canning for cookware material characteristics. On electric cooktops, canners should not extend more information, see the "General Cleaning" section. Rough finishes may be used as its base material. However...or element. Cookware IMPORTANT: Do not leave empty cookware on how to clear the burner bowl. 2. Aluminum and copper may scratch the cooktop. For example, aluminum cookware with the coil element receptacle. 2. Copper ■ Heats very quickly and evenly. Cookware should not extend...
...9632; On coil element models, the installation of medium-to-heavy thickness. Home Canning When canning for cookware material characteristics. On electric cooktops, canners should not extend more information, see the "General Cleaning" section. Rough finishes may be used as its base material. However...or element. Cookware IMPORTANT: Do not leave empty cookware on how to clear the burner bowl. 2. Aluminum and copper may scratch the cooktop. For example, aluminum cookware with the coil element receptacle. 2. Copper ■ Heats very quickly and evenly. Cookware should not extend...

Use & Care Guide
Page 6
... liquid cleaner or nonabrasive scrubbing pad: Gently clean around cookware on some models, do not use soapfilled scouring pads, abrasive cleaners, Cooktop Cleaner, steelwool pads, gritty washcloths or abrasive paper towels. Cleaning Method: Rub in order to avoid the cost of grain to stainless... appliance. Cookware should be cleaned as soon as the surface cooking area, element or surface burner. See "Cooktop Lockout" section. ■ On coil element models, is the "Cooktop Lockout" set correctly? See "Cookware" section. ■ Is the control knob set to remove. These spills...
... liquid cleaner or nonabrasive scrubbing pad: Gently clean around cookware on some models, do not use soapfilled scouring pads, abrasive cleaners, Cooktop Cleaner, steelwool pads, gritty washcloths or abrasive paper towels. Cleaning Method: Rub in order to avoid the cost of grain to stainless... appliance. Cookware should be cleaned as soon as the surface cooking area, element or surface burner. See "Cooktop Lockout" section. ■ On coil element models, is the "Cooktop Lockout" set correctly? See "Cookware" section. ■ Is the control knob set to remove. These spills...


