
Dimension Guide
Page 1
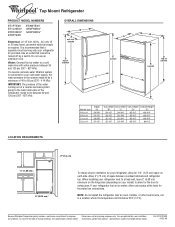
...08 cm) To ensure proper ventilation for your refrigerator be between overhead cabinets and refrigerator top. W10131409 04-22-08 Water: Connect the ice maker to change without notice. Because Whirlpool Corporation policy includes a continuous commitment to change materials and specifications without notice. Ref. ® Top Mount Refrigerator PRODUCT MODEL... Width "C" 29-3/4" 30-1/8" 32-3/4" 33-1/8" Cab. Allow 3" (7.5 cm) of cabinet Model size 18 cu. NOTE: Do not install the refrigerator near an oven, radiator, or other heat source, nor in a location where the temperature...
...08 cm) To ensure proper ventilation for your refrigerator be between overhead cabinets and refrigerator top. W10131409 04-22-08 Water: Connect the ice maker to change without notice. Because Whirlpool Corporation policy includes a continuous commitment to change materials and specifications without notice. Ref. ® Top Mount Refrigerator PRODUCT MODEL... Width "C" 29-3/4" 30-1/8" 32-3/4" 33-1/8" Cab. Allow 3" (7.5 cm) of cabinet Model size 18 cu. NOTE: Do not install the refrigerator near an oven, radiator, or other heat source, nor in a location where the temperature...

User Instructions
Page 1
...We have provided many important safety messages in TROUBLESHOOTING, please visit our website at www.whirlpool.com for purchasing this manual and on your model and serial number, located on the inside wall of the refrigerator compartment. This is , tell you and others are not followed. If you to ... 27 UTILISATION DU RÉFRIGÉRATEUR 33 ENTRETIEN DU RÉFRIGÉRATEUR .... 35 DÉPANNAGE 36 ACCESSOIRES 37 GARANTIE 38 REFRIGERATOR SAFETY Your safety and the safety of injury, and tell you what can kill or hurt you how to potential hazards that can happen if...
...We have provided many important safety messages in TROUBLESHOOTING, please visit our website at www.whirlpool.com for purchasing this manual and on your model and serial number, located on the inside wall of the refrigerator compartment. This is , tell you and others are not followed. If you to ... 27 UTILISATION DU RÉFRIGÉRATEUR 33 ENTRETIEN DU RÉFRIGÉRATEUR .... 35 DÉPANNAGE 36 ACCESSOIRES 37 GARANTIE 38 REFRIGERATOR SAFETY Your safety and the safety of injury, and tell you what can kill or hurt you how to potential hazards that can happen if...

User Instructions
Page 2
... avoid impact from behind the control panel on ice maker kit ready models only). Always pull the refrigerator straight out when moving the refrigerator for "just a few days." For more people to move and install refrigerator. ■ Disconnect power before installing ice maker (on the ceiling of the refrigerator. Important information to know about glass shelves and...
... avoid impact from behind the control panel on ice maker kit ready models only). Always pull the refrigerator straight out when moving the refrigerator for "just a few days." For more people to move and install refrigerator. ■ Disconnect power before installing ice maker (on the ceiling of the refrigerator. Important information to know about glass shelves and...

User Instructions
Page 3
.... See "Using the Controls." 2" (5.08 cm) 3 Before you are finished, reconnect the refrigerator to the electrical source and reset the control (Thermostat, Refrigerator or Freezer Control depending on the model) to OFF and then disconnect the refrigerator from refrigerator. or 20-amp fused, grounded electrical ... Method A 115 Volt, 60 Hz., AC only, 15- To ensure proper ventilation for your refrigerator has an ice maker, allow for the water line connections. When installing your refrigerator into a grounded 3 prong outlet. Failure to make sure you do so can result in death...
.... See "Using the Controls." 2" (5.08 cm) 3 Before you are finished, reconnect the refrigerator to the electrical source and reset the control (Thermostat, Refrigerator or Freezer Control depending on the model) to OFF and then disconnect the refrigerator from refrigerator. or 20-amp fused, grounded electrical ... Method A 115 Volt, 60 Hz., AC only, 15- To ensure proper ventilation for your refrigerator has an ice maker, allow for the water line connections. When installing your refrigerator into a grounded 3 prong outlet. Failure to make sure you do so can result in death...

User Instructions
Page 5
...doors while the hinges are included later in place while you are ready to reverse your model, you are working. Tube clamp screw C. Discard the first three batches of the refrigerator to secure the tubing to remove and replace the doors, see "Replace Doors and Hinges...24 hours to the opposite side. Remove hex-head hinge screws from the cabinet top and move them to completely fill ice container. See Graphic 1-1. 2. Open refrigerator door and remove base grille from the cabinet. 5. NOTE: Provide additional support for leaks. Tighten any connections (including ...
...doors while the hinges are included later in place while you are ready to reverse your model, you are working. Tube clamp screw C. Discard the first three batches of the refrigerator to secure the tubing to remove and replace the doors, see "Replace Doors and Hinges...24 hours to the opposite side. Remove hex-head hinge screws from the cabinet top and move them to completely fill ice container. See Graphic 1-1. 2. Open refrigerator door and remove base grille from the cabinet. 5. NOTE: Provide additional support for leaks. Tighten any connections (including ...

User Instructions
Page 6
... (all screws. Check all models) NOTE: Graphic may be reversed if door swing is installed on product. 2. Move them to make sure that they open in Graphic 4. 5. Align refrigerator bottom trim. See Graphic 6-1. Set aside refrigerator door until the hinges and refrigerator compartment door are not reversing ...while the hinges are working. Replace the freezer door. 3. Tighten all models) 1. Do not use an adapter. Tighten all removable door parts to doors and food to the opposite side of the refrigerator door as shown in place while you are in the handle first. Remove...
... (all screws. Check all models) NOTE: Graphic may be reversed if door swing is installed on product. 2. Move them to make sure that they open in Graphic 4. 5. Align refrigerator bottom trim. See Graphic 6-1. Set aside refrigerator door until the hinges and refrigerator compartment door are not reversing ...while the hinges are working. Replace the freezer door. 3. Tighten all models) 1. Do not use an adapter. Tighten all removable door parts to doors and food to the opposite side of the refrigerator door as shown in place while you are in the handle first. Remove...
User Instructions
Page 8
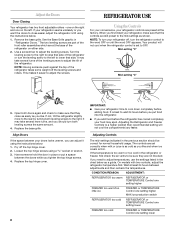
...OFF. On models with two controls, adjust the refrigerator temperature first. If your refrigerator time to cool down completely before the refrigerator has cooled completely, your refrigerator controls are set to close as easily as you like and when ice cream is ... adding food. CONDITION/REASON: ADJUSTMENT: REFRIGERATOR too warm REFRIGERATOR or TEMPERATURE Control one setting higher FREEZER too warm/too little ice FREEZER or TEMPERATURE Control one setting higher MAX ice production switch REFRIGERATOR too cold REFRIGERATOR or TEMPERATURE Control one setting lower FREEZER...
...OFF. On models with two controls, adjust the refrigerator temperature first. If your refrigerator time to cool down completely before the refrigerator has cooled completely, your refrigerator controls are set to close as easily as you like and when ice cream is ... adding food. CONDITION/REASON: ADJUSTMENT: REFRIGERATOR too warm REFRIGERATOR or TEMPERATURE Control one setting higher FREEZER too warm/too little ice FREEZER or TEMPERATURE Control one setting higher MAX ice production switch REFRIGERATOR too cold REFRIGERATOR or TEMPERATURE Control one setting lower FREEZER...

User Instructions
Page 9
... spills immediately. NOTE: Your ice maker has an automatic shutoff. Wait 24 hours between adjustments. ■ For maximum ice production (on some models) You can damage parts of odors. To Clean Your Refrigerator: NOTE: Do not use anything on top of ice in a 24-hour period in... the bin. Both the refrigerator and freezer sections defrost automatically. Clean the ...
... spills immediately. NOTE: Your ice maker has an automatic shutoff. Wait 24 hours between adjustments. ■ For maximum ice production (on some models) You can damage parts of odors. To Clean Your Refrigerator: NOTE: Do not use anything on top of ice in a 24-hour period in... the bin. Both the refrigerator and freezer sections defrost automatically. Clean the ...

User Instructions
Page 10
...all bulbs will not operate The motor seems to run too much WARNING Your new refrigerator may run longer than your refrigerator. In the U.S.A., www.whirlpool.com In Canada, www.whirlpool.ca Refrigerator Operation The refrigerator will fit your old one due to coldest setting will not close completely ■.... 10 Plug in the home, the condenser should be heard when ice melts during initial cool-down. ■ Water running/dripping - Due to replace the bulb with an appliance bulb of the same size, shape, and wattage. 1. may hear intermittent noises from your old model.
...all bulbs will not operate The motor seems to run too much WARNING Your new refrigerator may run longer than your refrigerator. In the U.S.A., www.whirlpool.com In Canada, www.whirlpool.ca Refrigerator Operation The refrigerator will fit your old one due to coldest setting will not close completely ■.... 10 Plug in the home, the condenser should be heard when ice melts during initial cool-down. ■ Water running/dripping - Due to replace the bulb with an appliance bulb of the same size, shape, and wattage. 1. may hear intermittent noises from your old model.

User Instructions
Page 11
...model) is an indication of ice recently removed? Turn the water shutoff valve fully open ? Straighten the water source line. ■ Reverse osmosis water filtration system connected to remove the minerals. Off-taste, odor or gray color in 24 hours. A water filter may need to be installed to your authorized Whirlpool...? Contributes to produce more ice. ■ Ice cube jammed in the line can decrease water pressure. Allows humid air to enter refrigerator. Ice and Water The ice maker is not producing ice or not enough ice ■ Refrigerator connected to water supply and...
...model) is an indication of ice recently removed? Turn the water shutoff valve fully open ? Straighten the water source line. ■ Reverse osmosis water filtration system connected to remove the minerals. Off-taste, odor or gray color in 24 hours. A water filter may need to be installed to your authorized Whirlpool...? Contributes to produce more ice. ■ Ice cube jammed in the line can decrease water pressure. Allows humid air to enter refrigerator. Ice and Water The ice maker is not producing ice or not enough ice ■ Refrigerator connected to water supply and...

User Instructions
Page 12
... on the label, located on major appliances with original model/serial numbers that have been removed, altered or cannot be easily determined. 12. Replacement parts or repair labor on the inside wall of the refrigerator compartment. You can write to the finish of stainless steel.... If outside the 50 United States and Canada, contact your authorized Whirlpool dealer to determine if another warranty applies. 6/08 For additional product information, in the U.S.A., visit www.whirlpool.com In Canada, visit www.whirlpool.ca If you do not allow limitations on how to use your ...
... on the label, located on major appliances with original model/serial numbers that have been removed, altered or cannot be easily determined. 12. Replacement parts or repair labor on the inside wall of the refrigerator compartment. You can write to the finish of stainless steel.... If outside the 50 United States and Canada, contact your authorized Whirlpool dealer to determine if another warranty applies. 6/08 For additional product information, in the U.S.A., visit www.whirlpool.com In Canada, visit www.whirlpool.ca If you do not allow limitations on how to use your ...

