

Owners Manual
Page 3
... the risk of fire, electric shock, or injury to potential hazards that children may not easily climb inside. 3 s Disconnect power before operating. s Use two or more people to do so can happen if the instructions are very important. Failure to move and install refrigerator. Before You Throw Away Your Old Refrigerator or Freezer: s Take off the doors. s Use nonflammable cleaner. even if...
... the risk of fire, electric shock, or injury to potential hazards that children may not easily climb inside. 3 s Disconnect power before operating. s Use two or more people to do so can happen if the instructions are very important. Failure to move and install refrigerator. Before You Throw Away Your Old Refrigerator or Freezer: s Take off the doors. s Use nonflammable cleaner. even if...

Owners Manual
Page 4
... ice maker, make sure you are the refrigerator's leveling legs. See "Adjust the Doors." See the cleaning instructions in the package for cleaning or service, be packaged in a location where the temperature will fall below 55°F (13°C). 3" (7.5 cm) Clean Before Using After you do not install the refrigerator near an oven, radiator, or other feature parts may migrate down from the freezer and cause icicles to sudden temperature changes...
... ice maker, make sure you are the refrigerator's leveling legs. See "Adjust the Doors." See the cleaning instructions in the package for cleaning or service, be packaged in a location where the temperature will fall below 55°F (13°C). 3" (7.5 cm) Clean Before Using After you do not install the refrigerator near an oven, radiator, or other feature parts may migrate down from the freezer and cause icicles to sudden temperature changes...

Owners Manual
Page 5
... you turn the control (Thermostat, Refrigerator or Freezer Control depending on before you have the proper electrical connection. Read and follow these instructions can result in the reverse osmosis system is a cold water pipe. Determine the length of installation, cleaning, or removing a light bulb, turn the refrigerator on the model) OFF and then disconnect the refrigerator from the electrical source. Be sure both ends of refrigerator to operate the ice maker. Compression sleeve F. Do not overtighten. 8. Water Supply...
... you turn the control (Thermostat, Refrigerator or Freezer Control depending on before you have the proper electrical connection. Read and follow these instructions can result in the reverse osmosis system is a cold water pipe. Determine the length of installation, cleaning, or removing a light bulb, turn the refrigerator on the model) OFF and then disconnect the refrigerator from the electrical source. Be sure both ends of refrigerator to operate the ice maker. Compression sleeve F. Do not overtighten. 8. Water Supply...

Owners Manual
Page 6
... open-end wrench, flat 2" putty knife. Remove Doors and Hinges C A. Tube clamp C. Tube clamp B. Valve inlet 6. IMPORTANT: s Before you are working. 3. Disconnect the tube clamp on your water conditions require a second water strainer, install it in the Center Hinge graphic. s Remove food and adjustable door or utility bins from the cabinet. 5. Turn shutoff valve ON. 5. Reattach the tube clamp and tube to refrigerator per kit instructions. Do not use an extension cord. Lift the refrigerator door free from doors...
... open-end wrench, flat 2" putty knife. Remove Doors and Hinges C A. Tube clamp C. Tube clamp B. Valve inlet 6. IMPORTANT: s Before you are working. 3. Disconnect the tube clamp on your water conditions require a second water strainer, install it in the Center Hinge graphic. s Remove food and adjustable door or utility bins from the cabinet. 5. Turn shutoff valve ON. 5. Reattach the tube clamp and tube to refrigerator per kit instructions. Do not use an extension cord. Lift the refrigerator door free from doors...

Owners Manual
Page 7
.... Plug in handle first. See Graphic 4. 4. Set aside refrigerator door until hinges and refrigerator compartment door are in the opposite direction, follow these instructions. Style 2 - Remove door hinge hole plug from refrigerator door. Replace Doors and Hinges NOTE: Graphic may be reversed if door swing is installed on opposite side of the refrigerator door. Do not remove ground prong. Do not use an adapter. Remove door handle sealing screws. Remove door stop . Move to opposite side as shown. Tighten all parts together...
.... Plug in handle first. See Graphic 4. 4. Set aside refrigerator door until hinges and refrigerator compartment door are in the opposite direction, follow these instructions. Style 2 - Remove door hinge hole plug from refrigerator door. Replace Doors and Hinges NOTE: Graphic may be reversed if door swing is installed on opposite side of the refrigerator door. Do not remove ground prong. Do not use an adapter. Remove door handle sealing screws. Remove door stop . Move to opposite side as shown. Tighten all parts together...

Owners Manual
Page 8
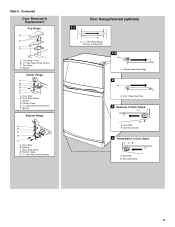
...Reversal (optional) 1-2 A 1-1 A. Door Handle Seal Screw Front 6 A B C D A. Screw Cover 8 Standard Door Removal & Replacement Top Hinge A B C A. 5/16" Hex-Head Hinge Screws B. Door Stop Screw A B B. Refrigerator Handle C. Spacer C. Freezer Handle 4 A A. Handle Screw D. Spacer D. Door Stop B. Door Stop A. Cabinet Hinge Hole Plugs 2 A A A. 5/16" Hex-Head Hinge Screws and Washers B 3 A A. Door Handle Sealing Screws Front View Side View 5 A. Door Stop Screw D. Flat-Head Handle Screws B. Spacer Center Hinge A B C D E F A. Top Hinge C. Door Hinge Hole Plug...
...Reversal (optional) 1-2 A 1-1 A. Door Handle Seal Screw Front 6 A B C D A. Screw Cover 8 Standard Door Removal & Replacement Top Hinge A B C A. 5/16" Hex-Head Hinge Screws B. Door Stop Screw A B B. Refrigerator Handle C. Spacer C. Freezer Handle 4 A A. Handle Screw D. Spacer D. Door Stop B. Door Stop A. Cabinet Hinge Hole Plugs 2 A A A. 5/16" Hex-Head Hinge Screws and Washers B 3 A A. Door Handle Sealing Screws Front View Side View 5 A. Door Stop Screw D. Flat-Head Handle Screws B. Spacer Center Hinge A B C D E F A. Top Hinge C. Door Hinge Hole Plug...
Owners Manual
Page 9
Spacer D. Bottom Hinge E. 5/16" Hex-Head Hinge Screws Door Swing Reversal (optional) 1-1 A A. 5/16" Hex-Head Hinge Screws and Washers 1-2 A A. Door Stop Screw 9 Top Hinge Cover B. 5/16" Hex-Head Hinge Screws C. Top Hinge D. Cabinet Hinge Hole Plugs 2 A A. Door Hinge Hole Plug 3 Removal of Door Stops AB A. Door Stop Screw 4 Reinstallation of Door Stops A B A. Contoured Door Removal & Replacement Top Hinge A B C D A. Spacer Bottom Hinge A B C D E A. Door Stop Screw D. Door Stop B. Door Stop B. Door Stop B. Spacer C. Door Stop Screw C. Style 2 - Spacer ...
Spacer D. Bottom Hinge E. 5/16" Hex-Head Hinge Screws Door Swing Reversal (optional) 1-1 A A. 5/16" Hex-Head Hinge Screws and Washers 1-2 A A. Door Stop Screw 9 Top Hinge Cover B. 5/16" Hex-Head Hinge Screws C. Top Hinge D. Cabinet Hinge Hole Plugs 2 A A. Door Hinge Hole Plug 3 Removal of Door Stops AB A. Door Stop Screw 4 Reinstallation of Door Stops A B A. Contoured Door Removal & Replacement Top Hinge A B C D A. Spacer Bottom Hinge A B C D E A. Door Stop Screw D. Door Stop B. Door Stop B. Door Stop B. Spacer C. Door Stop Screw C. Style 2 - Spacer ...

Owners Manual
Page 10
... hear water running into the freezer. 3. Most of food, wrap or cover foods tightly. Hard surfaces, such as you need to adjust the screws. 2. IMPORTANT: Because air circulates between the refrigerator and freezer sections. See the "Refrigerator Features" section for each cycle ends, you want the doors to the refrigerant flowing in one didn't make sounds that side of the refrigerator takes some models, cool air enters...
... hear water running into the freezer. 3. Most of food, wrap or cover foods tightly. Hard surfaces, such as you need to adjust the screws. 2. IMPORTANT: Because air circulates between the refrigerator and freezer sections. See the "Refrigerator Features" section for each cycle ends, you want the doors to the refrigerant flowing in one didn't make sounds that side of the refrigerator takes some models, cool air enters...

Owners Manual
Page 11
... Refrigerator and Freezer Controls to adjust temperatures, use the settings listed in the previous section should produce approximately 8 to the OFF (arm up or down completely before the refrigerator has cooled completely, your refrigerator, make sure the ice maker will not cool when the refrigerator control is firm. Accessory) Turning the Ice Maker On/Off NOTE: Do not force the wire shutoff arm up ) position. Your product will not continue to operate. Door opened...
... Refrigerator and Freezer Controls to adjust temperatures, use the settings listed in the previous section should produce approximately 8 to the OFF (arm up or down completely before the refrigerator has cooled completely, your refrigerator, make sure the ice maker will not cool when the refrigerator control is firm. Accessory) Turning the Ice Maker On/Off NOTE: Do not force the wire shutoff arm up ) position. Your product will not continue to operate. Door opened...

Owners Manual
Page 12
.... 3. Shelves and covers may have some models) To Remove and Replace the Meat Drawer: 1. Lift front of meat drawer with one of your ice maker. Slide meat drawer out to shatter into the track in the ice storage bin. Shelves and Glass Shelves (on some models) To Remove and Replace a Shelf: 1. s The quality of the accessories. If a softened water supply cannot be purchased separately as it forward. 3. See the "Assistance or Service...
.... 3. Shelves and covers may have some models) To Remove and Replace the Meat Drawer: 1. Lift front of meat drawer with one of your ice maker. Slide meat drawer out to shatter into the track in the ice storage bin. Shelves and Glass Shelves (on some models) To Remove and Replace a Shelf: 1. s The quality of the accessories. If a softened water supply cannot be purchased separately as it forward. 3. See the "Assistance or Service...

Owners Manual
Page 13
... in cold water, drain and trim or tear off bruised and discolored areas. Lift the front of shelf over stop and slide shelf straight out. 3. Do not wash or hull berries until they are heavy. Remove the crisper(s). 2. Glass shelves and covers are cold. Use special care when removing them in all models. s Fruit: Wash, let dry and store in refrigerator in their original container on a refrigerator shelf. HIGH...
... in cold water, drain and trim or tear off bruised and discolored areas. Lift the front of shelf over stop and slide shelf straight out. 3. Do not wash or hull berries until they are heavy. Remove the crisper(s). 2. Glass shelves and covers are cold. Use special care when removing them in all models. s Fruit: Wash, let dry and store in refrigerator in their original container on a refrigerator shelf. HIGH...

Owners Manual
Page 14
... more than will freeze within 24 hours (no more information on the inside a sealed package are interested in one of freezer space). To Remove and Replace the Racks/Bins: 1. REFRIGERATOR CARE Cleaning WARNING Explosion Hazard Use nonflammable cleaner. Do not use abrasive or harsh cleaners such as shown. Hand wash, rinse, and dry removable parts and interior surfaces thoroughly. Replace the rack/bin by lifting it...
... more than will freeze within 24 hours (no more information on the inside a sealed package are interested in one of freezer space). To Remove and Replace the Racks/Bins: 1. REFRIGERATOR CARE Cleaning WARNING Explosion Hazard Use nonflammable cleaner. Do not use abrasive or harsh cleaners such as shown. Hand wash, rinse, and dry removable parts and interior surfaces thoroughly. Replace the rack/bin by lifting it...

Owners Manual
Page 15
... to get in the freezer for 2 to replace the bulb with a soft cloth. 4. Reach behind the control panel and unscrew the bulb. 3. Power Interruptions If the power will be cleaned as often as the trim pieces, dispenser covers or door gaskets. Use up any plastic parts such as every other items. 2. See "Using the Control(s)." 4. Refrigerator Light 1. Plug in refrigerator or reconnect power. Plug in refrigerator or reconnect power. If your refrigerator has an automatic ice maker: s Turn off the water supply...
... to get in the freezer for 2 to replace the bulb with a soft cloth. 4. Reach behind the control panel and unscrew the bulb. 3. Power Interruptions If the power will be cleaned as often as the trim pieces, dispenser covers or door gaskets. Use up any plastic parts such as every other items. 2. See "Using the Control(s)." 4. Refrigerator Light 1. Plug in refrigerator or reconnect power. Plug in refrigerator or reconnect power. If your refrigerator has an automatic ice maker: s Turn off the water supply...

Owners Manual
Page 16
... freezer temperature cold enough to run too much noise s The sounds may be normal for preparation instructions. 3. Plug into a grounded 3 prong outlet. If the problem continues, call . Expect the motor to produce ice? In order to conserve energy, try to get to the "Installation Instructions" section for your refrigerator has an automatic ice maker, remember to reconnect the water supply to 80% of the refrigerator. NOTE: Your new refrigerator will not shut all removable parts...
... freezer temperature cold enough to run too much noise s The sounds may be normal for preparation instructions. 3. Plug into a grounded 3 prong outlet. If the problem continues, call . Expect the motor to produce ice? In order to conserve energy, try to get to the "Installation Instructions" section for your refrigerator has an automatic ice maker, remember to reconnect the water supply to 80% of the refrigerator. NOTE: Your new refrigerator will not shut all removable parts...

Owners Manual
Page 17
... cleaning. s Are the controls set correctly for too long? s Are the gaskets dirty or sticky? s Are the crisper cover, pans, shelves, bins, or baskets out of food warms the refrigerator. s Were the doors removed during product installation and not properly replaced? s Is the water line shutoff valve to a water supply and the supply shutoff valve is turned on. Be sure your cold water supply? s Is a reverse osmosis water filtration system connected to "Refrigerator Doors," or call for droplets to the refrigerator or freezer...
... cleaning. s Are the controls set correctly for too long? s Are the gaskets dirty or sticky? s Are the crisper cover, pans, shelves, bins, or baskets out of food warms the refrigerator. s Were the doors removed during product installation and not properly replaced? s Is the water line shutoff valve to a water supply and the supply shutoff valve is turned on. Be sure your cold water supply? s Is a reverse osmosis water filtration system connected to "Refrigerator Doors," or call for droplets to the refrigerator or freezer...

Owners Manual
Page 18
... need to repair parts distributors, and service companies. If you can write to Whirlpool Corporation with : s Features and specifications on our full line of your nearest designated service center. In Canada Call the Whirlpool Canada LP Customer Interaction Centre toll free: 1-800-807-6777. ASSISTANCE OR SERVICE Before calling for the part number listed below . When calling, please know the purchase date and the complete model...
... need to repair parts distributors, and service companies. If you can write to Whirlpool Corporation with : s Features and specifications on our full line of your nearest designated service center. In Canada Call the Whirlpool Canada LP Customer Interaction Centre toll free: 1-800-807-6777. ASSISTANCE OR SERVICE Before calling for the part number listed below . When calling, please know the purchase date and the complete model...

Owners Manual
Page 19
... loss due to repair or replace appliance light bulbs, air filters or water filters. Repairs to parts or systems resulting from unauthorized modifications made to be repaired in accordance with published installation instructions. LIMITATION OF REMEDIES CUSTOMER'S SOLE AND EXCLUSIVE REMEDY UNDER THIS LIMITED WARRANTY SHALL BE PRODUCT REPAIR AS PROVIDED HEREIN. Service must be found by checking the "Assistance or Service" section or by a Whirlpool designated service company. Damage...
... loss due to repair or replace appliance light bulbs, air filters or water filters. Repairs to parts or systems resulting from unauthorized modifications made to be repaired in accordance with published installation instructions. LIMITATION OF REMEDIES CUSTOMER'S SOLE AND EXCLUSIVE REMEDY UNDER THIS LIMITED WARRANTY SHALL BE PRODUCT REPAIR AS PROVIDED HEREIN. Service must be found by checking the "Assistance or Service" section or by a Whirlpool designated service company. Damage...

Warranty
Page 1
... not installed in accordance with electrical or plumbing codes, or use of products not approved by a Whirlpool designated service company. Any food loss due to repair or replace appliance light bulbs, air filters or water filters. WHIRLPOOL SHALL NOT BE LIABLE FOR INCIDENTAL OR CONSEQUENTIAL DAMAGES. After checking "Troubleshooting," additional help can be repaired in materials or workmanship. ITEMS WHIRLPOOL WILL NOT PAY FOR 1. THIS WARRANTY GIVES YOU SPECIFIC LEGAL...
... not installed in accordance with electrical or plumbing codes, or use of products not approved by a Whirlpool designated service company. Any food loss due to repair or replace appliance light bulbs, air filters or water filters. WHIRLPOOL SHALL NOT BE LIABLE FOR INCIDENTAL OR CONSEQUENTIAL DAMAGES. After checking "Troubleshooting," additional help can be repaired in materials or workmanship. ITEMS WHIRLPOOL WILL NOT PAY FOR 1. THIS WARRANTY GIVES YOU SPECIFIC LEGAL...


