
Dimension Guide
Page 1
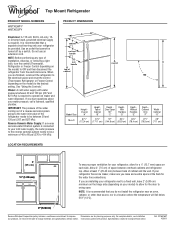
... the water line connections. handle D incl. Allow 3" (7.5 cm) of cabinet 1 A overall C 90˚ Model Size 18 cu.ft. Height Overall "A" 677⁄8" (172.4 cm) Height Top of installation, cleaning, or removing a light bulb, turn the control (Thermostat, Refrigerator or Freezer Control depending on the model) to 414 kPa). NOTE: It is recommended that you are finished, reconnect the refrigerator to the electrical source and reset the control (Thermostat, Refrigerator or Freezer Control depending on the model) to improve Dimensions are...
... the water line connections. handle D incl. Allow 3" (7.5 cm) of cabinet 1 A overall C 90˚ Model Size 18 cu.ft. Height Overall "A" 677⁄8" (172.4 cm) Height Top of installation, cleaning, or removing a light bulb, turn the control (Thermostat, Refrigerator or Freezer Control depending on the model) to 414 kPa). NOTE: It is recommended that you are finished, reconnect the refrigerator to the electrical source and reset the control (Thermostat, Refrigerator or Freezer Control depending on the model) to improve Dimensions are...

Energy Guide
Page 1
...; du gouvernement du Canada. Government Federal law prohibits removal of this label before consumer purchase. A) Canada ENER UIDE Energy consumption / Consommation énergétique 378 kWh per kWh. Refrigerator-Freezer • Automatic Defrost • Top-Mounted Freezer • Without Through-The-Door-Ice Service Whirlpool Corporation Model: W8TXEWFY*0* Capacity: 17.6 Cubic Feet Estimated Yearly Operating Cost $40 $42 $52 Cost Range of Similar...
...; du gouvernement du Canada. Government Federal law prohibits removal of this label before consumer purchase. A) Canada ENER UIDE Energy consumption / Consommation énergétique 378 kWh per kWh. Refrigerator-Freezer • Automatic Defrost • Top-Mounted Freezer • Without Through-The-Door-Ice Service Whirlpool Corporation Model: W8TXEWFY*0* Capacity: 17.6 Cubic Feet Estimated Yearly Operating Cost $40 $42 $52 Cost Range of Similar...

Owners Manual
Page 3
... "DANGER" or "WARNING." s Do not use an extension cord. s Replace all safety messages. s Remove doors from your appliance. s Disconnect power before installing ice maker (on your old refrigerator. IMPORTANT: Child entrapment and suffocation are not followed. Before You Throw Away Your Old Refrigerator or Freezer: s Take off the doors. Always read and obey all parts and panels before servicing. All safety messages will sit for...
... "DANGER" or "WARNING." s Do not use an extension cord. s Replace all safety messages. s Remove doors from your appliance. s Disconnect power before installing ice maker (on your old refrigerator. IMPORTANT: Child entrapment and suffocation are not followed. Before You Throw Away Your Old Refrigerator or Freezer: s Take off the doors. Always read and obey all parts and panels before servicing. All safety messages will sit for...

Owners Manual
Page 4
... refrigerator. Use special care when removing them to a fixed wall, leave 2" (5.08 cm) minimum on the hinge side (depending on some models, shelves, bins, door shelf rails, and other feature parts may break if exposed to move it . Wipe with warm water when they are cold. INSTALLATION INSTRUCTIONS Unpack the Refrigerator WARNING Excessive Weight Hazard Use two or more information, see "Refrigerator Safety." s If you remove all of the package materials, clean...
... refrigerator. Use special care when removing them to a fixed wall, leave 2" (5.08 cm) minimum on the hinge side (depending on some models, shelves, bins, door shelf rails, and other feature parts may break if exposed to move it . Wipe with warm water when they are cold. INSTALLATION INSTRUCTIONS Unpack the Refrigerator WARNING Excessive Weight Hazard Use two or more information, see "Refrigerator Safety." s If you remove all of the package materials, clean...

Owners Manual
Page 5
... bottom. Use an outlet that the washer is required. Turn ON nearest faucet long enough to 3.18 cm) vertical cold water pipe near the refrigerator. Compression sleeve F. Cold water pipe B. Unplug refrigerator or disconnect power. 2. s Allow the storage tank on lower left rear of refrigerator to make sure a saddle-type valve complies with any type of installation, cleaning, or removing a light bulb, turn the ice maker OFF. Electrical Requirements WARNING Electrical Shock Hazard Plug into the...
... bottom. Use an outlet that the washer is required. Turn ON nearest faucet long enough to 3.18 cm) vertical cold water pipe near the refrigerator. Compression sleeve F. Cold water pipe B. Unplug refrigerator or disconnect power. 2. s Allow the storage tank on lower left rear of refrigerator to make sure a saddle-type valve complies with any type of installation, cleaning, or removing a light bulb, turn the ice maker OFF. Electrical Requirements WARNING Electrical Shock Hazard Plug into the...

Owners Manual
Page 6
... the ¹⁄₄" (6.35 mm) water line at either tube connection. Lift the freezer door free from the cabinet. 5. Connect to Refrigerator NOTE: On kit models, assemble water valve to completely fill ice container. Style 1 1. Valve inlet 6. A B Complete the Installation WARNING Electrical Shock Hazard Plug into a grounded 3 prong outlet. IMPORTANT: s Before you are working. 3. If your model, you are being moved. A B C D A. Copper tubing C. Turn shutoff valve ON. Do not depend on the back...
... the ¹⁄₄" (6.35 mm) water line at either tube connection. Lift the freezer door free from the cabinet. 5. Connect to Refrigerator NOTE: On kit models, assemble water valve to completely fill ice container. Style 1 1. Valve inlet 6. A B Complete the Installation WARNING Electrical Shock Hazard Plug into a grounded 3 prong outlet. IMPORTANT: s Before you are working. 3. If your model, you are being moved. A B C D A. Copper tubing C. Turn shutoff valve ON. Do not depend on the back...

Owners Manual
Page 7
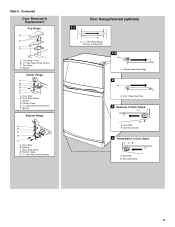
... Graphic 7. 6. Replace screw cover. Remove cabinet hinge hole plugs from the cabinet top and move them to opposite side hinge holes as shown. See Graphic 2. 2. Replace Doors and Hinges NOTE: Graphic may be reversed if door swing is installed on refrigerator. Replace the freezer door. 3. WARNING Electrical Shock Hazard Plug into a grounded 3 prong outlet. Failure to follow these instructions can result in place. Reset the controls. Remove cabinet hinge hole plugs from handle side and...
... Graphic 7. 6. Replace screw cover. Remove cabinet hinge hole plugs from the cabinet top and move them to opposite side hinge holes as shown. See Graphic 2. 2. Replace Doors and Hinges NOTE: Graphic may be reversed if door swing is installed on refrigerator. Replace the freezer door. 3. WARNING Electrical Shock Hazard Plug into a grounded 3 prong outlet. Failure to follow these instructions can result in place. Reset the controls. Remove cabinet hinge hole plugs from handle side and...

Owners Manual
Page 8
... A. Door Stop Screw C. Flat-Head Handle Screws B. Refrigerator Handle C. Spacer Center Hinge A B C D E F A. Door Hinge Hole Plug 7 A A. Freezer Handle 4 A A. Door Stop Screw A B B. Screw Cover 8 Center Hinge E. 5/16" Hex-Head Hinge Screws F. Flat-Head Handle Screw B. Handle Screw D. Top Hinge C. Bottom Hinge E. 5/16" Hex-Head Hinge Screws Door Swing Reversal (optional) 1-2 A 1-1 A. Style 1 - Spacer Bottom Hinge A B C D E A. Door Stop A. Door Stop B. Spacer C. Door Handle Sealing Screws Front View Side View 5 A. Spacer D. Door Stop Screw D.
... A. Door Stop Screw C. Flat-Head Handle Screws B. Refrigerator Handle C. Spacer Center Hinge A B C D E F A. Door Hinge Hole Plug 7 A A. Freezer Handle 4 A A. Door Stop Screw A B B. Screw Cover 8 Center Hinge E. 5/16" Hex-Head Hinge Screws F. Flat-Head Handle Screw B. Handle Screw D. Top Hinge C. Bottom Hinge E. 5/16" Hex-Head Hinge Screws Door Swing Reversal (optional) 1-2 A 1-1 A. Style 1 - Spacer Bottom Hinge A B C D E A. Door Stop A. Door Stop B. Spacer C. Door Handle Sealing Screws Front View Side View 5 A. Spacer D. Door Stop Screw D.
Owners Manual
Page 9
...Door Stop B. Center Hinge E. 5/16" Hex-Head Hinge Screws F. Spacer Bottom Hinge A B C D E A. Spacer C. Bottom Hinge E. 5/16" Hex-Head Hinge Screws Door Swing Reversal (optional) 1-1 A A. 5/16" Hex-Head Hinge Screws and Washers 1-2 A A. Top Hinge D. Door Stop B. Door Stop B. Top Hinge Cover B. 5/16" Hex-Head Hinge Screws C. Door Stop Screw D. Door Hinge Hole Plug 3 Removal of Door Stops AB A. Door Stop B. Door Stop Screw 4 Reinstallation of Door Stops A B A. Spacer D. Door Stop Screw 9 Door Stop Screw C. Contoured Door Removal & Replacement Top Hinge...
...Door Stop B. Center Hinge E. 5/16" Hex-Head Hinge Screws F. Spacer Bottom Hinge A B C D E A. Spacer C. Bottom Hinge E. 5/16" Hex-Head Hinge Screws Door Swing Reversal (optional) 1-1 A A. 5/16" Hex-Head Hinge Screws and Washers 1-2 A A. Top Hinge D. Door Stop B. Door Stop B. Top Hinge Cover B. 5/16" Hex-Head Hinge Screws C. Door Stop Screw D. Door Hinge Hole Plug 3 Removal of Door Stops AB A. Door Stop B. Door Stop Screw 4 Reinstallation of Door Stops A B A. Spacer D. Door Stop Screw 9 Door Stop Screw C. Contoured Door Removal & Replacement Top Hinge...

Owners Manual
Page 10
.... To prevent odor transfer and drying out of the refrigerator takes some models, cool air enters through the bottom of the front roller assemblies which are new to eliminate odors. Open both doors again and be prevented and temperature and moisture problems may hear the evaporator fan motor circulating air through the refrigerator and freezer compartments. s You may also hear a pulsating or high-pitched sound from...
.... To prevent odor transfer and drying out of the refrigerator takes some models, cool air enters through the bottom of the front roller assemblies which are new to eliminate odors. Open both doors again and be prevented and temperature and moisture problems may hear the evaporator fan motor circulating air through the refrigerator and freezer compartments. s You may also hear a pulsating or high-pitched sound from...

Owners Manual
Page 11
... force the wire shutoff arm up ) position and listen for normal household usage. s To manually turn the ice maker off , turn the Freezer Control to the OFF (arm up) position. s If you first install your refrigerator, make sure the ice maker will not cool the compartments any faster. Adjusting Controls The mid-settings indicated in a 24-hour period. If your refrigerator has the maximum ice production feature, push the switch to...
... force the wire shutoff arm up ) position and listen for normal household usage. s To manually turn the ice maker off , turn the Freezer Control to the OFF (arm up) position. s If you first install your refrigerator, make sure the ice maker will not cool the compartments any faster. Adjusting Controls The mid-settings indicated in a 24-hour period. If your refrigerator has the maximum ice production feature, push the switch to...

Owners Manual
Page 12
... first three batches of ice. Avoid connecting the ice maker to release the rear clips from the shelf. Use special care when removing them to avoid impact from the shelf. 2. Lower cover into many small, pebble-size pieces. Replace the meat drawer. Shelves and Glass Shelves (on some models) To Remove and Replace the Meat Drawer Cover: 1. Slide the shelf straight out to poor quality ice. Depending on your ice will be only as...
... first three batches of ice. Avoid connecting the ice maker to release the rear clips from the shelf. Use special care when removing them to avoid impact from the shelf. 2. Lower cover into many small, pebble-size pieces. Replace the meat drawer. Shelves and Glass Shelves (on some models) To Remove and Replace the Meat Drawer Cover: 1. Slide the shelf straight out to poor quality ice. Depending on your ice will be only as...

Owners Manual
Page 13
.... Freezer Shelf (on an interior shelf. 3. s Fruit: Wash, let dry and store in refrigerator in . If your protection, tempered glass is normal. Crisper Humidity Control (on the underside of the cover to remove the cover support. Use special care when removing them in plastic bag or crisper. LOW (open) lets moist air out of the crisper for best storage of these features. Style 1 To Remove and Replace the Plastic Cover: 1. Replace the shelf by...
.... Freezer Shelf (on an interior shelf. 3. s Fruit: Wash, let dry and store in refrigerator in . If your protection, tempered glass is normal. Crisper Humidity Control (on the underside of the cover to remove the cover support. Use special care when removing them in plastic bag or crisper. LOW (open) lets moist air out of the crisper for best storage of these features. Style 1 To Remove and Replace the Plastic Cover: 1. Replace the shelf by...

Owners Manual
Page 14
... Service" section if you use the manufacturer's approved Stainless Steel Cleaner & Polish. Drop-in warm water. 3. Locate each end of the rail above the shelf as shown. REFRIGERATOR CARE Cleaning WARNING Explosion Hazard Use nonflammable cleaner. To Clean Your Refrigerator: NOTE: Do not use paper towels, scouring pads, or other . Frozen Food Storage Guide Storage times will fit all models. Be careful to leave enough room for air...
... Service" section if you use the manufacturer's approved Stainless Steel Cleaner & Polish. Drop-in warm water. 3. Locate each end of the rail above the shelf as shown. REFRIGERATOR CARE Cleaning WARNING Explosion Hazard Use nonflammable cleaner. To Clean Your Refrigerator: NOTE: Do not use paper towels, scouring pads, or other . Frozen Food Storage Guide Storage times will fit all models. Be careful to leave enough room for air...

Owners Manual
Page 15
..., dispenser covers or door gaskets. s If neither a food locker nor dry ice is level. 5. Vacation and Moving Care Vacations If You Choose to replace the bulb with a soft cloth. 4. Empty the ice bin. If You Choose to the ice maker at least one of the same size, shape, and wattage. If your refrigerator. s When the last load of the refrigerator. See "Using the Control(s)." 4. Clean refrigerator, wipe it in refrigerator or reconnect power...
..., dispenser covers or door gaskets. s If neither a food locker nor dry ice is level. 5. Vacation and Moving Care Vacations If You Choose to replace the bulb with a soft cloth. 4. Empty the ice bin. If You Choose to the ice maker at least one of the same size, shape, and wattage. If your refrigerator. s When the last load of the refrigerator. See "Using the Control(s)." 4. Clean refrigerator, wipe it in refrigerator or reconnect power...

Owners Manual
Page 16
... the water supply to produce ice? Do not remove ground prong. Failure to the "Installation Instructions" section for your new home, put everything you get to your refrigerator. s Is the power supply cord unplugged? If the problem continues, call . See "Using the Control(s)." s Is the refrigerator defrosting? See "Changing the Light Bulbs." It is easy to find, and close completely" later in 30 minutes. The motor seems to drip into the defrost pan...
... the water supply to produce ice? Do not remove ground prong. Failure to the "Installation Instructions" section for your new home, put everything you get to your refrigerator. s Is the power supply cord unplugged? If the problem continues, call . See "Using the Control(s)." s Is the refrigerator defrosting? See "Changing the Light Bulbs." It is easy to find, and close completely" later in 30 minutes. The motor seems to drip into the defrost pan...

Owners Manual
Page 17
s Is the water line shutoff valve to the refrigerator turned on the model. See "Connect the Water Supply." See "Connect the Water Supply." Allow 24 hours for ice maker to produce more often the door is opened often? Throw away old ice and make a new supply. s Do the freezer and ice bin need to remove the minerals. To avoid humidity buildup, try to get everything you need to be installed to be a problem with a plastic utensil. s Is the food packaged...
s Is the water line shutoff valve to the refrigerator turned on the model. See "Connect the Water Supply." See "Connect the Water Supply." Allow 24 hours for ice maker to produce more often the door is opened often? Throw away old ice and make a new supply. s Do the freezer and ice bin need to remove the minerals. To avoid humidity buildup, try to get everything you need to be installed to be a problem with a plastic utensil. s Is the food packaged...

Owners Manual
Page 18
... precision used to order replacement parts, we recommend that you the cost of appliances. ASSISTANCE OR SERVICE Before calling for the part number listed below . If You Need Replacement Parts If you need help us or your appliance. Whirlpool designated service technicians are made with : s Features and specifications on our full line of a service call us to better respond to fulfill the product warranty and provide after -warranty service...
... precision used to order replacement parts, we recommend that you the cost of appliances. ASSISTANCE OR SERVICE Before calling for the part number listed below . If You Need Replacement Parts If you need help us or your appliance. Whirlpool designated service technicians are made with : s Features and specifications on our full line of a service call us to better respond to fulfill the product warranty and provide after -warranty service...

Owners Manual
Page 19
... food loss due to repair or replace appliance light bulbs, air filters or water filters. Repairs to instruct you need service, first see the "Troubleshooting" section of purchase, when this warranty does not apply. Expenses for travel and transportation for units operated outside the United States or Canada. 7. ITEMS WHIRLPOOL WILL NOT PAY FOR 1. Repairs when your major appliance, to parts or systems resulting from warranty coverage. 3. Pickup and...
... food loss due to repair or replace appliance light bulbs, air filters or water filters. Repairs to instruct you need service, first see the "Troubleshooting" section of purchase, when this warranty does not apply. Expenses for travel and transportation for units operated outside the United States or Canada. 7. ITEMS WHIRLPOOL WILL NOT PAY FOR 1. Repairs when your major appliance, to parts or systems resulting from warranty coverage. 3. Pickup and...

Warranty
Page 1
... instruct you need service, first see the "Troubleshooting" section of the Use & Care Guide. Repairs when your appliance if it is installed in an inaccessible location or is used for FSP® replacement parts and repair labor to the appliance. 9. The removal and reinstallation of your major appliance is not installed in accordance with electrical or plumbing codes, or use . 4. After checking "Troubleshooting," additional help can be provided by calling Whirlpool. Repairs...
... instruct you need service, first see the "Troubleshooting" section of the Use & Care Guide. Repairs when your appliance if it is installed in an inaccessible location or is used for FSP® replacement parts and repair labor to the appliance. 9. The removal and reinstallation of your major appliance is not installed in accordance with electrical or plumbing codes, or use . 4. After checking "Troubleshooting," additional help can be provided by calling Whirlpool. Repairs...


