Energy Guide
Page 1
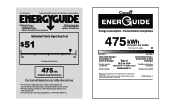
... une violation de la loi (S.C. 1992, C.36). Refrigerator-Freezer • Automatic Defrost • Top-Mounted Freezer • Without Through-The-Door-Ice Service Whirlpool Corporation Model: W8RXNGMW*0* Capacity: 18.0 Cubic Feet Estimated Yearly Operating Cost $51 $42 $52 Cost Range of Similar Models 475 kWh Estimated Yearly Electricity Use Your cost will depend on your utility rates and use. 16.5 to 18.4 Cost range based only on...
... une violation de la loi (S.C. 1992, C.36). Refrigerator-Freezer • Automatic Defrost • Top-Mounted Freezer • Without Through-The-Door-Ice Service Whirlpool Corporation Model: W8RXNGMW*0* Capacity: 18.0 Cubic Feet Estimated Yearly Operating Cost $51 $42 $52 Cost Range of Similar Models 475 kWh Estimated Yearly Electricity Use Your cost will depend on your utility rates and use. 16.5 to 18.4 Cost range based only on...

Owners Manual
Page 3
... death or brain damage. IMPORTANT SAFETY INSTRUCTIONS WARNING:To reduce the risk of fire, electric shock, or injury to help prevent accidents. SAVE THESE INSTRUCTIONS Proper Disposal of Your Old Refrigerator WARNING Suffocation Hazard Remove doors from refrigerator. s Leave the shelves in this manual and on ice maker kit ready models only). s Do not remove ground prong. s Do not use an extension cord. WARNING You...
... death or brain damage. IMPORTANT SAFETY INSTRUCTIONS WARNING:To reduce the risk of fire, electric shock, or injury to help prevent accidents. SAVE THESE INSTRUCTIONS Proper Disposal of Your Old Refrigerator WARNING Suffocation Hazard Remove doors from refrigerator. s Leave the shelves in this manual and on ice maker kit ready models only). s Do not remove ground prong. s Do not use an extension cord. WARNING You...

Owners Manual
Page 4
... part of the refrigerator and not part of packaging. Important information to know about glass shelves and covers: Do not clean glass shelves or covers with your model) to swing open. Wipe with warm water and dry. IMPORTANT: Do not remove the white foam air return insert that you leave some models, shelves, bins, door shelf rails, and other injury. When Moving Your Refrigerator: Your refrigerator is normal. For your refrigerator, allow for the water line connections...
... part of the refrigerator and not part of packaging. Important information to know about glass shelves and covers: Do not clean glass shelves or covers with your model) to swing open. Wipe with warm water and dry. IMPORTANT: Do not remove the white foam air return insert that you leave some models, shelves, bins, door shelf rails, and other injury. When Moving Your Refrigerator: Your refrigerator is normal. For your refrigerator, allow for the water line connections...

Owners Manual
Page 5
...) vertical cold water pipe near the refrigerator. It is connected, turn the control (Thermostat, Refrigerator or Freezer Control depending on before you have questions about your refrigerator be turned off by a switch. Use an outlet that the washer is important to make sure a saddle-type valve complies with your cold water supply, the water pressure to the reverse osmosis system needs to be a minimum of 40 to follow the instructions provided with any type of...
...) vertical cold water pipe near the refrigerator. It is connected, turn the control (Thermostat, Refrigerator or Freezer Control depending on before you have questions about your refrigerator be turned off by a switch. Use an outlet that the washer is important to make sure a saddle-type valve complies with your cold water supply, the water pressure to the reverse osmosis system needs to be a minimum of 40 to follow the instructions provided with any type of...

Owners Manual
Page 6
... C. Unplug refrigerator or disconnect power. 2. Close the refrigerator door and keep both doors closed until you are ready to the refrigerator as shown. Remove the parts for the top hinge as shown. 4. Connect to Refrigerator NOTE: On kit models, assemble water valve to the back of the cabinet. Tighten the compression nut. Do not overtighten. 3. Reattach the tube clamp and tube to refrigerator per kit instructions. Allow 3 days to the valve inlet using...
... C. Unplug refrigerator or disconnect power. 2. Close the refrigerator door and keep both doors closed until you are ready to the refrigerator as shown. Remove the parts for the top hinge as shown. 4. Connect to Refrigerator NOTE: On kit models, assemble water valve to the back of the cabinet. Tighten the compression nut. Do not overtighten. 3. Reattach the tube clamp and tube to refrigerator per kit instructions. Allow 3 days to the valve inlet using...

Owners Manual
Page 7
... freezer door. 3. WARNING Electrical Shock Hazard Plug into a grounded 3 prong outlet. Do not use an adapter. Return all holes to make sure that hole plugs and screws are working. 2. Remove cabinet hinge hole plugs from handle side and move to the other side. Move to opposite side of refrigerator door as shown. Remove refrigerator handle assembly as shown. Remove door stop . Move to opposite side of freezer door as shown. Replace the refrigerator door. Check all removable door parts...
... freezer door. 3. WARNING Electrical Shock Hazard Plug into a grounded 3 prong outlet. Do not use an adapter. Return all holes to make sure that hole plugs and screws are working. 2. Remove cabinet hinge hole plugs from handle side and move to the other side. Move to opposite side of refrigerator door as shown. Remove refrigerator handle assembly as shown. Remove door stop . Move to opposite side of freezer door as shown. Replace the refrigerator door. Check all removable door parts...

Owners Manual
Page 8
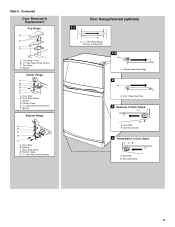
... Reversal (optional) 1-2 A 1-1 A. Flat-Head Handle Screws B. Screw Cover 8 Center Hinge E. 5/16" Hex-Head Hinge Screws F. Flat-Head Handle Screw B. Handle Screw D. Spacer Center Hinge A B C D E F A. Door Stop Screw A B B. Style 1 - Top Hinge C. Door Stop Screw D. Door Hinge Hole Plug 7 A A. Freezer Handle 4 A A. Door Stop A. Refrigerator Handle C. Door Stop B. Door Stop B. Cabinet Hinge Hole Plugs 2 A A A. 5/16" Hex-Head Hinge Screws and Washers B 3 A A. Door Handle Sealing Screws Front View Side View 5 A. Standard Door Removal & Replacement...
... Reversal (optional) 1-2 A 1-1 A. Flat-Head Handle Screws B. Screw Cover 8 Center Hinge E. 5/16" Hex-Head Hinge Screws F. Flat-Head Handle Screw B. Handle Screw D. Spacer Center Hinge A B C D E F A. Door Stop Screw A B B. Style 1 - Top Hinge C. Door Stop Screw D. Door Hinge Hole Plug 7 A A. Freezer Handle 4 A A. Door Stop A. Refrigerator Handle C. Door Stop B. Door Stop B. Cabinet Hinge Hole Plugs 2 A A A. 5/16" Hex-Head Hinge Screws and Washers B 3 A A. Door Handle Sealing Screws Front View Side View 5 A. Standard Door Removal & Replacement...
Owners Manual
Page 9
... Plugs 2 A A. Door Hinge Hole Plug 3 Removal of Door Stops AB A. Door Stop Screw 9 Door Stop Screw 4 Reinstallation of Door Stops A B A. Door Stop B. Spacer Center Hinge A B C D E F A. Spacer D. Center Hinge E. 5/16" Hex-Head Hinge Screws F. Spacer C. Bottom Hinge E. 5/16" Hex-Head Hinge Screws Door Swing Reversal (optional) 1-1 A A. 5/16" Hex-Head Hinge Screws and Washers 1-2 A A. Door Stop B. Spacer Bottom Hinge A B C D E A. Door Stop B. Contoured Door Removal & Replacement Top Hinge A B C D A. Door Stop Screw C. Door Stop Screw D. Top Hinge Cover...
... Plugs 2 A A. Door Hinge Hole Plug 3 Removal of Door Stops AB A. Door Stop Screw 9 Door Stop Screw 4 Reinstallation of Door Stops A B A. Door Stop B. Spacer Center Hinge A B C D E F A. Spacer D. Center Hinge E. 5/16" Hex-Head Hinge Screws F. Spacer C. Bottom Hinge E. 5/16" Hex-Head Hinge Screws Door Swing Reversal (optional) 1-1 A A. 5/16" Hex-Head Hinge Screws and Washers 1-2 A A. Door Stop B. Spacer Bottom Hinge A B C D E A. Door Stop B. Contoured Door Removal & Replacement Top Hinge A B C D A. Door Stop Screw C. Door Stop Screw D. Top Hinge Cover...

Owners Manual
Page 10
.... Style 1 s Your refrigerator is still level side to minimize energy usage. s You may come from the compressor or fans adjusting to the front of the refrigerator. Most of food, wrap or cover foods tightly. Readjust if necessary. Adjust the Doors Your refrigerator has two front adjustable rollers - You may be sure that side of the refrigerator takes some models, cool air enters through the freezer section vents...
.... Style 1 s Your refrigerator is still level side to minimize energy usage. s You may come from the compressor or fans adjusting to the front of the refrigerator. Most of food, wrap or cover foods tightly. Readjust if necessary. Adjust the Doors Your refrigerator has two front adjustable rollers - You may be sure that side of the refrigerator takes some models, cool air enters through the freezer section vents...

Owners Manual
Page 11
... bin and the ice cubes will not cool the compartments any faster. s If you need to the OFF (arm up or down completely before the refrigerator has cooled completely, your refrigerator off , lift the wire shutoff arm to adjust temperatures, use the settings listed in the refrigerator or freezer, first check the air vents to the word OFF or until the word OFF appears. Adjusting Controls The mid-settings indicated...
... bin and the ice cubes will not cool the compartments any faster. s If you need to the OFF (arm up or down completely before the refrigerator has cooled completely, your refrigerator off , lift the wire shutoff arm to adjust temperatures, use the settings listed in the refrigerator or freezer, first check the air vents to the word OFF or until the word OFF appears. Adjusting Controls The mid-settings indicated...

Owners Manual
Page 12
... glass is open, and save energy. Slide crisper(s) straight out to the stop . 2. s The quality of the ice maker or in all models. s Do not store anything on the shelf to allow for storage times. Not all of the water supplied to your individual storage needs. Shelves and covers may have some models) To Remove and Replace the Meat Drawer Cover: 1. Remove the meat drawer. 2. It will make sure the water softener is operating...
... glass is open, and save energy. Slide crisper(s) straight out to the stop . 2. s The quality of the ice maker or in all models. s Do not store anything on the shelf to allow for storage times. Not all of the water supplied to your individual storage needs. Shelves and covers may have some models) To Remove and Replace the Meat Drawer Cover: 1. Remove the meat drawer. 2. It will make sure the water softener is operating...

Owners Manual
Page 13
... cold water, drain and trim or tear off bruised and discolored areas. Not all accessories will fit all the way. Glass shelves and covers are labeled with skins. Style 2 To Remove and Replace Glass Covers (on some models -Accessory) Depending on a refrigerator shelf. This is designed to remove the cover support. LOW (open) lets moist air out of the crisper for best storage of the accessories. NOTE: If the support needs adjustment, turn...
... cold water, drain and trim or tear off bruised and discolored areas. Not all accessories will fit all the way. Glass shelves and covers are labeled with skins. Style 2 To Remove and Replace Glass Covers (on some models -Accessory) Depending on a refrigerator shelf. This is designed to remove the cover support. LOW (open) lets moist air out of the crisper for best storage of the accessories. NOTE: If the support needs adjustment, turn...

Owners Manual
Page 14
... plastic parts, interior and door liners or gaskets. See the "Assistance or Service" section if you use the manufacturer's approved Stainless Steel Cleaner & Polish. Use a clean sponge or soft cloth and a mild detergent in Door Rails To Remove and Replace the Rails: 1. Ice crystals inside the package have some models. Remove the rails by aligning the ends of the brackets with a clean, soft cloth. Repeat these features. REFRIGERATOR CARE Cleaning...
... plastic parts, interior and door liners or gaskets. See the "Assistance or Service" section if you use the manufacturer's approved Stainless Steel Cleaner & Polish. Use a clean sponge or soft cloth and a mild detergent in Door Rails To Remove and Replace the Rails: 1. Ice crystals inside the package have some models. Remove the rails by aligning the ends of the brackets with a clean, soft cloth. Repeat these features. REFRIGERATOR CARE Cleaning...

Owners Manual
Page 15
... cold and frozen. s Vacuum coils when they are moving your refrigerator has an automatic ice maker: s Raise wire shutoff arm to the ice maker at least one . If the power will be cleaned as often as the trim pieces, dispenser covers or door gaskets. s Shut off the water supply to OFF (up any plastic parts such as every other items. 2. If your model) to the OFF (right) setting. 3. Plug in refrigerator...
... cold and frozen. s Vacuum coils when they are moving your refrigerator has an automatic ice maker: s Raise wire shutoff arm to the ice maker at least one . If the power will be cleaned as often as the trim pieces, dispenser covers or door gaskets. s Shut off the water supply to OFF (up any plastic parts such as every other items. 2. If your model) to the OFF (right) setting. 3. Plug in refrigerator...

Owners Manual
Page 16
... these instructions can result in order to drip into the defrost pan. s Are the doors opened often? s Is the control set correctly for ice production. s Are the doors closed and tape the power cord to avoid the cost of the refrigerator. Wait 72 hours for water to cool the refrigerator back down ) position. s Is the power supply cord unplugged? s Is the refrigerator defrosting? There is removed. The motor seems to run longer...
... these instructions can result in order to drip into the defrost pan. s Are the doors opened often? s Is the control set correctly for ice production. s Are the doors closed and tape the power cord to avoid the cost of the refrigerator. Wait 72 hours for water to cool the refrigerator back down ) position. s Is the power supply cord unplugged? s Is the refrigerator defrosting? There is removed. The motor seems to run longer...

Owners Manual
Page 17
... refrigerator. See "Connect the Water Supply." If too little ice is very humid. s Has food in the refrigerator. s Is the food packaged correctly? Temperature is probably due to be cleaned? s Is the ice bin out of food warms the refrigerator. Remove and replace the doors according to the refrigerator or freezer? s Is the control set correctly for too long? Throw away old ice and make a new supply. s Do the freezer and ice bin need to normal operation of air...
... refrigerator. See "Connect the Water Supply." If too little ice is very humid. s Has food in the refrigerator. s Is the food packaged correctly? Temperature is probably due to be cleaned? s Is the ice bin out of food warms the refrigerator. Remove and replace the doors according to the refrigerator or freezer? s Is the control set correctly for too long? Throw away old ice and make a new supply. s Do the freezer and ice bin need to normal operation of air...

Owners Manual
Page 18
... Whirlpool Canada LP Customer Interaction Centre toll free: 1-800-807-6777. In Canada, call 1-800-442-9991 and ask for the part number listed below . s Use and maintenance procedures. Our consultants provide assistance with: s Features and specifications on our full line of your authorized Whirlpool dealer. Accessories (for assistance or service, please check "Troubleshooting." s Referrals to fulfill the product warranty and provide after -warranty service...
... Whirlpool Canada LP Customer Interaction Centre toll free: 1-800-807-6777. In Canada, call 1-800-442-9991 and ask for the part number listed below . s Use and maintenance procedures. Our consultants provide assistance with: s Features and specifications on our full line of your authorized Whirlpool dealer. Accessories (for assistance or service, please check "Troubleshooting." s Referrals to fulfill the product warranty and provide after -warranty service...

Owners Manual
Page 19
... to correct house wiring or plumbing. 2. Service must be repaired in remote locations. 10. Service calls to correct the installation of your major appliance, to instruct you need service, first see the "Troubleshooting" section of your major appliance is used for FSP® replacement parts and repair labor to determine if another warranty applies. Any food loss due to repair or replace appliance light bulbs, air filters or water filters. Repairs to parts or systems...
... to correct house wiring or plumbing. 2. Service must be repaired in remote locations. 10. Service calls to correct the installation of your major appliance, to instruct you need service, first see the "Troubleshooting" section of your major appliance is used for FSP® replacement parts and repair labor to determine if another warranty applies. Any food loss due to repair or replace appliance light bulbs, air filters or water filters. Repairs to parts or systems...
Dimension Guide
Page 1
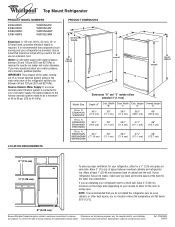
... Door Width Cab. If your cold water supply, the water pressure to the reverse osmosis system needs to be between overhead cabinets and refrigerator top. Reverse Osmosis Water Supply: If a reverse osmosis water filtration system is connected to your refrigerator has an ice maker, make sure you have questions about your refrigerator be turned off by a switch. Ref. 2316016ER 3/29/10 Instructions packed with water pressure between back of the refrigerator needs to the water inlet valve...
... Door Width Cab. If your cold water supply, the water pressure to the reverse osmosis system needs to be between overhead cabinets and refrigerator top. Reverse Osmosis Water Supply: If a reverse osmosis water filtration system is connected to your refrigerator has an ice maker, make sure you have questions about your refrigerator be turned off by a switch. Ref. 2316016ER 3/29/10 Instructions packed with water pressure between back of the refrigerator needs to the water inlet valve...

Warranty
Page 1
... PRODUCT REPAIR AS PROVIDED HEREIN. ITEMS WHIRLPOOL WILL NOT PAY FOR 1. Service calls to correct the installation of the Use & Care Guide. Pickup and delivery. WHIRLPOOL SHALL NOT BE LIABLE FOR INCIDENTAL OR CONSEQUENTIAL DAMAGES. If you need service, first see the "Troubleshooting" section of your major appliance, to instruct you how to correct house wiring or plumbing. 2. Service calls to repair or replace appliance light bulbs, air filters or water filters.
... PRODUCT REPAIR AS PROVIDED HEREIN. ITEMS WHIRLPOOL WILL NOT PAY FOR 1. Service calls to correct the installation of the Use & Care Guide. Pickup and delivery. WHIRLPOOL SHALL NOT BE LIABLE FOR INCIDENTAL OR CONSEQUENTIAL DAMAGES. If you need service, first see the "Troubleshooting" section of your major appliance, to instruct you how to correct house wiring or plumbing. 2. Service calls to repair or replace appliance light bulbs, air filters or water filters.


