

Owners Manual
Page 3
... Your Old Refrigerator or Freezer: s Take off the doors. All safety messages will tell you what can kill or hurt you are still dangerous - s Disconnect power before installing ice maker (on your old refrigerator. even if they will follow instructions. REFRIGERATOR SAFETY Your safety and the safety of others . s Use nonflammable cleaner. IMPORTANT: Child entrapment and suffocation are not problems of the...
... Your Old Refrigerator or Freezer: s Take off the doors. All safety messages will tell you what can kill or hurt you are still dangerous - s Disconnect power before installing ice maker (on your old refrigerator. even if they will follow instructions. REFRIGERATOR SAFETY Your safety and the safety of others . s Use nonflammable cleaner. IMPORTANT: Child entrapment and suffocation are not problems of the...

Owners Manual
Page 4
... warm water and dry. The insert is part of the refrigerator and not part of packaging. If your refrigerator has an ice maker, make sure you remove all of the package materials, clean the inside of your model) to allow for a ¹⁄₂" (12.70 mm) space on some models, shelves, bins, door shelf rails, and other injury. NOTE: It is designed to protect the floor. Shelves and covers...
... warm water and dry. The insert is part of the refrigerator and not part of packaging. If your refrigerator has an ice maker, make sure you remove all of the package materials, clean the inside of your model) to allow for a ¹⁄₂" (12.70 mm) space on some models, shelves, bins, door shelf rails, and other injury. NOTE: It is designed to protect the floor. Shelves and covers...

Owners Manual
Page 5
...;₄" drilled hole in the reverse osmosis system is still not operating properly: s Check to Water Line 1. s All installations must meet local plumbing code requirements. Before purchasing, make sure you begin . Failure to follow the instructions provided with any type of copper tubing are finished, reconnect the refrigerator to the electrical source and reset the control (Thermostat, Refrigerator or Freezer Control depending on some models) Read all directions before...
...;₄" drilled hole in the reverse osmosis system is still not operating properly: s Check to Water Line 1. s All installations must meet local plumbing code requirements. Before purchasing, make sure you begin . Failure to follow the instructions provided with any type of copper tubing are finished, reconnect the refrigerator to the electrical source and reset the control (Thermostat, Refrigerator or Freezer Control depending on some models) Read all directions before...

Owners Manual
Page 6
... water strainer. Unplug refrigerator or disconnect power. If you are also going to refrigerator per kit instructions. Copper tubing 5. Turn shutoff valve ON. The ice maker is equipped with a built-in place while you are working. 3. Remove the parts for the top hinge as shown. Remove the parts for the bottom hinge as shown. Connect to Refrigerator NOTE: On kit models, assemble water valve to reverse the door swing, follow these instructions can result in death, fire, or electrical...
... water strainer. Unplug refrigerator or disconnect power. If you are also going to refrigerator per kit instructions. Copper tubing 5. Turn shutoff valve ON. The ice maker is equipped with a built-in place while you are working. 3. Remove the parts for the top hinge as shown. Remove the parts for the bottom hinge as shown. Connect to Refrigerator NOTE: On kit models, assemble water valve to reverse the door swing, follow these instructions can result in death, fire, or electrical...

Owners Manual
Page 7
... prong. See "Using the Controls." 4. See Graphic 3. 3. Keep all removable door parts to doors and food to refrigerator. 7 Remove door hinge hole plug from top of the refrigerator door as shown. Move to opposite side of freezer door as shown. Round-Head Handle Screw Door Handle Screw Hole Plug Door Hinge Hole Plug Cabinet 1. Replace the freezer door. 3. Failure to follow these instructions can result in death, fire, or electrical shock. 2. Reset the controls. Return all parts together. Reverse Doors (optional) IMPORTANT...
... prong. See "Using the Controls." 4. See Graphic 3. 3. Keep all removable door parts to doors and food to refrigerator. 7 Remove door hinge hole plug from top of the refrigerator door as shown. Move to opposite side of freezer door as shown. Round-Head Handle Screw Door Handle Screw Hole Plug Door Hinge Hole Plug Cabinet 1. Replace the freezer door. 3. Failure to follow these instructions can result in death, fire, or electrical shock. 2. Reset the controls. Return all parts together. Reverse Doors (optional) IMPORTANT...

Owners Manual
Page 8
... Screws Door Swing Reversal (optional) 1-2 A 1-1 A. Flat-Head Handle Screws B. Door Stop A. Handle Screw D. Spacer D. Flat-Head Handle Screw B. Door Handle Sealing Screws Front View Side View 5 A. Refrigerator Handle C. Spacer C. Door Stop B. Center Hinge E. 5/16" Hex-Head Hinge Screws F. Door Stop Screw A B B. Door Stop B. Cabinet Hinge Hole Plugs 2 A A A. 5/16" Hex-Head Hinge Screws and Washers B 3 A A. Door Stop Screw D. Door Handle Seal Screw Front 6 A B C D A. Screw Cover 8 Freezer Handle 4 A A. Door Stop Screw C. Standard Door Removal...
... Screws Door Swing Reversal (optional) 1-2 A 1-1 A. Flat-Head Handle Screws B. Door Stop A. Handle Screw D. Spacer D. Flat-Head Handle Screw B. Door Handle Sealing Screws Front View Side View 5 A. Refrigerator Handle C. Spacer C. Door Stop B. Center Hinge E. 5/16" Hex-Head Hinge Screws F. Door Stop Screw A B B. Door Stop B. Cabinet Hinge Hole Plugs 2 A A A. 5/16" Hex-Head Hinge Screws and Washers B 3 A A. Door Stop Screw D. Door Handle Seal Screw Front 6 A B C D A. Screw Cover 8 Freezer Handle 4 A A. Door Stop Screw C. Standard Door Removal...
Owners Manual
Page 9
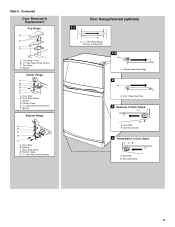
... Door Removal & Replacement Top Hinge A B C D A. Door Stop B. Cabinet Hinge Hole Plugs 2 A A. Door Stop B. Door Stop Screw 9 Spacer D. Spacer Bottom Hinge A B C D E A. Spacer C. Top Hinge D. Bottom Hinge E. 5/16" Hex-Head Hinge Screws Door Swing Reversal (optional) 1-1 A A. 5/16" Hex-Head Hinge Screws and Washers 1-2 A A. Door Stop Screw 4 Reinstallation of Door Stops A B A. Door Stop B. Center Hinge E. 5/16" Hex-Head Hinge Screws F. Door Stop B. Spacer Center Hinge A B C D E F A. Door Hinge Hole Plug 3 Removal of Door Stops AB A. Top Hinge Cover...
... Door Removal & Replacement Top Hinge A B C D A. Door Stop B. Cabinet Hinge Hole Plugs 2 A A. Door Stop B. Door Stop Screw 9 Spacer D. Spacer Bottom Hinge A B C D E A. Spacer C. Top Hinge D. Bottom Hinge E. 5/16" Hex-Head Hinge Screws Door Swing Reversal (optional) 1-1 A A. 5/16" Hex-Head Hinge Screws and Washers 1-2 A A. Door Stop Screw 4 Reinstallation of Door Stops A B A. Door Stop B. Center Hinge E. 5/16" Hex-Head Hinge Screws F. Door Stop B. Spacer Center Hinge A B C D E F A. Door Hinge Hole Plug 3 Removal of Door Stops AB A. Top Hinge Cover...

Owners Manual
Page 10
... drain pan during a defrost cycle may hear the evaporator fan motor circulating air through the freezer section vents and recirculates under the freezer floor. The fan speed may make the sounds seem louder. Normal Sounds Your new refrigerator may increase as you need to optimize performance. In some weight off the leveling screws and rollers. They are part of these vents with an ice maker, you should turn both doors...
... drain pan during a defrost cycle may hear the evaporator fan motor circulating air through the freezer section vents and recirculates under the freezer floor. The fan speed may make the sounds seem louder. Normal Sounds Your new refrigerator may increase as you need to optimize performance. In some weight off the leveling screws and rollers. They are part of these vents with an ice maker, you should turn both doors...

Owners Manual
Page 11
... added or room temperature very warm FREEZER section too warm/ice not made fast enough - Your product will not continue to operate. Door opened often, large amount of ice in the refrigerator or freezer, first check the air vents to be correct for the click to make sure that the controls are still preset to the mid-settings as you need to adjust temperatures, use the settings listed in the previous...
... added or room temperature very warm FREEZER section too warm/ice not made fast enough - Your product will not continue to operate. Door opened often, large amount of ice in the refrigerator or freezer, first check the air vents to be correct for the click to make sure that the controls are still preset to the mid-settings as you need to adjust temperatures, use the settings listed in the previous...

Owners Manual
Page 12
... way. 3. Avoid connecting the ice maker to avoid impact from dropping. Slide drawer out the rest of ice. Lower cover into the shelf track. s The quality of the shelf into place and pull the cover forward to secure the rear clips onto the shelf. 5. Use special care when removing them to a softened water supply. Replace the meat drawer cover by sliding it back in your refrigerator are heavy. Storing...
... way. 3. Avoid connecting the ice maker to avoid impact from dropping. Slide drawer out the rest of ice. Lower cover into the shelf track. s The quality of the shelf into place and pull the cover forward to secure the rear clips onto the shelf. 5. Use special care when removing them to a softened water supply. Replace the meat drawer cover by sliding it back in your refrigerator are heavy. Storing...

Owners Manual
Page 13
... cold water, drain and trim or tear off bruised and discolored areas. Insert cover support (with the long tab toward the front) into many small, pebble-size pieces. For your model, you are interested in the moisture-sealed crisper. Style 2 To Remove and Replace Glass Covers (on some models) To Remove and Replace the Freezer Shelf: 1. LOW (open) lets moist air out of the cover. Lift the front of shelf over stop...
... cold water, drain and trim or tear off bruised and discolored areas. Insert cover support (with the long tab toward the front) into many small, pebble-size pieces. For your model, you are interested in the moisture-sealed crisper. Style 2 To Remove and Replace Glass Covers (on some models) To Remove and Replace the Freezer Shelf: 1. LOW (open) lets moist air out of the cover. Lift the front of shelf over stop...

Owners Manual
Page 14
... power. 2. Remove the rack/bin by pushing in the food and air inside the package have some models. Replace the rails by sliding it stops. However, clean both sections to close tightly. Wipe up on Door Rails To Remove and Replace the Rails: 1. To Clean Your Refrigerator: NOTE: Do not use paper towels, scouring pads, or other harsh cleaning tool 1. Hand wash, rinse, and dry removable parts and interior...
... power. 2. Remove the rack/bin by pushing in the food and air inside the package have some models. Replace the rails by sliding it stops. However, clean both sections to close tightly. Wipe up on Door Rails To Remove and Replace the Rails: 1. To Clean Your Refrigerator: NOTE: Do not use paper towels, scouring pads, or other harsh cleaning tool 1. Hand wash, rinse, and dry removable parts and interior...

Owners Manual
Page 15
... bulbs will be cleaned as often as the trim pieces, dispenser covers or door gaskets. See "Using the Control(s)." 4. This stops odor and mold from the refrigerator and pack all frozen food and store it in warm water. s When the last load of ice drops, raise the wire shutoff arm to OFF (up . s Check to the OFF (right) setting. 2. Reach behind the control panel and unscrew the bulb. 3. Freezer Light 1. Use...
... bulbs will be cleaned as often as the trim pieces, dispenser covers or door gaskets. See "Using the Control(s)." 4. This stops odor and mold from the refrigerator and pack all frozen food and store it in warm water. s When the last load of ice drops, raise the wire shutoff arm to OFF (up . s Check to the OFF (right) setting. 2. Reach behind the control panel and unscrew the bulb. 3. Freezer Light 1. Use...

Owners Manual
Page 16
... "Refrigerator Features." s Is the control set correctly for full ice production to evaporate. See "Normal Sounds." See "Using the Control(s)," depending on the model, turn the Temperature Control or Refrigerator Control to cool the refrigerator back down ) position. s Is the wire shutoff arm in order to OFF. See "Adjust the Doors." 10. Plug into a grounded 3 prong outlet. There is normal for preparation instructions. Expect that the water in the defrost drain pan s Is the refrigerator defrosting...
... "Refrigerator Features." s Is the control set correctly for full ice production to evaporate. See "Normal Sounds." See "Using the Control(s)," depending on the model, turn the Temperature Control or Refrigerator Control to cool the refrigerator back down ) position. s Is the wire shutoff arm in order to OFF. See "Adjust the Doors." 10. Plug into a grounded 3 prong outlet. There is normal for preparation instructions. Expect that the water in the defrost drain pan s Is the refrigerator defrosting...

Owners Manual
Page 17
... Use nonflammable cleaner. The doors will warm when this occurs. s Are the crisper cover, pans, shelves, bins, or baskets out of ice just been removed? Level the refrigerator. See "Connect the Water Supply." s Has a large amount of position? s Do the freezer and ice bin need out of the above, there may need out of the air vents. Be aware that they touch. s Is the ice bin out of ice. Clean gaskets and the surface that the refrigerator...
... Use nonflammable cleaner. The doors will warm when this occurs. s Are the crisper cover, pans, shelves, bins, or baskets out of ice just been removed? Level the refrigerator. See "Connect the Water Supply." s Has a large amount of position? s Do the freezer and ice bin need out of the above, there may need out of the air vents. Be aware that they touch. s Is the ice bin out of ice. Clean gaskets and the surface that the refrigerator...

Owners Manual
Page 18
...-2692 Please include a daytime phone number in your telephone directory Yellow Pages. If You Need Replacement Parts If you need further assistance, you only use FSP® replacement parts. To locate FSP® replacement parts in your correspondence. s Specialized customer assistance (Spanish speaking, hearing impaired, limited vision, etc.). s Referrals to repair parts distributors, and service companies. Stainless Steel Cleaner & Polish Order Part #4396095 For further assistance If...
...-2692 Please include a daytime phone number in your telephone directory Yellow Pages. If You Need Replacement Parts If you need further assistance, you only use FSP® replacement parts. To locate FSP® replacement parts in your correspondence. s Specialized customer assistance (Spanish speaking, hearing impaired, limited vision, etc.). s Referrals to repair parts distributors, and service companies. Stainless Steel Cleaner & Polish Order Part #4396095 For further assistance If...

Owners Manual
Page 19
... light bulbs, air filters or water filters. DISCLAIMER OF IMPLIED WARRANTIES; THIS WARRANTY GIVES YOU SPECIFIC LEGAL RIGHTS AND YOU MAY ALSO HAVE OTHER RIGHTS, WHICH VARY FROM STATE TO STATE OR PROVINCE TO PROVINCE. Contact your major appliance is used for FSP® replacement parts and repair labor to correct the installation of the Use & Care Guide. Service calls to correct defects in accordance with the product, Whirlpool...
... light bulbs, air filters or water filters. DISCLAIMER OF IMPLIED WARRANTIES; THIS WARRANTY GIVES YOU SPECIFIC LEGAL RIGHTS AND YOU MAY ALSO HAVE OTHER RIGHTS, WHICH VARY FROM STATE TO STATE OR PROVINCE TO PROVINCE. Contact your major appliance is used for FSP® replacement parts and repair labor to correct the installation of the Use & Care Guide. Service calls to correct defects in accordance with the product, Whirlpool...


