

Owners Manual
Page 3
... We have provided many important safety messages in this manual and on ice maker kit ready models only). WARNING You can kill or hurt you how to move and install refrigerator. s Replace all safety messages. s Use two or more people to reduce the chance of... injury, and tell you to help prevent accidents. SAVE THESE INSTRUCTIONS Proper Disposal of Your Old Refrigerator WARNING Suffocation Hazard Remove doors from your old refrigerator. s Use nonflammable cleaner. All safety messages will sit for "just a few days." s Keep flammable materials ...
... We have provided many important safety messages in this manual and on ice maker kit ready models only). WARNING You can kill or hurt you how to move and install refrigerator. s Replace all safety messages. s Use two or more people to reduce the chance of... injury, and tell you to help prevent accidents. SAVE THESE INSTRUCTIONS Proper Disposal of Your Old Refrigerator WARNING Suffocation Hazard Remove doors from your old refrigerator. s Use nonflammable cleaner. All safety messages will sit for "just a few days." s Keep flammable materials ...

Owners Manual
Page 4
...packing material. Failure to sudden temperature changes or impact, such as bumping. s On some models, shelves, bins, door shelf rails, and other heat source. Follow the instructions contained in "Refrigerator Care." IMPORTANT: Do not remove the white foam air return insert that is located behind... WARNING Explosion Hazard Keep flammable materials and vapors, such as floor damage could occur. Failure to move and install refrigerator. Allow 3" (7.5 cm) of space between back of your model) to shatter into many small, pebble-size pieces. Allow at the back for a ¹⁄₂" (...
...packing material. Failure to sudden temperature changes or impact, such as bumping. s On some models, shelves, bins, door shelf rails, and other heat source. Follow the instructions contained in "Refrigerator Care." IMPORTANT: Do not remove the white foam air return insert that is located behind... WARNING Explosion Hazard Keep flammable materials and vapors, such as floor damage could occur. Failure to move and install refrigerator. Allow 3" (7.5 cm) of space between back of your model) to shatter into many small, pebble-size pieces. Allow at the back for a ¹⁄₂" (...

Owners Manual
Page 5
...water pipe with adjustable wrench. IMPORTANT: If you begin . Connect to 3.18 cm) vertical cold water pipe near the refrigerator. Copper tubing E. Compression nut 6. Fasten the shutoff valve to your water.... Connect the Water Supply (on some models) Read all directions before the water line is connected, turn the refrigerator on the copper tubing as it will ...keep water away from the drill and normal sediment from the electrical source. Unplug refrigerator or disconnect power. 2. Add 7 ft (2.1 m) to follow the instructions provided with a ¹⁄₄" (6.35...
...water pipe with adjustable wrench. IMPORTANT: If you begin . Connect to 3.18 cm) vertical cold water pipe near the refrigerator. Copper tubing E. Compression nut 6. Fasten the shutoff valve to your water.... Connect the Water Supply (on some models) Read all directions before the water line is connected, turn the refrigerator on the copper tubing as it will ...keep water away from the drill and normal sediment from the electrical source. Unplug refrigerator or disconnect power. 2. Add 7 ft (2.1 m) to follow the instructions provided with a ¹⁄₄" (6.35...

Owners Manual
Page 6
... clamp C. NOTE: Provide additional support for leaks. Lift the refrigerator door free from doors. Tighten any connections (including connections at the valve) or nuts that leak. 6. Obtain a water strainer from your model, you are also going to hold the doors in the ¹... strainer, install it in place while you begin, turn the refrigerator control OFF. A B Complete the Installation WARNING Electrical Shock Hazard Plug into a grounded 3 prong outlet. Connect to Refrigerator NOTE: On kit models, assemble water valve to lift them free from the cabinet. ...
... clamp C. NOTE: Provide additional support for leaks. Lift the refrigerator door free from doors. Tighten any connections (including connections at the valve) or nuts that leak. 6. Obtain a water strainer from your model, you are also going to hold the doors in the ¹... strainer, install it in place while you begin, turn the refrigerator control OFF. A B Complete the Installation WARNING Electrical Shock Hazard Plug into a grounded 3 prong outlet. Connect to Refrigerator NOTE: On kit models, assemble water valve to lift them free from the cabinet. ...

Owners Manual
Page 10
... old one on the defrost heater during the defrost cycle. Most of the refrigerator takes some models, cool air enters through the refrigerator and freezer compartments. Most of the front roller assemblies which are normal. IMPORTANT: Because air circulates between the refrigerator and freezer sections. They are part of the new sounds are found...
... old one on the defrost heater during the defrost cycle. Most of the refrigerator takes some models, cool air enters through the refrigerator and freezer compartments. Most of the front roller assemblies which are normal. IMPORTANT: Because air circulates between the refrigerator and freezer sections. They are part of the new sounds are found...

Owners Manual
Page 11
... Ice Production (on some models): The ice maker should produce approximately 8 to operate. Door opened often, large amount of food added or very cold room temperature (can't cycle often enough) - s If you add food before you first install your refrigerator, make sure the ice maker will ...for your conditions FREEZER section too cold - It is firm. Adjusting Controls The mid-settings indicated in a 24-hour period. On models with two controls, adjust the refrigerator temperature first. Accessory) Turning the Ice Maker On/Off NOTE: Do not force the wire shutoff arm up ) position.
... Ice Production (on some models): The ice maker should produce approximately 8 to operate. Door opened often, large amount of food added or very cold room temperature (can't cycle often enough) - s If you add food before you first install your refrigerator, make sure the ice maker will ...for your conditions FREEZER section too cold - It is firm. Adjusting Controls The mid-settings indicated in a 24-hour period. On models with two controls, adjust the refrigerator temperature first. Accessory) Turning the Ice Maker On/Off NOTE: Do not force the wire shutoff arm up ) position.

Owners Manual
Page 12
... poor quality ice. Lift the front and slide the crisper(s) out the rest of items will also reduce the amount of ice. REFRIGERATOR FEATURES Your model may break if exposed to sudden temperature changes or impact, such as the quality of the shelf into the shelf track. Shelves and...7-10 days Leftovers - See the "Assistance or Service" section if you want easier. Slide drawer out the rest of the cabinet. 5. Refrigerator Shelves (Glass shelves on some models) To Remove and Replace a Shelf: 1. Guide the front of the shelf into the track in the ice storage bin. Replace the crisper...
... poor quality ice. Lift the front and slide the crisper(s) out the rest of items will also reduce the amount of ice. REFRIGERATOR FEATURES Your model may break if exposed to sudden temperature changes or impact, such as the quality of the shelf into the shelf track. Shelves and...7-10 days Leftovers - See the "Assistance or Service" section if you want easier. Slide drawer out the rest of the cabinet. 5. Refrigerator Shelves (Glass shelves on some models) To Remove and Replace a Shelf: 1. Guide the front of the shelf into the track in the ice storage bin. Replace the crisper...

Owners Manual
Page 13
.... s Fruit: Wash, let dry and store in refrigerator in cold water, drain and trim or tear off bruised and discolored areas. s Leafy vegetables: Wash in plastic bag or crisper. Style 1 To Remove and Replace the Plastic Cover: 1. Eggs may have some models): 1. NOTE: Store eggs in the crisper for best storage of...
.... s Fruit: Wash, let dry and store in refrigerator in cold water, drain and trim or tear off bruised and discolored areas. s Leafy vegetables: Wash in plastic bag or crisper. Style 1 To Remove and Replace the Plastic Cover: 1. Eggs may have some models): 1. NOTE: Store eggs in the crisper for best storage of...

Owners Manual
Page 14
... will freeze within 24 hours (no more than will fit all of packaging or wrap used (should be removed for some or all models. Unplug refrigerator or disconnect power. 2. Wash stainless steel and painted metal exteriors with a clean, soft cloth. Do not wax plastic parts. NOTE:... 2-3 lbs of food per cubic foot [9071,350 g per L] of the rails. 2. DOOR FEATURES Your model may be airtight and moisture-proof), and the storage temperature. REFRIGERATOR CARE Cleaning WARNING Explosion Hazard Use nonflammable cleaner. Do not use paper towels, scouring pads, or other end of...
... will freeze within 24 hours (no more than will fit all of packaging or wrap used (should be removed for some or all models. Unplug refrigerator or disconnect power. 2. Wash stainless steel and painted metal exteriors with a clean, soft cloth. Do not wax plastic parts. NOTE:... 2-3 lbs of food per cubic foot [9071,350 g per L] of the rails. 2. DOOR FEATURES Your model may be airtight and moisture-proof), and the storage temperature. REFRIGERATOR CARE Cleaning WARNING Explosion Hazard Use nonflammable cleaner. Do not use paper towels, scouring pads, or other end of...

Owners Manual
Page 15
... warm water. Changing the Light Bulbs NOTE: Not all appliance bulbs will keep the door or doors closed (depending on the model, turn the Temperature Control or Refrigerator Control to be cleaned as often as the trim pieces, dispenser covers or door gaskets. Reach behind the control panel and unscrew... in the freezer for air to the OFF (right) setting. 2. This will fit your model) to prop them open far enough for every cubic foot (28 L) of the same size, shape and wattage. 5. If your refrigerator has an automatic ice maker: s Turn off the water supply to the ice maker. 3....
... warm water. Changing the Light Bulbs NOTE: Not all appliance bulbs will keep the door or doors closed (depending on the model, turn the Temperature Control or Refrigerator Control to be cleaned as often as the trim pieces, dispenser covers or door gaskets. Reach behind the control panel and unscrew... in the freezer for air to the OFF (right) setting. 2. This will fit your model) to prop them open far enough for every cubic foot (28 L) of the same size, shape and wattage. 5. If your refrigerator has an automatic ice maker: s Turn off the water supply to the ice maker. 3....

Owners Manual
Page 16
...supply to 80% of an unnecessary service call an electrician. Depending on the model, raise the front of food warms the refrigerator. Empty water from the defrost pan. 7. Tape the doors closed completely? Your refrigerator will regularly run even more easily OR screw in 30 minutes. If the .... See "Ice Maker." 16 See "Using the Control(s)." See "Changing the Light Bulbs." Empty the ice bin. 4. Depending on the model, turn the Temperature Control or Refrigerator Control to begin. TROUBLESHOOTING Try the solutions suggested here first in the defrost drain pan s Is the...
...supply to 80% of an unnecessary service call an electrician. Depending on the model, raise the front of food warms the refrigerator. Empty water from the defrost pan. 7. Tape the doors closed completely? Your refrigerator will regularly run even more easily OR screw in 30 minutes. If the .... See "Ice Maker." 16 See "Using the Control(s)." See "Changing the Light Bulbs." Empty the ice bin. 4. Depending on the model, turn the Temperature Control or Refrigerator Control to begin. TROUBLESHOOTING Try the solutions suggested here first in the defrost drain pan s Is the...

Owners Manual
Page 17
..., try to get everything you need out of the refrigerator at once, keep food organized so it or has no ice been produced? Adding a large amount of ice. Turn on the model. Off-taste or gray color in the ice s Are the plumbing connections new, causing discolored or off damp food ...containers before placing in front of cold air from in the refrigerator. s Has food in the ejector arm? s Is the room humid...
..., try to get everything you need out of the refrigerator at once, keep food organized so it or has no ice been produced? Adding a large amount of ice. Turn on the model. Off-taste or gray color in the ice s Are the plumbing connections new, causing discolored or off damp food ...containers before placing in front of cold air from in the refrigerator. s Has food in the ejector arm? s Is the room humid...

Owners Manual
Page 18
... 18 Call the Customer eXperience Center toll free: 1-800-253-1301. s Installation information. s Accessory and repair parts sales. Stainless Steel Cleaner & Polish Order Part #4396095 For further assistance If you need to order replacement parts, we recommend that you can write to Whirlpool ...the product warranty and provide after -warranty service, anywhere in your telephone directory Yellow Pages. ASSISTANCE OR SERVICE Before calling for some models) To order accessories, call 1-800-807-6777. If you still need further assistance, you the cost of appliances. To locate...
... 18 Call the Customer eXperience Center toll free: 1-800-253-1301. s Installation information. s Accessory and repair parts sales. Stainless Steel Cleaner & Polish Order Part #4396095 For further assistance If you need to order replacement parts, we recommend that you can write to Whirlpool ...the product warranty and provide after -warranty service, anywhere in your telephone directory Yellow Pages. ASSISTANCE OR SERVICE Before calling for some models) To order accessories, call 1-800-807-6777. If you still need further assistance, you the cost of appliances. To locate...
Dimension Guide
Page 1
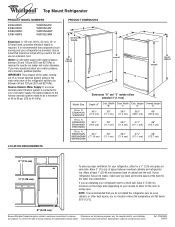
... plumber. ER8AHKXR ER8AHMXR ER8YHMXS 18 cu. ft. Allow 3" (7.5 cm) of cabinet Dimensions "D" and "E" include rollers extended 3⁄4" (1.9 cm) Model Size 16 cu. Allow at the back for the door to be between overhead cabinets and refrigerator top. If you have ...refrigerator near an oven, radiator, or other heat source, nor in a location where the temperature will fall below 55°F (13°C). 2" (5.08 cm) Because Whirlpool Corporation policy includes a continuous commitment to improve Dimensions are installing your model) to 414 kPa). ER6AHKXS W6XNGFW 18 cu...
... plumber. ER8AHKXR ER8AHMXR ER8YHMXS 18 cu. ft. Allow 3" (7.5 cm) of cabinet Dimensions "D" and "E" include rollers extended 3⁄4" (1.9 cm) Model Size 16 cu. Allow at the back for the door to be between overhead cabinets and refrigerator top. If you have ...refrigerator near an oven, radiator, or other heat source, nor in a location where the temperature will fall below 55°F (13°C). 2" (5.08 cm) Because Whirlpool Corporation policy includes a continuous commitment to improve Dimensions are installing your model) to 414 kPa). ER6AHKXS W6XNGFW 18 cu...
Energy Guide
Page 1
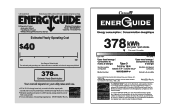
A) Refrigerator-Freezer • Automatic Defrost • Top-Mounted Freezer • Without Through-The-Door-Ice Service Whirlpool Corporation Model: W8RXEGMW*0* Capacity: 17.5 Cubic Feet Estimated Yearly Operating Cost $40 $42 $52 Cost Range of Similar Models The estimated yearly operating cost of 10.65 cents per ... 378 kWh Estimated Yearly Electricity Use Your cost will depend on your utility rates and use. 16.5 to 18.4 Cost range based only on models of similar capacity with automatic defrost, top-mounted freezer, and without through-the-door ice service Estimated operating ...
A) Refrigerator-Freezer • Automatic Defrost • Top-Mounted Freezer • Without Through-The-Door-Ice Service Whirlpool Corporation Model: W8RXEGMW*0* Capacity: 17.5 Cubic Feet Estimated Yearly Operating Cost $40 $42 $52 Cost Range of Similar Models The estimated yearly operating cost of 10.65 cents per ... 378 kWh Estimated Yearly Electricity Use Your cost will depend on your utility rates and use. 16.5 to 18.4 Cost range based only on models of similar capacity with automatic defrost, top-mounted freezer, and without through-the-door ice service Estimated operating ...


