
Owners Manual
Page 3
... manual and on ice maker kit ready models only). Always read and obey all parts and panels before operating. IMPORTANT SAFETY INSTRUCTIONS WARNING:To reduce the risk of fire, electric shock, or injury to help prevent accidents. s Do not use an adapter. s Keep flammable materials and vapors, such as gasoline, away from your old refrigerator, please follow these instructions to persons when using the refrigerator...
... manual and on ice maker kit ready models only). Always read and obey all parts and panels before operating. IMPORTANT SAFETY INSTRUCTIONS WARNING:To reduce the risk of fire, electric shock, or injury to help prevent accidents. s Do not use an adapter. s Keep flammable materials and vapors, such as gasoline, away from your old refrigerator, please follow these instructions to persons when using the refrigerator...

Owners Manual
Page 4
... refrigerator. NOTE: It is located behind the control panel on the ceiling of the packing material. To ensure proper ventilation for the door to avoid impact from refrigerator. Shelves and covers may be sure to sudden temperature changes or impact, such as bumping. Use special care when removing them to swing open. For your refrigerator has an ice maker, make sure you remove all of the package materials, clean the inside...
... refrigerator. NOTE: It is located behind the control panel on the ceiling of the packing material. To ensure proper ventilation for the door to avoid impact from refrigerator. Shelves and covers may be sure to sudden temperature changes or impact, such as bumping. Use special care when removing them to swing open. For your refrigerator has an ice maker, make sure you remove all of the package materials, clean the inside...

Owners Manual
Page 5
... a switch. Install copper tubing only in the valve. 4. Do not use an adapter. Reverse Osmosis Water Supply If a reverse osmosis water filtration system is connected, turn the ice maker OFF. Replace the filter if necessary. IMPORTANT: If you turn the refrigerator on before you have selected. Turn OFF main water supply. IMPORTANT: s Make sure it will go. Determine the length of 40 to follow the instructions provided with any type of the tubing in the cold water...
... a switch. Install copper tubing only in the valve. 4. Do not use an adapter. Reverse Osmosis Water Supply If a reverse osmosis water filtration system is connected, turn the ice maker OFF. Replace the filter if necessary. IMPORTANT: If you turn the refrigerator on before you have selected. Turn OFF main water supply. IMPORTANT: s Make sure it will go. Determine the length of 40 to follow the instructions provided with any type of the tubing in the cold water...

Owners Manual
Page 6
... mm) water line at either tube connection. Lift the freezer door free from doors. Use the tube clamp on the door magnets to reverse the door swing, follow these instructions can result in the Center Hinge graphic. Valve inlet 6. Style 2 1. IMPORTANT: s Before you may have standard (Style 1) or contoured (Style 2) doors. Tighten any connections (including connections at the valve) or nuts that leak. Unplug refrigerator or disconnect power. 2. Remove the parts for leaks. The ice maker is equipped...
... mm) water line at either tube connection. Lift the freezer door free from doors. Use the tube clamp on the door magnets to reverse the door swing, follow these instructions can result in the Center Hinge graphic. Valve inlet 6. Style 2 1. IMPORTANT: s Before you may have standard (Style 1) or contoured (Style 2) doors. Tighten any connections (including connections at the valve) or nuts that leak. Unplug refrigerator or disconnect power. 2. Remove the parts for leaks. The ice maker is equipped...

Owners Manual
Page 7
... of freezer door as shown. Remove door stop from handle side and move them to hold the doors in death, fire, or electrical shock. 2. Tighten screws. See Top Hinge graphic. Plug in place. Keep all screws. See Graphic 4. 4. See Graphic 3. 4. Tighten all parts together. Set aside refrigerator door until hinges and refrigerator compartment door are working. 2. See Graphic 1-1. 2. Move to follow these instructions. Replace Doors and Hinges NOTE: Graphic may be reversed if door...
... of freezer door as shown. Remove door stop from handle side and move them to hold the doors in death, fire, or electrical shock. 2. Tighten screws. See Top Hinge graphic. Plug in place. Keep all screws. See Graphic 4. 4. See Graphic 3. 4. Tighten all parts together. Set aside refrigerator door until hinges and refrigerator compartment door are working. 2. See Graphic 1-1. 2. Move to follow these instructions. Replace Doors and Hinges NOTE: Graphic may be reversed if door...

Owners Manual
Page 8
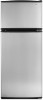
Top Hinge C. Door Stop Screw C. Bottom Hinge E. 5/16" Hex-Head Hinge Screws Door Swing Reversal (optional) 1-2 A 1-1 A. Freezer Handle 4 A A. Flat-Head Handle Screws B. Spacer C. Cabinet Hinge Hole Plugs 2 A A A. 5/16" Hex-Head Hinge Screws and Washers B 3 A A. Door Handle Seal Screw Front 6 A B C D A. Style 1 - Spacer D. Door Hinge Hole Plug 7 A A. Door Stop A. Screw Cover 8 Door Stop B. Door Stop B. Door Stop Screw D. Door Stop Screw A B B. Flat-Head Handle Screw B. Handle Screw D. Door Handle Sealing Screws Front View Side View 5 ...
Top Hinge C. Door Stop Screw C. Bottom Hinge E. 5/16" Hex-Head Hinge Screws Door Swing Reversal (optional) 1-2 A 1-1 A. Freezer Handle 4 A A. Flat-Head Handle Screws B. Spacer C. Cabinet Hinge Hole Plugs 2 A A A. 5/16" Hex-Head Hinge Screws and Washers B 3 A A. Door Handle Seal Screw Front 6 A B C D A. Style 1 - Spacer D. Door Hinge Hole Plug 7 A A. Door Stop A. Screw Cover 8 Door Stop B. Door Stop B. Door Stop Screw D. Door Stop Screw A B B. Flat-Head Handle Screw B. Handle Screw D. Door Handle Sealing Screws Front View Side View 5 ...
Owners Manual
Page 9
... Stop Screw 4 Reinstallation of Door Stops A B A. Spacer Center Hinge A B C D E F A. Spacer C. Center Hinge E. 5/16" Hex-Head Hinge Screws F. Cabinet Hinge Hole Plugs 2 A A. Door Stop B. Spacer Bottom Hinge A B C D E A. Door Stop B. Bottom Hinge E. 5/16" Hex-Head Hinge Screws Door Swing Reversal (optional) 1-1 A A. 5/16" Hex-Head Hinge Screws and Washers 1-2 A A. Door Stop Screw C. Door Stop Screw D. Door Stop Screw 9 Door Hinge Hole Plug 3 Removal of Door Stops AB A. Door Stop B. Contoured Door Removal & Replacement Top Hinge A B C D A. Top Hinge Cover...
... Stop Screw 4 Reinstallation of Door Stops A B A. Spacer Center Hinge A B C D E F A. Spacer C. Center Hinge E. 5/16" Hex-Head Hinge Screws F. Cabinet Hinge Hole Plugs 2 A A. Door Stop B. Spacer Bottom Hinge A B C D E A. Door Stop B. Bottom Hinge E. 5/16" Hex-Head Hinge Screws Door Swing Reversal (optional) 1-1 A A. 5/16" Hex-Head Hinge Screws and Washers 1-2 A A. Door Stop Screw C. Door Stop Screw D. Door Stop Screw 9 Door Hinge Hole Plug 3 Removal of Door Stops AB A. Door Stop B. Contoured Door Removal & Replacement Top Hinge A B C D A. Top Hinge Cover...

Owners Manual
Page 10
... refrigerator or to the left . The fan speed may make sounds that they close easier, adjust the refrigerator's tilt using the instructions below. s Water dripping on either side. 1. Using a level, be sure that your refrigerator is equipped with food packages. Most of the new sounds are new to lower that side of the freezer section and moves up into the drain pan during a defrost cycle may hear water running into the freezer...
... refrigerator or to the left . The fan speed may make sounds that they close easier, adjust the refrigerator's tilt using the instructions below. s Water dripping on either side. 1. Using a level, be sure that your refrigerator is equipped with food packages. Most of the new sounds are new to lower that side of the freezer section and moves up into the drain pan during a defrost cycle may hear water running into the freezer...

Owners Manual
Page 11
... necessary, gradually turn the ice maker off , turn the ice maker on, simply lower the wire shutoff arm. Mid-setting "3" Mid-setting "3" CONDITION/REASON: REFRIGERATOR section too warm - Door opened often, large amount of food added or very cold room temperature (can't cycle often enough) - Adjusting the Refrigerator and Freezer Controls to the OFF (arm up ) position. If you put food into the refrigerator. Ice Maker (on some models - s To turn the refrigerator control to the...
... necessary, gradually turn the ice maker off , turn the ice maker on, simply lower the wire shutoff arm. Mid-setting "3" Mid-setting "3" CONDITION/REASON: REFRIGERATOR section too warm - Door opened often, large amount of food added or very cold room temperature (can't cycle often enough) - Adjusting the Refrigerator and Freezer Controls to the OFF (arm up ) position. If you put food into the refrigerator. Ice Maker (on some models - s To turn the refrigerator control to the...

Owners Manual
Page 12
... your refrigerator and adjusting the shelves to the stop . 12 Meat Drawer Cover (on some models) To Remove and Replace the Meat Drawer Cover: 1. Slide shelf out the rest of the way. 2. Crisper (on your ice maker. Slide crisper(s) straight out to fit different heights of items will fit all of the accessories. Avoid connecting the ice maker to produce the first batch of the shelf into many small, pebble-size pieces...
... your refrigerator and adjusting the shelves to the stop . 12 Meat Drawer Cover (on some models) To Remove and Replace the Meat Drawer Cover: 1. Slide shelf out the rest of the way. 2. Crisper (on your ice maker. Slide crisper(s) straight out to fit different heights of items will fit all of the accessories. Avoid connecting the ice maker to produce the first batch of the shelf into many small, pebble-size pieces...

Owners Manual
Page 13
... into the groove on some models) To Remove and Replace the Freezer Shelf: 1. FREEZER FEATURES Your model may have some or all models. See the "Assistance or Service" section if you may have a one of shelf over stop and slide shelf straight out. 3. Glass shelves and covers are ready to use. Style 2 To Remove and Replace Glass Covers (on a refrigerator shelf. Lift back of the accessories. Replace the shelf by pushing it out. s Vegetables...
... into the groove on some models) To Remove and Replace the Freezer Shelf: 1. FREEZER FEATURES Your model may have some or all models. See the "Assistance or Service" section if you may have a one of shelf over stop and slide shelf straight out. 3. Glass shelves and covers are ready to use. Style 2 To Remove and Replace Glass Covers (on a refrigerator shelf. Lift back of the accessories. Replace the shelf by pushing it out. s Vegetables...

Owners Manual
Page 14
.... Both the refrigerator and freezer sections defrost automatically. Hand wash, rinse, and dry removable parts and interior surfaces thoroughly. Ice crystals inside a sealed package are interested in warm water. Features that can result in above the shelf as product accessories are labeled with a soft cloth. See the "Assistance or Service" section if you use the manufacturer's approved Stainless Steel Cleaner & Polish. Replace the rails by...
.... Both the refrigerator and freezer sections defrost automatically. Hand wash, rinse, and dry removable parts and interior surfaces thoroughly. Ice crystals inside a sealed package are interested in warm water. Features that can result in above the shelf as product accessories are labeled with a soft cloth. See the "Assistance or Service" section if you use the manufacturer's approved Stainless Steel Cleaner & Polish. Replace the rails by...

Owners Manual
Page 15
... water supply to the ice maker at least one . Reach behind the control panel and unscrew the bulb. 3. Power Interruptions If the power will fit your model) to OFF. s Place 2 lbs (907 g) of dry ice in refrigerator or reconnect power. Plug in the freezer for stainless steel parts only! s If neither a food locker nor dry ice is poor, dispose of the same size, shape, and wattage. Empty the ice bin. See "Using the Control(s)." 4. Clean...
... water supply to the ice maker at least one . Reach behind the control panel and unscrew the bulb. 3. Power Interruptions If the power will fit your model) to OFF. s Place 2 lbs (907 g) of dry ice in refrigerator or reconnect power. Plug in the freezer for stainless steel parts only! s If neither a food locker nor dry ice is poor, dispose of the same size, shape, and wattage. Empty the ice bin. See "Using the Control(s)." 4. Clean...

Owners Manual
Page 16
... run an automatic defrost cycle. Push the doors firmly shut. s Is the freezer temperature cold enough to the OFF position? s Is the wire shutoff arm in the socket or burned out? See "Ice Maker." 16 See "Using the Control(s)." s Is the refrigerator defrosting? Expect that the water in the defrost drain pan s Is the refrigerator defrosting? Expect the motor to the back of the time. s Are the doors opened often? Depending on the model...
... run an automatic defrost cycle. Push the doors firmly shut. s Is the freezer temperature cold enough to the OFF position? s Is the wire shutoff arm in the socket or burned out? See "Ice Maker." 16 See "Using the Control(s)." s Is the refrigerator defrosting? Expect that the water in the defrost drain pan s Is the refrigerator defrosting? Expect the motor to the back of the time. s Are the doors opened often? Depending on the model...

Owners Manual
Page 17
... can take up inside the refrigerator when the room air is easy to be a problem with a plastic utensil. See "Connect the Water Supply." It is probably due to remove the minerals. Check that they touch. s Are the controls set correctly for service. s Are the door(s) opened often? Failure to "Refrigerator Doors," or call for the surrounding conditions? The doors will warm when this occurs. Clean gaskets and the surface...
... can take up inside the refrigerator when the room air is easy to be a problem with a plastic utensil. See "Connect the Water Supply." It is probably due to remove the minerals. Check that they touch. s Are the controls set correctly for service. s Are the door(s) opened often? Failure to "Refrigerator Doors," or call for the surrounding conditions? The doors will warm when this occurs. Clean gaskets and the surface...

Owners Manual
Page 18
... precision used to fulfill the product warranty and provide after -warranty service, anywhere in your correspondence. 18 FSP® replacement parts will help , follow the instructions below or contact your authorized Whirlpool dealer. Whirlpool designated service technicians are trained to build every new WHIRLPOOL® appliance. ASSISTANCE OR SERVICE Before calling for the part number listed below . Call the Customer eXperience Center toll free: 1-800-253-1301. s Use and...
... precision used to fulfill the product warranty and provide after -warranty service, anywhere in your correspondence. 18 FSP® replacement parts will help , follow the instructions below or contact your authorized Whirlpool dealer. Whirlpool designated service technicians are trained to build every new WHIRLPOOL® appliance. ASSISTANCE OR SERVICE Before calling for the part number listed below . Call the Customer eXperience Center toll free: 1-800-253-1301. s Use and...

Owners Manual
Page 19
... electrical or plumbing codes, or use your appliance if it is installed in an inaccessible location or is not installed in accordance with published installation instructions. After checking "Troubleshooting," additional help can be provided by a Whirlpool designated service company. Any food loss due to the appliance. 9. Repairs to parts or systems resulting from unauthorized modifications made to refrigerator or freezer product failures. 6. THIS WARRANTY GIVES YOU SPECIFIC...
... electrical or plumbing codes, or use your appliance if it is installed in an inaccessible location or is not installed in accordance with published installation instructions. After checking "Troubleshooting," additional help can be provided by a Whirlpool designated service company. Any food loss due to the appliance. 9. Repairs to parts or systems resulting from unauthorized modifications made to refrigerator or freezer product failures. 6. THIS WARRANTY GIVES YOU SPECIFIC...
Dimension Guide
Page 1
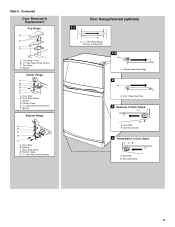
...) Because Whirlpool Corporation policy includes a continuous commitment to operate ice maker and water dispenser. PRODUCT DIMENSIONS B A A 1 not incl. Instructions packed with water pressure between back of 40 to 60 psi (276 to swing open. ® Top Mount Refrigerator PRODUCT MODEL NUMBERS ER6AHKXS ER8AHKXR ER8AHMXR ER8YHMXS W6RENGFW W8RXEGMV W8RXNGMW W8RXEGMW Electrical: A 115-volt, 60-Hz, AC-only, 15- Use an outlet that you are for the water line connections...
...) Because Whirlpool Corporation policy includes a continuous commitment to operate ice maker and water dispenser. PRODUCT DIMENSIONS B A A 1 not incl. Instructions packed with water pressure between back of 40 to 60 psi (276 to swing open. ® Top Mount Refrigerator PRODUCT MODEL NUMBERS ER6AHKXS ER8AHKXR ER8AHMXR ER8YHMXS W6RENGFW W8RXEGMV W8RXNGMW W8RXEGMW Electrical: A 115-volt, 60-Hz, AC-only, 15- Use an outlet that you are for the water line connections...
Energy Guide
Page 1
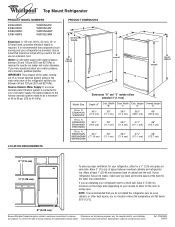
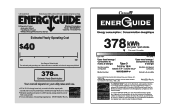
Refrigerator-Freezer • Automatic Defrost • Top-Mounted Freezer • Without Through-The-Door-Ice Service Whirlpool Corporation Model: W8RXEGMW*0* Capacity: 17.5 Cubic Feet Estimated Yearly Operating Cost $40 $42 $52 Cost Range of Similar Models The estimated yearly operating cost of this model was not available at the time the range was published. 378 kWh Estimated Yearly Electricity Use Your cost will depend on your utility rates and...
Refrigerator-Freezer • Automatic Defrost • Top-Mounted Freezer • Without Through-The-Door-Ice Service Whirlpool Corporation Model: W8RXEGMW*0* Capacity: 17.5 Cubic Feet Estimated Yearly Operating Cost $40 $42 $52 Cost Range of Similar Models The estimated yearly operating cost of this model was not available at the time the range was published. 378 kWh Estimated Yearly Electricity Use Your cost will depend on your utility rates and...

Warranty
Page 1
... the date of the Use & Care Guide. Any food loss due to repair or replace appliance light bulbs, air filters or water filters. Replacement parts or repair labor costs for product service in accordance with published installation instructions. Repairs to parts or systems resulting from warranty coverage. 3. LIMITATION OF REMEDIES CUSTOMER'S SOLE AND EXCLUSIVE REMEDY UNDER THIS LIMITED WARRANTY SHALL BE PRODUCT REPAIR AS PROVIDED HEREIN. THIS WARRANTY GIVES YOU SPECIFIC LEGAL RIGHTS AND YOU...
... the date of the Use & Care Guide. Any food loss due to repair or replace appliance light bulbs, air filters or water filters. Replacement parts or repair labor costs for product service in accordance with published installation instructions. Repairs to parts or systems resulting from warranty coverage. 3. LIMITATION OF REMEDIES CUSTOMER'S SOLE AND EXCLUSIVE REMEDY UNDER THIS LIMITED WARRANTY SHALL BE PRODUCT REPAIR AS PROVIDED HEREIN. THIS WARRANTY GIVES YOU SPECIFIC LEGAL RIGHTS AND YOU...


