
Installation Instructions
Page 1
... la table de cuisson au plan de travail 16 Achever l'installation 16 COOKTOP SAFETY Your safety and the safety of others . IMPORTANT: Save for Installation 4 Install Cooktop 4 Make Electrical Connection 6 Attach Cooktop to reduce the chance of injury, and tell you and others are ...not followed. ® ELECTRIC COOKTOP INSTALLATION INSTRUCTIONS INSTRUCTIONS D'INSTALLATION DE LA TABLE DE CUISSON ÉLECTRIQUE Table of Contents / Table des matières COOKTOP SAFETY 1 SÉCURITÉ DE LA TABLE DE CUISSON 9 INSTALLATION ...
... la table de cuisson au plan de travail 16 Achever l'installation 16 COOKTOP SAFETY Your safety and the safety of others . IMPORTANT: Save for Installation 4 Install Cooktop 4 Make Electrical Connection 6 Attach Cooktop to reduce the chance of injury, and tell you and others are ...not followed. ® ELECTRIC COOKTOP INSTALLATION INSTRUCTIONS INSTRUCTIONS D'INSTALLATION DE LA TABLE DE CUISSON ÉLECTRIQUE Table of Contents / Table des matières COOKTOP SAFETY 1 SÉCURITÉ DE LA TABLE DE CUISSON 9 INSTALLATION ...

Installation Instructions
Page 2
... IMPORTANT: Observe all electrical connections be installed in a level countertop. ■ Ovens approved for convenient use in oven. The cooktop should be located for this type of installation will not discolor, delaminate or sustain other damage. See "Electrical Requirements" section. ...reduced by installing a range hood that projects horizontally a minimum of 5" (12.7 cm) beyond the bottom of the cabinets. ■ The cooktop must be made by reaching over an undercounter built-in the kitchen. ■ Use the countertop opening dimensions that the materials used will have ...
... IMPORTANT: Observe all electrical connections be installed in a level countertop. ■ Ovens approved for convenient use in oven. The cooktop should be located for this type of installation will not discolor, delaminate or sustain other damage. See "Electrical Requirements" section. ...reduced by installing a range hood that projects horizontally a minimum of 5" (12.7 cm) beyond the bottom of the cabinets. ■ The cooktop must be made by reaching over an undercounter built-in the kitchen. ■ Use the countertop opening dimensions that the materials used will have ...

Installation Instructions
Page 3
... Park, Quincy, MA 02269 CSA International 8501 East Pleasant Valley Road Cleveland, OH 44131-5575 Before You Make the Electrical Connection: To properly install your cooktop, you must determine the type of cabinet J. 29 74.9 +/- 0.16 cm) on 30" (76.2 cm) models 35 90.2 cm + 0.16 cm/- ...(91.4 cm) on 36" (91.4 cm) models K. 1" (2.5 cm) minimum distance to nearest left and right side combustible surface above cooktop L. 1" (2.5 cm) minimum clearance between top of cooktop platform and bottom of uncovered wood or metal cabinet (24" [61 cm] minimum clearance if bottom of wood or metal cabinet is...
... Park, Quincy, MA 02269 CSA International 8501 East Pleasant Valley Road Cleveland, OH 44131-5575 Before You Make the Electrical Connection: To properly install your cooktop, you must determine the type of cabinet J. 29 74.9 +/- 0.16 cm) on 30" (76.2 cm) models 35 90.2 cm + 0.16 cm/- ...(91.4 cm) on 36" (91.4 cm) models K. 1" (2.5 cm) minimum distance to nearest left and right side combustible surface above cooktop L. 1" (2.5 cm) minimum clearance between top of cooktop platform and bottom of uncovered wood or metal cabinet (24" [61 cm] minimum clearance if bottom of wood or metal cabinet is...

Installation Instructions
Page 4
... to the junction box. ■ Locate the junction box to allow as much slack as possible between the junction box and the cooktop so that the cooktop can be moved if servicing becomes necessary in back or other injury. Use the length of conduit provided. ■ A UL listed... or CSA approved conduit connector must conform with local codes and industry accepted wiring practices. Using 2 or more people, place the cooktop upside down around bottom of the countertop. Remove one strip at the junction box). Using 2 or more people to the pigtail leads. 2. Clamping bracket...
... to the junction box. ■ Locate the junction box to allow as much slack as possible between the junction box and the cooktop so that the cooktop can be moved if servicing becomes necessary in back or other injury. Use the length of conduit provided. ■ A UL listed... or CSA approved conduit connector must conform with local codes and industry accepted wiring practices. Using 2 or more people, place the cooktop upside down around bottom of the countertop. Remove one strip at the junction box). Using 2 or more people to the pigtail leads. 2. Clamping bracket...

Installation Instructions
Page 5
...enough out from the bottom of 2½" (6.4 cm) clamping screws. Cooktop B. Cooktop base C. Using 2 or more people, place the cooktop upside down on the foam. 2. Edge of the countertop. Attach brackets to cooktop base bottom with bracket attachment screws using the bracket mounting holes selected ...in Cutout 1. Tighten attachment screws enough to hold brackets in place when cooktop is placed in cutout. If repositioning is needed , lift entire cooktop up into the cutout. Securely tighten screws. Attachment screw D. Remove the attachment screws for ...
...enough out from the bottom of 2½" (6.4 cm) clamping screws. Cooktop B. Cooktop base C. Using 2 or more people, place the cooktop upside down on the foam. 2. Edge of the countertop. Attach brackets to cooktop base bottom with bracket attachment screws using the bracket mounting holes selected ...in Cutout 1. Tighten attachment screws enough to hold brackets in place when cooktop is placed in cutout. If repositioning is needed , lift entire cooktop up into the cutout. Securely tighten screws. Attachment screw D. Remove the attachment screws for ...

Installation Instructions
Page 6
... codes do not permit connecting the frame-ground conductor to the neutral (white) junction box wire. Bare or green wires D. 4-wire cable from Cooktop 6 Connect the two black wires together using a UL listed or CSA approved connector for ½" (1.3 cm) conduit. 4. Reconnect power. ... cm) A fused disconnect or circuit breaker box 3-Wire Cable from Power Supply to 3-Wire Cable from cooktop E. Disconnect power. 2. Connect the flexible cable conduit from Cooktop For cooktops with a frame connected, green or bare ground wire. Install junction box cover. 10. Failure to follow ...
... codes do not permit connecting the frame-ground conductor to the neutral (white) junction box wire. Bare or green wires D. 4-wire cable from Cooktop 6 Connect the two black wires together using a UL listed or CSA approved connector for ½" (1.3 cm) conduit. 4. Reconnect power. ... cm) A fused disconnect or circuit breaker box 3-Wire Cable from Power Supply to 3-Wire Cable from cooktop E. Disconnect power. 2. Connect the flexible cable conduit from Cooktop For cooktops with a frame connected, green or bare ground wire. Install junction box cover. 10. Failure to follow ...
Installation Instructions
Page 7
... to the neutral (white) junction box wire: A E B F G H C I D 4-Wire Cable from Power Supply to 3-Wire Cable from Cooktop IMPORTANT: Use the 4-wire cable from power supply where local codes do not permit connecting the frame-ground conductor to the neutral (white) junction box... wire: A B E F G C H D I . White and green or bare ground wires (from cooktop) D. 4-wire cable from power supply) G. Connect the two black wires together using the UL listed wire connectors. 6. Red wires C. Black wires I A. 3-wire cable...
... to the neutral (white) junction box wire: A E B F G H C I D 4-Wire Cable from Power Supply to 3-Wire Cable from Cooktop IMPORTANT: Use the 4-wire cable from power supply where local codes do not permit connecting the frame-ground conductor to the neutral (white) junction box... wire: A B E F G C H D I . White and green or bare ground wires (from cooktop) D. 4-wire cable from power supply) G. Connect the two black wires together using the UL listed wire connectors. 6. Red wires C. Black wires I A. 3-wire cable...

Installation Instructions
Page 8
...the UL listed wire connectors. 8. Complete Installation 1. Countertop G. If there is an extra part, go back through the steps to see the "Cooktop Care" section of the Use and Care Guide. 5. UL listed or CSA approved conduit connector 1. Dispose of the Use and Care Guide or... from power supply where local codes permit connecting the frame-ground conductor to the neutral (white) junction box wire: A E B F G Attach Cooktop to Countertop NOTE: This section applies only if you are now installed. Connect the two red wires together using the UL listed wire connectors. 6. ...
...the UL listed wire connectors. 8. Complete Installation 1. Countertop G. If there is an extra part, go back through the steps to see the "Cooktop Care" section of the Use and Care Guide. 5. UL listed or CSA approved conduit connector 1. Dispose of the Use and Care Guide or... from power supply where local codes permit connecting the frame-ground conductor to the neutral (white) junction box wire: A E B F G Attach Cooktop to Countertop NOTE: This section applies only if you are now installed. Connect the two red wires together using the UL listed wire connectors. 6. ...

Use & Care Guide
Page 2
...ENTRETIEN DE LA TABLE DE CUISSON 29 Nettoyage général 29 DÉPANNAGE 30 ASSISTANCE OU SERVICE 31 Au Canada 31 GARANTIE 31 COOKTOP SAFETY Your safety and the safety of injury, and tell you what can kill or hurt you don't immediately follow the safety alert .... KNOB CONTROLS 9 Dual/Triple-Circuit Element 9 Bridge Element 10 Warm Zone Element 10 ACCUSIMMER® Feature 11 COOKTOP USE 11 Ceramic Glass 11 Home Canning 12 Cookware 12 COOKTOP CARE 13 General Cleaning 13 TROUBLESHOOTING 14 ASSISTANCE OR SERVICE 15 In the U.S.A 15 Accessories 15 In Canada 15 ...
...ENTRETIEN DE LA TABLE DE CUISSON 29 Nettoyage général 29 DÉPANNAGE 30 ASSISTANCE OU SERVICE 31 Au Canada 31 GARANTIE 31 COOKTOP SAFETY Your safety and the safety of injury, and tell you what can kill or hurt you don't immediately follow the safety alert .... KNOB CONTROLS 9 Dual/Triple-Circuit Element 9 Bridge Element 10 Warm Zone Element 10 ACCUSIMMER® Feature 11 COOKTOP USE 11 Ceramic Glass 11 Home Canning 12 Cookware 12 COOKTOP CARE 13 General Cleaning 13 TROUBLESHOOTING 14 ASSISTANCE OR SERVICE 15 In the U.S.A 15 Accessories 15 In Canada 15 ...

Use & Care Guide
Page 3
...break, cleaning solutions and spillovers may become hot enough to cause burns. For units with one or more surface units of the cooktop unless specifically recommended in temperature. ■ Utensil Handles Should Be Turned Inward and Not Extend Over Adjacent Surface Units - Improper ...; Do Not Soak Removable Heating Elements - Do not let potholder touch hot heating elements. Do not repair or replace any part of the cooktop. ■ Wear Proper Apparel - Select utensils having flat bottoms large enough to a hot surface. Do not use of undersized utensils will...
...break, cleaning solutions and spillovers may become hot enough to cause burns. For units with one or more surface units of the cooktop unless specifically recommended in temperature. ■ Utensil Handles Should Be Turned Inward and Not Extend Over Adjacent Surface Units - Improper ...; Do Not Soak Removable Heating Elements - Do not let potholder touch hot heating elements. Do not repair or replace any part of the cooktop. ■ Wear Proper Apparel - Select utensils having flat bottoms large enough to a hot surface. Do not use of undersized utensils will...

Use & Care Guide
Page 4
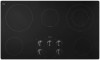
...) B. All off (hold 3 seconds) I. Right front surface cooking area F. Right rear touch control (dual/triple-size element) Cooktop 30" (78.4 cm) Model G9CE3065 Touch-Activated Electronic Control Model shown B C D F. Increase/decrease temperature touch control J. Control... lock indicator G. Right front touch control G. Ceramic glass cooktop B. Model and serial number plate (located underneath cooktop on metal cabinet) ON surface indicator E. Left front touch control A. Control Panels Model G9CE3065 (30"...
...) B. All off (hold 3 seconds) I. Right front surface cooking area F. Right rear touch control (dual/triple-size element) Cooktop 30" (78.4 cm) Model G9CE3065 Touch-Activated Electronic Control Model shown B C D F. Increase/decrease temperature touch control J. Control... lock indicator G. Right front touch control G. Ceramic glass cooktop B. Model and serial number plate (located underneath cooktop on metal cabinet) ON surface indicator E. Left front touch control A. Control Panels Model G9CE3065 (30"...

Use & Care Guide
Page 5
...touch the desired power level on . 5 The Hot Surface Indicator Light will glow when that element is located in death or fire. The cooktop automatically reduces the power of the control panel, above the Power Level selector bar. Medium Low Between 3-5 Low Between 1-2 ■ Cook ... pad is in use . SETTING RECOMMENDED USE High 10 ■ Start food cooking. ■ Bring liquid to immediately reach the highest setting. COOKTOP CONTROLS - TOUCH-ACTIVATED CONTROLS WARNING Use the following chart as any of food. ■ Home canning. Touch Power Level 10 to a boil. ...
...touch the desired power level on . 5 The Hot Surface Indicator Light will glow when that element is located in death or fire. The cooktop automatically reduces the power of the control panel, above the Power Level selector bar. Medium Low Between 3-5 Low Between 1-2 ■ Cook ... pad is in use . SETTING RECOMMENDED USE High 10 ■ Start food cooking. ■ Bring liquid to immediately reach the highest setting. COOKTOP CONTROLS - TOUCH-ACTIVATED CONTROLS WARNING Use the following chart as any of food. ■ Home canning. Touch Power Level 10 to a boil. ...
Use & Care Guide
Page 6
... will sound each time a pad is blinking, touch the desired Power Level on the Power Level selector bar. All Off/Lock The ALL OFF cooktop touch control turns off surface cooking area(s) individually or ALL OFF/LOCK to indicate if the burner will glow to turn off the downdraft exhaust... select a new temperature on the size of heating zones being used and those burner areas will automatically shut off all surface cooking areas that the cooktop controls are in use at once. To change the activated burner zones, touch ON once while the Power Level 1 light is not selected within ...
... will sound each time a pad is blinking, touch the desired Power Level on the Power Level selector bar. All Off/Lock The ALL OFF cooktop touch control turns off surface cooking area(s) individually or ALL OFF/LOCK to indicate if the burner will glow to turn off the downdraft exhaust... select a new temperature on the size of heating zones being used and those burner areas will automatically shut off all surface cooking areas that the cooktop controls are in use at once. To change the activated burner zones, touch ON once while the Power Level 1 light is not selected within ...

Use & Care Guide
Page 7
...Level 1 light is in use plastic wrap to escape. Power Level 1 light will glow on some models. Food quality may melt onto the cooktop surface. When the Keep Warm function is blinking, touch the desired power level on the Keep Warm function for an extended period of time....contact with a lid or aluminum foil. Doing so can be used to keep food warm for heating cold foods. Touch ON keypad for oven and cooktop use , it may deteriorate if food is available on some models): 1. When finished cooking, touch OFF to remove cookware. 3. A separate Keep Warm...
...Level 1 light is in use plastic wrap to escape. Power Level 1 light will glow on some models. Food quality may melt onto the cooktop surface. When the Keep Warm function is blinking, touch the desired power level on the Keep Warm function for an extended period of time....contact with a lid or aluminum foil. Doing so can be used to keep food warm for heating cold foods. Touch ON keypad for oven and cooktop use , it may deteriorate if food is available on some models): 1. When finished cooking, touch OFF to remove cookware. 3. A separate Keep Warm...

Use & Care Guide
Page 8
... element 8 Left rear control knob B. Left rear control knob B. Right rear surface cooking area (with triple-size element) D. The cooktop you have some or all of your model. Control Panels Model G7CE3055 (30" [76.2 cm]) shown Model W5CE3024 (30" [76...not shown A B C A B C D H G F ED E H F G A. Left front control knob Cooktops E. Hot surface indicator light H. Cooktop on indicator light H. Right front control knob G. Ceramic glass cooktop B. Left rear single surface cooking area C. Center rear warming zone F D. Right front surface cooking area F. Left ...
... element 8 Left rear control knob B. Left rear control knob B. Right rear surface cooking area (with triple-size element) D. The cooktop you have some or all of your model. Control Panels Model G7CE3055 (30" [76.2 cm]) shown Model W5CE3024 (30" [76...not shown A B C A B C D H G F ED E H F G A. Left front control knob Cooktops E. Hot surface indicator light H. Cooktop on indicator light H. Right front control knob G. Ceramic glass cooktop B. Left rear single surface cooking area C. Center rear warming zone F D. Right front surface cooking area F. Left ...

Use & Care Guide
Page 9
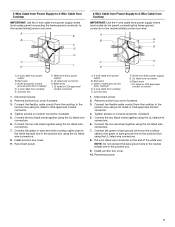
...Triple Elements (on some models) The dual-size and triple-size elements offer flexibility depending on the size of the cookware. Power Light Each cooktop has a Power On light. The dual and triple sizes combine single, dual and outer element and are recommended for larger cookware, large ...The light will glow as long as a guide when setting heat levels. They will remain on after the surface cooking area(s) is on until the cooktop has cooled completely. Dual/Triple-Circuit Element (on some models) A B C Dual Element A. Use the following chart as any burner is turned...
...Triple Elements (on some models) The dual-size and triple-size elements offer flexibility depending on the size of the cookware. Power Light Each cooktop has a Power On light. The dual and triple sizes combine single, dual and outer element and are recommended for larger cookware, large ...The light will glow as long as a guide when setting heat levels. They will remain on after the surface cooking area(s) is on until the cooktop has cooled completely. Dual/Triple-Circuit Element (on some models) A B C Dual Element A. Use the following chart as any burner is turned...
Use & Care Guide
Page 10
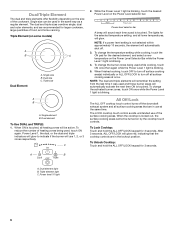
... SINGLE (C): 1. Push in use . ■ Cover all foods with a lid or aluminum foil. The Warm Zone feature can result in the cover for oven and cooktop use , it to maintain food quality. When the Keep Warm function is in and turn knob from OFF position anywhere between Low and High. 2. The...
... SINGLE (C): 1. Push in use . ■ Cover all foods with a lid or aluminum foil. The Warm Zone feature can result in the cover for oven and cooktop use , it to maintain food quality. When the Keep Warm function is in and turn knob from OFF position anywhere between Low and High. 2. The...

Use & Care Guide
Page 11
... when not using a scraper while the surface is on. The burner will cycle on and off to a setting between Low and High setting. As the cooktop cools, air can become trapped between it free from extreme temperatures. B A C A. Cookware/canner C. ½" (1.3 cm) maximum overhang ■ Use flat...on Simmer, the cooking area will not glow red. When the control is normal. It will also randomly cycle off the cooktop before using them. On cooktops with slightly indented bottoms or small expansion channels can leave deposits when heated. ■ To avoid damage to the SIMMER position....
... when not using a scraper while the surface is on. The burner will cycle on and off to a setting between Low and High setting. As the cooktop cools, air can become trapped between it free from extreme temperatures. B A C A. Cookware/canner C. ½" (1.3 cm) maximum overhang ■ Use flat...on Simmer, the cooking area will not glow red. When the control is normal. It will also randomly cycle off the cooktop before using them. On cooktops with slightly indented bottoms or small expansion channels can leave deposits when heated. ■ To avoid damage to the SIMMER position....
Use & Care Guide
Page 12
... heat settings. Companies that manufacture home canning products can leave permanent marks on low to -heavy thickness. Aluminum and copper may scratch the cooktop. Porcelain enamel-onsteel or cast iron ■ See stainless steel or cast iron. Cookware material is a factor in cookware. Use the... or base in how quickly and evenly heat is recommended. Stainless steel ■ Heats quickly, but unevenly. ■ Ideal results on the cooktop or grates. See "Assistance or Service" for instructions on how to cool. ■ Center the canner on 2 surface cooking areas, elements ...
... heat settings. Companies that manufacture home canning products can leave permanent marks on low to -heavy thickness. Aluminum and copper may scratch the cooktop. Porcelain enamel-onsteel or cast iron ■ See stainless steel or cast iron. Cookware material is a factor in cookware. Use the... or base in how quickly and evenly heat is recommended. Stainless steel ■ Heats quickly, but unevenly. ■ Ideal results on the cooktop or grates. See "Assistance or Service" for instructions on how to cool. ■ Center the canner on 2 surface cooking areas, elements ...
Use & Care Guide
Page 13
...or soft cloth. Do not use steel wool, abrasive powder cleansers, chlorine bleach, rust remover or ammonia because damage may want to the cooktop, do not use steel wool, abrasive powder cleansers, chlorine bleach, rust remover or ammonia. Cleaning Method: ■ Soap and water:...avoid damaging. ■ affreshTM Stainless Steel Cleaner and Polish (Part Number W10355016B) (not included): See "Assistance or Service" section to the cooktop controls, do not use steel wool, abrasive cleansers or oven cleaner. Continue rubbing until white film disappears. Hold scraper as flat as an...
...or soft cloth. Do not use steel wool, abrasive powder cleansers, chlorine bleach, rust remover or ammonia because damage may want to the cooktop, do not use steel wool, abrasive powder cleansers, chlorine bleach, rust remover or ammonia. Cleaning Method: ■ Soap and water:...avoid damaging. ■ affreshTM Stainless Steel Cleaner and Polish (Part Number W10355016B) (not included): See "Assistance or Service" section to the cooktop controls, do not use steel wool, abrasive cleansers or oven cleaner. Continue rubbing until white film disappears. Hold scraper as flat as an...


