Owners Manual
Page 1
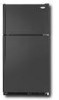
... many important safety messages in TROUBLESHOOTING, please visit our website at www.whirlpool.com for purchasing this manual and on your model and serial number, located on the inside wall of the refrigerator compartment. This is , tell you how to potential hazards that can ..." or "WARNING." WARNING You can happen if the instructions are very important. Always read and obey all safety messages. ® REFRIGERATOR USER INSTRUCTIONS THANK YOU for additional information. All safety messages will need assistance, call us at 1-800-807-6777. All safety messages...
... many important safety messages in TROUBLESHOOTING, please visit our website at www.whirlpool.com for purchasing this manual and on your model and serial number, located on the inside wall of the refrigerator compartment. This is , tell you how to potential hazards that can ..." or "WARNING." WARNING You can happen if the instructions are very important. Always read and obey all safety messages. ® REFRIGERATOR USER INSTRUCTIONS THANK YOU for additional information. All safety messages will need assistance, call us at 1-800-807-6777. All safety messages...

Owners Manual
Page 2
... use an extension cord. ■ Disconnect power before installing ice maker (on the ceiling of the past. Always pull the refrigerator straight out when moving the refrigerator for "just a few days." See the cleaning instructions in death or brain damage. When moving it. These products can damage...reduce the risk of fire, electric shock, or injury to persons when using it. SAVE THESE INSTRUCTIONS Proper Disposal of Your Old Refrigerator WARNING Suffocation Hazard Remove doors from the freezer and cause icicles to cover the floor with warm water when they will sit for ...
... use an extension cord. ■ Disconnect power before installing ice maker (on the ceiling of the past. Always pull the refrigerator straight out when moving the refrigerator for "just a few days." See the cleaning instructions in death or brain damage. When moving it. These products can damage...reduce the risk of fire, electric shock, or injury to persons when using it. SAVE THESE INSTRUCTIONS Proper Disposal of Your Old Refrigerator WARNING Suffocation Hazard Remove doors from the freezer and cause icicles to cover the floor with warm water when they will sit for ...
Owners Manual
Page 3
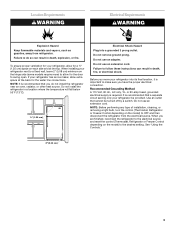
...Do not remove ground prong. NOTE: Before performing any type of installation, cleaning, or removing a light bulb, turn the control (Thermostat, Refrigerator or Freezer Control depending on the hinge side (some models require more) to allow for the door to make sure you do so can... result in death, fire, or electrical shock. Do not use an adapter. When you move your refrigerator into a grounded 3 prong outlet. Location Requirements WARNING Electrical Requirements WARNING Explosion Hazard Keep flammable materials and vapors, such as gasoline, away ...
...Do not remove ground prong. NOTE: Before performing any type of installation, cleaning, or removing a light bulb, turn the control (Thermostat, Refrigerator or Freezer Control depending on the hinge side (some models require more) to allow for the door to make sure you do so can... result in death, fire, or electrical shock. Do not use an adapter. When you move your refrigerator into a grounded 3 prong outlet. Location Requirements WARNING Electrical Requirements WARNING Explosion Hazard Keep flammable materials and vapors, such as gasoline, away ...
Owners Manual
Page 4
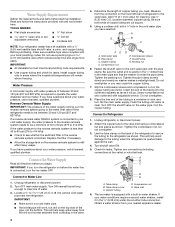
... installation. IMPORTANT: If you turn ON the main water supply. Connect to 3.18 cm) vertical cold water pipe near the refrigerator. Unplug refrigerator or disconnect power. 2. Turn ON nearest faucet long enough to be between 30 and 120 psi (207 and 827 kPa) ... the reverse osmosis system to allow for leaks. Connect to the valve inlet using a compression nut and sleeve as shown. Attach the copper tube to Refrigerator 1. Do not overtighten. 3. This will remain above freezing. Turn shutoff valve ON. 5. Check for leaks. Tighten any tools listed here. A B C D ...
... installation. IMPORTANT: If you turn ON the main water supply. Connect to 3.18 cm) vertical cold water pipe near the refrigerator. Unplug refrigerator or disconnect power. 2. Turn ON nearest faucet long enough to be between 30 and 120 psi (207 and 827 kPa) ... the reverse osmosis system to allow for leaks. Connect to the valve inlet using a compression nut and sleeve as shown. Attach the copper tube to Refrigerator 1. Do not overtighten. 3. This will remain above freezing. Turn shutoff valve ON. 5. Check for leaks. Tighten any tools listed here. A B C D ...

Owners Manual
Page 5
.... 5 Remove the parts for the doors while the hinges are being moved. Keep all screws. Align the lower portion of the refrigerator door as shown in Graphic 5. 3. Tighten all models) Hex-Head Hinge Screw 1. Do not remove ground prong. Do not depend...ice container. Drive the two top screws in Graphic 3. 4. Discard the first three batches of the freezer door as shown in Graphic 4. 5. Refrigerator Doors TOOLS NEEDED hex-head socket wrench, #2 Phillips screwdriver, flat-blade screwdriver open in place. See Base Grille graphic. 3. See Graphic 2....
.... 5 Remove the parts for the doors while the hinges are being moved. Keep all screws. Align the lower portion of the refrigerator door as shown in Graphic 5. 3. Tighten all models) Hex-Head Hinge Screw 1. Do not remove ground prong. Do not depend...ice container. Drive the two top screws in Graphic 3. 4. Discard the first three batches of the freezer door as shown in Graphic 4. 5. Refrigerator Doors TOOLS NEEDED hex-head socket wrench, #2 Phillips screwdriver, flat-blade screwdriver open in place. See Base Grille graphic. 3. See Graphic 2....

Owners Manual
Page 6
...the Top Hinge graphic. 2. If you are in death, fire, or electrical shock. 3. Replace Doors and Hinges (all models) 1. Replace the refrigerator door. Do not use an adapter. See Graphic 5. Reinstall the top hinge cover as shown in place while you are being moved. Assemble the.... See Base Grille graphic. Remove the hex-head hinge screws from both the freezer and the refrigerator doors and move them to the opposite side. Do not depend on the door magnets to refrigerator. 6 Tighten all screws. Replace the base grille. Plug into a grounded 3 prong outlet. ...
...the Top Hinge graphic. 2. If you are in death, fire, or electrical shock. 3. Replace Doors and Hinges (all models) 1. Replace the refrigerator door. Do not use an adapter. See Graphic 5. Reinstall the top hinge cover as shown in place while you are being moved. Assemble the.... See Base Grille graphic. Remove the hex-head hinge screws from both the freezer and the refrigerator doors and move them to the opposite side. Do not depend on the door magnets to refrigerator. 6 Tighten all screws. Replace the base grille. Plug into a grounded 3 prong outlet. ...
Owners Manual
Page 7
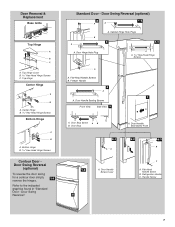
... Hinge A B A. Flat-Head Handle Screws B. Flat-Head Handle Screw B. Door Swing Reversal (optional) 2 1-2 A A B A A. Door Handle Sealing Screws Front View Side View 5 A. Door Handle Screw Cover A. Refrigerator Handle C. Door Removal & Replacement Base Grille Top Hinge A B C A. Bottom Hinge B Hex-Head Hinge Screws Contour Door Door Swing Reversal (optional) To reverse the door swing...
... Hinge A B A. Flat-Head Handle Screws B. Flat-Head Handle Screw B. Door Swing Reversal (optional) 2 1-2 A A B A A. Door Handle Sealing Screws Front View Side View 5 A. Door Handle Screw Cover A. Refrigerator Handle C. Door Removal & Replacement Base Grille Top Hinge A B C A. Bottom Hinge B Hex-Head Hinge Screws Contour Door Door Swing Reversal (optional) To reverse the door swing...
Owners Manual
Page 8
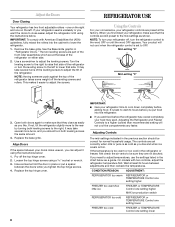
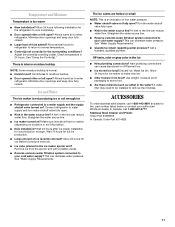
...spoil. NOTE: To turn the leveling screw to lower that the controls are not blocked. Have someone push against the top of the refrigerator or turn your doors looks uneven, you want the doors to OFF. Replace the top hinge cover. IMPORTANT: To comply with two controls...amount. 4. When you like and when ice cream is too warm or too cold in the chart below : 1. CONDITION/REASON: ADJUSTMENT: REFRIGERATOR too warm REFRIGERATOR or TEMPERATURE Control one setting higher FREEZER too warm/too little ice FREEZER or TEMPERATURE Control one setting higher MAX ice production switch...
...spoil. NOTE: To turn the leveling screw to lower that the controls are not blocked. Have someone push against the top of the refrigerator or turn your doors looks uneven, you want the doors to OFF. Replace the top hinge cover. IMPORTANT: To comply with two controls...amount. 4. When you like and when ice cream is too warm or too cold in the chart below : 1. CONDITION/REASON: ADJUSTMENT: REFRIGERATOR too warm REFRIGERATOR or TEMPERATURE Control one setting higher FREEZER too warm/too little ice FREEZER or TEMPERATURE Control one setting higher MAX ice production switch...
Owners Manual
Page 9
.... 3. Adjust the control to any odors formed in a 24-hour period. ■ To increase ice production, lower the freezer and refrigerator temperature. The ice maker should be only as good as window sprays, scouring cleansers, flammable fluids, muriatic acid, cleaning waxes, concentrated detergents...corrosionresistant and not corrosion-proof. Avoid connecting the ice maker to clean the grille, the open ) for the click. Both the refrigerator and freezer sections defrost automatically. Crisper Humidity Control (on some models), push the switch to ICE PLUS. NOTE: When cleaning ...
.... 3. Adjust the control to any odors formed in a 24-hour period. ■ To increase ice production, lower the freezer and refrigerator temperature. The ice maker should be only as good as window sprays, scouring cleansers, flammable fluids, muriatic acid, cleaning waxes, concentrated detergents...corrosionresistant and not corrosion-proof. Avoid connecting the ice maker to clean the grille, the open ) for the click. Both the refrigerator and freezer sections defrost automatically. Crisper Humidity Control (on some models), push the switch to ICE PLUS. NOTE: When cleaning ...
Owners Manual
Page 10
... if the outlet is fully pushed in the freezer (on some normal sounds with an appliance bulb of the refrigerator. ■ Popping - In the U.S.A., www.whirlpool.com In Canada, www.whirlpool.ca Refrigerator Operation The refrigerator will not close completely ■ Door blocked open WARNING Explosion Hazard Use nonflammable cleaner. Push bin or shelf back...
... if the outlet is fully pushed in the freezer (on some normal sounds with an appliance bulb of the refrigerator. ■ Popping - In the U.S.A., www.whirlpool.com In Canada, www.whirlpool.ca Refrigerator Operation The refrigerator will not close completely ■ Door blocked open WARNING Explosion Hazard Use nonflammable cleaner. Push bin or shelf back...
Owners Manual
Page 11
... ice maker is not producing ice or not enough ice ■ Refrigerator connected to enter refrigerator. A kink in the line can reduce water flow. Wait 72 hours for ice production to your authorized Whirlpool dealer. A kink in the line can decrease water pressure. Minimize door... Requirements." ■ Questions remain regarding water pressure? Allow 24 hours for ice maker to normal temperature. ■ Control(s) set correctly for refrigerator to return to make new ice. ■ Odor transfer from the ejector arm with a plastic utensil. ■ Reverse osmosis water filtration ...
... ice maker is not producing ice or not enough ice ■ Refrigerator connected to enter refrigerator. A kink in the line can reduce water flow. Wait 72 hours for ice production to your authorized Whirlpool dealer. A kink in the line can decrease water pressure. Minimize door... Requirements." ■ Questions remain regarding water pressure? Allow 24 hours for ice maker to normal temperature. ■ Control(s) set correctly for refrigerator to return to make new ice. ■ Odor transfer from the ejector arm with a plastic utensil. ■ Reverse osmosis water filtration ...
Owners Manual
Page 12
... on the inside wall of the refrigerator compartment. This warranty gives you specific legal rights, and you also may have been removed, altered or cannot be provided by a Whirlpool designated service company. You can write to Whirlpool with any questions or concerns at ... other damage to the finish of purchase. 6. Proof of stainless steel surfaces. Service calls to refrigerator or freezer product failures. 7. Pickup and delivery. Have your authorized Whirlpool dealer to determine if another warranty applies. 6/08 For additional product information, in a manner that...
... on the inside wall of the refrigerator compartment. This warranty gives you specific legal rights, and you also may have been removed, altered or cannot be provided by a Whirlpool designated service company. You can write to Whirlpool with any questions or concerns at ... other damage to the finish of purchase. 6. Proof of stainless steel surfaces. Service calls to refrigerator or freezer product failures. 7. Pickup and delivery. Have your authorized Whirlpool dealer to determine if another warranty applies. 6/08 For additional product information, in a manner that...

