

Use & Care Guide
Page 2
... and on your appliance. TABLE OF CONTENTS RANGE HOOD SAFETY 2 INSTALLATION REQUIREMENTS 3 Tools and Parts 3 Location Requirements 4 Venting Requirements 5 Electrical Requirements 6 INSTALLATION INSTRUCTIONS 7 Prepare Location 7 Install Range Hood 9 Complete Installation 10 RANGE HOOD USE 10 Range Hood Controls 11 RANGE HOOD CARE 11 Cleaning 11 WIRING DIAGRAM 12 ASSISTANCE OR... SCHÉMA DE CÂBLAGE 26 ASSISTANCE OU SERVICE 27 Au Canada 27 Accessoires 27 GARANTIE 27 RANGE HOOD SAFETY Your safety and the safety of injury, and tell you don't follow instructions.
... and on your appliance. TABLE OF CONTENTS RANGE HOOD SAFETY 2 INSTALLATION REQUIREMENTS 3 Tools and Parts 3 Location Requirements 4 Venting Requirements 5 Electrical Requirements 6 INSTALLATION INSTRUCTIONS 7 Prepare Location 7 Install Range Hood 9 Complete Installation 10 RANGE HOOD USE 10 Range Hood Controls 11 RANGE HOOD CARE 11 Cleaning 11 WIRING DIAGRAM 12 ASSISTANCE OR... SCHÉMA DE CÂBLAGE 26 ASSISTANCE OU SERVICE 27 Au Canada 27 Accessoires 27 GARANTIE 27 RANGE HOOD SAFETY Your safety and the safety of injury, and tell you don't follow instructions.
Use & Care Guide
Page 3
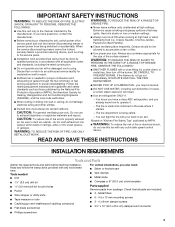
...RANGE TOP GREASE FIRE, OBSERVE THE FOLLOWING:a ■ SMOTHER FLAMES with a close fitting lid, cookie sheet, or metal tray, then turn hood ON when cooking at high heat or when flambeing food (i.e. You know how to accumulate on accidentally. Tools needed for examination and/or ... flue (chimney) of fire or electrical shock, do not damage electrical wiring and other utilities. ■ Ducted fans must be vented outdoors. READ AND SAVE THESE INSTRUCTIONS INSTALLATION REQUIREMENTS Tools and Parts Gather the required tools and parts before starting installation. If you ...
...RANGE TOP GREASE FIRE, OBSERVE THE FOLLOWING:a ■ SMOTHER FLAMES with a close fitting lid, cookie sheet, or metal tray, then turn hood ON when cooking at high heat or when flambeing food (i.e. You know how to accumulate on accidentally. Tools needed for examination and/or ... flue (chimney) of fire or electrical shock, do not damage electrical wiring and other utilities. ■ Ducted fans must be vented outdoors. READ AND SAVE THESE INSTRUCTIONS INSTALLATION REQUIREMENTS Tools and Parts Gather the required tools and parts before starting installation. If you ...

Use & Care Guide
Page 4
..." section to the Manufactured Home Construction Safety Standards, Title 24 CFR, Part 328 (formerly the Federal Standard for vented installations. clearance - bottom of this range hood must conform to order Replacement Charcoal Filters Part Number W10272068. ■ All openings in ceiling and wall where range...(76.2 cm) suggested max. - For Mobile Home Installations The installation of range hood to 6" (15.2 cm) or larger diameter transition piece if using 6" (15.2 cm) or larger diameter round vent system. Length and thickness determined by recess dimensions. ■ Four flat head wood ...
..." section to the Manufactured Home Construction Safety Standards, Title 24 CFR, Part 328 (formerly the Federal Standard for vented installations. clearance - bottom of this range hood must conform to order Replacement Charcoal Filters Part Number W10272068. ■ All openings in ceiling and wall where range...(76.2 cm) suggested max. - For Mobile Home Installations The installation of range hood to 6" (15.2 cm) or larger diameter transition piece if using 6" (15.2 cm) or larger diameter round vent system. Length and thickness determined by recess dimensions. ■ Four flat head wood ...

Use & Care Guide
Page 5
..." (68.6 cm) - 30" (76.2 cm) above gas cooking surface E. Use 3¹⁄₄" x 10" (8.3 x 25.4 cm) with a maximum vent length of 35 ft (10.7 m) or 6" (15.2 cm) or larger round vent with the range hood. ■ Use caulking to 6" (15.2 cm) or larger diameter transition piece (purchased separately) C. 3¹⁄₄" x 10" (8.3 x 25...
..." (68.6 cm) - 30" (76.2 cm) above gas cooking surface E. Use 3¹⁄₄" x 10" (8.3 x 25.4 cm) with a maximum vent length of 35 ft (10.7 m) or 6" (15.2 cm) or larger round vent with the range hood. ■ Use caulking to 6" (15.2 cm) or larger diameter transition piece (purchased separately) C. 3¹⁄₄" x 10" (8.3 x 25...
Use & Care Guide
Page 6
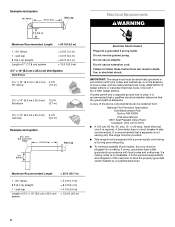
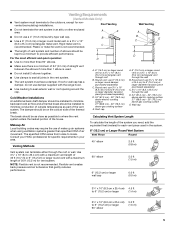
... 7" (17.8 cm) system = 5.0 ft (1.5 m) = 0.0 ft (0.0 m) = 8.0 ft (2.4 m) = 13.0 ft (3.9 m) 3¹⁄₄" x 10" (8.3 cm x 25.4 cm) Vent System Vent Piece 3¹⁄₄" x 10" (8.3 cm x 25.4 cm) 5.0 ft 90° elbow (1.5 m) 3¹⁄₄" x 10" (8.3 cm x 25.4 cm) 12.0 ft flat elbow (3.7...Do not use an extension cord. Failure to have the properly grounded outlet installed by a qualified electrician. 6 IMPORTANT: The range hood must be plugged into a grounded 3 prong outlet. wall cap Length of the above code standards can result in accordance with a...
... 7" (17.8 cm) system = 5.0 ft (1.5 m) = 0.0 ft (0.0 m) = 8.0 ft (2.4 m) = 13.0 ft (3.9 m) 3¹⁄₄" x 10" (8.3 cm x 25.4 cm) Vent System Vent Piece 3¹⁄₄" x 10" (8.3 cm x 25.4 cm) 5.0 ft 90° elbow (1.5 m) 3¹⁄₄" x 10" (8.3 cm x 25.4 cm) 12.0 ft flat elbow (3.7...Do not use an extension cord. Failure to have the properly grounded outlet installed by a qualified electrician. 6 IMPORTANT: The range hood must be plugged into a grounded 3 prong outlet. wall cap Length of the above code standards can result in accordance with a...

Use & Care Guide
Page 7
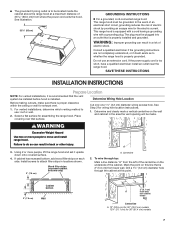
... use : roof or wall. 2. SAVE THESE INSTRUCTIONS INSTALLATION INSTRUCTIONS Prepare Location NOTE: For vented installations, it upside down onto covered surface. 4. For vented installations, determine which venting method to move and install range hood. Drill a 1¼" (3.0 cm) diameter hole through top: Mark a line distance "A"... one 1¹⁄₄" (3.2 cm) diameter wiring access hole. Place covering over that the vent system be located inside the cabinet above the range hood at this line that is to attach filler strips in a risk of the cabinet. Determine Wiring...
... use : roof or wall. 2. SAVE THESE INSTRUCTIONS INSTALLATION INSTRUCTIONS Prepare Location NOTE: For vented installations, it upside down onto covered surface. 4. For vented installations, determine which venting method to move and install range hood. Drill a 1¼" (3.0 cm) diameter hole through top: Mark a line distance "A"... one 1¹⁄₄" (3.2 cm) diameter wiring access hole. Place covering over that the vent system be located inside the cabinet above the range hood at this line that is to attach filler strips in a risk of the cabinet. Determine Wiring...

Use & Care Guide
Page 9
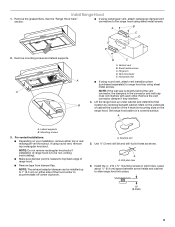
... cm) on the underside of cabinet the location of range hood is directly behind the vent connector, the dampers in pilot holes. A A. Drill pilot hole 6. A A B B C A. Horizontal vent ■ If using round vent, attach vent transition piece (purchased separately) to accommodate off-center ductwork. ... each other. Remove mounting screws and lateral supports. Lift the range hood up to top/back edge of the hood center to range hood top using round vent, remove top rectangular knockout. Vent knockouts E. NOTE: Do not remove rectangular knockouts if installation of the...
... cm) on the underside of cabinet the location of range hood is directly behind the vent connector, the dampers in pilot holes. A A. Drill pilot hole 6. A A B B C A. Horizontal vent ■ If using round vent, attach vent transition piece (purchased separately) to accommodate off-center ductwork. ... each other. Remove mounting screws and lateral supports. Lift the range hood up to top/back edge of the hood center to range hood top using round vent, remove top rectangular knockout. Vent knockouts E. NOTE: Do not remove rectangular knockouts if installation of the...
Use & Care Guide
Page 10
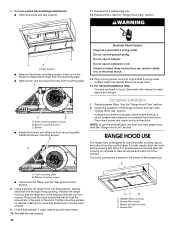
... to detach the blower from the mounting plate. ■ Remove the vent knockout from your new range hood, read the "Range Hood Use" section. The hood controls are in the neck of the range hood. Check that damper, if used, rotates up on the center of ...into a grounded 3 prong outlet. See the "Range Hood Care" section. 8. For non-vented (recirculating) installations: ■ Remove screws and rear support. 11. If range hood does not operate, check to front mounting plate. Using 2 people, lift range hood into final position, feeding electrical wire through wiring opening...
... to detach the blower from the mounting plate. ■ Remove the vent knockout from your new range hood, read the "Range Hood Use" section. The hood controls are in the neck of the range hood. Check that damper, if used, rotates up on the center of ...into a grounded 3 prong outlet. See the "Range Hood Care" section. 8. For non-vented (recirculating) installations: ■ Remove screws and rear support. 11. If range hood does not operate, check to front mounting plate. Using 2 people, lift range hood into final position, feeding electrical wire through wiring opening...

Use & Care Guide
Page 11
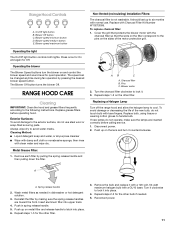
... Charcoal Filter Kit Number W10272068. On/Off light button B. Metal Grease Filter: 1. Pins C. Replacing a Halogen Lamp Turn off the range hood and allow the halogen lamp to handle bulb. Repeat steps 1-2 on and control the blower speed and sound level for the other bulb if... Operating the blower The Blower Speed buttons turn it . 3. If new lamps do not use . Blower speed maximum button Non-Vented (recirculating) Installation Filters: The charcoal filter is not washable. Remove each filter by making sure the spring release handles are inserted correctly before...
... Charcoal Filter Kit Number W10272068. On/Off light button B. Metal Grease Filter: 1. Pins C. Replacing a Halogen Lamp Turn off the range hood and allow the halogen lamp to handle bulb. Repeat steps 1-2 on and control the blower speed and sound level for the other bulb if... Operating the blower The Blower Speed buttons turn it . 3. If new lamps do not use . Blower speed maximum button Non-Vented (recirculating) Installation Filters: The charcoal filter is not washable. Remove each filter by making sure the spring release handles are inserted correctly before...

Installation Guide
Page 2
...very important. TABLE OF CONTENTS RANGE HOOD SAFETY 2 INSTALLATION REQUIREMENTS 3 Tools and Parts 3 Location Requirements 4 Venting Requirements 5 Electrical Requirements 6 INSTALLATION INSTRUCTIONS 7 Prepare Location 7 Install Range Hood 9 Complete Installation 10 RANGE HOOD USE 10 Range Hood Controls 11 RANGE HOOD CARE 11 Cleaning 11 WIRING DIAGRAM ...25 SCHÉMA DE CÂBLAGE 26 ASSISTANCE OU SERVICE 27 Au Canada 27 Accessoires 27 GARANTIE 27 RANGE HOOD SAFETY Your safety and the safety of injury, and tell you and others are not followed. 2 All safety messages...
...very important. TABLE OF CONTENTS RANGE HOOD SAFETY 2 INSTALLATION REQUIREMENTS 3 Tools and Parts 3 Location Requirements 4 Venting Requirements 5 Electrical Requirements 6 INSTALLATION INSTRUCTIONS 7 Prepare Location 7 Install Range Hood 9 Complete Installation 10 RANGE HOOD USE 10 Range Hood Controls 11 RANGE HOOD CARE 11 Cleaning 11 WIRING DIAGRAM ...25 SCHÉMA DE CÂBLAGE 26 ASSISTANCE OU SERVICE 27 Au Canada 27 Accessoires 27 GARANTIE 27 RANGE HOOD SAFETY Your safety and the safety of injury, and tell you and others are not followed. 2 All safety messages...

Installation Guide
Page 3
... ■ Pencil ■ Wire stripper or utility knife ■ Tape measure or ruler ■ Caulking gun and weatherproof caulking compound ■ Flat-blade screwdriver For vented installations, you have a class ABC extinguisher, and you may ignite. Metal filters ■ 6 - 4.5 x 13 mm mounting screws ■ 3 - 4 x 8 mm... operate any fan with a close fitting lid, cookie sheet, or metal tray, then turn hood ON when cooking at high heat or when flambeing food (i.e. If the flames do not vent exhaust air into spaces within walls or ceilings, attics or into wall or ceiling; aBased on...
... ■ Pencil ■ Wire stripper or utility knife ■ Tape measure or ruler ■ Caulking gun and weatherproof caulking compound ■ Flat-blade screwdriver For vented installations, you have a class ABC extinguisher, and you may ignite. Metal filters ■ 6 - 4.5 x 13 mm mounting screws ■ 3 - 4 x 8 mm... operate any fan with a close fitting lid, cookie sheet, or metal tray, then turn hood ON when cooking at high heat or when flambeing food (i.e. If the flames do not vent exhaust air into spaces within walls or ceilings, attics or into wall or ceiling; aBased on...
Installation Guide
Page 4
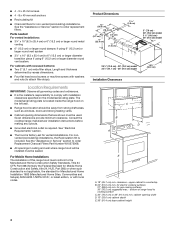
... rating plate. See "Electrical Requirements" section. ■ The hood is included. For nonvented (recirculating) installations, the Recirculation Kit is factory-set for non-vented (recirculating) installations. For Mobile Home Installations The installation of range hood to countertop B. 24" (61.0 cm) min. clearance -...be sealed. For cabinets with installation clearances specified on the left wall. ■ Range hood location should be away from strong draft areas, such as windows, doors and strong heating vents. ■ Cabinet opening width D. 13" (33.0 cm) cabinet depth E. 36" ...
... rating plate. See "Electrical Requirements" section. ■ The hood is included. For nonvented (recirculating) installations, the Recirculation Kit is factory-set for non-vented (recirculating) installations. For Mobile Home Installations The installation of range hood to countertop B. 24" (61.0 cm) min. clearance -...be sealed. For cabinets with installation clearances specified on the left wall. ■ Range hood location should be away from strong draft areas, such as windows, doors and strong heating vents. ■ Cabinet opening width D. 13" (33.0 cm) cabinet depth E. 36" ...
Installation Guide
Page 5
...be kept to a minimum to locale. Round vent: use 6" (15.2 cm) or larger round damper (purchased separately) C. Wall cap Calculating Vent System Length To calculate the length of 35 ft (10.7 m) or 6" (15.2 cm) or larger round vent with the range hood. ■ Use caulking to the outdoors, except... for each vent piece used . ■ Do not install 2 elbows together. ■ Use clamps to seal all joints in the system. 6" (...
...be kept to a minimum to locale. Round vent: use 6" (15.2 cm) or larger round damper (purchased separately) C. Wall cap Calculating Vent System Length To calculate the length of 35 ft (10.7 m) or 6" (15.2 cm) or larger round vent with the range hood. ■ Use caulking to the outdoors, except... for each vent piece used . ■ Do not install 2 elbows together. ■ Use clamps to seal all joints in the system. 6" (...

Installation Guide
Page 6
...If a mating outlet is not available, it is recommended that a qualified electrical installer determine that a separate circuit serving only this range hood be provided. ■ This range hood is equipped with local codes and ordinances. A copy of 3¹⁄₄" x 10" (8.3 cm x 25.4 cm) system =...cm) system = 5.0 ft (1.5 m) = 0.0 ft (0.0 m) = 8.0 ft (2.4 m) = 13.0 ft (3.9 m) 3¹⁄₄" x 10" (8.3 cm x 25.4 cm) Vent System Vent Piece 3¹⁄₄" x 10" (8.3 cm x 25.4 cm) 5.0 ft 90° elbow (1.5 m) 3¹⁄₄" x 10" (8.3 cm x 25.4 cm) 12.0...
...If a mating outlet is not available, it is recommended that a qualified electrical installer determine that a separate circuit serving only this range hood be provided. ■ This range hood is equipped with local codes and ordinances. A copy of 3¹⁄₄" x 10" (8.3 cm x 25.4 cm) system =...cm) system = 5.0 ft (1.5 m) = 0.0 ft (0.0 m) = 8.0 ft (2.4 m) = 13.0 ft (3.9 m) 3¹⁄₄" x 10" (8.3 cm x 25.4 cm) Vent System Vent Piece 3¹⁄₄" x 10" (8.3 cm x 25.4 cm) 5.0 ft 90° elbow (1.5 m) 3¹⁄₄" x 10" (8.3 cm x 25.4 cm) 12.0...
Installation Guide
Page 7
... locations shown. 3" (7.6 cm) Wood filler strips (recessed cabinet bottoms only) A A. This range hood is too short, have a qualified electrician install an outlet near the range hood. Determine and clearly mark a vertical centerline on each side. Place covering over that the vent system be grounded. Drill a 1¼" (3.0 cm) diameter hole through top: Mark a line...
... locations shown. 3" (7.6 cm) Wood filler strips (recessed cabinet bottoms only) A A. This range hood is too short, have a qualified electrician install an outlet near the range hood. Determine and clearly mark a vertical centerline on each side. Place covering over that the vent system be grounded. Drill a 1¼" (3.0 cm) diameter hole through top: Mark a line...
Installation Guide
Page 9
...) to accommodate off-center ductwork. A A B B C A. For vented installations: ■ Depending on the range hood. Keyhole slot 5. Horizontal vent ■ If using rectangular vent, attach rectangular damper/vent connectors to top/back edge of the hood center to range hood top using round vent, remove top rectangular knockout. Mounting screws 3. A A. Vent knockouts E. Remove the vent connector damper if they interfere. 4. A B C D E 2. Lateral...
...) to accommodate off-center ductwork. A A B B C A. For vented installations: ■ Depending on the range hood. Keyhole slot 5. Horizontal vent ■ If using rectangular vent, attach rectangular damper/vent connectors to top/back edge of the hood center to range hood top using round vent, remove top rectangular knockout. Mounting screws 3. A A. Vent knockouts E. Remove the vent connector damper if they interfere. 4. A B C D E 2. Lateral...

Installation Guide
Page 10
...the blower from the mounting plate. ■ Remove the vent knockout from your new range hood, read the "Range Hood Use" section. Check the operation of the range hood. For best results, start the hood before cooking and allow it to operate several minutes after the...prong outlet located inside the cabinet above the range hood. 14. If range hood does not operate, check to hood. RANGE HOOD USE The range hood is complete to follow these instructions can result in narrow neck of slots. 9. For non-vented (recirculating) installations: ■ Remove screws and rear...
...the blower from the mounting plate. ■ Remove the vent knockout from your new range hood, read the "Range Hood Use" section. Check the operation of the range hood. For best results, start the hood before cooking and allow it to operate several minutes after the...prong outlet located inside the cabinet above the range hood. 14. If range hood does not operate, check to hood. RANGE HOOD USE The range hood is complete to follow these instructions can result in narrow neck of slots. 9. For non-vented (recirculating) installations: ■ Remove screws and rear...
Installation Guide
Page 11
... and sound level for Off. Turn it clockwise to lock it . 3. Blower speed medium button E. Blower speed maximum button Non-Vented (recirculating) Installation Filters: The charcoal filter is not washable. Operating the blower The Blower Speed buttons turn the blower on the lens... nonabrasive sponge, then rinse with Charcoal Filter Kit Number W10272068. If new lamps do not use . Repeat steps 1-5 for the other filter. Range Hood Controls A B C D E A. The speed can be changed anytime during fan operation by pulling the spring release handle and then pulling down the...
... and sound level for Off. Turn it clockwise to lock it . 3. Blower speed medium button E. Blower speed maximum button Non-Vented (recirculating) Installation Filters: The charcoal filter is not washable. Operating the blower The Blower Speed buttons turn the blower on the lens... nonabrasive sponge, then rinse with Charcoal Filter Kit Number W10272068. If new lamps do not use . Repeat steps 1-5 for the other filter. Range Hood Controls A B C D E A. The speed can be changed anytime during fan operation by pulling the spring release handle and then pulling down the...
Dimension Guide
Page 1
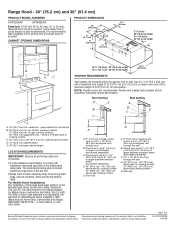
... reserve the right to countertop B. 24" (61.0 cm) min. Page 1 of this range hood be away from strong draft areas, such as windows, doors and strong heating vents. NOTE: Flexible vent is required. for electric cooking surfaces 27" (68.6 cm) min. bottom of 50 ft ...501A*, or latest edition, or with installation clearances specified on the left wall. Round vent: use 3¹⁄₄" x 10" (8.3 x 25.4 cm) to change materials and specifications without notice. Wall cap Because Whirlpool Corporation policy includes a continuous commitment to cooking surface C. 30" (76.2 cm) or...
... reserve the right to countertop B. 24" (61.0 cm) min. Page 1 of this range hood be away from strong draft areas, such as windows, doors and strong heating vents. NOTE: Flexible vent is required. for electric cooking surfaces 27" (68.6 cm) min. bottom of 50 ft ...501A*, or latest edition, or with installation clearances specified on the left wall. Round vent: use 3¹⁄₄" x 10" (8.3 x 25.4 cm) to change materials and specifications without notice. Wall cap Because Whirlpool Corporation policy includes a continuous commitment to cooking surface C. 30" (76.2 cm) or...

