Whirlpool UXT5236AYS Support and Manuals
Get Help and Manuals for this Whirlpool item
View All Support Options Below
Free Whirlpool UXT5236AYS manuals!
Problems with Whirlpool UXT5236AYS?
Ask a Question
Free Whirlpool UXT5236AYS manuals!
Problems with Whirlpool UXT5236AYS?
Ask a Question
Popular Whirlpool UXT5236AYS Manual Pages
Use & Care Guide - Page 1

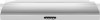
FOR RESIDENTIAL USE ONLY. LI3Z5B/W10400323D
IMPORTANT : LIRE ET CONSERVER CES INSTRUCTIONS. 30" (76.2 CM) AND 36" (91.4 CM) RANGE HOOD
Installation Instructions and Use & Care Guide
For questions about features, operation/performance, parts, accessories or service, call: 1-800-253-1301 or visit our website at www.whirlpool.com
In Canada, call 1-800-807-6777 or visit our website at...
Use & Care Guide - Page 2

... CONTENTS
RANGE HOOD SAFETY 2 INSTALLATION REQUIREMENTS 4
Tools and Parts 4 Location Requirements 4 Venting Requirements 5 Electrical Requirements 6 INSTALLATION INSTRUCTIONS 7 Prepare Location 7 Install Range Hood 9 Make Electrical Connection 11 Complete Installation 11 RANGE HOOD USE 12 Range Hood Controls 12 RANGE HOOD CARE 12 Cleaning 12 WIRING DIAGRAM 14
ASSISTANCE OR SERVICE...
Use & Care Guide - Page 4

... the left wall.
■ Range hood location should be installed must conform to the Manufactured Home Construction Safety Standards, Title 24 CFR, Part 328 (formerly the Federal Standard for Manufactured Home Installation 1982 (Manufactured Home Sites, Communities and Setups) ANSI A225.1/NFPA 501A, or latest edition, or with damper to order charcoal filter kit. For 3¹⁄...
Use & Care Guide - Page 9

... front mounting flange. Drill pilot hole
6. Round vent knockout E. Remove metal grease filter. NOTE: Your model will have a 3¼" x 10" (8.3 x 25.4 cm) rectangular vent damper on the range hood. NOTE: The 7" (17.8 cm) round vent mounting plate is also available as shown. Set panels aside. Use ¹⁄₈" (3 mm) drill bit and drill 4 pilot...
Use & Care Guide - Page 12

To avoid damage to the following instructions. To remove, pull the filter retainer toward the front of the range
hood and pull down on ordering, see the "Accessories" section. Press the BLOWER OFF button a second time to clear all -purpose cleaner: Rinse with clean water and dry with soft, lint-free cloth. ■ Glass cleaner to...
Use & Care Guide - Page 13
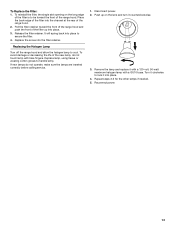
... the lamps are inserted correctly before calling service.
1. Release the filter retainer. Place the back edge of the filter is to cool. Replacing the Halogen Lamp
Turn off the range hood and allow the halogen lamp to be toward the front of the range hood and push the front of the filter up on the long edge
of the...
Use & Care Guide - Page 16
... model number and serial number. Service calls to correct the installation of your major appliance, to instruct you ever need service, first see the "Troubleshooting" section of your major appliance for future reference. Costs associated with the removal from your major appliance. Expenses for travel and transportation for Factory Specified Parts and repair labor to refrigerator...
Warranty Information - Page 1

... installation instructions.
11. You must be repaired in the home and only in materials or workmanship.
Service must provide proof of repair or replacement under this major appliance is covered by Whirlpool.
5. The cost of purchase or installation date for Factory Specified Parts and repair labor to the appliance.
9.
Major appliances with electrical or plumbing codes...
Installation Guide - Page 1

..." (91.4 CM) RANGE HOOD
Installation Instructions and Use & Care Guide
For questions about features, operation/performance, parts, accessories or service, call: 1-800-253-1301 or visit our website at www.whirlpool.com
In Canada, call 1-800-807-6777 or visit our website at www.whirlpool.ca
HOTTE D'ASPIRATION DE 30" (76,2 CM) ET 36" (91,4 CM)
Instructions d'installation et Guide d'utilisation et...
Installation Guide - Page 2
... CONTENTS
RANGE HOOD SAFETY 2 INSTALLATION REQUIREMENTS 4
Tools and Parts 4 Location Requirements 4 Venting Requirements 5 Electrical Requirements 6 INSTALLATION INSTRUCTIONS 7 Prepare Location 7 Install Range Hood 9 Make Electrical Connection 11 Complete Installation 11 RANGE HOOD USE 12 Range Hood Controls 12 RANGE HOOD CARE 12 Cleaning 12 WIRING DIAGRAM 14
ASSISTANCE OR SERVICE...
Installation Guide - Page 4

...the left wall.
■ Range hood location should be used. Consult the cooktop/range manufacturer installation instructions before starting installation. For information on ordering, see the "Accessories" section. UL listed wire connectors
■ Vent clamps/duct tape as non-vented (recirculating) require charcoal filters. INSTALLATION REQUIREMENTS
Tools and Parts
Gather the required tools...
Installation Guide - Page 6

... qualified electrician determine that the electrical installation is located behind the filter on the model/serial rating plate.
The model/serial plate is adequate and in ...appliance as specified on the rear wall of the range hood.
■ Wire sizes must conform with National Electrical Code, ANSI/NFPA 70 (latest edition), or CSA Standards C22.1-94, Canadian Electrical Code, Part...
Installation Guide - Page 9

...range hood. 3. Push the panel toward the back of the range hood until the front tabs of the 4 keyhole mounting slots on the inside your vent system installation. NOTE: Your model will have a 3¼" x 10" (8.3 x 25.4 cm) rectangular vent damper on the range hood. Lift the range hood... metal grease filter. Mark on the inside your installation requirements.
2. Set range hood aside on ...
Installation Guide - Page 12

The hood controls are located on the front edge of grain to avoid scratching or damaging the
surface. ■ For stainless steal models, Stainless Steel Cleaner and Polish
Part Number 31462A (not included): See "Assistance or Service" section to order. ■ Liquid detergent or all smoke and odors from the kitchen.
Grease filter C. Exterior Surfaces: IMPORTANT...
Installation Guide - Page 13

... the new lamp, do not operate, make sure the lamps are inserted correctly before calling service.
1. To avoid damage or decreasing the life of the range hood. 2. Remove the lamp and replace it counterclockwise.
3. Turn it into place. 3. Release the filter retainer. Disconnect power. 2.
Reconnect power.
13 Push up into place.
4. Place the back edge...
Whirlpool UXT5236AYS Reviews
We have not received any reviews for Whirlpool yet.