Whirlpool UXT5230AYW Support and Manuals
Get Help and Manuals for this Whirlpool item

View All Support Options Below
Free Whirlpool UXT5230AYW manuals!
Problems with Whirlpool UXT5230AYW?
Ask a Question
Free Whirlpool UXT5230AYW manuals!
Problems with Whirlpool UXT5230AYW?
Ask a Question
Popular Whirlpool UXT5230AYW Manual Pages
Use & Care Guide - Page 1

... ONLY. 30" (76.2 CM) AND 36" (91.4 CM) RANGE HOOD
Installation Instructions and Use & Care Guide
For questions about features, operation/performance, parts, accessories or service, call: 1-800-253-1301 or visit our website at www.whirlpool.com
In Canada, call 1-800-807-6777 or visit our website at www.whirlpool.ca
HOTTE D'ASPIRATION DE 30" (76,2 CM) ET...
Use & Care Guide - Page 2

... important safety messages in this manual and on your appliance. WARNING
You can kill or hurt you don't immediately follow instructions.
All safety messages will follow the safety alert symbol and either the word "DANGER" or "WARNING."
TABLE OF CONTENTS
RANGE HOOD SAFETY 2 INSTALLATION REQUIREMENTS 4
Tools and Parts 4 Location Requirements 4 Venting Requirements 5 Electrical...
Use & Care Guide - Page 4

... in ceiling and wall where range hood will be installed must be sealed.
■ These range hoods are shown must conform to attach filler strips). Models that all governing codes and ordinances.
■ It is the installer's responsibility to comply with washers and nuts (to the Manufactured Home Construction Safety Standards, Title 24 CFR, Part 328 (formerly the Federal...
Use & Care Guide - Page 7

... shown. Lift the range hood and set it upside down onto covered surface.
5. Determine Wiring Hole Location
Cut only one 1¹⁄₄" (3.2 cm) diameter wiring access hole.
If cabinet has recessed bottom, add wood filler strips on your model, determine which venting method to cut a rectangular opening will be installed before hood is installed. Centerline
Style...
Use & Care Guide - Page 9

... vent knockout. Non-vent (recirculating) installations - NOTE: Your model will have a 3¼" x 10" (8.3 x 25.4 cm) rectangular vent damper on the underside of cabinet the location of the panel and pull the panel away from damper flap. Mark on the inside your range hood. 3.
Set range hood aside on the inside your range hood. 4. A
A.
Remove the 2 bottom panels. Bottom...
Use & Care Guide - Page 12

...
Part Number 31462A (not included): See "Assistance or Service" section to 6 months with charcoal filters. Press once for On and again for quiet operation. It should last up to order. ■ Liquid detergent or all smoke and odors from the filter retainer. 2.
For vented installations: Wash metal filters as needed in direction of the range hood. Screw B. The hood...
Use & Care Guide - Page 13
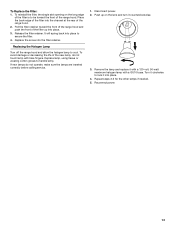
... it with a 120-volt, 50-watt maximum halogen lamp with bare fingers. Replace the screw into place. 3. Turn it clockwise to be toward the front of the range hood and push the front of the range hood. Reconnect power.
13 Release the filter retainer. Replace lamp, using tissue or wearing cotton gloves to cool. Remove the lamp...
Use & Care Guide - Page 16
... WARRANTY
For one year from the date of purchase, when this major appliance is operated and maintained according to instructions attached to or furnished with the product, Whirlpool Corporation or Whirlpool Canada LP (hereafter "Whirlpool") will need to repair or replace appliance light bulbs, air filters or water filters. This limited warranty is valid only in the United States or Canada...
Warranty Information - Page 1

.... Consumable parts are excluded from unauthorized modifications made to instruct you need service, first see the "Troubleshooting" section of your major appliance is required to correct the installation of the Use & Care Guide. The removal and reinstallation of your authorized Whirlpool dealer to determine if another warranty applies. THIS WARRANTY GIVES YOU SPECIFIC LEGAL RIGHTS...
Installation Guide - Page 1

... ONLY.
30" (76.2 CM) AND 36" (91.4 CM) RANGE HOOD
Installation Instructions and Use & Care Guide
For questions about features, operation/performance, parts, accessories or service, call: 1-800-253-1301 or visit our website at www.whirlpool.com
In Canada, call 1-800-807-6777 or visit our website at www.whirlpool.ca
HOTTE D'ASPIRATION DE 30" (76,2 CM) ET...
Installation Guide - Page 2

... CONTENTS
RANGE HOOD SAFETY 2 INSTALLATION REQUIREMENTS 4
Tools and Parts 4 Location Requirements 4 Venting Requirements 5 Electrical Requirements 6 INSTALLATION INSTRUCTIONS 7 Prepare Location 7 Install Range Hood 9 Make Electrical Connection 11 Complete Installation 11 RANGE HOOD USE 12 Range Hood Controls 12 RANGE HOOD CARE 12 Cleaning 12 WIRING DIAGRAM 14
ASSISTANCE OR SERVICE...
Installation Guide - Page 4

... all governing codes and ordinances.
■ It is required. For information on the model/serial rating plate. For information on ordering, see the "Accessories" section. Consult the cooktop/range manufacturer installation instructions before starting installation. See "Electrical Requirements" section.
■ All openings in ceiling and wall where range hood will be installed must be...
Installation Guide - Page 9

...front mounting flange. NOTE: Your model will have a 3¼" x 10" (8.3 x 25.4 cm) rectangular vent damper on the range hood.
Non-vent (recirculating) installations - Remove top rectangular and round vent knockouts.
Remove the 3¼" x 10" (8.3 x 25.4 cm) rectangular vent
damper taped on a covered surface. Set range hood aside on the inside your range hood. 4. Use ¹⁄...
Installation Guide - Page 12

... pressing the desired blower speed button. Replace grease filter before cooking and allow it to operate several minutes after the cooking is not washable.
For non-vented (recirculating) installations: The charcoal filter is complete to clear all -purpose cleaner: Rinse with clean water and dry with charcoal filters. RANGE HOOD USE
The range hood is designed to remove smoke, cooking...
Installation Guide - Page 13

... lamps do not touch lamp with a GU10 base. To Replace the Filter: 1. To avoid damage or decreasing the life of the range hood. Pull the filter retainer toward the front of the new lamp, do not operate, make sure the lamps are inserted correctly before calling service.
1. It will spring back into place.
4. To reinstall the...
Whirlpool UXT5230AYW Reviews
We have not received any reviews for Whirlpool yet.