
Use & Care Guide
Page 1
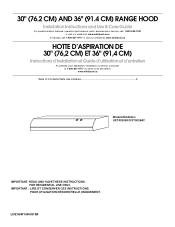
... USE ONLY. 30" (76.2 CM) AND 36" (91.4 CM) RANGE HOOD Installation Instructions and Use & Care Guide For questions about features, operation/performance, parts, accessories or service, call: 1-800-253-1301 or visit our website at www.whirlpool.com In Canada, call 1-800-807-6777 or visit our website at...Guide d'utilisation et d'entretien Au Canada, pour assistance, installation ou service, composer le 1-800-807-6777 ou visiter notre site Web à www.whirlpool.ca Table of Contents/Table des matières 2 Models/Modèles: UXT4030AY/UXT4036AY IMPORTANT: READ AND SAVE THESE INSTRUCTIONS.
... USE ONLY. 30" (76.2 CM) AND 36" (91.4 CM) RANGE HOOD Installation Instructions and Use & Care Guide For questions about features, operation/performance, parts, accessories or service, call: 1-800-253-1301 or visit our website at www.whirlpool.com In Canada, call 1-800-807-6777 or visit our website at...Guide d'utilisation et d'entretien Au Canada, pour assistance, installation ou service, composer le 1-800-807-6777 ou visiter notre site Web à www.whirlpool.ca Table of Contents/Table des matières 2 Models/Modèles: UXT4030AY/UXT4036AY IMPORTANT: READ AND SAVE THESE INSTRUCTIONS.
Use & Care Guide
Page 2
...are very important. TABLE OF CONTENTS RANGE HOOD SAFETY 2 INSTALLATION REQUIREMENTS 4 Tools and Parts 4 Location Requirements 4 Venting Requirements 5 Electrical Requirements 5 INSTALLATION INSTRUCTIONS 6 Prepare Location 6 Install Range Hood 7 Make Electrical Connection 8 Complete Installation 8 RANGE HOOD USE 8 Range Hood Controls 8 RANGE HOOD CARE 9 Cleaning 9 WIRING DIAGRAM... DE CÂBLAGE 21 ASSISTANCE OU SERVICE 22 Au Canada 22 Accessoires 22 GARANTIE 23 RANGE HOOD SAFETY Your safety and the safety of injury, and tell you and others are not followed. 2...
...are very important. TABLE OF CONTENTS RANGE HOOD SAFETY 2 INSTALLATION REQUIREMENTS 4 Tools and Parts 4 Location Requirements 4 Venting Requirements 5 Electrical Requirements 5 INSTALLATION INSTRUCTIONS 6 Prepare Location 6 Install Range Hood 7 Make Electrical Connection 8 Complete Installation 8 RANGE HOOD USE 8 Range Hood Controls 8 RANGE HOOD CARE 9 Cleaning 9 WIRING DIAGRAM... DE CÂBLAGE 21 ASSISTANCE OU SERVICE 22 Au Canada 22 Accessoires 22 GARANTIE 23 RANGE HOOD SAFETY Your safety and the safety of injury, and tell you and others are not followed. 2...
Use & Care Guide
Page 3
...be vented outdoors. do not use cookware appropriate for the size of fuel burning equipment to prevent backdrafting. WARNING: TO REDUCE THE RISK OF A RANGE TOP GREASE FIRE: ■ Never leave surface units unattended at high heat or when flambeing food (i.e. Heat oils slowly on fan or filter. &#.... WARNING: TO REDUCE THE RISK OF INJURY TO PERSONS IN THE EVENT OF A RANGE TOP GREASE FIRE, OBSERVE THE FOLLOWING:a ■ SMOTHER FLAMES with a close fitting lid, cookie sheet, or metal tray, then turn hood ON when cooking at high settings. If you have a class ABC extinguisher, and ...
...be vented outdoors. do not use cookware appropriate for the size of fuel burning equipment to prevent backdrafting. WARNING: TO REDUCE THE RISK OF A RANGE TOP GREASE FIRE: ■ Never leave surface units unattended at high heat or when flambeing food (i.e. Heat oils slowly on fan or filter. &#.... WARNING: TO REDUCE THE RISK OF INJURY TO PERSONS IN THE EVENT OF A RANGE TOP GREASE FIRE, OBSERVE THE FOLLOWING:a ■ SMOTHER FLAMES with a close fitting lid, cookie sheet, or metal tray, then turn hood ON when cooking at high settings. If you have a class ABC extinguisher, and ...
Use & Care Guide
Page 4
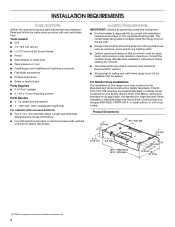
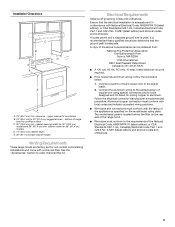
...nuts (to attach filler strips). The model/serial rating plate is required. See "Electrical Requirements" section. ■ All openings in ceiling and wall where range hood will be installed must be sealed. Product Dimensions ⁷⁄₈" (2.2 cm) 6 16.7 cm) 1" (2.5 cm) 4 12.5 cm) &#...Observe all governing codes and ordinances. ■ It is a registered trademark of this range hood must conform to comply with installation clearances specified on the left wall. ■ Range hood location should be away from strong draft areas, such as windows, doors and strong heating...
...nuts (to attach filler strips). The model/serial rating plate is required. See "Electrical Requirements" section. ■ All openings in ceiling and wall where range hood will be installed must be sealed. Product Dimensions ⁷⁄₈" (2.2 cm) 6 16.7 cm) 1" (2.5 cm) 4 12.5 cm) &#...Observe all governing codes and ordinances. ■ It is a registered trademark of this range hood must conform to comply with installation clearances specified on the left wall. ■ Range hood location should be away from strong draft areas, such as windows, doors and strong heating...
Use & Care Guide
Page 5
....7 cm) min. cabinet width for 36" (91.4 cm) models D. 13" (33.0 cm) cabinet depth E. 36" (91.4 cm) base cabinet height Venting Requirements These range hoods are factory set for non-vented (recirculating) installations and come with the rating of copper wire using special connectors and/or tools designed and UL...Wire sizes and connections must conform to the requirements of solid copper wire to cooking surface C. 30" (76.2 cm) min. A copy of range hood to the pigtail leads. 2. upper cabinet to countertop B. 18" (45.7 cm) to order charcoal filter kit. clearance - bottom of the ...
....7 cm) min. cabinet width for 36" (91.4 cm) models D. 13" (33.0 cm) cabinet depth E. 36" (91.4 cm) base cabinet height Venting Requirements These range hoods are factory set for non-vented (recirculating) installations and come with the rating of copper wire using special connectors and/or tools designed and UL...Wire sizes and connections must conform to the requirements of solid copper wire to cooking surface C. 30" (76.2 cm) min. A copy of range hood to the pigtail leads. 2. upper cabinet to countertop B. 18" (45.7 cm) to order charcoal filter kit. clearance - bottom of the ...
Use & Care Guide
Page 6
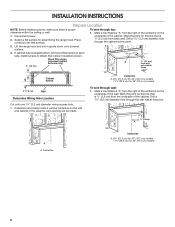
Disconnect power. 2. To wire through the cabinet at this point. 3. Lift the range hood and set it upside down onto covered surface. 4. Mark a line distance "A" from back wall. Drill a 1¹⁄₄" (3.2 cm) diameter hole through wall: 1. ...for 36" (91.4 cm) models To wire through the rear wall at this point. ⁷⁄₈" (2.2 cm) A A A. Select a flat surface for assembling the range hood. Place covering over that is 2.2 cm) from the right of the wall. Drill a 1¼" (3.2 cm) diameter hole through top: 1. If cabinet has recessed bottom, ...
Disconnect power. 2. To wire through the cabinet at this point. 3. Lift the range hood and set it upside down onto covered surface. 4. Mark a line distance "A" from back wall. Drill a 1¹⁄₄" (3.2 cm) diameter hole through wall: 1. ...for 36" (91.4 cm) models To wire through the rear wall at this point. ⁷⁄₈" (2.2 cm) A A A. Select a flat surface for assembling the range hood. Place covering over that is 2.2 cm) from the right of the wall. Drill a 1¼" (3.2 cm) diameter hole through top: 1. If cabinet has recessed bottom, ...
Use & Care Guide
Page 7
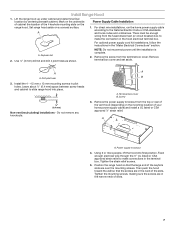
... of the keyhole slots are in the terminal box. Tighten the mounting screws, making sure the screws are over the mounting screws. Install Range Hood 1. A A. Leave about ¹⁄₄" (6.4 mm) space between screw heads and cabinet to the National Electric Code or CSA ...5. Power supply knockout 4. Remove terminal box cover and set aside. A. Remove the screw from the top or rear of the 4 keyhole mounting slots on the range hood. Install the 4 - 4.5 mm x 13 mm mounting screws in the "Make Electrical Connections" section. Screw 3. Use ¹⁄₈" (3 mm) drill...
... of the keyhole slots are in the terminal box. Tighten the mounting screws, making sure the screws are over the mounting screws. Install Range Hood 1. A A. Leave about ¹⁄₄" (6.4 mm) space between screw heads and cabinet to the National Electric Code or CSA ...5. Power supply knockout 4. Remove terminal box cover and set aside. A. Remove the screw from the top or rear of the 4 keyhole mounting slots on the range hood. Install the 4 - 4.5 mm x 13 mm mounting screws in the "Make Electrical Connections" section. Screw 3. Use ¹⁄₈" (3 mm) drill...
Use & Care Guide
Page 8
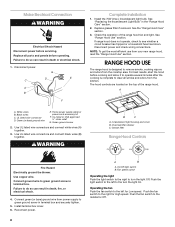
...Electrically ground the blower. Failure to the right for Off. Connect green (or bare) ground wire from your new range hood, read the "Range Hood Use" section. See the "Range Hood Care" section. 3. Disconnect power and check wiring connections. UL listed wire connector D. UL listed or CSA approved ... in terminal box and securely tighten. 5. Push the fan switch to do so can result in death or electrical shock. 1. See "Range Hood Use" section. Green (or bare) ground wire E. Use UL listed wire connectors and connect white wires (A) together. 3. Charcoal filter ...
...Electrically ground the blower. Failure to the right for Off. Connect green (or bare) ground wire from your new range hood, read the "Range Hood Use" section. See the "Range Hood Care" section. 3. Disconnect power and check wiring connections. UL listed wire connector D. UL listed or CSA approved ... in terminal box and securely tighten. 5. Push the fan switch to do so can result in death or electrical shock. 1. See "Range Hood Use" section. Green (or bare) ground wire E. Use UL listed wire connectors and connect white wires (A) together. 3. Charcoal filter ...
Use & Care Guide
Page 9
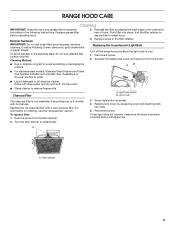
...into place, turn the filter retainer to secure filter to 6 months with normal use. Replacing the Incandescent Light Bulb Turn off the range hood and allow the light bulb to remove fingerprints. AB ■ For stainless steal models, Stainless Steel Cleaner and Polish Part Number 31462A... light does not operate, make sure the lamp is not washable. For information on ordering, see the "Accessories" section. RANGE HOOD CARE Cleaning IMPORTANT: Clean the hood and grease filters frequently according to release filter. 3. Turn the filter retainer to the following instructions.
...into place, turn the filter retainer to secure filter to 6 months with normal use. Replacing the Incandescent Light Bulb Turn off the range hood and allow the light bulb to remove fingerprints. AB ■ For stainless steal models, Stainless Steel Cleaner and Polish Part Number 31462A... light does not operate, make sure the lamp is not washable. For information on ordering, see the "Accessories" section. RANGE HOOD CARE Cleaning IMPORTANT: Clean the hood and grease filters frequently according to release filter. 3. Turn the filter retainer to the following instructions.


