
Installation Guide
Page 2
... mean: DANGER You can be killed or seriously injured if you don't immediately follow instructions. TABLE OF CONTENTS RANGE HOOD SAFETY 2 INSTALLATION REQUIREMENTS 4 Tools and Parts 4 Location Requirements 4 Venting Requirements 5 Electrical Requirements 6 INSTALLATION INSTRUCTIONS 7 Prepare Location 7 Install Hood Liner Internal Blower Motor 8 Install Hood Liner In-Line (External Type) Blower Motor 10 Make Electrical Connections for...
... mean: DANGER You can be killed or seriously injured if you don't immediately follow instructions. TABLE OF CONTENTS RANGE HOOD SAFETY 2 INSTALLATION REQUIREMENTS 4 Tools and Parts 4 Location Requirements 4 Venting Requirements 5 Electrical Requirements 6 INSTALLATION INSTRUCTIONS 7 Prepare Location 7 Install Hood Liner Internal Blower Motor 8 Install Hood Liner In-Line (External Type) Blower Motor 10 Make Electrical Connections for...
Installation Guide
Page 3
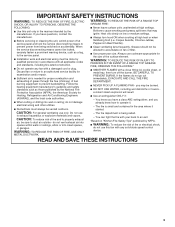
...proper pan size. Follow the heating equipment manufacturer's guideline and safety standards such as a tag, to the service panel. ■ Installation work and electrical wiring must always be locked, securely fasten a prominent warning device, such as those published by qualified person(s) in ...into crawl spaces, or garages. Discard fan or return to prevent backdrafting. Do not use only. READ AND SAVE THESE INSTRUCTIONS 3 IMPORTANT SAFETY INSTRUCTIONS WARNING: TO REDUCE THE RISK OF FIRE, ELECTRIC SHOCK, OR INJURY TO PERSONS, OBSERVE THE FOLLOWING: ■ Use this...
...proper pan size. Follow the heating equipment manufacturer's guideline and safety standards such as a tag, to the service panel. ■ Installation work and electrical wiring must always be locked, securely fasten a prominent warning device, such as those published by qualified person(s) in ...into crawl spaces, or garages. Discard fan or return to prevent backdrafting. Do not use only. READ AND SAVE THESE INSTRUCTIONS 3 IMPORTANT SAFETY INSTRUCTIONS WARNING: TO REDUCE THE RISK OF FIRE, ELECTRIC SHOCK, OR INJURY TO PERSONS, OBSERVE THE FOLLOWING: ■ Use this...
Installation Guide
Page 4
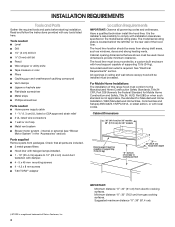
... of supporting 75 lb (34 kg). Given dimensions provide minimum clearance. All openings in the "Accessories" section). For Mobile Home Installations The installation of this range hood must be away from electric cooking surfaces. Minimum distance "X": 30" (76.2 cm) from packages. Parts...lb (34 kg) "X" bottom of Saturn Fasteners, Inc. 4 Suggested maximum distance "X": 36" (91.4 cm). †®TORX is required. Read and follow the instructions provided with damper. ■ 4 - 5 x 45 mm mounting screws ■ 4 - 4.2 x 8 mm screws ■ T-20 TORX®† adapter ...
... of supporting 75 lb (34 kg). Given dimensions provide minimum clearance. All openings in the "Accessories" section). For Mobile Home Installations The installation of this range hood must be away from electric cooking surfaces. Minimum distance "X": 30" (76.2 cm) from packages. Parts...lb (34 kg) "X" bottom of Saturn Fasteners, Inc. 4 Suggested maximum distance "X": 36" (91.4 cm). †®TORX is required. Read and follow the instructions provided with damper. ■ 4 - 5 x 45 mm mounting screws ■ 4 - 4.2 x 8 mm screws ■ T-20 TORX®† adapter ...
Installation Guide
Page 7
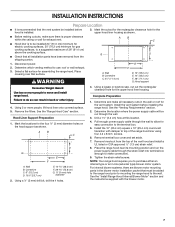
...the filters. Complete Preparation 1. Pull enough power supply cable through the wall. 3. Wall B. Install the 10" (25.4 cm) square x 10" (25.4 cm) round vent transition with the blower motor. 7 INSTALLATION INSTRUCTIONS Prepare Location ■ It is recommended that all necessary cuts in the wall or roof ...the cutout for the rectangular clearance hole for the upper hood liner housing as shown. Wall B. Install the vent system before hood is installed. 3. See the "Install Range Hood Internal Blower Motor" section and the instructions supplied with damper to the wall.
...the filters. Complete Preparation 1. Pull enough power supply cable through the wall. 3. Wall B. Install the 10" (25.4 cm) square x 10" (25.4 cm) round vent transition with the blower motor. 7 INSTALLATION INSTRUCTIONS Prepare Location ■ It is recommended that all necessary cuts in the wall or roof ...the cutout for the rectangular clearance hole for the upper hood liner housing as shown. Wall B. Install the vent system before hood is installed. 3. See the "Install Range Hood Internal Blower Motor" section and the instructions supplied with damper to the wall.

Installation Guide
Page 18
...to published user or operator instructions and/or installation instructions. 4. The cost of repair or replacement under this limited warranty. After checking "Troubleshooting," you on the product. In the U.S.A., call 1-800-807-6777. 9/07 Keep this book and your authorized Whirlpool dealer to determine if ...on the model and serial number label located on how to use or when it was purchased. Costs associated with published installation instructions. 11. This warranty is not available. 10. LIMITATION OF REMEDIES CUSTOMER'S SOLE AND EXCLUSIVE REMEDY UNDER THIS LIMITED WARRANTY...
...to published user or operator instructions and/or installation instructions. 4. The cost of repair or replacement under this limited warranty. After checking "Troubleshooting," you on the product. In the U.S.A., call 1-800-807-6777. 9/07 Keep this book and your authorized Whirlpool dealer to determine if ...on the model and serial number label located on how to use or when it was purchased. Costs associated with published installation instructions. 11. This warranty is not available. 10. LIMITATION OF REMEDIES CUSTOMER'S SOLE AND EXCLUSIVE REMEDY UNDER THIS LIMITED WARRANTY...
Dimension Guide
Page 1
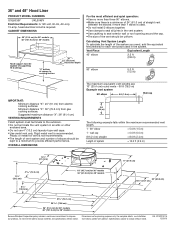
... between the elbows if more than 1 elbow is recommended. For complete details, see Installation our products, we reserve the right to provide efficient performance. VENTING REQUIREMENTS q Vent ...- q The size of the system you need, add the equivalent feet (meters) for 48" models Because Whirlpool Corporation policy includes a continuous commitment to cooking surface 22" (55.9 cm) Hood liner depth For the most...without notice. Specifications subject to the outdoors. W10331011A 12/20/10 q Do not install 2 elbows together. q Use caulking to seal all joints in an attic or ...
... between the elbows if more than 1 elbow is recommended. For complete details, see Installation our products, we reserve the right to provide efficient performance. VENTING REQUIREMENTS q Vent ...- q The size of the system you need, add the equivalent feet (meters) for 48" models Because Whirlpool Corporation policy includes a continuous commitment to cooking surface 22" (55.9 cm) Hood liner depth For the most...without notice. Specifications subject to the outdoors. W10331011A 12/20/10 q Do not install 2 elbows together. q Use caulking to seal all joints in an attic or ...

Warranty Information
Page 1
... and is reported to determine if another warranty applies. Proof of consumables or cleaning products not approved by an authorized Whirlpool servicer is required to published user or operator instructions and/or installation instructions. 4. ITEMS EXCLUDED FROM WARRANTY This limited warranty does not cover: 1. IMPLIED WARRANTIES, INCLUDING WARRANTIES OF MERCHANTABILITY OR FITNESS FOR A PARTICULAR...
... and is reported to determine if another warranty applies. Proof of consumables or cleaning products not approved by an authorized Whirlpool servicer is required to published user or operator instructions and/or installation instructions. 4. ITEMS EXCLUDED FROM WARRANTY This limited warranty does not cover: 1. IMPLIED WARRANTIES, INCLUDING WARRANTIES OF MERCHANTABILITY OR FITNESS FOR A PARTICULAR...

