
Installation Guide
Page 1
...manual and on your appliance. IMPORTANT : LIRE ET CONSERVER CES INSTRUCTIONS. INSTALLATION INSTRUCTIONS 600 CFM AND 1200 CFM INTERNAL BLOWERS FOR RANGE HOODS INSTRUCTIONS D'INSTALLATION VENTILATEURS INTERNES AVEC DÉBIT DE 600 PI³/MIN ET 1200 PI³/MIN ... Table of Contents/Table des matières RANGE HOOD SAFETY 1 INSTALLATION REQUIREMENTS 3 Tools and Parts 3 INSTALLATION INSTRUCTIONS 3 Prepare Internal Blower System 3 Install Range Hood Blower Motor 4 ASSISTANCE OR SERVICE 5 In the U.S.A 5 In Canada 5 WARRANTY 6 SÉCURITÉ DE LA HOTTE DE CUISINI&#...
...manual and on your appliance. IMPORTANT : LIRE ET CONSERVER CES INSTRUCTIONS. INSTALLATION INSTRUCTIONS 600 CFM AND 1200 CFM INTERNAL BLOWERS FOR RANGE HOODS INSTRUCTIONS D'INSTALLATION VENTILATEURS INTERNES AVEC DÉBIT DE 600 PI³/MIN ET 1200 PI³/MIN ... Table of Contents/Table des matières RANGE HOOD SAFETY 1 INSTALLATION REQUIREMENTS 3 Tools and Parts 3 INSTALLATION INSTRUCTIONS 3 Prepare Internal Blower System 3 Install Range Hood Blower Motor 4 ASSISTANCE OR SERVICE 5 In the U.S.A 5 In Canada 5 WARRANTY 6 SÉCURITÉ DE LA HOTTE DE CUISINI&#...

Installation Guide
Page 3
... 5 - 6 x 16 mm screws ■ 5 - 6.4 x 11 mm lock washers ■ T-20 Torx®† adapter Prepare Internal Blower System IMPORTANT: Perform steps 1-4 before starting installation. Slide the mounting tab of Saturn Fasteners, Inc. 3 INSTALLATION REQUIREMENTS INSTALLATION INSTRUCTIONS Tools and Parts Gather...of mounting holes for the selected motor system. Install motor spring clip using three 4.2 x 8 mm screws. Check that all parts are included. ■ Blower assembly ■ Motor support bracket ■ Motor spring clip ■ 2 - 6 x 1 mm nuts ■ 5 - 4.2 x 8 mm...
... 5 - 6 x 16 mm screws ■ 5 - 6.4 x 11 mm lock washers ■ T-20 Torx®† adapter Prepare Internal Blower System IMPORTANT: Perform steps 1-4 before starting installation. Slide the mounting tab of Saturn Fasteners, Inc. 3 INSTALLATION REQUIREMENTS INSTALLATION INSTRUCTIONS Tools and Parts Gather...of mounting holes for the selected motor system. Install motor spring clip using three 4.2 x 8 mm screws. Check that all parts are included. ■ Blower assembly ■ Motor support bracket ■ Motor spring clip ■ 2 - 6 x 1 mm nuts ■ 5 - 4.2 x 8 mm...

Installation Guide
Page 4
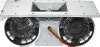
... and connector 4 Clip nuts into the small square notches, one located in the right end of the square vent opening . Install Range Hood Blower Motor 1. Single Blower Motor Assembly AB A. Wiring connection A 2. Clip nut (6 mm) locations for dual motor assembly (quantity 5) B. Motor mounting bracket B. 4.... motor system and to the left and right end of the motor mounting plate. A A A. A B A. Install the range hood blower motor assembly inside the range hood canopy with your range hood model. Clip nuts into the small square notches located at the proper location...
... and connector 4 Clip nuts into the small square notches, one located in the right end of the square vent opening . Install Range Hood Blower Motor 1. Single Blower Motor Assembly AB A. Wiring connection A 2. Clip nut (6 mm) locations for dual motor assembly (quantity 5) B. Motor mounting bracket B. 4.... motor system and to the left and right end of the motor mounting plate. A A A. A B A. Install the range hood blower motor assembly inside the range hood canopy with your range hood model. Clip nuts into the small square notches located at the proper location...