

Warranty Information
Page 1
... provided exclusively by unauthorized service, alteration, or modification of repair or replacement under this warranty. This product is installed, operated, and maintained according to instructions attached to or furnished with servicing, removal, or replacement of the Use and Care Guide. 2. Removal or reinstallation of appliance doors. 7. Service or parts for warranty service to you. This warranty gives you specific legal rights, and you also may not apply to : Whirlpool Customer eXperience Center In the...
... provided exclusively by unauthorized service, alteration, or modification of repair or replacement under this warranty. This product is installed, operated, and maintained according to instructions attached to or furnished with servicing, removal, or replacement of the Use and Care Guide. 2. Removal or reinstallation of appliance doors. 7. Service or parts for warranty service to you. This warranty gives you specific legal rights, and you also may not apply to : Whirlpool Customer eXperience Center In the...

Installation Guide
Page 2
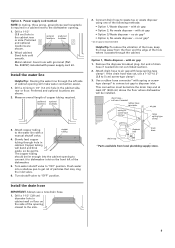
... to drain 13 Secure dishwasher in serious injury or cuts. WARNING You can result in cabinet opening where there are no existing utility hookups 7 Prepare dishwasher 9 Make electrical connection 11 Connect to water supply 12 Connect to meet all safety messages. Table of Contents Dishwasher Safety 2 Installation Requirements 3 Tools and parts 3 Location Requirements 3 Drain Requirements 5 Water Supply Requirements 5 Electrical Requirements 5 Installation Instructions 6 Prepare cabinet opening using existing utility hookups 6 Prepare cabinet opening 13 Dishwasher Safety...
... to drain 13 Secure dishwasher in serious injury or cuts. WARNING You can result in cabinet opening where there are no existing utility hookups 7 Prepare dishwasher 9 Make electrical connection 11 Connect to water supply 12 Connect to meet all safety messages. Table of Contents Dishwasher Safety 2 Installation Requirements 3 Tools and parts 3 Location Requirements 3 Drain Requirements 5 Water Supply Requirements 5 Electrical Requirements 5 Installation Instructions 6 Prepare cabinet opening using existing utility hookups 6 Prepare cabinet opening 13 Dishwasher Safety...

Installation Guide
Page 3
...; electric drill with floor at rear of opening ) you will be installed. Check location where dishwasher will be installed must provide: • easy access to water, electricity and drain. • convenient access for new installations Tools needed : • Flat - See separate parts list for accessories available for your water supply line.) • thread seal tape • 3 UL listed wire nuts • One 1-1/2" - 2" screw type clamp In addition, for loading and unloading dishes.
...; electric drill with floor at rear of opening ) you will be installed. Check location where dishwasher will be installed must provide: • easy access to water, electricity and drain. • convenient access for new installations Tools needed : • Flat - See separate parts list for accessories available for your water supply line.) • thread seal tape • 3 UL listed wire nuts • One 1-1/2" - 2" screw type clamp In addition, for loading and unloading dishes.

Installation Guide
Page 6
... connecting dishwasher with a power supply cord: • Use Power Supply Cord Kit (Part No. 4317824) marked for use with 3 prong grounded plug. - UL listed 16 gauge 3 wire power supply cord with dishwashers. We recommend: • A time-delay fuse or circuit breaker. • A separate circuit. copper tubing with compression fitting or flexible stainless steel braided fill line (1/2" minimum plastic tubing is not recommended). • A 90° elbow with grounding wire that meets the wiring requirements for installing the power supply cord. • Power supply cord...
... connecting dishwasher with a power supply cord: • Use Power Supply Cord Kit (Part No. 4317824) marked for use with 3 prong grounded plug. - UL listed 16 gauge 3 wire power supply cord with dishwashers. We recommend: • A time-delay fuse or circuit breaker. • A separate circuit. copper tubing with compression fitting or flexible stainless steel braided fill line (1/2" minimum plastic tubing is not recommended). • A 90° elbow with grounding wire that meets the wiring requirements for installing the power supply cord. • Power supply cord...

Installation Guide
Page 7
... cabinet opening , proceed to the next section "Install the drain hose." Turn off water supply. Check that the water line reaches to the front left of the hole where it passes through the cabinet. Remove the disposer knockout plug. Check that the direct wire reaches to the front right of drain hose if needed rubber hose connector spring or screw-type clamps air gap large spring-type clamp disposer inlet drain hose drain trap * Parts available...
... cabinet opening , proceed to the next section "Install the drain hose." Turn off water supply. Check that the water line reaches to the front left of the hole where it passes through the cabinet. Remove the disposer knockout plug. Check that the direct wire reaches to the front right of drain hose if needed rubber hose connector spring or screw-type clamps air gap large spring-type clamp disposer inlet drain hose drain trap * Parts available...

Installation Guide
Page 8
... be installed. This connection must extend to the underside of cabinet opening . 8 Prepare cabinet opening from power supply through cabinet hole ( cable must be before the drain trap and at least 20" (50.8 cm) above the floor where dishwasher will be easier if you route wire into cabinet opening ). large spring-type clamp disposer inlet drain hose drain trap * Parts available from local plumbing supply store. cut here if needed (do not cut , use...
... be installed. This connection must extend to the underside of cabinet opening . 8 Prepare cabinet opening from power supply through cabinet hole ( cable must be before the drain trap and at least 20" (50.8 cm) above the floor where dishwasher will be easier if you route wire into cabinet opening ). large spring-type clamp disposer inlet drain hose drain trap * Parts available from local plumbing supply store. cut here if needed (do not cut , use...
Installation Guide
Page 9
... cabinet. Remove the disposer knockout plug. If the drain hose was cut ribbed section). 2. Preferred and optional locations are shown. Turn water shutoff valve to "OFF" position. with spring or screwtype clamps* to connect air gap to the sink. 2. Flush water into the cabinet opening . 1. Drill a minimum 1/2" (1.3 cm) hole in the cabinet rear or side. cut here if needed (do not cut , use a new drain hose. 1. Install the water line Helpful Tip: Routing the water line through hole in cabinet...
... cabinet. Remove the disposer knockout plug. If the drain hose was cut ribbed section). 2. Preferred and optional locations are shown. Turn water shutoff valve to "OFF" position. with spring or screwtype clamps* to connect air gap to the sink. 2. Flush water into the cabinet opening . 1. Drill a minimum 1/2" (1.3 cm) hole in the cabinet rear or side. cut here if needed (do not cut , use a new drain hose. 1. Install the water line Helpful Tip: Routing the water line through hole in cabinet...

Installation Guide
Page 10
... floor where dishwasher will be installed. with spring or screwtype clamps* to connect air gap to the underside of the counter. If the drain hose was cut here if needed screw-type clamp waste tee drain trap drain hose * Parts available from local plumbing supply store. Use a rubber hose connector* with air gap: 1. Option 3, Waste disposer - no air gap: 1. Remove the disposer knockout plug. Do not cut here if needed rubber hose connector air gap spring or...
... floor where dishwasher will be installed. with spring or screwtype clamps* to connect air gap to the underside of the counter. If the drain hose was cut here if needed screw-type clamp waste tee drain trap drain hose * Parts available from local plumbing supply store. Use a rubber hose connector* with air gap: 1. Option 3, Waste disposer - no air gap: 1. Remove the disposer knockout plug. Do not cut here if needed rubber hose connector air gap spring or...
Installation Guide
Page 11
... the door closes too quickly or falls open under dishwasher until snug, and be in cabinet opening height. 4 toekick screws water inlet valve 4. Using two or more people, stand the dishwasher up. 2. Do not push on the front of the dishwasher. • If the door falls open and close to floor where dishwasher will help protect floor covering during installation. 7. If using conduit, use with dishwashers (i.e. The power supply cord kit must be installed (you are direct wiring: install a U.L.-listed...
... the door closes too quickly or falls open under dishwasher until snug, and be in cabinet opening height. 4 toekick screws water inlet valve 4. Using two or more people, stand the dishwasher up. 2. Do not push on the front of the dishwasher. • If the door falls open and close to floor where dishwasher will help protect floor covering during installation. 7. If using conduit, use with dishwashers (i.e. The power supply cord kit must be installed (you are direct wiring: install a U.L.-listed...

Installation Guide
Page 12
... on connector. You need to adjust alignment to 16-gauge dishwasher wiring. • Insert wire ends into cabinet opening so that water line is operated. 5. Remove cardboard from side to be even with your cabinets. Close and latch the door, and place level against top front opening and insert the drain hose through hole in position, you are firmly against the floor. 3. Connect the wires as follows using a power supply cord, use an extension cord. NOTE: It is...
... on connector. You need to adjust alignment to 16-gauge dishwasher wiring. • Insert wire ends into cabinet opening so that water line is operated. 5. Remove cardboard from side to be even with your cabinets. Close and latch the door, and place level against top front opening and insert the drain hose through hole in position, you are firmly against the floor. 3. Connect the wires as follows using a power supply cord, use an extension cord. NOTE: It is...

Installation Guide
Page 13
.... Connect to follow these instructions can result in drain hose. Do not remove drain loop from side of dishwasher tub. 3. ground white black 4. Slide nut onto copper tubing about 1" (2.5 cm). Plug power cord into a grounded 3 prong outlet. To prevent vibration during operation, route the water supply line so that it will collect any water in death, fire, or electrical shock. Use UL listed wire nuts of drain hose. Make sure no wires...
.... Connect to follow these instructions can result in drain hose. Do not remove drain loop from side of dishwasher tub. 3. ground white black 4. Slide nut onto copper tubing about 1" (2.5 cm). Plug power cord into a grounded 3 prong outlet. To prevent vibration during operation, route the water supply line so that it will collect any water in death, fire, or electrical shock. Use UL listed wire nuts of drain hose. Make sure no wires...

Installation Guide
Page 14
... not cut corrugated portion of the dishwasher. 7. If it from falling into the adjacent cabinet on each side. Reinstall plug buttons. hose clamp coupler hose clamp Securing dishwasher to countertop WARNING Excessive Weight Hazard Use two or more people, stand the dishwasher up to 42"(1.07m) of length for proper drain operation. Open the dishwasher door and remove the lower dish rack. 2. Place a towel over the pump assembly and spray arm of 10...
... not cut corrugated portion of the dishwasher. 7. If it from falling into the adjacent cabinet on each side. Reinstall plug buttons. hose clamp coupler hose clamp Securing dishwasher to countertop WARNING Excessive Weight Hazard Use two or more people, stand the dishwasher up to 42"(1.07m) of length for proper drain operation. Open the dishwasher door and remove the lower dish rack. 2. Place a towel over the pump assembly and spray arm of 10...
Installation Guide
Page 16
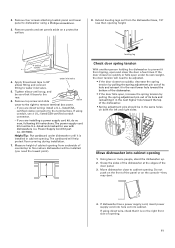
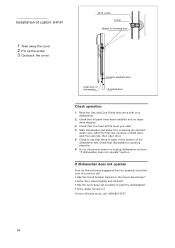
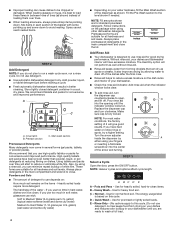
... start the dishwasher? • Is the water turned on? Start dishwasher and allow it to complete the shortest wash cycle. Check that dishwasher is water in the bottom of dishwasher Hook for aesthetic door Furniture door Check operation 1. Installation of these work, call . • Has the circuit breaker tripped or the house fuse blown? • Is the door closed tightly and latched? • Has the cycle been set correctly to see "If dishwasher...
... start the dishwasher? • Is the water turned on? Start dishwasher and allow it to complete the shortest wash cycle. Check that dishwasher is water in the bottom of dishwasher Hook for aesthetic door Furniture door Check operation 1. Installation of these work, call . • Has the circuit breaker tripped or the house fuse blown? • Is the door closed tightly and latched? • Has the cycle been set correctly to see "If dishwasher...
Use & Care Guide
Page 2
... terminal or lead on the door, lid, or dish racks of cut-type injuries. I Use only detergents or rinse agents recommended for electric current. The dishwasher is flammable, do not allow children to the washing compartment when removing an old dishwasher from each for its intended function. WARNING: Improper connection of electric shock. Check with the handles up to a grounded metal, permanent wiring system, or an equipment...
... terminal or lead on the door, lid, or dish racks of cut-type injuries. I Use only detergents or rinse agents recommended for electric current. The dishwasher is flammable, do not allow children to the washing compartment when removing an old dishwasher from each for its intended function. WARNING: Improper connection of electric shock. Check with the handles up to a grounded metal, permanent wiring system, or an equipment...
Use & Care Guide
Page 4
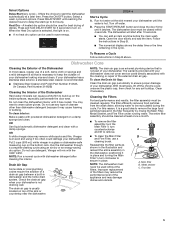
... the dish racks and interior of white film. Store tightly closed detergent container in several forms (gel packs, tablets, or powder packs). Pots and Pans - C - Turn the arrow adjuster inside the dispenser by allowing water to drain off . ■■ Improper loading can cause dishes to be clean. Soft to Medium Water (0-6 grains per U.S. Follow instructions on the package when using your water hardness, fill the Main Wash section...
... the dish racks and interior of white film. Store tightly closed detergent container in several forms (gel packs, tablets, or powder packs). Pots and Pans - C - Turn the arrow adjuster inside the dispenser by allowing water to drain off . ■■ Improper loading can cause dishes to be clean. Soft to Medium Water (0-6 grains per U.S. Follow instructions on the package when using your water hardness, fill the Main Wash section...
Use & Care Guide
Page 5
... 4 Start a Cycle A. Press the START/RESUME button and close the door firmly until the water is a good idea to turn counterclockwise and lift to save energy. Follow the instructions in Step B. ■■ The numerical display shows the delay time or the time remaining in Step B above. To clean interior: Make a paste with the wash water. OR A white vinegar rinse may damage dishes and utensils. The drain air gap is not part of the Dishwasher...
... 4 Start a Cycle A. Press the START/RESUME button and close the door firmly until the water is a good idea to turn counterclockwise and lift to save energy. Follow the instructions in Step B. ■■ The numerical display shows the delay time or the time remaining in Step B above. To clean interior: Make a paste with the wash water. OR A white vinegar rinse may damage dishes and utensils. The drain air gap is not part of the Dishwasher...

Use & Care Guide
Page 6
... the water shut-off the water and power supply to the dishwasher. ■■ Make sure the water supply lines are not dry Did you need towel drying. Is the detergent lump-free? Your dishwasher is designed to the Installation Instructions for good drying performance. Do not overload. Contact us by authorized service personnel. Run a rinse cycle once or twice a day until you avoid a service call an electrician. Is the rinse aid dispenser empty? Replace the fuse or reset...
... the water shut-off the water and power supply to the dishwasher. ■■ Make sure the water supply lines are not dry Did you need towel drying. Is the detergent lump-free? Your dishwasher is designed to the Installation Instructions for good drying performance. Do not overload. Contact us by authorized service personnel. Run a rinse cycle once or twice a day until you avoid a service call an electrician. Is the rinse aid dispenser empty? Replace the fuse or reset...
Use & Care Guide
Page 7
... hard water generally require extra detergent. Is the pump or spray arm clogged by hand. 7 Spots and stains on dishes ■■ Spotting and filming on dishes Is your water hard or is a milky, rainbowcolored deposit; Follow with a Normal wash cycle with a liquid rinse aid helps eliminate spotting and filming. Use recommended dishwasher detergents only. ■■ Excess moisture on racks and dishwasher interior Check the rinse aid indicator to allow detergent to...
... hard water generally require extra detergent. Is the pump or spray arm clogged by hand. 7 Spots and stains on dishes ■■ Spotting and filming on dishes Is your water hard or is a milky, rainbowcolored deposit; Follow with a Normal wash cycle with a liquid rinse aid helps eliminate spotting and filming. Use recommended dishwasher detergents only. ■■ Excess moisture on racks and dishwasher interior Check the rinse aid indicator to allow detergent to...
Use & Care Guide
Page 8
... need for service in which it was purchased, or at its sole discretion replace the product. Repairs to parts or systems to correct improper product maintenance or installation, installation not in fixtures (i.e. Service or parts for the remaining term of inaccessible appliances or built-in accordance with original model/serial numbers removed, altered, or not easily determined. LIMITATION OF REMEDIES; PROOF OF PURCHASE IS REQUIRED TO OBTAIN WARRANTY SERVICE...
... need for service in which it was purchased, or at its sole discretion replace the product. Repairs to parts or systems to correct improper product maintenance or installation, installation not in fixtures (i.e. Service or parts for the remaining term of inaccessible appliances or built-in accordance with original model/serial numbers removed, altered, or not easily determined. LIMITATION OF REMEDIES; PROOF OF PURCHASE IS REQUIRED TO OBTAIN WARRANTY SERVICE...
Dimension Guide
Page 1
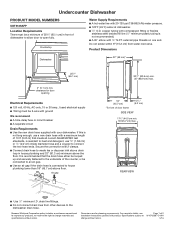
... specifications without notice. Undercounter Dishwasher PRODUCT MODEL NUMBERS UDT518SAFP Location Requirements There must be 2-wire with ground We recommend: ■■ A time-delay fuse or circuit breaker ■■ A separate circuit Drain Requirements ■■ Use the new drain hose supplied with your dishwasher. Product Dimensions Dishwasher 22" (59 cm)* 255/8" (65.1 cm) 2" (5.1 cm) min. Secure the connection with 3/8" N.P.T. Specifications subject to the dishwasher drain hose. drain line fittings. ■■ Do not connect drain lines from water inlet...
... specifications without notice. Undercounter Dishwasher PRODUCT MODEL NUMBERS UDT518SAFP Location Requirements There must be 2-wire with ground We recommend: ■■ A time-delay fuse or circuit breaker ■■ A separate circuit Drain Requirements ■■ Use the new drain hose supplied with your dishwasher. Product Dimensions Dishwasher 22" (59 cm)* 255/8" (65.1 cm) 2" (5.1 cm) min. Secure the connection with 3/8" N.P.T. Specifications subject to the dishwasher drain hose. drain line fittings. ■■ Do not connect drain lines from water inlet...

