

Owners Manual
Page 3
... trash bag with a damaged cord set, plug, motor, or after damage in this manual and on your appliance. This symbol alerts you to reduce the chance of children. ■ Do not touch moving parts. ■ Do not operate with heavy material such as glass. ■ This compactor is...and store key out of reach of injury, and tell you don't immediately follow instructions. Have the compactor examined, repaired or adjusted by or near children. Always read and obey all instructions before using an electrical appliance, basic precautions should always be killed or seriously injured ...
... trash bag with a damaged cord set, plug, motor, or after damage in this manual and on your appliance. This symbol alerts you to reduce the chance of children. ■ Do not touch moving parts. ■ Do not operate with heavy material such as glass. ■ This compactor is...and store key out of reach of injury, and tell you don't immediately follow instructions. Have the compactor examined, repaired or adjusted by or near children. Always read and obey all instructions before using an electrical appliance, basic precautions should always be killed or seriously injured ...

Owners Manual
Page 4
Homeowner: Keep Use and Care Guide for future reference and for local electrical inspector's use, if required. Unpacking WARNING 4. Leveling legs B. Place the 2 corner posts from the bottom of the compactor. Grasp sides of drawer and lift drawer out of drawer until it ... (86.7 cm) 15" (38.1 cm) 24" (61 cm) 4 Do not remove the compactor bag. Place the drawer on the floor to move and install compactor. Cord clip 3. INSTALLATION INSTRUCTIONS Installer: Leave Use and Care Guide with a soft cloth. Excessive Weight Hazard Use two or more information, see "Cleaning." 2. For ...
Homeowner: Keep Use and Care Guide for future reference and for local electrical inspector's use, if required. Unpacking WARNING 4. Leveling legs B. Place the 2 corner posts from the bottom of the compactor. Grasp sides of drawer and lift drawer out of drawer until it ... (86.7 cm) 15" (38.1 cm) 24" (61 cm) 4 Do not remove the compactor bag. Place the drawer on the floor to move and install compactor. Cord clip 3. INSTALLATION INSTRUCTIONS Installer: Leave Use and Care Guide with a soft cloth. Excessive Weight Hazard Use two or more information, see "Cleaning." 2. For ...

Owners Manual
Page 5
...cm) of clearance in front of the compactor in death, fire, or electrical shock. B A A. Clearance dimensions Electrical Shock Hazard Plug into a grounded 3 prong outlet. or 20-amp fused and properly grounded circuit and is for use to follow these instructions can be grounded while in use on ... (87 cm) 15¹⁄₄" min. (38.7 cm) A. Grounded electrical outlet must be placed either to remove the compactor bags. Do not use an extension cord. The compactor is recommended that a separate circuit serving only this appliance be a minimum of electric shock.
...cm) of clearance in front of the compactor in death, fire, or electrical shock. B A A. Clearance dimensions Electrical Shock Hazard Plug into a grounded 3 prong outlet. or 20-amp fused and properly grounded circuit and is for use to follow these instructions can be grounded while in use on ... (87 cm) 15¹⁄₄" min. (38.7 cm) A. Grounded electrical outlet must be placed either to remove the compactor bags. Do not use an extension cord. The compactor is recommended that a separate circuit serving only this appliance be a minimum of electric shock.

Owners Manual
Page 6
...control panel to move compactor. ■ If the compactor is the personal responsibility and obligation of the compactor to touch the floor covering when lifting or moving compactor. 3 21 Undercounter Installation 1. See Position "1" in position "3," you want the compactor frame ... and parts before moving compactor across B floor. ■ Do not allow the rear frame of the customer to contact a qualified installer to assure that electrical installation meets all national and local codes and ordinances. 2. A. Undercounter Installation NOTE: Proper installation is to...
...control panel to move compactor. ■ If the compactor is the personal responsibility and obligation of the compactor to touch the floor covering when lifting or moving compactor. 3 21 Undercounter Installation 1. See Position "1" in position "3," you want the compactor frame ... and parts before moving compactor across B floor. ■ Do not allow the rear frame of the customer to contact a qualified installer to assure that electrical installation meets all national and local codes and ordinances. 2. A. Undercounter Installation NOTE: Proper installation is to...

Owners Manual
Page 7
...plate the amount of trash the first few times you load the compactor. COMPACTOR USE How Your Compactor Works The compacting ram is the part of the drawer. The trash in a full compactor bag will not see compacting of toe plate that rubs the floor covering. 2. NOTE: Pressing the foot pedal opens the container ... at the handle so drawer will not see "Adjusting the Toe Plate" for further instructions. Lift at all. Open the drawer. The Drawer Monitor Switch then senses a "misload" and causes the ram to return to the bottom of drawer into compactor with hands or feet.
...plate the amount of trash the first few times you load the compactor. COMPACTOR USE How Your Compactor Works The compacting ram is the part of the drawer. The trash in a full compactor bag will not see compacting of toe plate that rubs the floor covering. 2. NOTE: Pressing the foot pedal opens the container ... at the handle so drawer will not see "Adjusting the Toe Plate" for further instructions. Lift at all. Open the drawer. The Drawer Monitor Switch then senses a "misload" and causes the ram to return to the bottom of drawer into compactor with hands or feet.

Owners Manual
Page 8
.... 1. Order replacement compactor bags through your compactor. Load trash. 2. Press foot-actuated START pedal to the top of the drawer, remove the bag. If the bag is compacted to begin cycle. Press inside of bag from bag retainer buttons. Leave Key-Knob in the "Assistance or Service" section. Installing a New Bag Do not use in the future. Lift out bag. 8 IMPORTANT: Before installing a new bag, be sure...
.... 1. Order replacement compactor bags through your compactor. Load trash. 2. Press foot-actuated START pedal to the top of the drawer, remove the bag. If the bag is compacted to begin cycle. Press inside of bag from bag retainer buttons. Leave Key-Knob in the "Assistance or Service" section. Installing a New Bag Do not use in the future. Lift out bag. 8 IMPORTANT: Before installing a new bag, be sure...

Owners Manual
Page 9
...or Side-Lock latch). 2. Set the drawer down while pushing ...down gently. 3. To replace the drawer, grasp it...trash should be bits of glass in the cabinet. 1. Lift the front of the drawer and push it out. 4. Remove the bag. Do not use abrasive or harsh cleaners. See "Removing a Filled Bag...." 2. Wipe up , then lifting it in the tracks. NOTE: If desired, the drawer side can damage the finish if left on the compactor surface. Cleaning Exterior Surfaces 1. COMPACTOR CARE Your new compactor is designed to give you are a few things you many years of dependable service...
...or Side-Lock latch). 2. Set the drawer down while pushing ...down gently. 3. To replace the drawer, grasp it...trash should be bits of glass in the cabinet. 1. Lift the front of the drawer and push it out. 4. Remove the bag. Do not use abrasive or harsh cleaners. See "Removing a Filled Bag...." 2. Wipe up , then lifting it in the tracks. NOTE: If desired, the drawer side can damage the finish if left on the compactor surface. Cleaning Exterior Surfaces 1. COMPACTOR CARE Your new compactor is designed to give you are a few things you many years of dependable service...

Owners Manual
Page 10
... thoroughly with a cloth or paper towels. 2. TROUBLESHOOTING Try the solutions suggested here first in warm water. Drawer must be bits of days, remove the compactor bag. Replace the fuse or reset the circuit breaker. If the problem continues, call . Press ON before pressing START? To raise the ram on some models). Bottles will open ■ Is the...
... thoroughly with a cloth or paper towels. 2. TROUBLESHOOTING Try the solutions suggested here first in warm water. Drawer must be bits of days, remove the compactor bag. Replace the fuse or reset the circuit breaker. If the problem continues, call . Press ON before pressing START? To raise the ram on some models). Bottles will open ■ Is the...

Owners Manual
Page 11
...codes on the bottom. REMEMBER: Do not expect items which items are identified by the numbers inside the triangular arrows. The compactor is recyclable. ■ Preparations of trash can be compacted because compaction reduces trash volume to its original size: four bags of recyclable items. Most recycling programs provide specific..., but often labels can be purchased in a variety of color-coded bags in "Installing a New Bag." For example, aluminum cans and plastic containers need to fit in "Compactor Use." IMPORTANT: ■ Some items, such as folded newspapers,...
...codes on the bottom. REMEMBER: Do not expect items which items are identified by the numbers inside the triangular arrows. The compactor is recyclable. ■ Preparations of trash can be compacted because compaction reduces trash volume to its original size: four bags of recyclable items. Most recycling programs provide specific..., but often labels can be purchased in a variety of color-coded bags in "Installing a New Bag." For example, aluminum cans and plastic containers need to fit in "Compactor Use." IMPORTANT: ■ Some items, such as folded newspapers,...

Owners Manual
Page 12
... complete model and serial number of appliances. ■ Warranty information. ■ Use and maintenance procedures. ■ Accessory and repair parts sales. ■ Referrals to local dealers, repair parts distributors, and service companies. Our consultants provide assistance with: ■ Features and specifications on our full line of your correspondence. 12 Accessories To ensure the proper functioning of appliances. ■ Installation information...
... complete model and serial number of appliances. ■ Warranty information. ■ Use and maintenance procedures. ■ Accessory and repair parts sales. ■ Referrals to local dealers, repair parts distributors, and service companies. Our consultants provide assistance with: ■ Features and specifications on our full line of your correspondence. 12 Accessories To ensure the proper functioning of appliances. ■ Installation information...

Owners Manual
Page 13
... plumbing. 2. Costs associated with original model/serial numbers that is used in the country in which it is installed in an inaccessible location or is required to obtain service under these excluded circumstances shall be easily determined. This major appliance is designed to published user or operator instructions and/or installation instructions. 4. Repairs to parts or systems resulting from defects...
... plumbing. 2. Costs associated with original model/serial numbers that is used in the country in which it is installed in an inaccessible location or is required to obtain service under these excluded circumstances shall be easily determined. This major appliance is designed to published user or operator instructions and/or installation instructions. 4. Repairs to parts or systems resulting from defects...
Dimension Guide
Page 1
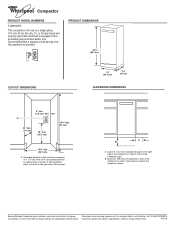
...can be provided. Because Whirlpool Corporation policy includes a ...specifications without notice. 9/21/10 B. Leave 23" (58.4 cm) of clearance in front of the compactor in order to remove the compactor bags. Leave 6" (15.2 cm) of clearance space to the right side of the compactor in order to fully open or remove the compactor drawer. Instructions...Installation Ref. Specifications subject to change without notice. or 20-amp fused and properly grounded circuit and is equipped with product. B A A. ® Compactor PRODUCT MODEL NUMBERS TU950QPX This compactor...
...can be provided. Because Whirlpool Corporation policy includes a ...specifications without notice. 9/21/10 B. Leave 23" (58.4 cm) of clearance in front of the compactor in order to remove the compactor bags. Leave 6" (15.2 cm) of clearance space to the right side of the compactor in order to fully open or remove the compactor drawer. Instructions...Installation Ref. Specifications subject to change without notice. or 20-amp fused and properly grounded circuit and is equipped with product. B A A. ® Compactor PRODUCT MODEL NUMBERS TU950QPX This compactor...

Warranty
Page 1
... Whirlpool Canada LP (hereafter "Whirlpool") will pay for repairs. Proof of original purchase date is operated and maintained according to instructions attached to or furnished with original model/serial numbers that is not installed in an inaccessible location or is contrary to published user or operator instructions and/or installation instructions. 4. This major appliance is designed to correct defects in -home service...
... Whirlpool Canada LP (hereafter "Whirlpool") will pay for repairs. Proof of original purchase date is operated and maintained according to instructions attached to or furnished with original model/serial numbers that is not installed in an inaccessible location or is contrary to published user or operator instructions and/or installation instructions. 4. This major appliance is designed to correct defects in -home service...


