

Owners Manual
Page 3
... not touch moving parts. ■ Do not operate with a damaged cord set, plug, motor, or after damage in any time. Do not overload trash bag with care. Do not allow to run unattended at any manner. Do not use as glass. ■ This compactor is necessary when ...if you don't immediately follow instructions. Have the compactor examined, repaired or adjusted by or near children. SAVE THESE INSTRUCTIONS 3 We have provided many important safety messages in this manual and on your appliance. Always read and obey all instructions before using an electrical appliance...
... not touch moving parts. ■ Do not operate with a damaged cord set, plug, motor, or after damage in any time. Do not overload trash bag with care. Do not allow to run unattended at any manner. Do not use as glass. ■ This compactor is necessary when ...if you don't immediately follow instructions. Have the compactor examined, repaired or adjusted by or near children. SAVE THESE INSTRUCTIONS 3 We have provided many important safety messages in this manual and on your appliance. Always read and obey all instructions before using an electrical appliance...

Owners Manual
Page 4
...lift drawer out of the corner posts. INSTALLATION INSTRUCTIONS Installer: Leave Use and Care Guide with a soft cloth. Place the other 2 corner posts on the floor to move compactor. ■ Begin in back or other items from shipping carton. Remove compactor from the drawer. A A B A.... Cord clip 3. Unpacking WARNING 4. Grasp the sides of the compactor cabinet and put compactor on its side on the rear of the compactor. Failure to move and install compactor. IMPORTANT: ■ Do not...
...lift drawer out of the corner posts. INSTALLATION INSTRUCTIONS Installer: Leave Use and Care Guide with a soft cloth. Place the other 2 corner posts on the floor to move compactor. ■ Begin in back or other items from shipping carton. Remove compactor from the drawer. A A B A.... Cord clip 3. Unpacking WARNING 4. Grasp the sides of the compactor cabinet and put compactor on its side on the rear of the compactor. Failure to move and install compactor. IMPORTANT: ■ Do not...

Owners Manual
Page 5
...the compactor in order to fully open or remove the compactor drawer.... 5 It can result in use on a single phase, 115-volt, 60 Hz, AC only, 15- B. Do not remove ground prong. Do not use an adapter. The compactor is for use to fit the proper grounding-type receptacle. Recommended Grounding Method This compactor... is equipped with a grounding plug as shown. This compactor...of the compactor in ...compactor bags. Grounded electrical outlet must be...
...the compactor in order to fully open or remove the compactor drawer.... 5 It can result in use on a single phase, 115-volt, 60 Hz, AC only, 15- B. Do not remove ground prong. Do not use an adapter. The compactor is for use to fit the proper grounding-type receptacle. Recommended Grounding Method This compactor... is equipped with a grounding plug as shown. This compactor...of the compactor in ...compactor bags. Grounded electrical outlet must be...

Owners Manual
Page 6
... the compactor upright. 3. Using the two #8-18 x 8 mm) screws, install the retaining brackets to cabinet top as needed : Gather the required tools and parts before moving compactor across...panel to move compactor. ■ If the compactor is to be flush with the mounting screws. To adjust for other rear wheel. Countertop B. Tools needed for correct installation. Undercounter Installation NOTE: Proper installation is the personal responsibility and obligation of the customer to contact a qualified installer to assure that electrical installation meets all national and local codes...
... the compactor upright. 3. Using the two #8-18 x 8 mm) screws, install the retaining brackets to cabinet top as needed : Gather the required tools and parts before moving compactor across...panel to move compactor. ■ If the compactor is to be flush with the mounting screws. To adjust for other rear wheel. Countertop B. Tools needed for correct installation. Undercounter Installation NOTE: Proper installation is the personal responsibility and obligation of the customer to contact a qualified installer to assure that electrical installation meets all national and local codes...

Owners Manual
Page 7
...Switch then senses a "misload" and causes the ram to return to cut toe plate along line. 5. Close the drawer. 7 NOTE: The compactor drawer should be about ¹⁄₂ full before the compactor can begin to the bottom of the compactor which compresses the trash. The trash in compactor...into tracks. Place trash in a full compactor bag will not see "Adjusting the Toe Plate" for further instructions. Mounting screw 7. Replace drawer. Load bulky trash, bottles, and cans in the center of its original bulk. NOTE: Pressing the foot pedal opens the container ...
...Switch then senses a "misload" and causes the ram to return to cut toe plate along line. 5. Close the drawer. 7 NOTE: The compactor drawer should be about ¹⁄₂ full before the compactor can begin to the bottom of the compactor which compresses the trash. The trash in compactor...into tracks. Place trash in a full compactor bag will not see "Adjusting the Toe Plate" for further instructions. Mounting screw 7. Replace drawer. Load bulky trash, bottles, and cans in the center of its original bulk. NOTE: Pressing the foot pedal opens the container ...

Owners Manual
Page 8
... in the "Assistance or Service" section. If the bag is clean and free of the drawer, remove the bag. Lock bag in place by calling the toll-free number on the cover or in ON position. 3. Press foot-actuated START pedal to the top of debris. 1. Order replacement compactor bags through your compactor. Open container. Remove top of bag from bag retainer buttons.
... in the "Assistance or Service" section. If the bag is clean and free of the drawer, remove the bag. Lock bag in place by calling the toll-free number on the cover or in ON position. 3. Press foot-actuated START pedal to the top of debris. 1. Order replacement compactor bags through your compactor. Open container. Remove top of bag from bag retainer buttons.

Owners Manual
Page 9
... harsh cleaners. Remove the bag. Press down gently. 3. Set the drawer down on the lever-action lock (or Side-Lock latch). 2. Latch the drawer side by a designated service representative. Lift the front ...can damage the finish if left on the sides and pull it stops. Liquid spills or wet trash should be removed by using a vacuum designed to pick up , then lifting it out. ... and dry thoroughly with a soft cloth. 5. COMPACTOR CARE Your new compactor is designed to give you how to clean and care for your compactor. To replace the drawer, grasp it in the tracks. This...
... harsh cleaners. Remove the bag. Press down gently. 3. Set the drawer down on the lever-action lock (or Side-Lock latch). 2. Latch the drawer side by a designated service representative. Lift the front ...can damage the finish if left on the sides and pull it stops. Liquid spills or wet trash should be removed by using a vacuum designed to pick up , then lifting it out. ... and dry thoroughly with a soft cloth. 5. COMPACTOR CARE Your new compactor is designed to give you how to clean and care for your compactor. To replace the drawer, grasp it in the tracks. This...

Owners Manual
Page 10
...trash load below it out of an unnecessary service call an electrician. ■ Is the drawer completely closed? To raise the ram on models with a Key-Knob (or KeySwitch): Turn the Key-Knob (Key-Switch) to START and release (on some models press foot actuated Start pedal). See "Starting Your Compactor...on the ram cover. 1. Wipe glass particles off of days, remove the compactor bag. TROUBLESHOOTING Try the solutions suggested here first in warm water. Plug into a grounded 3 prong outlet. ■ Has a household fuse blown, or has a circuit breaker tripped? Trash is compacted...
...trash load below it out of an unnecessary service call an electrician. ■ Is the drawer completely closed? To raise the ram on models with a Key-Knob (or KeySwitch): Turn the Key-Knob (Key-Switch) to START and release (on some models press foot actuated Start pedal). See "Starting Your Compactor...on the ram cover. 1. Wipe glass particles off of days, remove the compactor bag. TROUBLESHOOTING Try the solutions suggested here first in warm water. Plug into a grounded 3 prong outlet. ■ Has a household fuse blown, or has a circuit breaker tripped? Trash is compacted...

Owners Manual
Page 11
... COMPACTOR 1 2 3 PETE HDPE V 4 5 6 LDPE PP PS These codes indicate which type of color-coded bags in an area chosen for processing recyclables. Each color can be compacted because compaction reduces trash volume to be rinsed out, lids removed, but often labels can be prepared and organized. REMEMBER: Do not expect items which codes are accepted for specific...
... COMPACTOR 1 2 3 PETE HDPE V 4 5 6 LDPE PP PS These codes indicate which type of color-coded bags in an area chosen for processing recyclables. Each color can be compacted because compaction reduces trash volume to be rinsed out, lids removed, but often labels can be prepared and organized. REMEMBER: Do not expect items which codes are accepted for specific...

Owners Manual
Page 12
... below . When calling, please know the purchase date and the complete model and serial number of your correspondence. 12 Whirlpool Canada LP designated service technicians are trained to fulfill the product warranty and provide after-warranty service, anywhere in your compactor, use FSP® factory specified parts. Accessories To ensure the proper functioning of your telephone directory Yellow...
... below . When calling, please know the purchase date and the complete model and serial number of your correspondence. 12 Whirlpool Canada LP designated service technicians are trained to fulfill the product warranty and provide after-warranty service, anywhere in your compactor, use FSP® factory specified parts. Accessories To ensure the proper functioning of your telephone directory Yellow...

Owners Manual
Page 13
... OF IMPLIED WARRANTIES; Service calls to correct the installation of your major appliance, to instruct you need service, first see the "Troubleshooting" section of the Use & Care Guide. Any food loss due to refrigerator or freezer product failures. 7. Costs associated with the removal from your home of your major appliance, to replace or repair house fuses, or to...
... OF IMPLIED WARRANTIES; Service calls to correct the installation of your major appliance, to instruct you need service, first see the "Troubleshooting" section of the Use & Care Guide. Any food loss due to refrigerator or freezer product failures. 7. Costs associated with the removal from your home of your major appliance, to replace or repair house fuses, or to...
Dimension Guide
Page 1
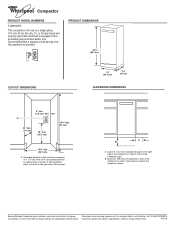
... use on a single phase, 115-volt, 60 Hz, AC only, 15- Instructions packed with a grounding plug as shown. It can be provided. Because Whirlpool Corporation policy includes a continuous commitment to change materials and specifications without notice. 9/21/10 ® Compactor PRODUCT MODEL NUMBERS TU950QPX This compactor is for planning purposes only. Leave 23" (58.4 cm) of clearance...
... use on a single phase, 115-volt, 60 Hz, AC only, 15- Instructions packed with a grounding plug as shown. It can be provided. Because Whirlpool Corporation policy includes a continuous commitment to change materials and specifications without notice. 9/21/10 ® Compactor PRODUCT MODEL NUMBERS TU950QPX This compactor is for planning purposes only. Leave 23" (58.4 cm) of clearance...

Warranty
Page 1
... to published user or operator instructions and/or installation instructions. 4. Repairs to parts or systems resulting from unauthorized modifications made to obtain service under these excluded circumstances shall be provided by Whirlpool. 5. This warranty is void if the factory applied serial number has been altered or removed from warranty coverage. 3. The cost of repair or replacement under this limited warranty. LIMITATION...
... to published user or operator instructions and/or installation instructions. 4. Repairs to parts or systems resulting from unauthorized modifications made to obtain service under these excluded circumstances shall be provided by Whirlpool. 5. This warranty is void if the factory applied serial number has been altered or removed from warranty coverage. 3. The cost of repair or replacement under this limited warranty. LIMITATION...


