
Owners Manual
Page 1
www.whirlpool.com or www.whirlpoolappliances.ca Table of Contents 2 In Canada, call for assistance 1-800-461-5681, for installation and service, call : 1-800-253-1301. 9872208 ® COMPACTORS Use & Care Guide For questions about features, operation/performance, parts, accessories or service, call : 1-800-807-6777 or visit our website at...
www.whirlpool.com or www.whirlpoolappliances.ca Table of Contents 2 In Canada, call for assistance 1-800-461-5681, for installation and service, call : 1-800-253-1301. 9872208 ® COMPACTORS Use & Care Guide For questions about features, operation/performance, parts, accessories or service, call : 1-800-807-6777 or visit our website at...
Owners Manual
Page 2
TABLE OF CONTENTS COMPACTOR SAFETY 3 INSTALLATION INSTRUCTIONS 4 Unpacking 4 Location Requirements 4 Electrical Requirements 5 Freestanding and Undercounter Installation 6 Changing the Decorative Panel 7 COMPACTOR USE 10 How Your Compactor Works 10 Loading 10 Starting the Compactor 10 Removing a Filled Bag 11 Installing a New Bag 11 COMPACTOR CARE 12 Cleaning 12 TROUBLESHOOTING 13 ASSISTANCE OR SERVICE 14 In the U.S.A 14 In Canada 14 Accessories 14 WARRANTY 16 ® 2
TABLE OF CONTENTS COMPACTOR SAFETY 3 INSTALLATION INSTRUCTIONS 4 Unpacking 4 Location Requirements 4 Electrical Requirements 5 Freestanding and Undercounter Installation 6 Changing the Decorative Panel 7 COMPACTOR USE 10 How Your Compactor Works 10 Loading 10 Starting the Compactor 10 Removing a Filled Bag 11 Installing a New Bag 11 COMPACTOR CARE 12 Cleaning 12 TROUBLESHOOTING 13 ASSISTANCE OR SERVICE 14 In the U.S.A 14 In Canada 14 Accessories 14 WARRANTY 16 ® 2
Owners Manual
Page 3
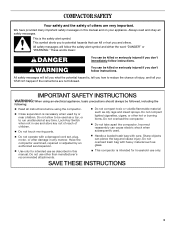
...described in this manual and on your appliance. Lock Key Switch when not in use as a toy, or to be killed or seriously injured if you don't follow instructions. s Do not operate with heavy material such as oily rags and insect sprays. SAVE THESE INSTRUCTIONS 3 We ...safety alert symbol. s Do not take apart the compactor. Do not overload trash bag with a damaged cord set, plug, motor, or after damage in this manual. You can happen if the instructions are very important. s Do not touch moving parts. s Handle a loaded trash bag with care. s Use only for household use ...
...described in this manual and on your appliance. Lock Key Switch when not in use as a toy, or to be killed or seriously injured if you don't follow instructions. s Do not operate with heavy material such as oily rags and insect sprays. SAVE THESE INSTRUCTIONS 3 We ...safety alert symbol. s Do not take apart the compactor. Do not overload trash bag with a damaged cord set, plug, motor, or after damage in this manual. You can happen if the instructions are very important. s Do not touch moving parts. s Handle a loaded trash bag with care. s Use only for household use ...

Owners Manual
Page 4
... compactor bag. Grasp the sides of the compactor. Shipping base Location Requirements Product dimensions 34¹⁄₈" (86.7 cm) A. IMPORTANT: s Do not grasp console to the side of the compactor. Use a mild detergent and warm water to be located. 1. Check to remove waxy residue caused by protective shipping material. INSTALLATION INSTRUCTIONS Installer: Leave Use and Care Guide...
... compactor bag. Grasp the sides of the compactor. Shipping base Location Requirements Product dimensions 34¹⁄₈" (86.7 cm) A. IMPORTANT: s Do not grasp console to the side of the compactor. Use a mild detergent and warm water to be located. 1. Check to remove waxy residue caused by protective shipping material. INSTALLATION INSTRUCTIONS Installer: Leave Use and Care Guide...
Owners Manual
Page 5
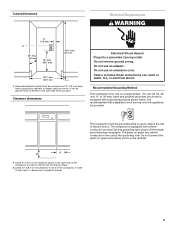
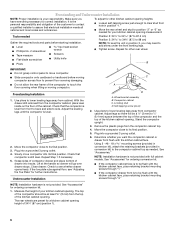
... be placed either to the left or the right side of the compactor in order to follow these instructions can be a minimum of electric shock. Do not use an adapter. Failure to remove the compactor bags. Cutout dimensions Electrical Requirements WARNING 3" (7.6 cm) A 24" min. (61 cm) 18" min. (45.7 cm) 34¹⁄₄...
... be placed either to the left or the right side of the compactor in order to follow these instructions can be a minimum of electric shock. Do not use an adapter. Failure to remove the compactor bags. Cutout dimensions Electrical Requirements WARNING 3" (7.6 cm) A 24" min. (61 cm) 18" min. (45.7 cm) 34¹⁄₄...
Owners Manual
Page 6
...compactor to touch the floor covering when lifting or moving compactor across floor to position "2" or "3" as needed Gather the required tools and parts before moving compactor...s If the compactor cabinet face is to be flush with full cabinet models. s If the compactor drawer front is...installation meets all national and local codes and ordinances. Self-tapping screw (pivot) 2. B IMPORTANT: s Do not grasp control panel to assure that compactor is not provided. Stand the compactor upright. 3. Plug into its final position. The rear wheels are preset for further instructions...
...compactor to touch the floor covering when lifting or moving compactor across floor to position "2" or "3" as needed Gather the required tools and parts before moving compactor...s If the compactor cabinet face is to be flush with full cabinet models. s If the compactor drawer front is...installation meets all national and local codes and ordinances. Self-tapping screw (pivot) 2. B IMPORTANT: s Do not grasp control panel to assure that compactor is not provided. Stand the compactor upright. 3. Plug into its final position. The rear wheels are preset for further instructions...
Owners Manual
Page 7
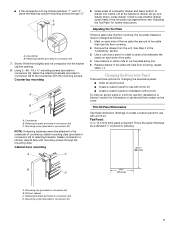
... mounting screws. This is required. Slowly lift the front slightly and roll compactor into tracks. Check to see "Adjusting the Toe Plate" for further instructions. Adjusting the Toe Plate If the toe plate rubs the floor covering, the...panel s Create a custom panel for use with a trim kit s Create a custom panel for installation without trim To order an acrylic panel or a trim kit, see the "Assistance or Service" section for use with a trim kit. Trim Kit Panel Dimensions Use these dimension drawings to create a custom panel for information or call the toll-free number...
... mounting screws. This is required. Slowly lift the front slightly and roll compactor into tracks. Check to see "Adjusting the Toe Plate" for further instructions. Adjusting the Toe Plate If the toe plate rubs the floor covering, the...panel s Create a custom panel for use with a trim kit s Create a custom panel for installation without trim To order an acrylic panel or a trim kit, see the "Assistance or Service" section for use with a trim kit. Trim Kit Panel Dimensions Use these dimension drawings to create a custom panel for information or call the toll-free number...
Owners Manual
Page 8
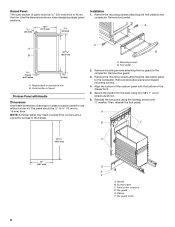
...) both sides 8 mm) A. The panel should be 5.6 mm) thick to the compactor. Foot pedal 2. Reinstall the toe guard using four #8 x 1" wood screws as shown. 6. Toe guard E. Remove toe guard. 3. Then, reinstall the foot pedal. Remove the mounting screws attaching the decorative panel to fit into the trim. Remove foot pedal. Raised Panel: The outer section of panel must be ¹⁄...
...) both sides 8 mm) A. The panel should be 5.6 mm) thick to the compactor. Foot pedal 2. Reinstall the toe guard using four #8 x 1" wood screws as shown. 6. Toe guard E. Remove toe guard. 3. Then, reinstall the foot pedal. Remove the mounting screws attaching the decorative panel to fit into the trim. Remove foot pedal. Raised Panel: The outer section of panel must be ¹⁄...
Owners Manual
Page 9
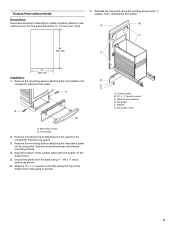
... 4 - #8 x 1" wood screws as shown. 6. Custom panel B. 15" x ¹⁄₂ " quarter-round C. Remove toe guard. 3. Trimless Panel without Handle Dimensions Use these dimension drawings to the compactor. The panel should be ¹⁄₂" (13 mm) min. thick. 7. Then, reinstall the foot pedal. B A C 25" (63.5 cm) C 15" (38.1 cm) Installation 1. Remove decorative panel and discard mounting screws. 4. D E F A. Washer G.
... 4 - #8 x 1" wood screws as shown. 6. Custom panel B. 15" x ¹⁄₂ " quarter-round C. Remove toe guard. 3. Trimless Panel without Handle Dimensions Use these dimension drawings to the compactor. The panel should be ¹⁄₂" (13 mm) min. thick. 7. Then, reinstall the foot pedal. B A C 25" (63.5 cm) C 15" (38.1 cm) Installation 1. Remove decorative panel and discard mounting screws. 4. D E F A. Washer G.
Owners Manual
Page 10
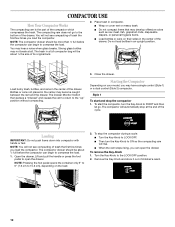
... the foot pedal to 15.2 cm), depending on your model, you load the compactor. To stop at all. You will be more than ¹⁄₂ full before the compactor can open the drawer. The trash in an upright position. Do not load bottles in a full compactor bag will...load. 1. COMPACTOR USE How Your Compactor Works The compacting ram is the part of children's reach. 10 NOTE: The compactor drawer should be about ¹⁄₄ the size of the drawer. Place trash in the center of its original bulk. 2. Load bulky trash, bottles, and cans in compactor. To remove...
... the foot pedal to 15.2 cm), depending on your model, you load the compactor. To stop at all. You will be more than ¹⁄₂ full before the compactor can open the drawer. The trash in an upright position. Do not load bottles in a full compactor bag will...load. 1. COMPACTOR USE How Your Compactor Works The compacting ram is the part of children's reach. 10 NOTE: The compactor drawer should be about ¹⁄₄ the size of the drawer. Place trash in the center of its original bulk. 2. Load bulky trash, bottles, and cans in compactor. To remove...
Owners Manual
Page 11
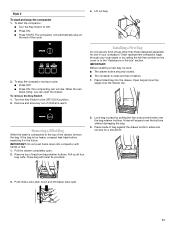
.... Lift out bag. Pull up all four bag cuffs. Pull the drawer completely open the drawer. Lock bag in place by calling the toll-free number on the cover or in the "Assistance or Service" section. Style 2 To start the compactor: s Turn the Key-Switch to the OFF...damaging the bag. 3. If the bag is compacted to the top of bag against the drawer bottom, sides and corners for use in the future. Place folded bag into compactor with twist tie provided. 2. Close bag with hands or feet. 1. Order replacement compactor bags through your compactor. Press ...
.... Lift out bag. Pull up all four bag cuffs. Pull the drawer completely open the drawer. Lock bag in place by calling the toll-free number on the cover or in the "Assistance or Service" section. Style 2 To start the compactor: s Turn the Key-Switch to the OFF...damaging the bag. 3. If the bag is compacted to the top of bag against the drawer bottom, sides and corners for use in the future. Place folded bag into compactor with twist tie provided. 2. Close bag with hands or feet. 1. Order replacement compactor bags through your compactor. Press ...
Owners Manual
Page 12
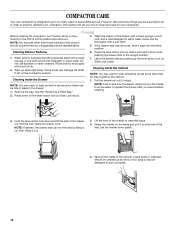
...rollers move in order to the upright position. 7. Cleaning Exterior Surfaces 1. See the "Removing a Filled Bag." Wash the interior of the drawer to clean and care for your compactor. Do not use abrasive or harsh cleaners. NOTE: You may want to wear protective gloves since there... OFF & LOCK position and remove it stops. Liquid spills or wet trash should be bits of dependable service. Set the drawer down and tilt the side of the cabinet. COMPACTOR CARE Your new compactor is designed to replace the drawer after you have finished cleaning. 2. Vacuum the inside of the...
...rollers move in order to the upright position. 7. Cleaning Exterior Surfaces 1. See the "Removing a Filled Bag." Wash the interior of the drawer to clean and care for your compactor. Do not use abrasive or harsh cleaners. NOTE: You may want to wear protective gloves since there... OFF & LOCK position and remove it stops. Liquid spills or wet trash should be bits of dependable service. Set the drawer down and tilt the side of the cabinet. COMPACTOR CARE Your new compactor is designed to replace the drawer after you have finished cleaning. 2. Vacuum the inside of the...
Owners Manual
Page 13
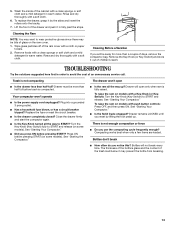
...all the way up . To raise the ram on some models). Rinse and dry thoroughly with a Key-Knob (or KeySwitch): Turn the Key-Knob (Key-Switch) to avoid the cost of the trash load below it by lifting the foot pedal up ? To replace the drawer, grasp it may be away ...and a mild detergent in fully past the stops. TROUBLESHOOTING Try the solutions suggested here first in warm water. Plug into a grounded 3 prong outlet. s Has a household fuse blown, or has a circuit breaker tripped? See "Starting Your Compactor." See "Starting Your Compactor." s Is the Solid Cycle engaged? The thickness ...
...all the way up . To raise the ram on some models). Rinse and dry thoroughly with a Key-Knob (or KeySwitch): Turn the Key-Knob (Key-Switch) to avoid the cost of the trash load below it by lifting the foot pedal up ? To replace the drawer, grasp it may be away ...and a mild detergent in fully past the stops. TROUBLESHOOTING Try the solutions suggested here first in warm water. Plug into a grounded 3 prong outlet. s Has a household fuse blown, or has a circuit breaker tripped? See "Starting Your Compactor." See "Starting Your Compactor." s Is the Solid Cycle engaged? The thickness ...
Owners Manual
Page 14
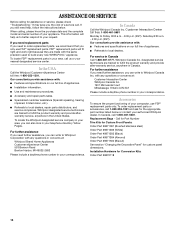
... and specifications on our full line of your correspondence. To locate FSP® replacement parts in your area, call 1-800-461-5681. To locate the Whirlpool designated service company in your area, you can also look in your telephone directory Yellow Pages. ASSISTANCE OR SERVICE Before calling for custom panel dimensions. Installation Hardware for the appropriate part number listed below...
... and specifications on our full line of your correspondence. To locate FSP® replacement parts in your area, call 1-800-461-5681. To locate the Whirlpool designated service company in your area, you can also look in your telephone directory Yellow Pages. ASSISTANCE OR SERVICE Before calling for custom panel dimensions. Installation Hardware for the appropriate part number listed below...

Owners Manual
Page 16
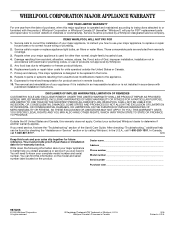
...Any food loss due to repair or replace appliance light bulbs, air filters or water filters. THIS WARRANTY GIVES YOU SPECIFIC LEGAL RIGHTS AND YOU MAY ...installation instructions. WHIRLPOOL SHALL NOT BE LIABLE FOR INCIDENTAL OR CONSEQUENTIAL DAMAGES. After checking "Troubleshooting," additional help you obtain assistance or service if you ever need to know your sales slip together for FSP® replacement parts and repair labor to correct defects in materials or workmanship. You will pay for future reference. Dealer name Address Phone number Model number Serial number...
...Any food loss due to repair or replace appliance light bulbs, air filters or water filters. THIS WARRANTY GIVES YOU SPECIFIC LEGAL RIGHTS AND YOU MAY ...installation instructions. WHIRLPOOL SHALL NOT BE LIABLE FOR INCIDENTAL OR CONSEQUENTIAL DAMAGES. After checking "Troubleshooting," additional help you obtain assistance or service if you ever need to know your sales slip together for FSP® replacement parts and repair labor to correct defects in materials or workmanship. You will pay for future reference. Dealer name Address Phone number Model number Serial number...

Dimension Guide
Page 1
... to improve Dimensions are for access to the handle. 15" (38.1 cm) Panel should be 1/2 in order to remove the compactor bags. Instructions packed with handles Models without notice. OVERALL DIMENSIONS 341⁄8" (86.7 cm) CABINET OPENING DIMENSIONS 15...Installation Ref. 9871676 Rev. or 20-amp. Specifications subject to change materials and specifications without handles 23 (60.5 cm) A B 23 60.5 cm) 23 60.5 cm) 25" (63.5 cm) 14⁵⁄₈" (37.2 cm) A 7/32 in. (5.6 mm) thick panel is the same thickness as shown. ® Compactor PRODUCT MODEL NUMBERS...
... to improve Dimensions are for access to the handle. 15" (38.1 cm) Panel should be 1/2 in order to remove the compactor bags. Instructions packed with handles Models without notice. OVERALL DIMENSIONS 341⁄8" (86.7 cm) CABINET OPENING DIMENSIONS 15...Installation Ref. 9871676 Rev. or 20-amp. Specifications subject to change materials and specifications without handles 23 (60.5 cm) A B 23 60.5 cm) 23 60.5 cm) 25" (63.5 cm) 14⁵⁄₈" (37.2 cm) A 7/32 in. (5.6 mm) thick panel is the same thickness as shown. ® Compactor PRODUCT MODEL NUMBERS...
Warranty
Page 1
... filters. If you need service, first see the "Troubleshooting" section of your appliance if it . You can be provided by Whirlpool. 5. Dealer name Address Phone number Model number Serial number Purchase date 9872208 © 2005 Whirlpool Corporation. Replacement parts or repair labor costs for in accordance with published installation instructions. Expenses for travel and transportation for FSP® replacement parts and repair labor to correct defects in...
... filters. If you need service, first see the "Troubleshooting" section of your appliance if it . You can be provided by Whirlpool. 5. Dealer name Address Phone number Model number Serial number Purchase date 9872208 © 2005 Whirlpool Corporation. Replacement parts or repair labor costs for in accordance with published installation instructions. Expenses for travel and transportation for FSP® replacement parts and repair labor to correct defects in...


