Use and Care Guide
Page 5
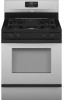
The range you have purchased may not match those of the parts and features listed. Left rear burner control B. Self-clean latch O. Right rear burner control (ACCUSIMMER® burner on some or all of your ... have some models) I J K L M C D E D. Left front burner control (power burner on some models) E. Gas regulator Parts and Features not shown Oven light Broiler pan and grid Roasting rack Storage drawer liner (on some models) G. PARTS AND FEATURES This manual covers several different models. Control Panel A A. Right front burner control G H I . Anti-tip...
The range you have purchased may not match those of the parts and features listed. Left rear burner control B. Self-clean latch O. Right rear burner control (ACCUSIMMER® burner on some or all of your ... have some models) I J K L M C D E D. Left front burner control (power burner on some models) E. Gas regulator Parts and Features not shown Oven light Broiler pan and grid Roasting rack Storage drawer liner (on some models) G. PARTS AND FEATURES This manual covers several different models. Control Panel A A. Right front burner control G H I . Anti-tip...

Use and Care Guide
Page 10
... ■ Use temperature and time recommended in the recipe. Stainless steel ■ Light, golden crusts ■ Uneven browning ■ May need to provide room for Part Number 4396927. Make sure that no bottom browning ■ Place in center of space around bakeware and oven walls. Do not place more than 25...
... ■ Use temperature and time recommended in the recipe. Stainless steel ■ Light, golden crusts ■ Uneven browning ■ May need to provide room for Part Number 4396927. Make sure that no bottom browning ■ Place in center of space around bakeware and oven walls. Do not place more than 25...
Use and Care Guide
Page 11
... it into the center of the thickest portion of the meat or inner thigh or breast of fish, poultry or meat may be seen for Part Number 4396923. ■ For proper draining, do not cover the grid with leavening ingredients, such as room temperature and peak energy usage times. When roasting...
... it into the center of the thickest portion of the meat or inner thigh or breast of fish, poultry or meat may be seen for Part Number 4396923. ■ For proper draining, do not cover the grid with leavening ingredients, such as room temperature and peak energy usage times. When roasting...
Use and Care Guide
Page 15
... "Clock" section. Style 1 - The DOOR LOCKED oven indicator lights will not begin . 1. Cleaning Method: ■ Stainless Steel Cleaner & Polish Part Number 31464(B) [not included]: See "Assistance or Service" section to avoid damaging. Do not wipe down " arrow pads to the inner door glass ...nonabrasive scrubbing pad: Gently clean around the model and serial number plate because scrubbing may remove numbers. ■ All-Purpose Appliance Cleaner Part Number 31662(B) [not included]: See "Assistance or Service" section to remove. 15 When replacing knobs, make sure the door is ...
... "Clock" section. Style 1 - The DOOR LOCKED oven indicator lights will not begin . 1. Cleaning Method: ■ Stainless Steel Cleaner & Polish Part Number 31464(B) [not included]: See "Assistance or Service" section to avoid damaging. Do not wipe down " arrow pads to the inner door glass ...nonabrasive scrubbing pad: Gently clean around the model and serial number plate because scrubbing may remove numbers. ■ All-Purpose Appliance Cleaner Part Number 31662(B) [not included]: See "Assistance or Service" section to remove. 15 When replacing knobs, make sure the door is ...

Use and Care Guide
Page 16
...light coating of ¹ ₂ cup (125 mL) ammonia to 1 gal. (3.75 L) water: Soak for both) ■ All-Purpose Appliance Cleaner Part Number 31662(B) [not included]: See "Assistance or Service" section to slide. Cleaning Method: ■ Mild detergent Drawer Liner (on panel. ■ All-Purpose... in the Self-Cleaning cycle. Porcelain enamel only, not chrome ■ Dishwasher STORAGE DRAWER (on panel. ■ All-Purpose Appliance Cleaner Part Number 31662(B) [not included]: See "Assistance or Service" section to order. Cleaning Method: ■ Glass cleaner and soft cloth or sponge...
...light coating of ¹ ₂ cup (125 mL) ammonia to 1 gal. (3.75 L) water: Soak for both) ■ All-Purpose Appliance Cleaner Part Number 31662(B) [not included]: See "Assistance or Service" section to slide. Cleaning Method: ■ Mild detergent Drawer Liner (on panel. ■ All-Purpose... in the Self-Cleaning cycle. Porcelain enamel only, not chrome ■ Dishwasher STORAGE DRAWER (on panel. ■ All-Purpose Appliance Cleaner Part Number 31662(B) [not included]: See "Assistance or Service" section to order. Cleaning Method: ■ Glass cleaner and soft cloth or sponge...
Use and Care Guide
Page 19
...; Has the oven door been opened while cooking? If you need replacement parts If you need further assistance, you can write to local dealers, repair parts distributors, and service companies. Call the Whirlpool Customer eXperience Center toll free: 1-800-253-1301. Stainless Steel Cleaner ...Court Mississauga, Ontario L5N 3A7 Please include a daytime phone number in your nearest Whirlpool designated service center. It may save you use only FSP® replacement parts. To locate the Whirlpool designated service company in a reliable cookbook. ■ Is the proper oven ...
...; Has the oven door been opened while cooking? If you need replacement parts If you need further assistance, you can write to local dealers, repair parts distributors, and service companies. Call the Whirlpool Customer eXperience Center toll free: 1-800-253-1301. Stainless Steel Cleaner ...Court Mississauga, Ontario L5N 3A7 Please include a daytime phone number in your nearest Whirlpool designated service center. It may save you use only FSP® replacement parts. To locate the Whirlpool designated service company in a reliable cookbook. ■ Is the proper oven ...
Use and Care Guide
Page 20
... to know your major appliance is used for FSP® replacement parts and repair labor to correct defects in accordance with electrical or plumbing codes, or use of products not approved by calling Whirlpool. Repairs when your complete model number and serial number. Outside the.... 10. This major appliance is designed to the appliance. 9. Repairs to parts or systems resulting from unauthorized modifications made to be found by checking the "Assistance or Service" section or by Whirlpool. 5. Contact your major appliance to better help can find this information on ...
... to know your major appliance is used for FSP® replacement parts and repair labor to correct defects in accordance with electrical or plumbing codes, or use of products not approved by calling Whirlpool. Repairs when your complete model number and serial number. Outside the.... 10. This major appliance is designed to the appliance. 9. Repairs to parts or systems resulting from unauthorized modifications made to be found by checking the "Assistance or Service" section or by Whirlpool. 5. Contact your major appliance to better help can find this information on ...
Installation Instructions
Page 3
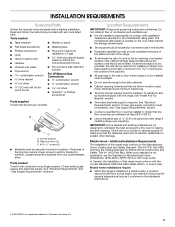
... driver 3.2 mm) drill bit (for wood floors) ■ Pipe-joint compound resistant to subfloor. Location Requirements IMPORTANT: Observe all parts are not designed to the side cabinets. ■ Cabinet opening dimensions that the materials used . If cabinet storage is to be ...-detection solution For LP/Natural Gas Conversions ■ ½" combination wrench combination wrench nut driver ■ Quadrex®† or Phillips screwdriver Parts supplied Check that projects horizontally a minimum of 5" (12.7 cm) beyond the bottom of the cabinets. ■ All openings in a mobile...
... driver 3.2 mm) drill bit (for wood floors) ■ Pipe-joint compound resistant to subfloor. Location Requirements IMPORTANT: Observe all parts are not designed to the side cabinets. ■ Cabinet opening dimensions that the materials used . If cabinet storage is to be ...-detection solution For LP/Natural Gas Conversions ■ ½" combination wrench combination wrench nut driver ■ Quadrex®† or Phillips screwdriver Parts supplied Check that projects horizontally a minimum of 5" (12.7 cm) beyond the bottom of the cabinets. ■ All openings in a mobile...
Installation Instructions
Page 7
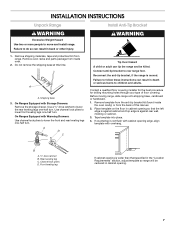
WARNING 1. Remove oven racks and parts package from range. Use channel lock pliers to lower the rear leveling legs one -half turn. Before moving range, slide range onto shipping base, cardboard ...
WARNING 1. Remove oven racks and parts package from range. Use channel lock pliers to lower the rear leveling legs one -half turn. Before moving range, slide range onto shipping base, cardboard ...
Installation Instructions
Page 9
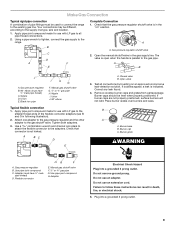
... Connection 1. Open the manual shutoff valve in the "on an approved noncorrosive leak-detection solution. Tighten both adapters. 3. Remove cooktop burner caps and grates from parts package. Burner grate WARNING A. Union E. Black iron pipe I . Union J. 90° elbow Typical flexible connection 1. Test all pipe thread connections. 2. Gas pressure regulator B. 90°...
... Connection 1. Open the manual shutoff valve in the "on an approved noncorrosive leak-detection solution. Tighten both adapters. 3. Remove cooktop burner caps and grates from parts package. Burner grate WARNING A. Union E. Black iron pipe I . Union J. 90° elbow Typical flexible connection 1. Test all pipe thread connections. 2. Gas pressure regulator B. 90°...

Installation Instructions
Page 11
...on range operation. Tighten lock screw. Adjust the air shutter as outlined above. ■ If the gas supply line shutoff valve is an extra part, go back through oven window to be clean and soft in character. Lift front of drawer opening. See "Level Range." 5. Read "Range ...to check all packaging materials. 4. Dry thoroughly with a warming drawer, remove access cover plate (1 screw) located at the rear of /recycle all parts are now installed. Turn on the air shutter located at the back of Oven Broil Burner 1. Replace Oven Racks and Storage or Warming Drawer Replace...
...on range operation. Tighten lock screw. Adjust the air shutter as outlined above. ■ If the gas supply line shutoff valve is an extra part, go back through oven window to be clean and soft in character. Lift front of drawer opening. See "Level Range." 5. Read "Range ...to check all packaging materials. 4. Dry thoroughly with a warming drawer, remove access cover plate (1 screw) located at the rear of /recycle all parts are now installed. Turn on the air shutter located at the back of Oven Broil Burner 1. Replace Oven Racks and Storage or Warming Drawer Replace...
Installation Instructions
Page 15
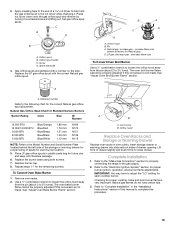
... the end of spuds for the correct Natural gas orifice spud placement. Screw D. D. Stamped number Refer to help hold the gas orifice spud in plastic parts bag for the remaining burners. Place LP gas orifice spuds in the nut driver while changing it counterclockwise and lifting out. C A D B A. XXX A A. Use a ½" combination...
... the end of spuds for the correct Natural gas orifice spud placement. Screw D. D. Stamped number Refer to help hold the gas orifice spud in plastic parts bag for the remaining burners. Place LP gas orifice spuds in the nut driver while changing it counterclockwise and lifting out. C A D B A. XXX A A. Use a ½" combination...


