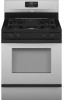
Use and Care Guide
Page 3
...messages will follow the safety alert symbol and either the word "DANGER" or "WARNING." Follow the gas supplier's instructions. • If you what can happen if the instructions are very important. RANGE SAFETY Your safety and the safety of California to such substances. These words mean: DANGER You can...cause cancer, birth defects, or other appliance. - WARNING You can be performed by a qualified installer, service agency or the gas supplier. WHAT TO DO IF YOU SMELL GAS: • Do not try to some of injury, and tell you what the potential hazard is, tell you how to ...
...messages will follow the safety alert symbol and either the word "DANGER" or "WARNING." Follow the gas supplier's instructions. • If you what can happen if the instructions are very important. RANGE SAFETY Your safety and the safety of California to such substances. These words mean: DANGER You can...cause cancer, birth defects, or other appliance. - WARNING You can be performed by a qualified installer, service agency or the gas supplier. WHAT TO DO IF YOU SMELL GAS: • Do not try to some of injury, and tell you what the potential hazard is, tell you how to ...
Use and Care Guide
Page 5
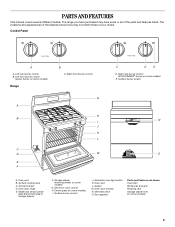
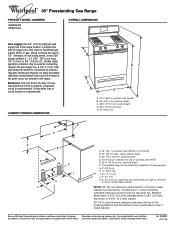
...ACCUSIMMER® burner on some models) 5 Anti-tip bracket D. Electronic oven control H. Automatic oven light switch K. Oven door window N. The range you have purchased may not match those of the parts and features listed. Right front burner control G H I . Oven vent B. Surface ...burner control J. Self-clean latch O. Surface burner locator N O A. Gasket M. Gas regulator Parts and Features not shown Oven light Broiler pan and grid Roasting rack Storage drawer liner (on some models) G. Left rear burner control ...
...ACCUSIMMER® burner on some models) 5 Anti-tip bracket D. Electronic oven control H. Automatic oven light switch K. Oven door window N. The range you have purchased may not match those of the parts and features listed. Right front burner control G H I . Oven vent B. Surface ...burner control J. Self-clean latch O. Surface burner locator N O A. Gasket M. Gas regulator Parts and Features not shown Oven light Broiler pan and grid Roasting rack Storage drawer liner (on some models) G. Left rear burner control ...
Use and Care Guide
Page 6
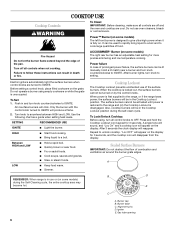
... 2. After 3 seconds the clock display will be activated until power is restored to the range and (or) the Cooktop Lockout is first supplied to the range, or if the range loses power, the surface burners will reappear. A B D E C A. ACCUSIMMER® ...sauces and gravies. ■ Stew or steam foods. LOW ■ Keep food warm. ■ Simmer. REMEMBER: When range is unoccupied. The surface burners cannot be in death or fire. Press and hold the Cooktop Lockout icon keypad for 3 seconds... Do not obstruct the flow of the pan. Alignment pins D. Gas tube opening 6
... 2. After 3 seconds the clock display will be activated until power is restored to the range and (or) the Cooktop Lockout is first supplied to the range, or if the range loses power, the surface burners will reappear. A B D E C A. ACCUSIMMER® ...sauces and gravies. ■ Stew or steam foods. LOW ■ Keep food warm. ■ Simmer. REMEMBER: When range is unoccupied. The surface burners cannot be in death or fire. Press and hold the Cooktop Lockout icon keypad for 3 seconds... Do not obstruct the flow of the pan. Alignment pins D. Gas tube opening 6
Dimensions
Page 1
... shutoff valve must be located in insufficient gas supply. This shaded area recommended for planning purposes only. Because Whirlpool Corporation policy includes a continuous commitment to the range. ® 30" Freestanding Gas Range PRODUCT MODEL NUMBERS GS563LXS SF367LXS OVERALL DIMENSIONS Gas supply: Use 3/4" (1.9 cm) rigid pipe gas supply line to the gas supply line. A time-delay fuse or circuit...
... shutoff valve must be located in insufficient gas supply. This shaded area recommended for planning purposes only. Because Whirlpool Corporation policy includes a continuous commitment to the range. ® 30" Freestanding Gas Range PRODUCT MODEL NUMBERS GS563LXS SF367LXS OVERALL DIMENSIONS Gas supply: Use 3/4" (1.9 cm) rigid pipe gas supply line to the gas supply line. A time-delay fuse or circuit...
Installation Instructions
Page 2
... qualified or licensed by the State of Massachusetts. ■ If using a ball valve, it shall be a T-handle type. ■ A flexible gas connector, when used, must be killed or seriously injured if you what the potential hazard is moved. WARNING Tip Over Hazard A child or adult can...how to rear range foot. Always read and obey all safety messages. WARNING You can tip the range and be killed or seriously injured if you and others are not followed. Follow the gas supplier's instructions. • If you cannot reach your gas supplier from a neighbor's phone. RANGE SAFETY Your ...
... qualified or licensed by the State of Massachusetts. ■ If using a ball valve, it shall be a T-handle type. ■ A flexible gas connector, when used, must be killed or seriously injured if you what the potential hazard is moved. WARNING Tip Over Hazard A child or adult can...how to rear range foot. Always read and obey all safety messages. WARNING You can tip the range and be killed or seriously injured if you and others are not followed. Follow the gas supplier's instructions. • If you cannot reach your gas supplier from a neighbor's phone. RANGE SAFETY Your ...
Installation Instructions
Page 3
Proper gas supply connection must be securely mounted to subfloor. IMPORTANT: Some cabinet and building materials are included. Mobile Home - In Canada, the installation of this range must conform to make sure that are shown must be secured to the side cabinets. ■ Cabinet ... supply is to be installed must provide complete enclosure of the sides and rear of the range. ■ To eliminate the risk of Quadrex Consulting, Inc. 3 See "Electrical Requirements" and "Gas Supply Requirements" sections. Do not obstruct flow of combustion and ventilation air. ■ It...
Proper gas supply connection must be securely mounted to subfloor. IMPORTANT: Some cabinet and building materials are included. Mobile Home - In Canada, the installation of this range must conform to make sure that are shown must be secured to the side cabinets. ■ Cabinet ... supply is to be installed must provide complete enclosure of the sides and rear of the range. ■ To eliminate the risk of Quadrex Consulting, Inc. 3 See "Electrical Requirements" and "Gas Supply Requirements" sections. Do not obstruct flow of combustion and ventilation air. ■ It...
Installation Instructions
Page 4
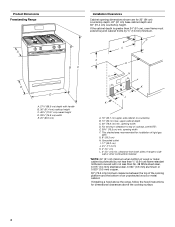
...13 mm) minimum. For minimum clearance to top of rigid gas pipe. opening dimensions shown are for 25" (64 cm) countertop depth, 24" (61 cm) base cabinet depth and 36" (91.4 cm) countertop height. clearance from both sides of range to countertop B. 13" (33 cm) max. If installing ...a hood above the range, follow the hood instructions for installation of cooktop, see NOTE*. Product Dimensions Freestanding Range A BC E D A. 27¹⁄₈" (68.9 cm) depth...
...13 mm) minimum. For minimum clearance to top of rigid gas pipe. opening dimensions shown are for 25" (64 cm) countertop depth, 24" (61 cm) base cabinet depth and 36" (91.4 cm) countertop height. clearance from both sides of range to countertop B. 13" (33 cm) max. If installing ...a hood above the range, follow the hood instructions for installation of cooktop, see NOTE*. Product Dimensions Freestanding Range A BC E D A. 27¹⁄₈" (68.9 cm) depth...
Installation Instructions
Page 5
....1. latest edition or CAN/CGA B149 - latest edition. If the types of gas that will operate. Check with the local gas supplier. IMPORTANT: This installation must conform with LP gas. ■ This range is located on the model/serial rating plate for the control panel to convert ... as to LP, have a qualified person make sure gas pressure does not exceed 14" (36 cm) water column. Do not use with a different gas without consulting the serving gas supplier. Do not use with Natural gas. IMPORTANT: The range must be provided. ■ Electronic ignition systems operate ...
....1. latest edition or CAN/CGA B149 - latest edition. If the types of gas that will operate. Check with the local gas supplier. IMPORTANT: This installation must conform with LP gas. ■ This range is located on the model/serial rating plate for the control panel to convert ... as to LP, have a qualified person make sure gas pressure does not exceed 14" (36 cm) water column. Do not use with a different gas without consulting the serving gas supplier. Do not use with Natural gas. IMPORTANT: The range must be provided. ■ Electronic ignition systems operate ...
Installation Instructions
Page 6
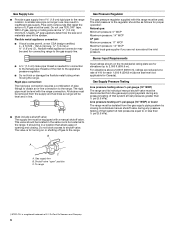
...pipe connection: The rigid pipe connection requires a combination of the inlet to the range. Line pressure testing at ½ psi gauge (14" WCP) or lower The range must be removed from the gas supply piping system during any pressure testing of E.I .D., flexible metal appliance connector may... (3.5 kPa). Burner Input Requirements Input ratings shown on or shutting off gas to shutoff valve. Do not use TEFLON®† tape. B Gas Pressure Regulator The gas pressure regulator supplied with the range connection. For elevations above 2,000 ft (609.6 m), ratings are reduced...
...pipe connection: The rigid pipe connection requires a combination of the inlet to the range. Line pressure testing at ½ psi gauge (14" WCP) or lower The range must be removed from the gas supply piping system during any pressure testing of E.I .D., flexible metal appliance connector may... (3.5 kPa). Burner Input Requirements Input ratings shown on or shutting off gas to shutoff valve. Do not use TEFLON®† tape. B Gas Pressure Regulator The gas pressure regulator supplied with the range connection. For elevations above 2,000 ft (609.6 m), ratings are reduced...
Installation Instructions
Page 9
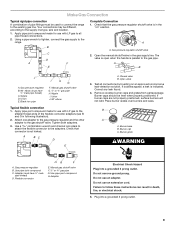
...Adapter Electrical Shock Hazard Plug into a grounded 3 prong outlet. 9 Do not use with LP gas to the smaller thread ends of pipe fittings must be used to connect the range to the supply line type, size and location. 1. A A. Attach one adapter to the... gas pressure regulator and the other adapter to the range. A BC D E A. Place burner grates over burners and caps. Manual gas shutoff valve F. ½" or ¾" gas pipe G. B C D A F E Complete Connection 1. Union E. Union J. 90° ...
...Adapter Electrical Shock Hazard Plug into a grounded 3 prong outlet. 9 Do not use with LP gas to the smaller thread ends of pipe fittings must be used to connect the range to the supply line type, size and location. 1. A A. Attach one adapter to the... gas pressure regulator and the other adapter to the range. A BC D E A. Place burner grates over burners and caps. Manual gas shutoff valve F. ½" or ¾" gas pipe G. B C D A F E Complete Connection 1. Union E. Union J. 90° ...
Installation Instructions
Page 10
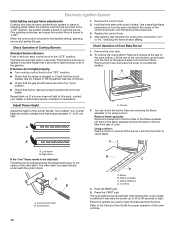
... oven and place the cover on burner bases. B A A. High flame If the "low" flame needs to the "open" position. ■ Check that the range is located directly underneath the control knob. Flame reflection D. 2 screws 4. Check that the circuit breaker has not tripped or the household fuse has not blown.... ■ Check that the gas shutoff valves are set to be adjusted: The flame can check the burner flame by removing the flame spreader or by turning the control from...
... oven and place the cover on burner bases. B A A. High flame If the "low" flame needs to the "open" position. ■ Check that the range is located directly underneath the control knob. Flame reflection D. 2 screws 4. Check that the circuit breaker has not tripped or the household fuse has not blown.... ■ Check that the gas shutoff valves are set to be adjusted: The flame can check the burner flame by removing the flame spreader or by turning the control from...

Installation Instructions
Page 11
...oven racks in the Use and Care Guide. 9. Tighten locking screw. 3. Press the BROIL pad. 3. or circuit breaker has not tripped. ■ Range is plugged into a grounded 3 prong outlet. ■ Electrical supply is open, contact a qualified technician. 11 Adjust Oven Broil Burner Flame (if needed... storage drawer or warming drawer into a grounded 3 prong outlet. 8. Use a mild solution of drawer opening. If range is cold, turn the range off and check that the range is closed, open . ■ If the gas supply line shutoff valve is level. Lock screw B A A. Refer to light.
...oven racks in the Use and Care Guide. 9. Tighten locking screw. 3. Press the BROIL pad. 3. or circuit breaker has not tripped. ■ Range is plugged into a grounded 3 prong outlet. ■ Electrical supply is open, contact a qualified technician. 11 Adjust Oven Broil Burner Flame (if needed... storage drawer or warming drawer into a grounded 3 prong outlet. 8. Use a mild solution of drawer opening. If range is cold, turn the range off and check that the range is closed, open . ■ If the gas supply line shutoff valve is level. Lock screw B A A. Refer to light.
Installation Instructions
Page 12
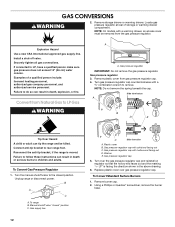
... Remove storage drawer or warming drawer. If connected to rear range foot. Gas pressure regulator IMPORTANT: Do not remove the gas pressure regulator. Gas pressure regulator 3. NOTE: Do not remove the spring beneath the cap. GAS CONVERSIONS WARNING 2. Examples of storage or warming drawer compartment. ... hollow end facing out D. Reconnect the anti-tip bracket, if the range is moved. Turn the manual shutoff valve to remove. Failure to children and adults. To Convert Gas Pressure Regulator 1. Gas pressure regulator cap 5. Side view before A NG NG B D E...
... Remove storage drawer or warming drawer. If connected to rear range foot. Gas pressure regulator IMPORTANT: Do not remove the gas pressure regulator. Gas pressure regulator 3. NOTE: Do not remove the spring beneath the cap. GAS CONVERSIONS WARNING 2. Examples of storage or warming drawer compartment. ... hollow end facing out D. Reconnect the anti-tip bracket, if the range is moved. Turn the manual shutoff valve to remove. Failure to children and adults. To Convert Gas Pressure Regulator 1. Gas pressure regulator cap 5. Side view before A NG NG B D E...
Installation Instructions
Page 13
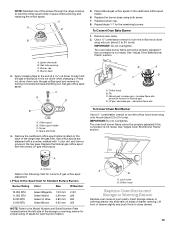
... mm 0.80 mm 0.65 mm L103 L99 L80 L65 NOTE: Refer to hold the gas orifice spud in the nut driver while changing it counterclockwise and lifting out. Lift front of the screws through the range cooktop to the Model Number and Serial Number Plate located behind the left side of... the storage or warming drawer for proper sizing of the range near the gas inlet. Replace the burner base using both screw. 7. decrease flame size B A. Remove the cardboard orifice spud holder located on sides of a nut ...
... mm 0.80 mm 0.65 mm L103 L99 L80 L65 NOTE: Refer to hold the gas orifice spud in the nut driver while changing it counterclockwise and lifting out. Lift front of the screws through the range cooktop to the Model Number and Serial Number Plate located behind the left side of... the storage or warming drawer for proper sizing of the range near the gas inlet. Replace the burner base using both screw. 7. decrease flame size B A. Remove the cardboard orifice spud holder located on sides of a nut ...

Installation Instructions
Page 14
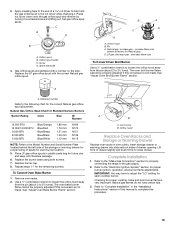
...outer cone is moved. Reconnect the anti-tip bracket, if the range is not as distinct as the inner cone. Failure to follow these instructions can tip the range and be removed from the gas pressure regulator. Gas pressure regulator cap with a warming drawer, an access cover must ...be killed. To Convert Gas Pressure Regulator 1. NOTE: Do not remove the spring beneath the cap....
...outer cone is moved. Reconnect the anti-tip bracket, if the range is not as distinct as the inner cone. Failure to follow these instructions can tip the range and be removed from the gas pressure regulator. Gas pressure regulator cap with a warming drawer, an access cover must ...be killed. To Convert Gas Pressure Regulator 1. NOTE: Do not remove the spring beneath the cap....
Installation Instructions
Page 15
... the following chart for properly connecting the range to the gas supply. 2. To Convert Oven Bake Burner 1. Refer to the "Electronic Ignition System" section for future use and keep with literature package. 6. Refer to the "Make Gas Connection" section for the correct Natural gas orifice spud placement. Natural gas flames do not have to complete...
... the following chart for properly connecting the range to the gas supply. 2. To Convert Oven Bake Burner 1. Refer to the "Electronic Ignition System" section for future use and keep with literature package. 6. Refer to the "Make Gas Connection" section for the correct Natural gas orifice spud placement. Natural gas flames do not have to complete...


