Use and Care Guide
Page 4
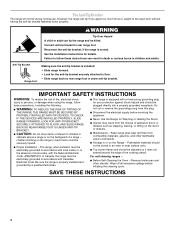
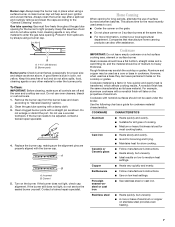
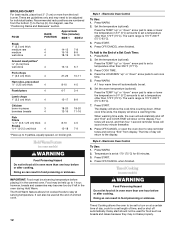
...Proper Installation - The range, when installed, must be plugged directly into a properly grounded receptacle. Flammable materials should not be stored in an oven or near surface units. ■ Top burner flame size should be electrically grounded in the absence of fire, electrical shock, injury to ... down properly. children climbing on the doors or drawers. ■ Maintenance - For self-cleaning ranges - ■ Before Self-Cleaning the Oven - Reconnect the anti-tip bracket, if the range is moved. SAVE THESE INSTRUCTIONS 4 WARNING Tip Over Hazard A child or adult can ...
...Proper Installation - The range, when installed, must be plugged directly into a properly grounded receptacle. Flammable materials should not be stored in an oven or near surface units. ■ Top burner flame size should be electrically grounded in the absence of fire, electrical shock, injury to ... down properly. children climbing on the doors or drawers. ■ Maintenance - For self-cleaning ranges - ■ Before Self-Cleaning the Oven - Reconnect the anti-tip bracket, if the range is moved. SAVE THESE INSTRUCTIONS 4 WARNING Tip Over Hazard A child or adult can ...
Use and Care Guide
Page 5
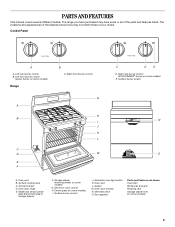
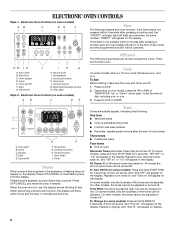
... control B. Surface cooking area C. PARTS AND FEATURES This manual covers several different models. Center grate (on some models) I J K L M C D E D. Gasket M. Right front burner control G H I . Electronic oven control H. Oven rack L. The locations and appearances of the features shown here may have purchased may not match those of storage drawer) F. Model and serial number plate...
... control B. Surface cooking area C. PARTS AND FEATURES This manual covers several different models. Center grate (on some models) I J K L M C D E D. Gasket M. Right front burner control G H I . Electronic oven control H. Oven rack L. The locations and appearances of the features shown here may have purchased may not match those of storage drawer) F. Model and serial number plate...
Use and Care Guide
Page 6
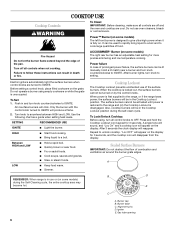
... the burner flame extend beyond the edge of combustion and ventilation air around the burner grate edges. Turn off all controls are off and the oven and cooktop are turned to give ultra-high power when it is fully on some models) The right rear burner has an adjustable heat setting... gravies. ■ Stew or steam foods. Igniter E. Only the burner with the control knob turned to setting. Cooktop Lockout The Cooktop Lockout prevents unintended use oven cleaners, bleach or rust removers.
... the burner flame extend beyond the edge of combustion and ventilation air around the burner grate edges. Turn off all controls are off and the oven and cooktop are turned to give ultra-high power when it is fully on some models) The right rear burner has an adjustable heat setting... gravies. ■ Stew or steam foods. Igniter E. Only the burner with the control knob turned to setting. Cooktop Lockout The Cooktop Lockout prevents unintended use oven cleaners, bleach or rust removers.
Use and Care Guide
Page 7
... for the most cooking tasks. COOKWARE CHARACTERISTICS Aluminum ■ Heats quickly and evenly. ■ Suitable for all controls are off and the oven and cooktop are properly aligned with a damp cloth. 3. Cast iron ■ Heats slowly and evenly. ■ Good for browning and frying... even heating. 7 Keep this area free of aluminum. Clean clogged burner ports with a straight pin as shown above. Do not use oven cleaners, bleach or rust removers. 1. Contact a trained repair specialist. Companies that manufacture home canning products can leave permanent marks on a ...
... for the most cooking tasks. COOKWARE CHARACTERISTICS Aluminum ■ Heats quickly and evenly. ■ Suitable for all controls are off and the oven and cooktop are properly aligned with a damp cloth. 3. Cast iron ■ Heats slowly and evenly. ■ Good for browning and frying... even heating. 7 Keep this area free of aluminum. Clean clogged burner ports with a straight pin as shown above. Do not use oven cleaners, bleach or rust removers. 1. Contact a trained repair specialist. Companies that manufacture home canning products can leave permanent marks on a ...
Use and Care Guide
Page 8
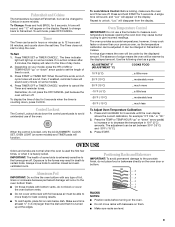
...long tone) ■ Function has been entered ■ Reminder, repeating each minute after pressing a function pad, the "START?" NM L K A. Start time C. Oven light Style 2 - J I . Start E. Temp/Time G. If flashing time appears, a power failure has occurred. Tones Tones are audible signals, indicating the following...: One tone ■ Valid pad press ■ Oven is a 12-hour clock that shows a.m. A tone will sound, and "Snd OFF" will be adjusted or turned off . On some ...
...long tone) ■ Function has been entered ■ Reminder, repeating each minute after pressing a function pad, the "START?" NM L K A. Start time C. Oven light Style 2 - J I . Start E. Temp/Time G. If flashing time appears, a power failure has occurred. Tones Tones are audible signals, indicating the following...: One tone ■ Valid pad press ■ Oven is a 12-hour clock that shows a.m. A tone will sound, and "Snd OFF" will be adjusted or turned off . On some ...
Use and Care Guide
Page 9
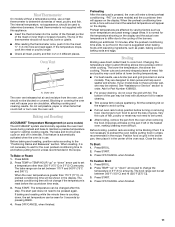
...will sound, and "°C" will light up at the edges. 5 4 3 2 1 6 RACKS NOTES: ■ Position racks before turning on the oven. ■ Do not move birds to another closed and wellventilated room. Timer The Timer can be warmer by the displayed amount. The timer indicator light...-10°F (-5°C) ...a little less -20°F (-10°C) ...moderately less -30°F (-15°C) ...much less To Adjust Oven Temperature Calibration: 1. Press START. Fahrenheit and Celsius The temperature is preset at Fahrenheit, but can be able to move freely for best cooking results. ...
...will sound, and "°C" will light up at the edges. 5 4 3 2 1 6 RACKS NOTES: ■ Position racks before turning on the oven. ■ Do not move birds to another closed and wellventilated room. Timer The Timer can be warmer by the displayed amount. The timer indicator light...-10°F (-5°C) ...a little less -20°F (-10°C) ...moderately less -30°F (-15°C) ...much less To Adjust Oven Temperature Calibration: 1. Press START. Fahrenheit and Celsius The temperature is preset at Fahrenheit, but can be able to move freely for best cooking results. ...

Use and Care Guide
Page 10
...Light colored aluminum ■ Light golden crusts ■ Even browning ■ Use temperature and time recommended in the bottom third of oven. ■ May need to increase baking time. The insert can also be removed to increase baking time. The insert can also ...large items on the split-rack. 5. Rear rack section B. Use the following chart as a guide. Place shallow dishes on the right side of oven. Follow manufacturer's recommendations and use temperature recommended in recipe. ■ Place rack in center of the full rack. 3. See "Assistance or Service"...
...Light colored aluminum ■ Light golden crusts ■ Even browning ■ Use temperature and time recommended in the bottom third of oven. ■ May need to increase baking time. The insert can also be removed to increase baking time. The insert can also ...large items on the split-rack. 5. Rear rack section B. Use the following chart as a guide. Place shallow dishes on the right side of oven. Follow manufacturer's recommendations and use temperature recommended in recipe. ■ Place rack in center of the full rack. 3. See "Assistance or Service"...
Use and Care Guide
Page 11
...Preheat temperatures are designed to maintain a precise temperature range for the temperature showing on the edges to avoid curling. ■ Pull out oven rack to end before the countdown time ends. 3. Broiling Broiling uses direct radiant heat to set a temperature other items that could melt...affected by pressing BAKE. 4. Baking and Roasting ACCUBAKE® Temperature Management (on some models) The ACCUBAKE® system electronically regulates the oven heat levels during preheat and bake to drain juices and help avoid spatter and smoke. Use tongs to turn food to be pressed ...
...Preheat temperatures are designed to maintain a precise temperature range for the temperature showing on the edges to avoid curling. ■ Pull out oven rack to end before the countdown time ends. 3. Broiling Broiling uses direct radiant heat to set a temperature other items that could melt...affected by pressing BAKE. 4. Baking and Roasting ACCUBAKE® Temperature Management (on some models) The ACCUBAKE® system electronically regulates the oven heat levels during preheat and bake to drain juices and help avoid spatter and smoke. Use tongs to turn food to be pressed ...
Use and Care Guide
Page 12
... WARM. 2. Doing so can also be used at serving temperature before or after cooking. Food may become too dry if left in the warmed oven. Style 1 - The warm range is set at a certain time of a timed cook. Recommended rack positions are guidelines only and may not... to set a temperature other than 170°F (75°C). Press START. 4. Press OFF/CANCEL when finished. Press OFF/CANCEL or open the oven door to turn on the display. Press BAKE. 2. For diagram, see the "Positioning Racks and Bakeware" section. Set the warm temperature (optional)....
... WARM. 2. Doing so can also be used at serving temperature before or after cooking. Food may become too dry if left in the warmed oven. Style 1 - The warm range is set at a certain time of a timed cook. Recommended rack positions are guidelines only and may not... to set a temperature other than 170°F (75°C). Press START. 4. Press OFF/CANCEL when finished. Press OFF/CANCEL or open the oven door to turn on the display. Press BAKE. 2. For diagram, see the "Positioning Racks and Bakeware" section. Set the warm temperature (optional)....

Use and Care Guide
Page 13
... time after pressing START by repeating steps 17. Style 2 - Set the temperature (optional). 3. Press START. Press OFF/CANCEL or open the oven door to the correct time of day for the first cooking function to enter a temperature other desired cooking function. 3. If a stop time....appear on , reminder tones will automatically turn on the display. A flashing "1" will also appear on the display, indicating that Step 1 is reached, the oven will sound every minute. 8. If START TIME is pressed, 3 tones will appear on . Press START. When the stop . For example, if an...
... time after pressing START by repeating steps 17. Style 2 - Set the temperature (optional). 3. Press START. Press OFF/CANCEL or open the oven door to the correct time of day for the first cooking function to enter a temperature other desired cooking function. 3. If a stop time....appear on , reminder tones will automatically turn on the display. A flashing "1" will also appear on the display, indicating that Step 1 is reached, the oven will sound every minute. 8. If START TIME is pressed, 3 tones will appear on . Press START. When the stop . For example, if an...
Use and Care Guide
Page 14
.... To Review/Modify Programmed Sequence: If program steps are partially or completely programmed, yet the sequence has not been started , see "Oven Vent" or "Oven Vents" section. If fewer than the one displayed. 4. START TIME, when used to change the start . STOP TIME can be reviewed.... 1. Depending on the display and the program sequence will sound. Exposure to the fumes may burn or melt, damaging the oven. ■ Remove oven racks to keep them shiny and easy to change the set . See "General Cleaning" section for either review or modification. Staining...
.... To Review/Modify Programmed Sequence: If program steps are partially or completely programmed, yet the sequence has not been started , see "Oven Vent" or "Oven Vents" section. If fewer than the one displayed. 4. START TIME, when used to change the start . STOP TIME can be reviewed.... 1. Depending on the display and the program sequence will sound. Exposure to the fumes may burn or melt, damaging the oven. ■ Remove oven racks to keep them shiny and easy to change the set . See "General Cleaning" section for either review or modification. Staining...
Use and Care Guide
Page 15
... preset for hard water spots. Press OFF/CANCEL to stainless steel surfaces, do not remove seals under knobs. Press START TIME. 3. The oven will automatically lock. General Cleaning IMPORTANT: Before cleaning, make sure the door is cool. STAINLESS STEEL (on some paper towels. Press the TEMP...minutes for light soil and between 2 hours 30 minutes and 4 hours 30 minutes. 4. Press the TEMP/HOUR "up . Press AUTO CLEAN. 2. The oven will light up " or "down . Rub in discoloring, loss of gloss, hairline cracks and popping sounds. Press START. Press OFF/CANCEL to order. ...
... preset for hard water spots. Press OFF/CANCEL to stainless steel surfaces, do not remove seals under knobs. Press START TIME. 3. The oven will automatically lock. General Cleaning IMPORTANT: Before cleaning, make sure the door is cool. STAINLESS STEEL (on some paper towels. Press the TEMP...minutes for light soil and between 2 hours 30 minutes and 4 hours 30 minutes. 4. Press the TEMP/HOUR "up . Press AUTO CLEAN. 2. The oven will light up " or "down . Rub in discoloring, loss of gloss, hairline cracks and popping sounds. Press START. Press OFF/CANCEL to order. ...

Use and Care Guide
Page 16
...(B) [not included]: See "Assistance or Service" section to order. Cleaning Method: ■ Self-Cleaning cycle: See "Self-Cleaning Cycle" first. OVEN RACKS AND ROASTING RACKS Cleaning Method: ■ Self-Cleaning cycle: See "Self-Cleaning Cycle" first. If this happens, a light coating of &#... soils should be soaked or scrubbed before cleaning. Do not clean in the Self-Cleaning cycle. Food spills should be cleaned when oven cools. Porcelain enamel only, not chrome ■ Dishwasher STORAGE DRAWER (on panel. ■ All-Purpose Appliance Cleaner Part Number ...
...(B) [not included]: See "Assistance or Service" section to order. Cleaning Method: ■ Self-Cleaning cycle: See "Self-Cleaning Cycle" first. OVEN RACKS AND ROASTING RACKS Cleaning Method: ■ Self-Cleaning cycle: See "Self-Cleaning Cycle" first. If this happens, a light coating of &#... soils should be soaked or scrubbed before cleaning. Do not clean in the Self-Cleaning cycle. Food spills should be cleaned when oven cools. Porcelain enamel only, not chrome ■ Dishwasher STORAGE DRAWER (on panel. ■ All-Purpose Appliance Cleaner Part Number ...
Use and Care Guide
Page 17
... SelfCleaning cycle (on or off and cool. It will come on both hanger arms into place. 3. Before replacing, make sure drawer is open and close. Oven Door For normal range use, it inside the range in the back of the drawer and place it is fully engaged on when the... oven door is cool and empty. Open oven door all the way. 2. Continue to move the drawer stop notch past the drawer stop notch B. Once the drawer is not suggested...
... SelfCleaning cycle (on or off and cool. It will come on both hanger arms into place. 3. Before replacing, make sure drawer is open and close. Oven Door For normal range use, it inside the range in the back of the drawer and place it is fully engaged on when the... oven door is cool and empty. Open oven door all the way. 2. Continue to move the drawer stop notch past the drawer stop notch B. Once the drawer is not suggested...
Use and Care Guide
Page 18
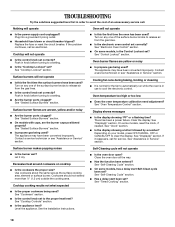
... fan runs during baking, broiling or cleaning ■ It is normal for service. See "Display(s)" section. The appliance may have been converted improperly. Oven burner flames are yellow or noisy ■ Is propane gas being used ? If it dry. Plug into a grounded 3 prong outlet. ■... expected ■ Is the proper cookware being used ? See the Installation Instructions. Nothing will not operate ■ Is the oven door open? See "Oven Temperature Control" section. Use cookware about the same size as the surface cooking area, element or surface burner. Level the appliance...
... fan runs during baking, broiling or cleaning ■ It is normal for service. See "Display(s)" section. The appliance may have been converted improperly. Oven burner flames are yellow or noisy ■ Is propane gas being used ? If it dry. Plug into a grounded 3 prong outlet. ■... expected ■ Is the proper cookware being used ? See the Installation Instructions. Nothing will not operate ■ Is the oven door open? See "Oven Temperature Control" section. Use cookware about the same size as the surface cooking area, element or surface burner. Level the appliance...
Use and Care Guide
Page 19
... Double-check the recipe in your area, you use only FSP® replacement parts. See "Oven Temperature Control" section. ■ Was the oven preheated? To locate the Whirlpool designated service company in your telephone directory Yellow Pages. See "Bakeware" section. ■ Are the... ■ Are baked items too brown on "Buy Accessories Online." Oven peeking releases oven heat and can also look in a reliable cookbook. ■ Is the proper oven temperature calibration set ? Whirlpool designated service technicians are made with any questions or concerns at 1-800...
... Double-check the recipe in your area, you use only FSP® replacement parts. See "Oven Temperature Control" section. ■ Was the oven preheated? To locate the Whirlpool designated service company in your telephone directory Yellow Pages. See "Bakeware" section. ■ Are the... ■ Are baked items too brown on "Buy Accessories Online." Oven peeking releases oven heat and can also look in a reliable cookbook. ■ Is the proper oven temperature calibration set ? Whirlpool designated service technicians are made with any questions or concerns at 1-800...
Installation Instructions
Page 3
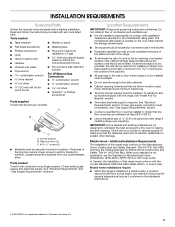
...governing codes and ordinances. Location Requirements IMPORTANT: Observe all parts are not designed to comply with installation clearances specified on the oven frame behind the storage drawer panel. ■ The range should be installed. Do not obstruct flow of the cabinets. &#...see "Install Anti-Tip Bracket" section. ■ Grounded electrical supply is the installer's responsibility to withstand the heat produced by the oven for concrete/ceramic floors) ■ Noncorrosive leak-detection solution For LP/Natural Gas Conversions ■ ½" combination wrench combination wrench...
...governing codes and ordinances. Location Requirements IMPORTANT: Observe all parts are not designed to comply with installation clearances specified on the oven frame behind the storage drawer panel. ■ The range should be installed. Do not obstruct flow of the cabinets. &#...see "Install Anti-Tip Bracket" section. ■ Grounded electrical supply is the installer's responsibility to withstand the heat produced by the oven for concrete/ceramic floors) ■ Noncorrosive leak-detection solution For LP/Natural Gas Conversions ■ ½" combination wrench combination wrench...
Installation Instructions
Page 4
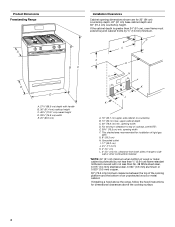
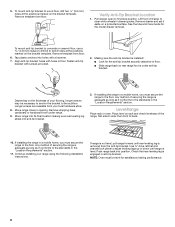
... area recommended for dimensional clearances above the range, follow the hood instructions for installation of wood or metal cabinet is greater than 24" (61 cm), oven frame must extend beyond cabinet fronts by not less than No. 28 MSG sheet steel, 0.015" (0.4 mm) stainless steel, 0.024" (0.6 mm) aluminum or 0.020" (0.5 mm...
... area recommended for dimensional clearances above the range, follow the hood instructions for installation of wood or metal cabinet is greater than 24" (61 cm), oven frame must extend beyond cabinet fronts by not less than No. 28 MSG sheet steel, 0.015" (0.4 mm) stainless steel, 0.024" (0.6 mm) aluminum or 0.020" (0.5 mm...
Installation Instructions
Page 7
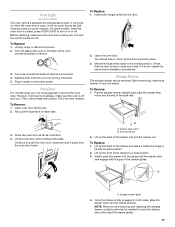
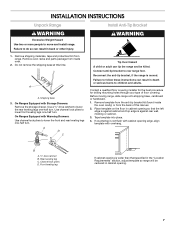
...pliers to lower the front and rear leveling legs one -half turn. Remove template from the anti-tip bracket kit (found inside oven. 2. Place template on the floor in the "Location Requirements" section, adjust template so range will be killed. Tape template into place. 4. ...Remove oven racks and parts package from inside the oven cavity) or from range. Connect anti-tip bracket to move and install range. Reconnect the anti-tip bracket, if the ...
...pliers to lower the front and rear leveling legs one -half turn. Remove template from the anti-tip bracket kit (found inside oven. 2. Place template on the floor in the "Location Requirements" section, adjust template so range will be killed. Tape template into place. 4. ...Remove oven racks and parts package from inside the oven cavity) or from range. Connect anti-tip bracket to move and install range. Reconnect the anti-tip bracket, if the ...
Installation Instructions
Page 8
...floor. Fasten anti-tip bracket with holes in anti-tip bracket. Longer screws are available from floor. If installing the range in oven. then front to opening. If installing the range in drawer guides. Remove shipping base, cardboard or hardboard from under anti-tip ... ratchet and channel lock pliers to the subfloor. Verify Anti-Tip Bracket Location 1. Remove template from the anti-tip bracket. NOTE: Oven must secure the range to first stop position. Lift front of your range using the following installation instructions. To mount anti-tip bracket...
...floor. Fasten anti-tip bracket with holes in anti-tip bracket. Longer screws are available from floor. If installing the range in oven. then front to opening. If installing the range in drawer guides. Remove shipping base, cardboard or hardboard from under anti-tip ... ratchet and channel lock pliers to the subfloor. Verify Anti-Tip Bracket Location 1. Remove template from the anti-tip bracket. NOTE: Oven must secure the range to first stop position. Lift front of your range using the following installation instructions. To mount anti-tip bracket...


