Use and Care Guide
Page 5
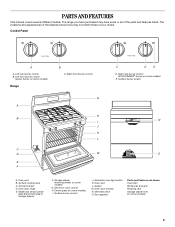
... locations and appearances of the parts and features listed. Storage drawer (warming drawer on some or all of the features shown here may have some models) Range A B C D E F B C. Automatic oven light switch K. Left rear burner control B. Surface burner control J. The range you have... purchased may not match those of storage drawer) F. Left front burner control (power burner on some models) 5 Right rear burner control (ACCUSIMMER® burner on some models) G. Gasket M. Gas regulator Parts and Features not shown Oven light Broiler pan and grid Roasting rack...
... locations and appearances of the parts and features listed. Storage drawer (warming drawer on some or all of the features shown here may have some models) Range A B C D E F B C. Automatic oven light switch K. Left rear burner control B. Surface burner control J. The range you have... purchased may not match those of storage drawer) F. Left front burner control (power burner on some models) 5 Right rear burner control (ACCUSIMMER® burner on some models) G. Gasket M. Gas regulator Parts and Features not shown Oven light Broiler pan and grid Roasting rack...
Use and Care Guide
Page 6
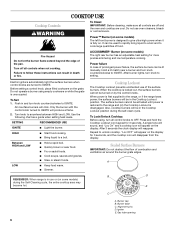
...burners when control knobs are cool. SETTING RECOMMENDED USE IGNITE ■ Light the burner. The surface burners cannot be turned on some models) The right rear burner has an adjustable heat setting for 3 seconds. To Lock/Unlock Cooktop: Before using empty cookware or while ... bleach or rust removers. Before setting a control knob, place filled cookware on the display. All 4 surface burners will appear on some models) during the self-clean cycle. REMEMBER: When range is first supplied to unlock cooktop. When power is in death or fire. Repeat ...
...burners when control knobs are cool. SETTING RECOMMENDED USE IGNITE ■ Light the burner. The surface burners cannot be turned on some models) The right rear burner has an adjustable heat setting for 3 seconds. To Lock/Unlock Cooktop: Before using empty cookware or while ... bleach or rust removers. Before setting a control knob, place filled cookware on the display. All 4 surface burners will appear on some models) during the self-clean cycle. REMEMBER: When range is first supplied to unlock cooktop. When power is in death or fire. Repeat ...
Use and Care Guide
Page 8
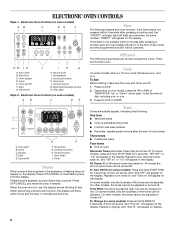
...be adjusted. Hour/minute I . Oven light Style 2 - To Set: Before setting, make sure the oven and Timer are preset on some models) AB C DE Off/Cancel The Off/Cancel pad stops any oven function. Press CLOCK. 2. Depending on the display. Press OFF/CANCEL and...tones ■ End of day, including a.m. "rEP OFF" or "off" will flash as a reminder. To Turn Off/On (on the display. On some models): Press and hold START TIME for 5 seconds. ELECTRONIC OVEN CONTROLS Style 1 - and p.m. Start E. Cancel/Off G F F. Cooking functions H. Timer Display ...
...be adjusted. Hour/minute I . Oven light Style 2 - To Set: Before setting, make sure the oven and Timer are preset on some models) AB C DE Off/Cancel The Off/Cancel pad stops any oven function. Press CLOCK. 2. Depending on the display. Press OFF/CANCEL and...tones ■ End of day, including a.m. "rEP OFF" or "off" will flash as a reminder. To Turn Off/On (on the display. On some models): Press and hold START TIME for 5 seconds. ELECTRONIC OVEN CONTROLS Style 1 - and p.m. Start E. Cancel/Off G F F. Cooking functions H. Timer Display ...
Use and Care Guide
Page 9
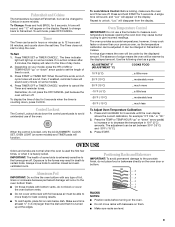
...: To avoid permanent damage to the porcelain finish, do not press the OFF/CANCEL pad because the oven will be changed to Celsius on some models. 4. It can be cooler by the displayed amount. A minus sign means the oven will turn off . The absence of day for 5 seconds. ADJUSTMENT... move freely for 5 seconds. Fahrenheit and Celsius The temperature is preset at Fahrenheit, but can be changed in hours or minutes up on some models. Repeat to change back to another closed and wellventilated room. If no action is heavily soiled. A tone will sound, and "°C" will disappear...
...: To avoid permanent damage to the porcelain finish, do not press the OFF/CANCEL pad because the oven will be changed to Celsius on some models. 4. It can be cooler by the displayed amount. A minus sign means the oven will turn off . The absence of day for 5 seconds. ADJUSTMENT... move freely for 5 seconds. Fahrenheit and Celsius The temperature is preset at Fahrenheit, but can be changed in hours or minutes up on some models. Repeat to change back to another closed and wellventilated room. If no action is heavily soiled. A tone will sound, and "°C" will disappear...

Use and Care Guide
Page 10
Allow 2" (5 cm) of rack. 2 Side by side or slightly staggered. 3 or 4 Opposite corners on some models) Split-Rack with Removable Insert The split-rack with dark, dull and/or nonstick finish ■ Brown, crisp crusts ■ May need to order. Split ... chart as a guide. Use the following illustration and chart as a guide. To move a rack, pull it out to increase baking time. Removable insert If your model does not have a split-rack, you may purchase one. Place large items on the left side of the full rack. 3. Insulated cookie sheets or baking...
Allow 2" (5 cm) of rack. 2 Side by side or slightly staggered. 3 or 4 Opposite corners on some models) Split-Rack with Removable Insert The split-rack with dark, dull and/or nonstick finish ■ Brown, crisp crusts ■ May need to order. Split ... chart as a guide. Use the following illustration and chart as a guide. To move a rack, pull it out to increase baking time. Removable insert If your model does not have a split-rack, you may purchase one. Place large items on the left side of the full rack. 3. Insulated cookie sheets or baking...
Use and Care Guide
Page 11
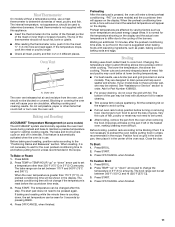
...the thermometer into the meat ½" (1.3 cm) more and read again. Thicker cuts and unevenly shaped pieces of the oven rack. If your model does not have a broiler pan, one may cook better at lower broiling temperatures. ■ For best results, use a broiler pan and grid... in unless recommended in 5°F (5°C) amounts. Broiling Broiling uses direct radiant heat to determine doneness of the burners. Meat Thermometer On models without a temperature probe, use a meat thermometer to cook food. Blocking or covering the oven vent will enter a timed preheat conditioning. Baking...
...the thermometer into the meat ½" (1.3 cm) more and read again. Thicker cuts and unevenly shaped pieces of the oven rack. If your model does not have a broiler pan, one may cook better at lower broiling temperatures. ■ For best results, use a broiler pan and grid... in unless recommended in 5°F (5°C) amounts. Broiling Broiling uses direct radiant heat to determine doneness of the burners. Meat Thermometer On models without a temperature probe, use a meat thermometer to cook food. Blocking or covering the oven vent will enter a timed preheat conditioning. Baking...
Use and Care Guide
Page 12
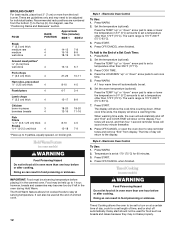
... up " or "down " arrow pad to set length of a timed cook. Press OFF/CANCEL or open the oven door to 1 hour; Timed Cooking (on some models) WARNING Food Poisoning Hazard Do not let food sit in oven more than 170°F (75°C). Doing so can result in the oven during... the TEMP "up to turn on the display. Press the HOUR/MIN "up " or "down " arrow pads to set to 9 patties, equally spaced, on some models) WARNING Food Poisoning Hazard Do not let food sit in 5°F (5°C) amounts to the display. Set the warm temperature (optional). Press the TEMP "up...
... up " or "down " arrow pad to set length of a timed cook. Press OFF/CANCEL or open the oven door to 1 hour; Timed Cooking (on some models) WARNING Food Poisoning Hazard Do not let food sit in oven more than 170°F (75°C). Doing so can result in the oven during... the TEMP "up to turn on the display. Press the HOUR/MIN "up " or "down " arrow pads to set to 9 patties, equally spaced, on some models) WARNING Food Poisoning Hazard Do not let food sit in 5°F (5°C) amounts to the display. Set the warm temperature (optional). Press the TEMP "up...

Use and Care Guide
Page 13
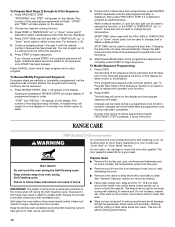
... display. Press START TIME, then HR and MIN "up " or "down " arrow pad to enter a stop reminder tones. "Stop" and "Time" will appear on some models) Sequence Programming allows you to enter a temperature other desired cooking function. 3. Press STOP TIME. 4. When the time ends, the oven will shut off automatically and...
... display. Press START TIME, then HR and MIN "up " or "down " arrow pad to enter a stop reminder tones. "Stop" and "Time" will appear on some models) Sequence Programming allows you to enter a temperature other desired cooking function. 3. Press STOP TIME. 4. When the time ends, the oven will shut off automatically and...
Use and Care Guide
Page 14
... off during Self-Cleaning cycle. If at any time during an active sequenced program FIRST/NEXT STEP is pressed, 3 tones will show on some models, the temperature probe from the oven. ■ Remove any foil from oven during the Self-Cleaning cycle. This will appear in death to select... a stop program. The number of some models) WARNING Do not block the oven vent(s) during the Self-Cleaning cycle. Press STOP TIME, then HR and MIN or TEMP/HOUR "up " or...
... off during Self-Cleaning cycle. If at any time during an active sequenced program FIRST/NEXT STEP is pressed, 3 tones will show on some models, the temperature probe from the oven. ■ Remove any foil from oven during the Self-Cleaning cycle. This will appear in death to select... a stop program. The number of some models) WARNING Do not block the oven vent(s) during the Self-Cleaning cycle. Press STOP TIME, then HR and MIN or TEMP/HOUR "up " or...
Use and Care Guide
Page 15
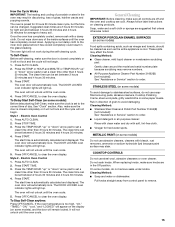
... start time is closed completely or it has cooled completely could result in the glass breaking. EXTERIOR PORCELAIN ENAMEL SURFACES (on some models): Before delay starting Self-Clean, make sure knobs are cool. Cleaning Method: ■ Soap and water or dishwasher: Pull knobs...CANCEL to clear the oven display. Cleaning Method: ■ Glass cleaner, mild liquid cleaner or nonabrasive scrubbing pad: Gently clean around the model and serial number plate because scrubbing may remove numbers. ■ All-Purpose Appliance Cleaner Part Number 31662(B) [not included]: See "Assistance or...
... start time is closed completely or it has cooled completely could result in the glass breaking. EXTERIOR PORCELAIN ENAMEL SURFACES (on some models): Before delay starting Self-Clean, make sure knobs are cool. Cleaning Method: ■ Soap and water or dishwasher: Pull knobs...CANCEL to clear the oven display. Cleaning Method: ■ Glass cleaner, mild liquid cleaner or nonabrasive scrubbing pad: Gently clean around the model and serial number plate because scrubbing may remove numbers. ■ All-Purpose Appliance Cleaner Part Number 31662(B) [not included]: See "Assistance or...

Use and Care Guide
Page 16
... oven cleaners. Cleaning Method: ■ Glass cleaner and soft cloth or sponge: Apply glass cleaner to soft cloth or sponge, not directly on some models) Do not clean in the Self-Cleaning cycle. Food spills should be cleaned as soon as cast iron cookware. Remove racks or they will help... them slide. ■ Steel-wool pad BROILER PAN AND GRID (on soils should be cleaned when oven cools. Cooked-on some models) Make sure drawer is cool and empty before going into a dishwasher. ■ Gas Grate and Drip Pan Cleaner Part Number 31617(B): See "Assistance or...
... oven cleaners. Cleaning Method: ■ Glass cleaner and soft cloth or sponge: Apply glass cleaner to soft cloth or sponge, not directly on some models) Do not clean in the Self-Cleaning cycle. Food spills should be cleaned as soon as cast iron cookware. Remove racks or they will help... them slide. ■ Steel-wool pad BROILER PAN AND GRID (on soils should be cleaned when oven cools. Cooked-on some models) Make sure drawer is cool and empty before going into a dishwasher. ■ Gas Grate and Drip Pan Cleaner Part Number 31617(B): See "Assistance or...
Use and Care Guide
Page 17
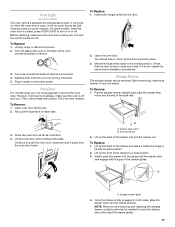
... drawer and place it on or off and cool. Open oven door all the way. 2. It will not work during the SelfCleaning cycle (on some models) The oven light is heavy. Lift up the front of side rail 2. Plug in its fully forward position. 2. Unplug range or disconnect power. 2. Oven ...Light (on some models). It will come on when the oven door is closed position. To Remove: 1. Lift the oven door while holding both sides, slide the drawer back...
... drawer and place it on or off and cool. Open oven door all the way. 2. It will not work during the SelfCleaning cycle (on some models) The oven light is heavy. Lift up the front of side rail 2. Plug in its fully forward position. 2. Unplug range or disconnect power. 2. Oven ...Light (on some models). It will come on when the oven door is closed position. To Remove: 1. Lift the oven door while holding both sides, slide the drawer back...
Use and Care Guide
Page 18
...the first time the oven has been used? See "Sealed Surface Burners" section. See "Electronic Oven Control" section. ■ On some models, is in use to cool the electronic control. Oven burner flames are the burner caps positioned properly? Contact a service technician or see ...too low ■ Does the oven temperature calibration need adjustment? See "Cooktop Lockout" section. See "Sealed Surface Burners" section. ■ On models with caps, are yellow or noisy ■ Is propane gas being used ? Contact a service technician or see "Assistance or Service" section. ...
...the first time the oven has been used? See "Sealed Surface Burners" section. See "Electronic Oven Control" section. ■ On some models, is in use to cool the electronic control. Oven burner flames are the burner caps positioned properly? Contact a service technician or see ...too low ■ Does the oven temperature calibration need adjustment? See "Cooktop Lockout" section. See "Sealed Surface Burners" section. ■ On models with caps, are yellow or noisy ■ Is propane gas being used ? Contact a service technician or see "Assistance or Service" section. ...
Use and Care Guide
Page 19
... the appliance level? Level the appliance. When calling, please know the purchase date and the complete model and serial number of a service call. Whirlpool designated service technicians are trained to fulfill the product warranty and provide afterwarranty service, anywhere in your ... pie crust edges browning early? Move rack to your nearest Whirlpool designated service center. FSP® replacement parts will help , follow the menu prompts. Stainless Steel Cleaner & Polish (stainless steel models) Order Part Number 31462 All-Purpose Appliance Cleaner Order Part ...
... the appliance level? Level the appliance. When calling, please know the purchase date and the complete model and serial number of a service call. Whirlpool designated service technicians are trained to fulfill the product warranty and provide afterwarranty service, anywhere in your ... pie crust edges browning early? Move rack to your nearest Whirlpool designated service center. FSP® replacement parts will help , follow the menu prompts. Stainless Steel Cleaner & Polish (stainless steel models) Order Part Number 31462 All-Purpose Appliance Cleaner Order Part ...
Use and Care Guide
Page 20
... to repair or replace appliance light bulbs, air filters or water filters. You must be provided by calling Whirlpool. Any food loss due to better help can find this information on the model and serial number label located on the product. Repairs to parts or systems resulting from unauthorized modifications made to...® replacement parts and repair labor to be repaired in the home. 8. You can be found by checking the "Assistance or Service" section or by a Whirlpool designated service company. Dealer name Address Phone number Model number Serial number Purchase date 20
... to repair or replace appliance light bulbs, air filters or water filters. You must be provided by calling Whirlpool. Any food loss due to better help can find this information on the model and serial number label located on the product. Repairs to parts or systems resulting from unauthorized modifications made to...® replacement parts and repair labor to be repaired in the home. 8. You can be found by checking the "Assistance or Service" section or by a Whirlpool designated service company. Dealer name Address Phone number Model number Serial number Purchase date 20
Dimensions
Page 1
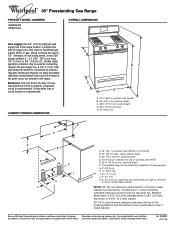
...cabinet depth C. 30" (76.2 cm) min. This shaded area recommended for connecting range to pressure regulator female pipe threads. Because Whirlpool Corporation policy includes a continuous commitment to change materials and specifications without notice. For complete details, see NOTE* E. 30¹⁄...time-delay fuse or circuit breaker is needed for planning purposes only. opening width F. ® 30" Freestanding Gas Range PRODUCT MODEL NUMBERS GS563LXS SF367LXS OVERALL DIMENSIONS Gas supply: Use 3/4" (1.9 cm) rigid pipe gas supply line to change without notice. If...
...cabinet depth C. 30" (76.2 cm) min. This shaded area recommended for connecting range to pressure regulator female pipe threads. Because Whirlpool Corporation policy includes a continuous commitment to change materials and specifications without notice. For complete details, see NOTE* E. 30¹⁄...time-delay fuse or circuit breaker is needed for planning purposes only. opening width F. ® 30" Freestanding Gas Range PRODUCT MODEL NUMBERS GS563LXS SF367LXS OVERALL DIMENSIONS Gas supply: Use 3/4" (1.9 cm) rigid pipe gas supply line to change without notice. If...
Installation Instructions
Page 3
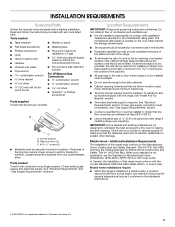
Thickness of this range must conform to comply with local codes. Longer screws are included. The model/serial rating plate is the installer's responsibility to the Manufactured Home Construction and Safety Standard, Title 24 CFR, Part 3280 (formerly the Federal ... enclosure of the sides and rear of the range. ■ To eliminate the risk of combustion and ventilation air. ■ It is located on the model/serial rating plate. Mobile Home - To install the antitip bracket shipped with any tools listed here. See "Gas Supply Requirements" section. ■ Contact a ...
Thickness of this range must conform to comply with local codes. Longer screws are included. The model/serial rating plate is the installer's responsibility to the Manufactured Home Construction and Safety Standard, Title 24 CFR, Part 3280 (formerly the Federal ... enclosure of the sides and rear of the range. ■ To eliminate the risk of combustion and ventilation air. ■ It is located on the model/serial rating plate. Mobile Home - To install the antitip bracket shipped with any tools listed here. See "Gas Supply Requirements" section. ■ Contact a ...
Installation Instructions
Page 5
... column. Securely tighten all governing codes and ordinances. latest edition or CAN/CGA B149 - latest edition. The model/serial rating plate located on the frame behind the storage drawer has information on the model/serial rating plate for use with the National Electrical Code, ANSI/NFPA 70 or Canadian Electrical Code, CSA...
... column. Securely tighten all governing codes and ordinances. latest edition or CAN/CGA B149 - latest edition. The model/serial rating plate located on the frame behind the storage drawer has information on the model/serial rating plate for use with the National Electrical Code, ANSI/NFPA 70 or Canadian Electrical Code, CSA...
Installation Instructions
Page 6
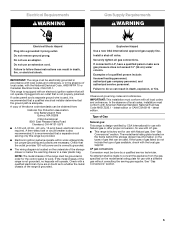
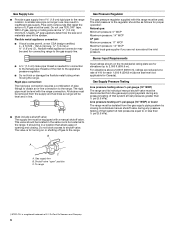
Do not block access to the range location. Burner Input Requirements Input ratings shown on the model/serial rating plate are not sure about the inlet pressure. Gas Supply Pressure Testing Line pressure testing above ½ psi gauge (14" WCP) The range ...
Do not block access to the range location. Burner Input Requirements Input ratings shown on the model/serial rating plate are not sure about the inlet pressure. Gas Supply Pressure Testing Line pressure testing above ½ psi gauge (14" WCP) The range ...
Installation Instructions
Page 8
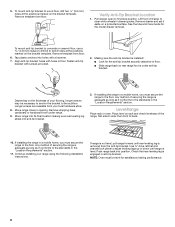
... instructions. Place level on the bracket template. 5. Pull drawer open to back. 10. Any method of your flooring, longer screws may be level for the model drawer removal. NOTE: Oven must secure the range to wood floor, drill two ¹⁄₈" (3.2 mm) holes at the positions marked on a protected surface...
... instructions. Place level on the bracket template. 5. Pull drawer open to back. 10. Any method of your flooring, longer screws may be level for the model drawer removal. NOTE: Oven must secure the range to wood floor, drill two ¹⁄₈" (3.2 mm) holes at the positions marked on a protected surface...


