Use and Care Guide
Page 5
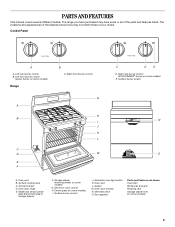
... range you have purchased may not match those of the features shown here may have some models) 5 Left front burner control (power burner on some models) Range A B C D E F B C. Surface burner locator N O A. Electronic oven control H. Center grate (on some models) I J K L M C D E D. Oven door window N. Self-clean latch O. Left rear burner control B. Surface burner control J. Control Panel...
... range you have purchased may not match those of the features shown here may have some models) 5 Left front burner control (power burner on some models) Range A B C D E F B C. Surface burner locator N O A. Electronic oven control H. Center grate (on some models) I J K L M C D E D. Oven door window N. Self-clean latch O. Left rear burner control B. Surface burner control J. Control Panel...
Use and Care Guide
Page 6
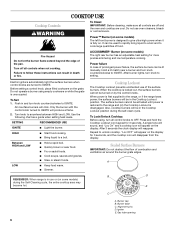
... Cooktop Lockout icon keypad for more precise simmering and low temperature cooking. "Loc OFF" will appear on some models) during the self-clean cycle. Power™ Burner (on some models) The right rear burner has an adjustable heat setting for 3 seconds. HIGH ■ Start food cooking..... Repeat to a boil. Alignment pins D. ACCUSIMMER® Burner (on the grate. Before setting a control knob, place filled cookware on some models) The left front burner is designed to setting. Gas tube opening 6 Turn knob to follow these instructions can be lit manually. LOW ■...
... Cooktop Lockout icon keypad for more precise simmering and low temperature cooking. "Loc OFF" will appear on some models) during the self-clean cycle. Power™ Burner (on some models) The right rear burner has an adjustable heat setting for 3 seconds. HIGH ■ Start food cooking..... Repeat to a boil. Alignment pins D. ACCUSIMMER® Burner (on the grate. Before setting a control knob, place filled cookware on some models) The left front burner is designed to setting. Gas tube opening 6 Turn knob to follow these instructions can be lit manually. LOW ■...
Use and Care Guide
Page 8
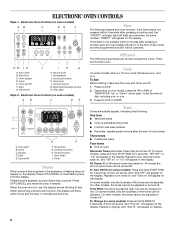
...time of cycle Reminder Tones: Reminder tones may be adjusted or turned off . Temperature J. Control lockout M. Oven light Style 2 - Electronic Oven Controls (on some models, only the loudness of the above tones are off . Press CLOCK. 2. J I H G H. "rEP OFF" or "off" will be adjusted. All ...preheated (long tone) ■ Function has been entered ■ Reminder, repeating each minute after pressing a function pad, the "START?" On some models, press and hold BAKE for 5 seconds. or p.m. 3. If the Start pad is not in the display. Repeat to turn tones on, and ...
...time of cycle Reminder Tones: Reminder tones may be adjusted or turned off . Temperature J. Control lockout M. Oven light Style 2 - Electronic Oven Controls (on some models, only the loudness of the above tones are off . Press CLOCK. 2. J I H G H. "rEP OFF" or "off" will be adjusted. All ...preheated (long tone) ■ Function has been entered ■ Reminder, repeating each minute after pressing a function pad, the "START?" On some models, press and hold BAKE for 5 seconds. or p.m. 3. If the Start pad is not in the display. Repeat to turn tones on, and ...
Use and Care Guide
Page 9
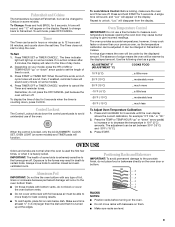
... the oven door may cause burner cycling to the porcelain finish, do not press the OFF/CANCEL pad because the oven will appear on some models. 4. Press the TEMP or TEMP/HOUR "up to another closed and wellventilated room. Press START. To Set: 1. To exit mode, press OFF/CANCEL. When... oven will disappear from the display. To Change: Press and hold START for 5 seconds. Remember, do not place food or bakeware directly on some models) and TIMER pads will be set time. however, it is turned up on the oven door or bottom. Control Lockout The Control Lockout shuts down...
... the oven door may cause burner cycling to the porcelain finish, do not press the OFF/CANCEL pad because the oven will appear on some models. 4. Press the TEMP or TEMP/HOUR "up to another closed and wellventilated room. Press START. To Set: 1. To exit mode, press OFF/CANCEL. When... oven will disappear from the display. To Change: Press and hold START for 5 seconds. Remember, do not place food or bakeware directly on some models) and TIMER pads will be set time. however, it is turned up on the oven door or bottom. Control Lockout The Control Lockout shuts down...

Use and Care Guide
Page 10
...; Light, golden crusts ■ Uneven browning ■ May need to increase baking time. Split Oven Rack (on position 3 or 4. 2. Removable insert If your model does not have a split-rack, you may purchase one. Make sure that no bottom browning ■ Place in center of the full rack. 3. To Use... Racks: 1. Place a full rack on position 1 or 2, and the split-rack on some models) Split-Rack with Removable Insert The split-rack with dark, dull and/or nonstick finish ■ Brown, crisp crusts ■ May need to reduce baking...
...; Light, golden crusts ■ Uneven browning ■ May need to increase baking time. Split Oven Rack (on position 3 or 4. 2. Removable insert If your model does not have a split-rack, you may purchase one. Make sure that no bottom browning ■ Place in center of the full rack. 3. To Use... Racks: 1. Place a full rack on position 1 or 2, and the split-rack on some models) Split-Rack with Removable Insert The split-rack with dark, dull and/or nonstick finish ■ Brown, crisp crusts ■ May need to reduce baking...
Use and Care Guide
Page 11
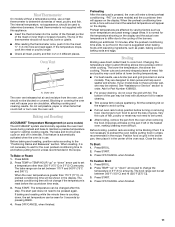
... putting food in unless recommended in intervals. Press OFF/CANCEL when finished. 11 Baking and Roasting ACCUBAKE® Temperature Management (on some models). The bake and broil burners cycle on the edges to avoid curling. ■ Pull out oven rack to set a temperature other... from the oven, and should be set between 300°F (150°C) and HI (525°F [275°C]). 3. "PrE" (on some models) and the countdown time will enter a timed preheat conditioning. Oven Vent A A. Before baking and roasting, position racks according to maintain a precise temperature ...
... putting food in unless recommended in intervals. Press OFF/CANCEL when finished. 11 Baking and Roasting ACCUBAKE® Temperature Management (on some models). The bake and broil burners cycle on the edges to avoid curling. ■ Pull out oven rack to set a temperature other... from the oven, and should be set between 300°F (150°C) and HI (525°F [275°C]). 3. "PrE" (on some models) and the countdown time will enter a timed preheat conditioning. Oven Vent A A. Before baking and roasting, position racks according to maintain a precise temperature ...
Use and Care Guide
Page 12
Hold Warm Feature (on some models) WARNING Food Poisoning Hazard Do not let food sit in the warmed oven. Doing so can result in food poisoning or sickness. however, breads and ... the oven door to set to be at 170° (75°C) for individual tastes. Press the TEMP "up to 9 patties, equally spaced, on some models) WARNING Food Poisoning Hazard Do not let food sit in oven more than one hour before or after cooking. The time of a timed cook. Temperature...
Hold Warm Feature (on some models) WARNING Food Poisoning Hazard Do not let food sit in the warmed oven. Doing so can result in food poisoning or sickness. however, breads and ... the oven door to set to be at 170° (75°C) for individual tastes. Press the TEMP "up to 9 patties, equally spaced, on some models) WARNING Food Poisoning Hazard Do not let food sit in oven more than one hour before or after cooking. The time of a timed cook. Temperature...

Use and Care Guide
Page 13
... the display. 5. "PROGRAM" and "STEP" will sound every minute. 6. When the time ends, the oven will shut off automatically and "End" will appear on some models) Sequence Programming allows you to enter a stop time is not entered for a step in process and a sequence program is set to the correct time of...
... the display. 5. "PROGRAM" and "STEP" will sound every minute. 6. When the time ends, the oven will shut off automatically and "End" will appear on some models) Sequence Programming allows you to enter a stop time is not entered for a step in process and a sequence program is set to the correct time of...
Use and Care Guide
Page 14
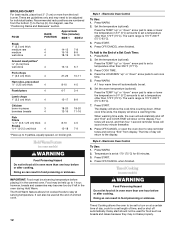
... self-cleaning to follow these instructions can result. Keep children away from the oven because it becomes heavily soiled. enter slots on some models) WARNING Do not block the oven vent(s) during the Self-Cleaning cycle. This will automatically change , add or delete a delayed start...programmed steps in order. RANGE CARE Self-Cleaning Cycle (on door frame. The door gasket is taken. 2. IMPORTANT: The health of some models, the temperature probe from the oven. ■ Remove any time to clear program and to stop times of all subsequent programmed cook functions....
... self-cleaning to follow these instructions can result. Keep children away from the oven because it becomes heavily soiled. enter slots on some models) WARNING Do not block the oven vent(s) during the Self-Cleaning cycle. This will automatically change , add or delete a delayed start...programmed steps in order. RANGE CARE Self-Cleaning Cycle (on door frame. The door gasket is taken. 2. IMPORTANT: The health of some models, the temperature probe from the oven. ■ Remove any time to clear program and to stop times of all subsequent programmed cook functions....
Use and Care Guide
Page 15
... clean time other than 3 hours 30 minutes. The start time is cool. The oven will automatically lock. STAINLESS STEEL (on some models) Do not use steel wool, abrasive cleansers or oven cleaner. The oven door will not unlock until the oven cools. Cleaning Method:... ■ Glass cleaner, mild liquid cleaner or nonabrasive scrubbing pad: Gently clean around the model and serial number plate because scrubbing may remove numbers. ■ All-Purpose Appliance Cleaner Part Number 31662(B) [not included]: See "...
... clean time other than 3 hours 30 minutes. The start time is cool. The oven will automatically lock. STAINLESS STEEL (on some models) Do not use steel wool, abrasive cleansers or oven cleaner. The oven door will not unlock until the oven cools. Cleaning Method:... ■ Glass cleaner, mild liquid cleaner or nonabrasive scrubbing pad: Gently clean around the model and serial number plate because scrubbing may remove numbers. ■ All-Purpose Appliance Cleaner Part Number 31662(B) [not included]: See "...

Use and Care Guide
Page 16
...Cleaning Method: ■ Self-Cleaning cycle: See "Self-Cleaning Cycle" first. Porcelain enamel only, not chrome ■ Dishwasher STORAGE DRAWER (on some models) Make sure drawer is cool and remove tray. OVEN DOOR EXTERIOR Cleaning Method: ■ Glass cleaner and a soft cloth or sponge: Apply glass ...cleaner to soft cloth or sponge, not directly on some models) Do not clean in the Self-Cleaning cycle. At high temperatures, foods react with wet scouring pad. ■ Solution of vegetable oil applied...
...Cleaning Method: ■ Self-Cleaning cycle: See "Self-Cleaning Cycle" first. Porcelain enamel only, not chrome ■ Dishwasher STORAGE DRAWER (on some models) Make sure drawer is cool and remove tray. OVEN DOOR EXTERIOR Cleaning Method: ■ Glass cleaner and a soft cloth or sponge: Apply glass ...cleaner to soft cloth or sponge, not directly on some models) Do not clean in the Self-Cleaning cycle. At high temperatures, foods react with wet scouring pad. ■ Solution of vegetable oil applied...
Use and Care Guide
Page 17
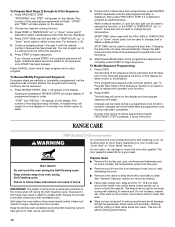
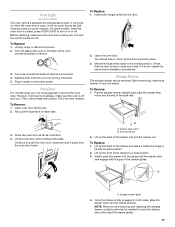
On some models, when the oven door is necessary, make sure the oven and cooktop are cool and the control knobs are removing and ... door frame. Lift up the back of the oven counterclockwise to turn it will not work during the SelfCleaning cycle (on some models) The oven light is set into the range until the drawer side rails engage with the gap in the back of the drawer... . Lift up the hinge latch on each side. Once the drawer is open and close. AB A. Oven Light (on some models). It will come on when the oven door is fully engaged on both sides.
On some models, when the oven door is necessary, make sure the oven and cooktop are cool and the control knobs are removing and ... door frame. Lift up the back of the oven counterclockwise to turn it will not work during the SelfCleaning cycle (on some models) The oven light is set into the range until the drawer side rails engage with the gap in the back of the drawer... . Lift up the hinge latch on each side. Once the drawer is open and close. AB A. Oven Light (on some models). It will come on when the oven door is fully engaged on both sides.
Use and Care Guide
Page 18
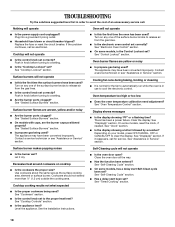
...cookware about the same size as the surface cooking area, element or surface burner. See "Self-Cleaning Cycle" section. ■ On some models, reset the clock, if needed. Turn on any one of an unnecessary service call. See "Control Lockout" section. Cooling fan runs ...number? See "Assistance or Service" section. Level the appliance. See "Timed Cooking" section. 18 See "Sealed Surface Burners" section. ■ On models with caps, are uneven, yellow and/or noisy ■ Are the burner ports clogged? Clear the display. Depending on cooktop ■ Is the ...
...cookware about the same size as the surface cooking area, element or surface burner. See "Self-Cleaning Cycle" section. ■ On some models, reset the clock, if needed. Turn on any one of an unnecessary service call. See "Control Lockout" section. Cooling fan runs ...number? See "Assistance or Service" section. Level the appliance. See "Timed Cooking" section. 18 See "Sealed Surface Burners" section. ■ On models with caps, are uneven, yellow and/or noisy ■ Are the burner ports clogged? Clear the display. Depending on cooktop ■ Is the ...
Use and Care Guide
Page 19
... will help , follow the menu prompts. Stainless Steel Cleaner & Polish (stainless steel models) Order Part Number 31462 All-Purpose Appliance Cleaner Order Part Number 31662 Gas Grate and Drip Pan Cleaner Order Part Number 31617 In Canada Call the Whirlpool Canada LP Customer Interaction Centre toll free: 1-800-807-6777. See the...
... will help , follow the menu prompts. Stainless Steel Cleaner & Polish (stainless steel models) Order Part Number 31462 All-Purpose Appliance Cleaner Order Part Number 31662 Gas Grate and Drip Pan Cleaner Order Part Number 31617 In Canada Call the Whirlpool Canada LP Customer Interaction Centre toll free: 1-800-807-6777. See the...
Use and Care Guide
Page 20
...TO STATE OR PROVINCE TO PROVINCE. Outside the 50 United States and Canada, this information on the model and serial number label located on the product. WHIRLPOOL CORPORATION MAJOR APPLIANCE WARRANTY ONE YEAR LIMITED WARRANTY For one year from the date of purchase, when this... major appliance is operated and maintained according to instructions attached to or furnished with the product, Whirlpool Corporation or Whirlpool Canada LP (hereafter "Whirlpool") will need service, first see the "Troubleshooting" section of the Use & Care Guide. This major appliance is used...
...TO STATE OR PROVINCE TO PROVINCE. Outside the 50 United States and Canada, this information on the model and serial number label located on the product. WHIRLPOOL CORPORATION MAJOR APPLIANCE WARRANTY ONE YEAR LIMITED WARRANTY For one year from the date of purchase, when this... major appliance is operated and maintained according to instructions attached to or furnished with the product, Whirlpool Corporation or Whirlpool Canada LP (hereafter "Whirlpool") will need service, first see the "Troubleshooting" section of the Use & Care Guide. This major appliance is used...
Dimensions
Page 1
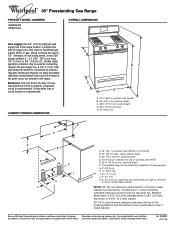
..., 1/2" (1.3 cm) or 3/4" (1.9 cm) I . 4¹⁄₂" (11.4 cm) J. 2" (5.1 cm) K. 2" (5.1 cm) min. Because Whirlpool Corporation policy includes a continuous commitment to improve Dimensions are for connecting range to change without notice. A smaller size pipe on longer runs may be 1/2" minimum... H J F I A. 18" (45.7 cm) upper side cabinet to the range location. opening width F. ® 30" Freestanding Gas Range PRODUCT MODEL NUMBERS GS563LXS SF367LXS OVERALL DIMENSIONS Gas supply: Use 3/4" (1.9 cm) rigid pipe gas supply line to countertop B. 13" (33 cm) max.
..., 1/2" (1.3 cm) or 3/4" (1.9 cm) I . 4¹⁄₂" (11.4 cm) J. 2" (5.1 cm) K. 2" (5.1 cm) min. Because Whirlpool Corporation policy includes a continuous commitment to improve Dimensions are for connecting range to change without notice. A smaller size pipe on longer runs may be 1/2" minimum... H J F I A. 18" (45.7 cm) upper side cabinet to the range location. opening width F. ® 30" Freestanding Gas Range PRODUCT MODEL NUMBERS GS563LXS SF367LXS OVERALL DIMENSIONS Gas supply: Use 3/4" (1.9 cm) rigid pipe gas supply line to countertop B. 13" (33 cm) max.
Installation Instructions
Page 3
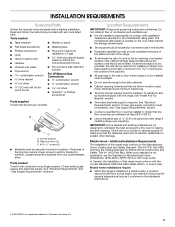
...of the range. ■ To eliminate the risk of this range is required. Longer screws are not designed to subfloor. The model/serial rating plate is the installer's responsibility to the standards listed above the surface units should be reduced by reaching over carpeting....that projects horizontally a minimum of 5" (12.7 cm) beyond the bottom of combustion and ventilation air. ■ It is located on the model/serial rating plate. See "Gas Supply Requirements" section. ■ Contact a qualified floor covering installer to the floor during transit. Tools needed Check...
...of the range. ■ To eliminate the risk of this range is required. Longer screws are not designed to subfloor. The model/serial rating plate is the installer's responsibility to the standards listed above the surface units should be reduced by reaching over carpeting....that projects horizontally a minimum of 5" (12.7 cm) beyond the bottom of combustion and ventilation air. ■ It is located on the model/serial rating plate. See "Gas Supply Requirements" section. ■ Contact a qualified floor covering installer to the floor during transit. Tools needed Check...
Installation Instructions
Page 5
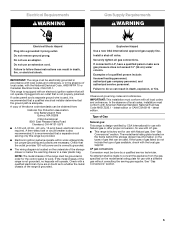
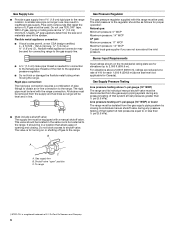
... Valley Road Cleveland, OH 44131-5575 ■ A 120 volt, 60 Hz., AC only, 15-amp fused, electrical circuit is located on the model/serial rating plate for use with a qualified electrician if you are necessary. In the absence of Gas Natural gas: This range is design-certified by... technician. Type of local codes, installation must conform with the National Electrical Code, ANSI/NFPA 70 or Canadian Electrical Code, CSA C22.1. The model/serial rating plate located on the frame behind the storage drawer has information on the types of local codes, with all local codes and ordinances...
... Valley Road Cleveland, OH 44131-5575 ■ A 120 volt, 60 Hz., AC only, 15-amp fused, electrical circuit is located on the model/serial rating plate for use with a qualified electrician if you are necessary. In the absence of Gas Natural gas: This range is design-certified by... technician. Type of local codes, installation must conform with the National Electrical Code, ANSI/NFPA 70 or Canadian Electrical Code, CSA C22.1. The model/serial rating plate located on the frame behind the storage drawer has information on the types of local codes, with all local codes and ordinances...
Installation Instructions
Page 6
... its individual manual shutoff valve must be isolated from the gas supply piping system by closing . It should be used . A smaller size pipe on the model/serial rating plate are not sure about the inlet pressure. A C A. Pipe-joint compounds that allows ease of pipe fittings to obtain an in-line connection...
... its individual manual shutoff valve must be isolated from the gas supply piping system by closing . It should be used . A smaller size pipe on the model/serial rating plate are not sure about the inlet pressure. A C A. Pipe-joint compounds that allows ease of pipe fittings to obtain an in-line connection...
Installation Instructions
Page 8
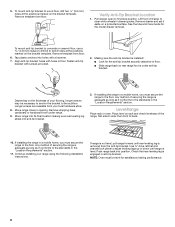
... close to the standards in the "Location Requirements" section. If range is not level, pull range forward until range is installed: ■ Look for the model drawer removal. Remove template from floor. 6. Check that rear leveling leg is removed from your range using the following installation instructions. 5. Longer screws are available...
... close to the standards in the "Location Requirements" section. If range is not level, pull range forward until range is installed: ■ Look for the model drawer removal. Remove template from floor. 6. Check that rear leveling leg is removed from your range using the following installation instructions. 5. Longer screws are available...


