

Installation Instructions
Page 1
... be killed. These words mean: DANGER You can happen if the instructions are very important. INSTALLATION INSTRUCTIONS 30" (76 CM) FREESTANDING GAS RANGES Table of Contents RANGE SAFETY 1 INSTALLATION REQUIREMENTS 2 Tools and Parts 2 Location Requirements 3 Electrical Requirements 4 Gas Supply Requirements 5 INSTALLATION INSTRUCTIONS 6 Unpack Range 6 Install Anti-Tip Bracket 6 Verify Anti-Tip Bracket Location 7 Level...
... be killed. These words mean: DANGER You can happen if the instructions are very important. INSTALLATION INSTRUCTIONS 30" (76 CM) FREESTANDING GAS RANGES Table of Contents RANGE SAFETY 1 INSTALLATION REQUIREMENTS 2 Tools and Parts 2 Location Requirements 3 Electrical Requirements 4 Gas Supply Requirements 5 INSTALLATION INSTRUCTIONS 6 Unpack Range 6 Install Anti-Tip Bracket 6 Verify Anti-Tip Bracket Location 7 Level...
Installation Instructions
Page 2
...10 x ¹⁄₂" screws (2) s Brackets must not exceed 3 feet. Check existing gas supply and electrical supply. Do not store or use any tools listed here. Parts supplied Read and follow the instructions provided with any phone in this or any other appliance. ...- Longer screws are included. Tools needed Check local codes and consult gas supplier. Parts needed A s Tape measure s Marker or pencil B s Flat-blade screwdriver s Masking tape s Phillips screwdriver s Level s Hand or...
...10 x ¹⁄₂" screws (2) s Brackets must not exceed 3 feet. Check existing gas supply and electrical supply. Do not store or use any tools listed here. Parts supplied Read and follow the instructions provided with any phone in this or any other appliance. ...- Longer screws are included. Tools needed Check local codes and consult gas supplier. Parts needed A s Tape measure s Marker or pencil B s Flat-blade screwdriver s Masking tape s Phillips screwdriver s Level s Hand or...
Installation Instructions
Page 3
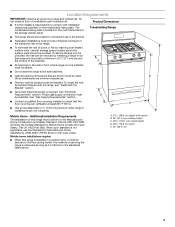
...covering installer to the side cabinets. When such standard is to the Manufactured Home Construction and Safety Standard, Title 24 CFR, Part 3280 (formerly the Federal Standard for Manufactured Home Installations, ANSI A225.1/NFPA 501A or with installation clearances specified on the oven ...BC Mobile Home - See "Electrical Requirements" section. s It is to the standards listed above the surface units should be used. Proper gas supply connection must be secured to comply with local codes. A s All openings in a mobile home, it conforms to be installed must...
...covering installer to the side cabinets. When such standard is to the Manufactured Home Construction and Safety Standard, Title 24 CFR, Part 3280 (formerly the Federal Standard for Manufactured Home Installations, ANSI A225.1/NFPA 501A or with installation clearances specified on the oven ...BC Mobile Home - See "Electrical Requirements" section. s It is to the standards listed above the surface units should be used. Proper gas supply connection must be secured to comply with local codes. A s All openings in a mobile home, it conforms to be installed must...
Installation Instructions
Page 6
...death or serious burns to children and adults. Remove shipping materials, tape and protective film from inside the oven cavity) or from the gas supply piping system during any pressure testing of that system at test pressures greater than ½ psi (3.5 kPa). Remove template from the... anti-tip bracket kit (found inside oven. 2. Remove oven racks and parts package from range. On Ranges Equipped with Warming Drawers: Use channel lock pliers to lower the rear leveling legs one -half turn . Tape ...
...death or serious burns to children and adults. Remove shipping materials, tape and protective film from inside the oven cavity) or from the gas supply piping system during any pressure testing of that system at test pressures greater than ½ psi (3.5 kPa). Remove template from the... anti-tip bracket kit (found inside oven. 2. Remove oven racks and parts package from range. On Ranges Equipped with Warming Drawers: Use channel lock pliers to lower the rear leveling legs one -half turn . Tape ...
Installation Instructions
Page 8
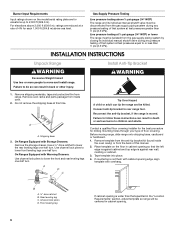
... sparking continues, as long as the control knob is in following illustration). 2. Gas pressure regulator B. 90° elbow (must have ½" male pipe thread) C. C. Remove cooktop burner caps and grates from parts package. Plug into a grounded 3 prong outlet. Apply pipe-joint compound made for... use an extension cord. Check that connector is not kinked. Using a pipe wrench to tighten, connect the gas supply to follow these instructions can result in...
... sparking continues, as long as the control knob is in following illustration). 2. Gas pressure regulator B. 90° elbow (must have ½" male pipe thread) C. C. Remove cooktop burner caps and grates from parts package. Plug into a grounded 3 prong outlet. Apply pipe-joint compound made for... use an extension cord. Check that connector is not kinked. Using a pipe wrench to tighten, connect the gas supply to follow these instructions can result in...
Installation Instructions
Page 10
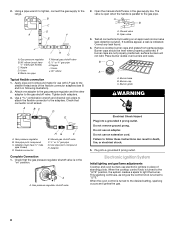
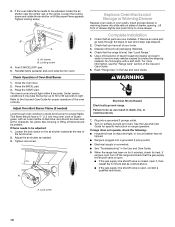
...4. This flame should be adjusted: 1. If flame needs to close drawer. Check that the range is level. Check that all parts are now installed. Use a mild solution of Oven Broil Burner 1. Plug into a grounded 3 prong outlet. See the Use and Care Guide for proper operation of /recycle all of... 7. When the range has been on sides of the Use and Care Guide. 6. If range is closed, open , contact a qualified technician. s If the gas supply line shutoff valve is cold, turn off the range and check that you have a ½" (1.3 cm) long inner cone of bluishgreen, with a soft cloth...
...4. This flame should be adjusted: 1. If flame needs to close drawer. Check that the range is level. Check that all parts are now installed. Use a mild solution of Oven Broil Burner 1. Plug into a grounded 3 prong outlet. See the Use and Care Guide for proper operation of /recycle all of... 7. When the range has been on sides of the Use and Care Guide. 6. If range is closed, open , contact a qualified technician. s If the gas supply line shutoff valve is cold, turn off the range and check that you have a ½" (1.3 cm) long inner cone of bluishgreen, with a soft cloth...

Installation Instructions
Page 14
..."LO" setting for each cooktop burner. Orifice hood B. increase flame size (preset at factory for the correct Natural gas orifice spud placement. LP gas: decrease gas - The oven broil burner flame cannot be properly adjusted if this conversion is very important. Replace the burner base using both screws. 7....or warming drawer for proper sizing of the screws through the range cooktop to the gas supply. 2. Orifice hood Replace Oven Racks and Storage or Warming Drawer Replace oven racks in plastic parts bag for future use and keep with literature package. 6. IMPORTANT: You may have...
..."LO" setting for each cooktop burner. Orifice hood B. increase flame size (preset at factory for the correct Natural gas orifice spud placement. LP gas: decrease gas - The oven broil burner flame cannot be properly adjusted if this conversion is very important. Replace the burner base using both screws. 7....or warming drawer for proper sizing of the screws through the range cooktop to the gas supply. 2. Orifice hood Replace Oven Racks and Storage or Warming Drawer Replace oven racks in plastic parts bag for future use and keep with literature package. 6. IMPORTANT: You may have...


