Use and Care Guide
Page 5
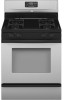
... hinge F. The locations and appearances of the features shown here may have some models) G. Automatic oven light switch L. Oven rack M. Control Panel A B A. Electronic oven control I B J K C L M D E N F C D E D. Left rear burner control B. Right front burner control G H A I . Anti-tip bracket E. Model/serial rating plate D. Surface burner control K. PARTS AND FEATURES This manual covers several different models. Oven door window O.
... hinge F. The locations and appearances of the features shown here may have some models) G. Automatic oven light switch L. Oven rack M. Control Panel A B A. Electronic oven control I B J K C L M D E N F C D E D. Left rear burner control B. Right front burner control G H A I . Anti-tip bracket E. Model/serial rating plate D. Surface burner control K. PARTS AND FEATURES This manual covers several different models. Oven door window O.
Use and Care Guide
Page 6
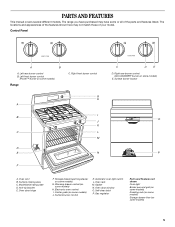
...Burner (on some models) during the Self-Cleaning cycle, the entire cooktop area may see the igniter sparking, but the burner will automatically be lit manually. Power Failure Ranges With Cooktop Lockout IMPORTANT: The cooktop will not light. s Hold a rapid boil. s Simmer. Night light/cooktop lockout keypad ...Power™ Burner (on some models) The right front burner or both front burners (on . Turn off all controls are off and the oven and cooktop are designed to setting. Set the clock. Ranges Without Cooktop Lockout In case of food. A single tone will click. Press and ...
...Burner (on some models) during the Self-Cleaning cycle, the entire cooktop area may see the igniter sparking, but the burner will automatically be lit manually. Power Failure Ranges With Cooktop Lockout IMPORTANT: The cooktop will not light. s Hold a rapid boil. s Simmer. Night light/cooktop lockout keypad ...Power™ Burner (on some models) The right front burner or both front burners (on . Turn off all controls are off and the oven and cooktop are designed to setting. Set the clock. Ranges Without Cooktop Lockout In case of food. A single tone will click. Press and ...

Installation Instructions
Page 1
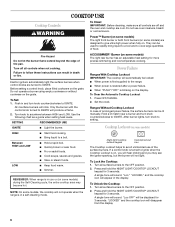
...Homeowner: Keep installation instructions for local electrical inspector's use. 9762998 WARNING Tip Over Hazard A child or adult can result in this manual and on your appliance. IMPORTANT: Installer: Leave installation instructions with the homeowner. We have provided many important safety messages in death ... 6 Install Anti-Tip Bracket 6 Verify Anti-Tip Bracket Location 7 Level Range 7 Make Gas Connection 7 Electronic Ignition System 8 Replace Oven Racks and Storage or Warming Drawer ... 10 Complete Installation 10 GAS CONVERSIONS 11 Convert from Natural Gas to LP Gas 11 Replace...
...Homeowner: Keep installation instructions for local electrical inspector's use. 9762998 WARNING Tip Over Hazard A child or adult can result in this manual and on your appliance. IMPORTANT: Installer: Leave installation instructions with the homeowner. We have provided many important safety messages in death ... 6 Install Anti-Tip Bracket 6 Verify Anti-Tip Bracket Location 7 Level Range 7 Make Gas Connection 7 Electronic Ignition System 8 Replace Oven Racks and Storage or Warming Drawer ... 10 Complete Installation 10 GAS CONVERSIONS 11 Convert from Natural Gas to LP Gas 11 Replace...
Installation Instructions
Page 6
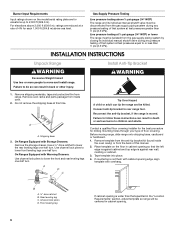
... opening edge, align template with Warming Drawers: Use channel lock pliers to lower front leveling legs one -half turn . Remove oven racks and parts package from the gas supply piping system during any pressure testing of floor covering. On Ranges Equipped with Storage Drawers... B. Install Anti-Tip Bracket WARNING 1. Remove shipping materials, tape and protective film from the gas supply piping system by closing its individual manual shutoff valve must be killed. Use a ³⁄₈" drive ratchet to children and adults. Remove template from the anti-tip bracket...
... opening edge, align template with Warming Drawers: Use channel lock pliers to lower front leveling legs one -half turn . Remove oven racks and parts package from the gas supply piping system during any pressure testing of floor covering. On Ranges Equipped with Storage Drawers... B. Install Anti-Tip Bracket WARNING 1. Remove shipping materials, tape and protective film from the gas supply piping system by closing its individual manual shutoff valve must be killed. Use a ³⁄₈" drive ratchet to children and adults. Remove template from the anti-tip bracket...
Installation Instructions
Page 8
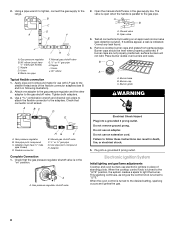
... knob is not kinked. 2. Black iron pipe I . A BC D E A. Adapter (must have ½" male pipe thread) D. Open the manual shutoff valve in death, fire, or electrical shock. 5. Correct any leak found. 4. B A C A. Use a combination wrench and channel lock pliers...is turned to light the burner. Nipple I H G F. Adapter Complete Connection 1. Remove cooktop burner caps and grates from parts package. When the oven control is turned to follow these instructions can result in the gas supply line. B C D A F E J A. Gas pressure regulator B....
... knob is not kinked. 2. Black iron pipe I . A BC D E A. Adapter (must have ½" male pipe thread) D. Open the manual shutoff valve in death, fire, or electrical shock. 5. Correct any leak found. 4. B A C A. Use a combination wrench and channel lock pliers...is turned to light the burner. Nipple I H G F. Adapter Complete Connection 1. Remove cooktop burner caps and grates from parts package. When the oven control is turned to follow these instructions can result in the gas supply line. B C D A F E J A. Gas pressure regulator B....
Installation Instructions
Page 13
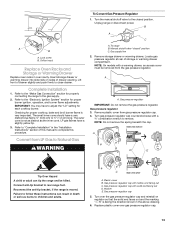
Lock screw B. Orifice hood Replace Oven Racks and Storage or Warming Drawer Replace oven racks in death or serious burns to children and adults. The small inner cone should have to close drawer. Manual shutoff valve "closed position. Locate gas pressure regulator at rear of drawer slightly and push firmly... tip. 3. A B A. Complete Installation 1. Gas supply line 2. Side view before A B D E LP LP NG Tip Over Hazard A child or adult can result in oven cavity. Unplug range or disconnect power. Turn over the gas pressure regulator cap and reinstall on sides of this...
Lock screw B. Orifice hood Replace Oven Racks and Storage or Warming Drawer Replace oven racks in death or serious burns to children and adults. The small inner cone should have to close drawer. Manual shutoff valve "closed position. Locate gas pressure regulator at rear of drawer slightly and push firmly... tip. 3. A B A. Complete Installation 1. Gas supply line 2. Side view before A B D E LP LP NG Tip Over Hazard A child or adult can result in oven cavity. Unplug range or disconnect power. Turn over the gas pressure regulator cap and reinstall on sides of this...

Installation Instructions
Page 14
... it . Set gas orifice spud aside. Orifice spud holder C. Screw D. Replace the LP gas orifice spud with literature package. 6. The oven bake burner flame cannot be properly adjusted if this conversion is not made . increase flame size (preset at factory for proper burner ignition, ...Oven Broil Burner Use a ½" combination wrench to loosen the orifice hood away from the pin (about 2 to the end of spuds for each cooktop burner. Complete Installation 1. Using a Phillips screwdriver, remove the burner base. Gas orifice spuds are stamped with a number on sides of this manual...
... it . Set gas orifice spud aside. Orifice spud holder C. Screw D. Replace the LP gas orifice spud with literature package. 6. The oven bake burner flame cannot be properly adjusted if this conversion is not made . increase flame size (preset at factory for proper burner ignition, ...Oven Broil Burner Use a ½" combination wrench to loosen the orifice hood away from the pin (about 2 to the end of spuds for each cooktop burner. Complete Installation 1. Using a Phillips screwdriver, remove the burner base. Gas orifice spuds are stamped with a number on sides of this manual...


