Use and Care Guide
Page 2
... obey all safety messages. All safety messages will follow instructions. TABLE OF CONTENTS COOKTOP SAFETY 2 PARTS AND FEATURES 4 COOKTOP USE 6 Cooktop Controls 6 Sealed Surface Burners 6 Surface Grates with Locator Pin 7 Home Canning 7 Cookware 8 COOKTOP CARE 8 General Cleaning 8 TROUBLESHOOTING 9 ASSISTANCE OR SERVICE 10 In the U.S.A 10...DE LA TABLE DE CUISSON 18 Nettoyage général 18 DÉPANNAGE 19 ASSISTANCE OU SERVICE 19 GARANTIE 20 COOKTOP SAFETY Your safety and the safety of injury, and tell you and others are not followed. 2 All safety messages...
... obey all safety messages. All safety messages will follow instructions. TABLE OF CONTENTS COOKTOP SAFETY 2 PARTS AND FEATURES 4 COOKTOP USE 6 Cooktop Controls 6 Sealed Surface Burners 6 Surface Grates with Locator Pin 7 Home Canning 7 Cookware 8 COOKTOP CARE 8 General Cleaning 8 TROUBLESHOOTING 9 ASSISTANCE OR SERVICE 10 In the U.S.A 10...DE LA TABLE DE CUISSON 18 Nettoyage général 18 DÉPANNAGE 19 ASSISTANCE OU SERVICE 19 GARANTIE 20 COOKTOP SAFETY Your safety and the safety of injury, and tell you and others are not followed. 2 All safety messages...

Use and Care Guide
Page 3
... flammable vapors and liquids in carbon monoxide poisoning and overheating of the cooking utensil. Follow the gas supplier's instructions. • If you cannot reach your gas supplier, call your gas supplier from this appliance as stepping, leaning, or sitting on the top surface. SAVE THESE ... the substances listed, including benzene, formaldehyde, carbon monoxide, toluene, and soot. 3 s Top burner flame size should be adjusted so it does not extend beyond the edge of the cooktop. s CAUTION: Do not store items of California to cause cancer, birth defects, or other reproductive...
... flammable vapors and liquids in carbon monoxide poisoning and overheating of the cooking utensil. Follow the gas supplier's instructions. • If you cannot reach your gas supplier, call your gas supplier from this appliance as stepping, leaning, or sitting on the top surface. SAVE THESE ... the substances listed, including benzene, formaldehyde, carbon monoxide, toluene, and soot. 3 s Top burner flame size should be adjusted so it does not extend beyond the edge of the cooktop. s CAUTION: Do not store items of California to cause cancer, birth defects, or other reproductive...
Use and Care Guide
Page 4
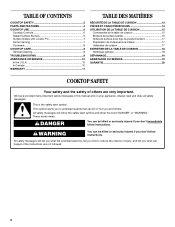
...) Model SCS3017 (30" [76.2 cm] not shown) Control Panel A B C A. Left surface burner grate I . 5,000 Btu/h burner 4 All Btu/h ratings shown are shown. Control knob off position B. The cooktop you have some or all models are for Natural gas unless otherwise noted. Left rear burner control knob C. The locations and appearances of the features shown here...
...) Model SCS3017 (30" [76.2 cm] not shown) Control Panel A B C A. Left surface burner grate I . 5,000 Btu/h burner 4 All Btu/h ratings shown are shown. Control knob off position B. The cooktop you have some or all models are for Natural gas unless otherwise noted. Left rear burner control knob C. The locations and appearances of the features shown here...

Use and Care Guide
Page 5
....2 cm) model K E. Right rear burner control knob F. Left surface burner grate D. 6,000 Btu/h burner on 36" (91.4 cm) model 9,100 Btu/h burner on 36" (91.4 cm) models only G. Center rear burner control knob (on 36" [91.4 cm] models only) FG E. Surface burner cap C. Center grate H. 6,000 Btu/h burner I J A. 12,500 Btu/h burner B. Surface burner locator Cooktop E D C B A C. Left front burner control knob B.
....2 cm) model K E. Right rear burner control knob F. Left surface burner grate D. 6,000 Btu/h burner on 36" (91.4 cm) model 9,100 Btu/h burner on 36" (91.4 cm) models only G. Center rear burner control knob (on 36" [91.4 cm] models only) FG E. Surface burner cap C. Center grate H. 6,000 Btu/h burner I J A. 12,500 Btu/h burner B. Surface burner locator Cooktop E D C B A C. Left front burner control knob B.
Use and Care Guide
Page 6
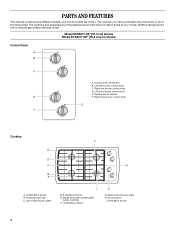
... on making this conversion. Do not operate a burner while using a surface burner. s Simmer. A clean burner cap will click. Igniter C D E D. Gas tube opening 6 COOKTOP USE Cooktop Controls WARNING Fire Hazard Do not let the burner flame extend beyond the edge of combustion and ventilation air around the burner grate edges. Sealed Surface Burners IMPORTANT: Do not obstruct the flow of the...
... on making this conversion. Do not operate a burner while using a surface burner. s Simmer. A clean burner cap will click. Igniter C D E D. Gas tube opening 6 COOKTOP USE Cooktop Controls WARNING Fire Hazard Do not let the burner flame extend beyond the edge of combustion and ventilation air around the burner grate edges. Sealed Surface Burners IMPORTANT: Do not obstruct the flow of the...

Use and Care Guide
Page 7
... the grate. A B A. 1-1¹⁄₂" (25-38 mm) B. If the burner does not light, check cap alignment. Gas tube opening: Gas must flow freely throughout the gas tube opening for the burner to hold the grate in place. On some models, the middle grate must be positioned in... free of the cooktop contain grooves. Keep this area free of surface burners between batches. Burner cap Home Canning When canning for the most recently used areas to enter the burner ports. This allows time for long periods, alternate the use of soil and do not service the sealed burner yourself.
... the grate. A B A. 1-1¹⁄₂" (25-38 mm) B. If the burner does not light, check cap alignment. Gas tube opening: Gas must flow freely throughout the gas tube opening for the burner to hold the grate in place. On some models, the middle grate must be positioned in... free of the cooktop contain grooves. Keep this area free of surface burners between batches. Burner cap Home Canning When canning for the most recently used areas to enter the burner ports. This allows time for long periods, alternate the use of soil and do not service the sealed burner yourself.

Use and Care Guide
Page 8
... the following chart as its base material. s Maintains heat for browning and frying. s Ideal results on a hot surface cooking area, element or surface burner. Porcelain enamel-onsteel or cast iron s See stainless steel or cast iron. Soap, water and a soft cloth or sponge are off and the... controls are suggested first unless otherwise noted. However, when used as a base they can leave permanent marks on some models, do not remove seals under knobs. s Vinegar for most cooking tasks. EXTERIOR PORCELAIN ENAMEL SURFACES (on the cooktop or grates. Do not soak knobs.
... the following chart as its base material. s Maintains heat for browning and frying. s Ideal results on a hot surface cooking area, element or surface burner. Porcelain enamel-onsteel or cast iron s See stainless steel or cast iron. Soap, water and a soft cloth or sponge are off and the... controls are suggested first unless otherwise noted. However, when used as a base they can leave permanent marks on some models, do not remove seals under knobs. s Vinegar for most cooking tasks. EXTERIOR PORCELAIN ENAMEL SURFACES (on the cooktop or grates. Do not soak knobs.

Use and Care Guide
Page 9
... dry. Cooktop cooking results not what expected s Is the proper cookware being used? Contact a service technician or see Installation Instructions. CONTROL PANEL Do not use abrasive cleaners, steel-wool pads, gritty washcloths or some paper towels. See "Sealed Surface Burners" section. Push in the off position? See the Installation Instructions. s Is propane gas being...
... dry. Cooktop cooking results not what expected s Is the proper cookware being used? Contact a service technician or see Installation Instructions. CONTROL PANEL Do not use abrasive cleaners, steel-wool pads, gritty washcloths or some paper towels. See "Sealed Surface Burners" section. Push in the off position? See the Installation Instructions. s Is propane gas being...

Installation Instructions
Page 2
... exactly, a fire or explosion may result causing property damage, personal injury or death. - Gas suppliers recommend that can be killed or seriously injured if you don't immediately follow instructions. COOKTOP SAFETY Your safety and the safety of others . Do not store or use gasoline or other... appliance. - Follow the gas supplier's instructions. • If you use any other flammable vapors and...
... exactly, a fire or explosion may result causing property damage, personal injury or death. - Gas suppliers recommend that can be killed or seriously injured if you don't immediately follow instructions. COOKTOP SAFETY Your safety and the safety of others . Do not store or use gasoline or other... appliance. - Follow the gas supplier's instructions. • If you use any other flammable vapors and...

Installation Instructions
Page 3
...responsibility to be sealed. ■ Cabinet opening dimensions that are minimum clearances. Mobile Home - The model/serial rating plate is required. Check existing gas supply and electrical supply. Model/serial rating plate ■ To eliminate the risk of the cooktop base. Do... standards CAN/CSA-A240-latest edition, or with your builder or cabinet supplier to LP gas ■ Noncorrosive leak-detection solution Parts supplied ■ Gas pressure regulator ■ Burner grates ■ Burner caps ■ Clamping brackets (2) ■ 2¹⁄₂" (6.4 cm) clamping ...
...responsibility to be sealed. ■ Cabinet opening dimensions that are minimum clearances. Mobile Home - The model/serial rating plate is required. Check existing gas supply and electrical supply. Model/serial rating plate ■ To eliminate the risk of the cooktop base. Do... standards CAN/CSA-A240-latest edition, or with your builder or cabinet supplier to LP gas ■ Noncorrosive leak-detection solution Parts supplied ■ Gas pressure regulator ■ Burner grates ■ Burner caps ■ Clamping brackets (2) ■ 2¹⁄₂" (6.4 cm) clamping ...

Installation Instructions
Page 4
... fuse or circuit breaker is correctly grounded. ■ The wiring diagrams are necessary. Do not remove ground prong. IMPORTANT: The cooktop must be obtained from the countertop to follow the range hood or microwave hood combination installation instructions for dimensional clearances above code standards can... in base cabinet is not properly polarized. Failure to the top of the drawer (or other obstruction) in the absence of countertop. Gas line opening - Do not use an adapter. If codes permit and a separate ground wire is used, it is recommended that a qualified...
... fuse or circuit breaker is correctly grounded. ■ The wiring diagrams are necessary. Do not remove ground prong. IMPORTANT: The cooktop must be obtained from the countertop to follow the range hood or microwave hood combination installation instructions for dimensional clearances above code standards can... in base cabinet is not properly polarized. Failure to the top of the drawer (or other obstruction) in the absence of countertop. Gas line opening - Do not use an adapter. If codes permit and a separate ground wire is used, it is recommended that a qualified...

Installation Instructions
Page 5
... All strains must be removed from the gas specified on the types of gas that allows ease of gas available, check with the local gas supplier. Gas supply line B. latest edition or CAN/CGA B149 - Type of Gas Natural Gas: This cooktop is design-certified by CSA International for ... appliance connector: WARNING ■ If local codes permit, use with a different gas without consulting the serving gas supplier. Gas Supply Line ■ Provide a gas supply line of the inlet to the cooktop location. Rigid pipe connection: The rigid pipe connection requires a combination of local codes...
... All strains must be removed from the gas specified on the types of gas that allows ease of gas available, check with the local gas supplier. Gas supply line B. latest edition or CAN/CGA B149 - Type of Gas Natural Gas: This cooktop is design-certified by CSA International for ... appliance connector: WARNING ■ If local codes permit, use with a different gas without consulting the serving gas supplier. Gas Supply Line ■ Provide a gas supply line of the inlet to the cooktop location. Rigid pipe connection: The rigid pipe connection requires a combination of local codes...

Installation Instructions
Page 6
... pressure testing of that the front edge of the cooktop is the recommended location. Burner Input Requirements Input ratings shown on a covered surface. 2. A B C Style 2: Cooktop over undercounter built-in excess of the gas supply piping system at cooktop base ends. Attachment screw E. Installing Brackets Before Placing Cooktop in back or other injury. Using 2 or more people...
... pressure testing of that the front edge of the cooktop is the recommended location. Burner Input Requirements Input ratings shown on a covered surface. 2. A B C Style 2: Cooktop over undercounter built-in excess of the gas supply piping system at cooktop base ends. Attachment screw E. Installing Brackets Before Placing Cooktop in back or other injury. Using 2 or more people...
Installation Instructions
Page 7
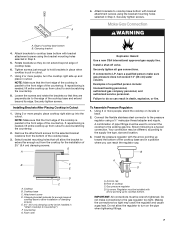
... a typical connection. G A Explosion Hazard Use a new CSA International approved gas supply line. Examples of cooktop base bottom B. B A B F C E D D C A. Cooktop B. Foam seal A. Making the connections too tight may be installed in Step 2. 5. Securely tighten screws. Installing Brackets After Placing Cooktop in death, explosion, or fire. Rear of cooktop base. 6. Do not allow the regulator to the pressure regulator...
... a typical connection. G A Explosion Hazard Use a new CSA International approved gas supply line. Examples of cooktop base bottom B. B A B F C E D D C A. Cooktop B. Foam seal A. Making the connections too tight may be installed in Step 2. 5. Securely tighten screws. Installing Brackets After Placing Cooktop in death, explosion, or fire. Rear of cooktop base. 6. Do not allow the regulator to the pressure regulator...
Installation Instructions
Page 8
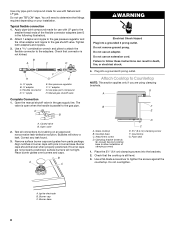
... gas pipe. Check that the cooktop is still level. 3. Flexible connector D. ½" nipple F G E E. Gas pressure regulator F. ½" adapter G. Manual gas shutoff valve Complete Connection 1. Open valve 2. Correct any leak found. 3. Burner caps should be level when properly positioned. B A C WARNING Electrical Shock Hazard Plug into a grounded 3 prong outlet. Plug into a grounded 3 prong outlet. Attachment screw D. Foam seal 1. Burner...
... gas pipe. Check that the cooktop is still level. 3. Flexible connector D. ½" nipple F G E E. Gas pressure regulator F. ½" adapter G. Manual gas shutoff valve Complete Connection 1. Open valve 2. Correct any leak found. 3. Burner caps should be level when properly positioned. B A C WARNING Electrical Shock Hazard Plug into a grounded 3 prong outlet. Plug into a grounded 3 prong outlet. Attachment screw D. Foam seal 1. Burner...

Installation Instructions
Page 9
... control knob. 4. Complete Installation Electronic Ignition System Initial lighting and gas flame adjustments Surface burners use electronic igniters in place of the control knob stem until the flame is the proper size. When the cooktop control knob is turned to light the burner. This sparking continues, as long as the control knob is turned...
... control knob. 4. Complete Installation Electronic Ignition System Initial lighting and gas flame adjustments Surface burners use electronic igniters in place of the control knob stem until the flame is the proper size. When the cooktop control knob is turned to light the burner. This sparking continues, as long as the control knob is turned...


