
Use and Care Guide
Page 3
...SIDE TRIMS, AND VERIFY THAT THE ANTITIP DEVICES ARE ENGAGED TO CABINETS WITH TWO SCREWS THROUGH THE MOUNTING HOLES IN THE MOUNTING RAIL OF THE OVEN. • CAUTION - SAVE THESE INSTRUCTIONS - This is in use. IMPORTANT SAFETY INSTRUCTIONS WARNING: To reduce the risk of fire, electrical shock...items of interest to reach items could be left alone or unattended in or on any part of the range unless specifically recommended in an oven or near surface units. - All safety messages will be killed or seriously injured if you don't follow basic precautions, including the following...
...SIDE TRIMS, AND VERIFY THAT THE ANTITIP DEVICES ARE ENGAGED TO CABINETS WITH TWO SCREWS THROUGH THE MOUNTING HOLES IN THE MOUNTING RAIL OF THE OVEN. • CAUTION - SAVE THESE INSTRUCTIONS - This is in use. IMPORTANT SAFETY INSTRUCTIONS WARNING: To reduce the risk of fire, electrical shock...items of interest to reach items could be left alone or unattended in or on any part of the range unless specifically recommended in an oven or near surface units. - All safety messages will be killed or seriously injured if you don't follow basic precautions, including the following...
Use and Care Guide
Page 4
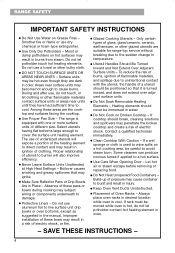
.... • Glazed Cooking Utensils - Do not use of undersized utensils will expose a portion of pressure may result in desired location while oven is equipped with the utensil, the handle of a utensil should break, cleaning solutions and spillovers may penetrate the broken cooktop and create a...Heating Elements - Let hot air or steam escape before removing or replacing food. • Do Not Heat Unopened Food Containers - Always place oven racks in ignition of electric shock. RANGE SAFETY IMPORTANT SAFETY INSTRUCTIONS • Do Not Use Water on a hot cooking area, be immersed...
.... • Glazed Cooking Utensils - Do not use of undersized utensils will expose a portion of pressure may result in desired location while oven is equipped with the utensil, the handle of a utensil should break, cleaning solutions and spillovers may penetrate the broken cooktop and create a...Heating Elements - Let hot air or steam escape before removing or replacing food. • Do Not Heat Unopened Food Containers - Always place oven racks in ignition of electric shock. RANGE SAFETY IMPORTANT SAFETY INSTRUCTIONS • Do Not Use Water on a hot cooking area, be immersed...
Use and Care Guide
Page 5
... Not Clean Door Gasket - The door gasket is essential for a good seal. Heating elements may be used in or around any part of an oven become hot enough to accumulate on hood or filter. • When flaming foods under the hood, turn the fan off. Care should be allowed to... cause burns - No commercial oven cleaner or oven liner protective coating of any kind should not be taken not to cool. RANGE SAFETY IMPORTANT SAFETY INSTRUCTIONS • DO NOT TOUCH HEATING ELEMENTS...
... Not Clean Door Gasket - The door gasket is essential for a good seal. Heating elements may be used in or around any part of an oven become hot enough to accumulate on hood or filter. • When flaming foods under the hood, turn the fan off. Care should be allowed to... cause burns - No commercial oven cleaner or oven liner protective coating of any kind should not be taken not to cool. RANGE SAFETY IMPORTANT SAFETY INSTRUCTIONS • DO NOT TOUCH HEATING ELEMENTS...
Use and Care Guide
Page 6
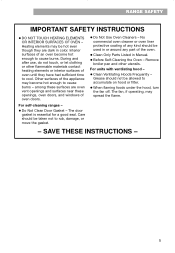
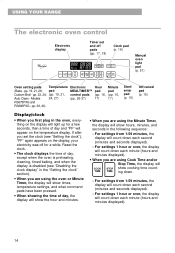
...Y T TIME STOP TIME TIMER SET TIMER OFF MIN HR CLOCK LIGHT START ENTER 5 SEC OFF CANCEL Cooktop control panel (pp. 6, 8) Oven control panel (p. 14) Model and serial number plate (on mounting rail) Cooktop control panel Left rear control knob Surface cooking area marker NOTE...: Oven cooling fan remains on indicator light 6 Right rear control knob Left front control knob Right front control knob Power on when oven is off until cavity temperature cools down.
...Y T TIME STOP TIME TIMER SET TIMER OFF MIN HR CLOCK LIGHT START ENTER 5 SEC OFF CANCEL Cooktop control panel (pp. 6, 8) Oven control panel (p. 14) Model and serial number plate (on mounting rail) Cooktop control panel Left rear control knob Surface cooking area marker NOTE...: Oven cooling fan remains on indicator light 6 Right rear control knob Left front control knob Right front control knob Power on when oven is off until cavity temperature cools down.
Use and Care Guide
Page 7
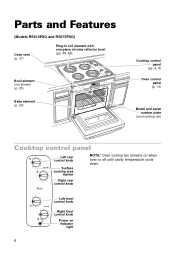
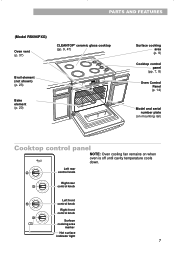
...OFF CANCEL Surface cooking area (p. 9) Cooktop control panel (pp. 7, 8) Oven Control Panel (p. 14) Model and serial number plate (on mounting rail) Cooktop control panel NOTE: Oven cooling fan remains on when oven is off until cavity temperature cools down. PARTS AND FEATURES (Model RS696PXG...) Oven vent (p. 37) CLEANTOP® ceramic glass cooktop (pp. 9, 47) Broil element (not...
...OFF CANCEL Surface cooking area (p. 9) Cooktop control panel (pp. 7, 8) Oven Control Panel (p. 14) Model and serial number plate (on mounting rail) Cooktop control panel NOTE: Oven cooling fan remains on when oven is off until cavity temperature cools down. PARTS AND FEATURES (Model RS696PXG...) Oven vent (p. 37) CLEANTOP® ceramic glass cooktop (pp. 9, 47) Broil element (not...

Use and Care Guide
Page 12
...; For best performance, cook on one rack. Increase baking time, if necessary. • For best results allow 2 inches of space around the pans in the oven for specific foods: FOOD RACK POSITION Frozen pies, large roasts, turkeys, angel food cakes 1st or 2nd rack guide from bottom Bundt cakes, most quick... out to the stop position, raise the front edge and lift it out. • Be sure the rack(s) is level. • Use pot holders or oven mitts to protect your rack when broiling, see "Broiling guidelines" later in this section. 12 Two sheets of cookies may be baked if sheets are...
...; For best performance, cook on one rack. Increase baking time, if necessary. • For best results allow 2 inches of space around the pans in the oven for specific foods: FOOD RACK POSITION Frozen pies, large roasts, turkeys, angel food cakes 1st or 2nd rack guide from bottom Bundt cakes, most quick... out to the stop position, raise the front edge and lift it out. • Be sure the rack(s) is level. • Use pot holders or oven mitts to protect your rack when broiling, see "Broiling guidelines" later in this section. 12 Two sheets of cookies may be baked if sheets are...

Use and Care Guide
Page 13
...• Use narrow strips of foil to slow down surface browning for pies, breads, and casseroles. • Place rack in the bottom third of oven. • May need to catch spillovers from pies or casseroles by the type of your baking. • Do not cover the entire rack with ...shaped foil loosely over meat or poultry to shield piecrust edges if browning too quickly. 13 Using aluminum foil NOTE: Do not line the oven bottom with aluminum foil. BAKEWARE TYPE Light colored aluminum Dark aluminum and other liners. USING YOUR RANGE Bakeware choices Baking performance is affected by...
...• Use narrow strips of foil to slow down surface browning for pies, breads, and casseroles. • Place rack in the bottom third of oven. • May need to catch spillovers from pies or casseroles by the type of your baking. • Do not cover the entire rack with ...shaped foil loosely over meat or poultry to shield piecrust edges if browning too quickly. 13 Using aluminum foil NOTE: Do not line the oven bottom with aluminum foil. BAKEWARE TYPE Light colored aluminum Dark aluminum and other liners. USING YOUR RANGE Bakeware choices Baking performance is affected by...
Use and Care Guide
Page 14
...OFF CLOCK LIGHT BAKE CUSTOM AUTO BROIL CLEAN TEMP COOK TIME DELAY START TIME STOP TIME HR MIN START ENTER 5 SEC OFF CANCEL Manual oven light pad (p. 51) Oven setting pads Temperature Electronic Hour Minute (Bake - pad MEALTIMER™ pad pad Custom Broil - pp. 19, 21, 26; Reset the ...is disabled (see "Setting the clock"), "PF" again appears on the display, your electricity was off pads (pp. 17, 18) Clock pad (p. 16) ELECTRONIC OVEN CONTROL C F HEAT DELAY BAKE TIMED BROIL ON START? Models 24, 27) (pp. 26-37) 17) 17) RS675PXG and RS696PXG - For settings 1 hour ...
...OFF CLOCK LIGHT BAKE CUSTOM AUTO BROIL CLEAN TEMP COOK TIME DELAY START TIME STOP TIME HR MIN START ENTER 5 SEC OFF CANCEL Manual oven light pad (p. 51) Oven setting pads Temperature Electronic Hour Minute (Bake - pad MEALTIMER™ pad pad Custom Broil - pp. 19, 21, 26; Reset the ...is disabled (see "Setting the clock"), "PF" again appears on the display, your electricity was off pads (pp. 17, 18) Clock pad (p. 16) ELECTRONIC OVEN CONTROL C F HEAT DELAY BAKE TIMED BROIL ON START? Models 24, 27) (pp. 26-37) 17) 17) RS675PXG and RS696PXG - For settings 1 hour ...
Use and Care Guide
Page 15
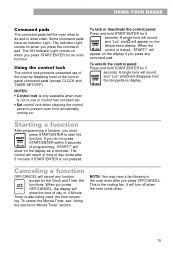
... of day mode after you do and in what to start the START function. USING YOUR RANGE Command pads The command pads tell the oven what order. Using the control lock The control lock prevents unwanted use or control has not been set. • Set control lock when... cleaning the control panel to prevent oven from ENTER the temperature display. 5 SEC Starting a function After programming a function, you press any function except for 5 seconds. A single tone will sound START...
... of day mode after you do and in what to start the START function. USING YOUR RANGE Command pads The command pads tell the oven what order. Using the control lock The control lock prevents unwanted use or control has not been set. • Set control lock when... cleaning the control panel to prevent oven from ENTER the temperature display. 5 SEC Starting a function After programming a function, you press any function except for 5 seconds. A single tone will sound START...
Use and Care Guide
Page 16
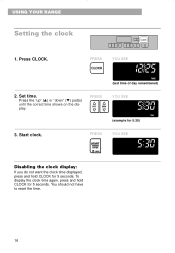
USING YOUR RANGE Setting the clock ELECTRONIC OVEN CONTROL BAKE CUSTOM BROIL CLOCK TIMER TIMER SET OFF CLOCK LIGHT TEMP COOK TIME DELAY START TIME STOP TIME HR MIN START ENTER 5 SEC OFF ...
USING YOUR RANGE Setting the clock ELECTRONIC OVEN CONTROL BAKE CUSTOM BROIL CLOCK TIMER TIMER SET OFF CLOCK LIGHT TEMP COOK TIME DELAY START TIME STOP TIME HR MIN START ENTER 5 SEC OFF ...

Use and Care Guide
Page 17
USING YOUR RANGE Using the electronic Minute Timer The Minute Timer does not start or stop the oven. The Minute Timer will hear four 1-second tones, then four 1-second reminder tones every minute until the correct time shows on next page 17 Set ... four 1-second tones when the set in hours and minutes up unless reminder tones are disabled (see "Disabling the timer reminder tones.") ELECTRONIC OVEN CONTROL UPPER OVEN LOWER OVEN BAKE CUSTOM BROIL TIMER TIMER TIMER TIMER SET OFF CLOCK LIGHT SET OFF TEMP COOK TIME DELAY START TIME STOP TIME HR MIN START...
USING YOUR RANGE Using the electronic Minute Timer The Minute Timer does not start or stop the oven. The Minute Timer will hear four 1-second tones, then four 1-second reminder tones every minute until the correct time shows on next page 17 Set ... four 1-second tones when the set in hours and minutes up unless reminder tones are disabled (see "Disabling the timer reminder tones.") ELECTRONIC OVEN CONTROL UPPER OVEN LOWER OVEN BAKE CUSTOM BROIL TIMER TIMER TIMER TIMER SET OFF CLOCK LIGHT SET OFF TEMP COOK TIME DELAY START TIME STOP TIME HR MIN START...
Use and Care Guide
Page 19
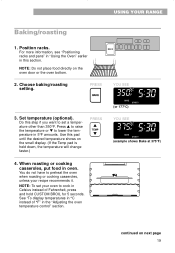
...SEC OFF CANCEL NOTE: Do not place food directly on next page 19 continued on the oven door or the oven bottom. 2. When roasting or cooking casseroles, put food in the "Adjusting the oven temperature control" section. Set temperature (optional). You do not have to lower the temperature...To set a temperature other than 350°F. Choose baking/roasting setting. For more information, see "Positioning racks and pans" in "Using the Oven" earlier in °C instead of Fahrenheit, press and hold CUSTOM BROIL for 5 seconds. Use this pad until the desired temperature shows on...
...SEC OFF CANCEL NOTE: Do not place food directly on next page 19 continued on the oven door or the oven bottom. 2. When roasting or cooking casseroles, put food in the "Adjusting the oven temperature control" section. Set temperature (optional). You do not have to lower the temperature...To set a temperature other than 350°F. Choose baking/roasting setting. For more information, see "Positioning racks and pans" in "Using the Oven" earlier in °C instead of Fahrenheit, press and hold CUSTOM BROIL for 5 seconds. Use this pad until the desired temperature shows on...
Use and Care Guide
Page 20
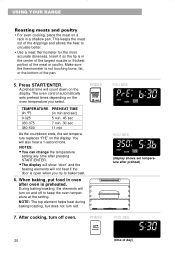
...display. This keeps the meat out of the pan. 5. A preheat time will not heat if the door is in a shallow pan. The oven control automatically sets preheat times depending on a rack in the center of the largest muscle or thickest portion of day) PRESS OFF CANCEL 20 ... thermometer is preheated. After cooking, turn red. 7. USING YOUR RANGE Roasting meats and poultry • For even cooking, place the meat on the oven temperature you try to circulate better. • Use a meat thermometer for the most accurate doneness. NOTES: • You can change the temperature setting...
...display. This keeps the meat out of the pan. 5. A preheat time will not heat if the door is in a shallow pan. The oven control automatically sets preheat times depending on a rack in the center of the largest muscle or thickest portion of day) PRESS OFF CANCEL 20 ... thermometer is preheated. After cooking, turn red. 7. USING YOUR RANGE Roasting meats and poultry • For even cooking, place the meat on the oven temperature you try to circulate better. • Use a meat thermometer for the most accurate doneness. NOTES: • You can change the temperature setting...
Use and Care Guide
Page 21
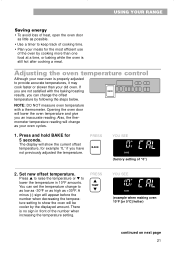
... you can set the temperature change to provide accurate temperatures, it may cook faster or slower than one food at a time, or baking while the oven is properly adjusted to as low as -30°F or as high as +30°F. USING YOUR RANGE Saving energy • To avoid loss of... heat, open the oven door as little as your oven cycles. 1. TIMER TIMER SET OFF CLOCK LIGHT TEMP COOK TIME DELAY START TIME STOP TIME HR MIN START ENTER 5 SEC OFF CANCEL NOTE...
... you can set the temperature change to provide accurate temperatures, it may cook faster or slower than one food at a time, or baking while the oven is properly adjusted to as low as -30°F or as high as +30°F. USING YOUR RANGE Saving energy • To avoid loss of... heat, open the oven door as little as your oven cycles. 1. TIMER TIMER SET OFF CLOCK LIGHT TEMP COOK TIME DELAY START TIME STOP TIME HR MIN START ENTER 5 SEC OFF CANCEL NOTE...
Use and Care Guide
Page 23
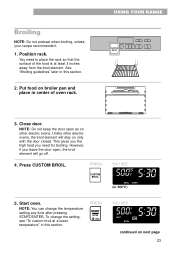
...To custom broil at least 3 inches away from the broil element. PRESS START ENTER 5 SEC YOU SEE HEAT F BROIL continued on other electric ovens, the broil element will go off. 4. Put food on only with the door closed. See "Broiling guidelines" later in this section. 2. Unlike... other electric ovens. However, if you need to place the rack so that the surface of oven rack. To change the temperature setting any time after pressing START/ENTER. PRESS CUSTOM BROIL YOU SEE F ...
...To custom broil at least 3 inches away from the broil element. PRESS START ENTER 5 SEC YOU SEE HEAT F BROIL continued on other electric ovens, the broil element will go off. 4. Put food on only with the door closed. See "Broiling guidelines" later in this section. 2. Unlike... other electric ovens. However, if you need to place the rack so that the surface of oven rack. To change the temperature setting any time after pressing START/ENTER. PRESS CUSTOM BROIL YOU SEE F ...

Use and Care Guide
Page 24
...°C and 260°C) shows on the small display. PRESS OFF CANCEL To custom broil at a lower temperature: • If food is done, turn off oven. PRESS CUSTOM BROIL TEMP YOU SEE F HEAT ON BROIL (example shows Broil at 325°F) • If you use lower broiling temperatures. USING YOUR RANGE...
...°C and 260°C) shows on the small display. PRESS OFF CANCEL To custom broil at a lower temperature: • If food is done, turn off oven. PRESS CUSTOM BROIL TEMP YOU SEE F HEAT ON BROIL (example shows Broil at 325°F) • If you use lower broiling temperatures. USING YOUR RANGE...

Use and Care Guide
Page 25
...Chops, 1" thick 4 Ham Slice, 1⁄2" thick, precooked 4 Frankfurters 4 Lamb Chops, 1" thick 4 Chicken bone-in the heated oven, making cleaning more from the oven when removing the food. Recommended rack positions are designed to reduce spattering. This drainage helps prevent spatter and smoke. • To make sure...will bake on the edges to prevent curling. • Use tongs to turn meat to avoid losing juices. • Pull out oven rack to stop position before turning or removing food. • After broiling, remove the pan from the broil element. USING YOUR RANGE...
...Chops, 1" thick 4 Ham Slice, 1⁄2" thick, precooked 4 Frankfurters 4 Lamb Chops, 1" thick 4 Chicken bone-in the heated oven, making cleaning more from the oven when removing the food. Recommended rack positions are designed to reduce spattering. This drainage helps prevent spatter and smoke. • To make sure...will bake on the edges to prevent curling. • Use tongs to turn meat to avoid losing juices. • Pull out oven rack to stop position before turning or removing food. • After broiling, remove the pan from the broil element. USING YOUR RANGE...

Use and Care Guide
Page 26
... make sure the clock is best for foods which method(s) is set , even when you set to choose which do not require a preheated oven, such as meats and casseroles. Read this section. 2. TIMER TIMER SET OFF CLOCK LIGHT CTOIMOEK DSTTEIAMLRAEYT TEMP COOK TIME DELAY START TIME STOP ...starting baking/roasting now and stopping automatically later, and three methods for cakes, cookies, etc. - Doing so can result in the oven. they will turn the oven on and off at times you are not around. Using Cook Time: 1. USING YOUR RANGE Using the electronic MEALTIMER™ control The...
... make sure the clock is best for foods which method(s) is set , even when you set to choose which do not require a preheated oven, such as meats and casseroles. Read this section. 2. TIMER TIMER SET OFF CLOCK LIGHT CTOIMOEK DSTTEIAMLRAEYT TEMP COOK TIME DELAY START TIME STOP ...starting baking/roasting now and stopping automatically later, and three methods for cakes, cookies, etc. - Doing so can result in the oven. they will turn the oven on and off at times you are not around. Using Cook Time: 1. USING YOUR RANGE Using the electronic MEALTIMER™ control The...

Use and Care Guide
Page 27
... time shows on next page 27 Press COOK TIME. PRESS HR MIN YOU SEE F BAKE COOK TIME (example shows 30-minute baking/roasting time) 6. Start oven. Set temperature (optional). USING YOUR RANGE 3.
... time shows on next page 27 Press COOK TIME. PRESS HR MIN YOU SEE F BAKE COOK TIME (example shows 30-minute baking/roasting time) 6. Start oven. Set temperature (optional). USING YOUR RANGE 3.

Use and Care Guide
Page 28
Using Stop Time 1. Position the oven rack(s) properly and put food in this section. 2. YOU SEE 8. PRESS OFF CANCEL YOU SEE (time of day) COOK TIME Method 2 - Choose Bake setting. USING ... Timer" section]) until you press OFF/CANCEL. PRESS BAKE YOU SEE F BAKE 28 NOTE: You can do this step. When baking/roasting is done: The oven will also hear four 1-second tones every minute (unless they have been disabled [see "Positioning racks and pans" in "Using the...
Using Stop Time 1. Position the oven rack(s) properly and put food in this section. 2. YOU SEE 8. PRESS OFF CANCEL YOU SEE (time of day) COOK TIME Method 2 - Choose Bake setting. USING ... Timer" section]) until you press OFF/CANCEL. PRESS BAKE YOU SEE F BAKE 28 NOTE: You can do this step. When baking/roasting is done: The oven will also hear four 1-second tones every minute (unless they have been disabled [see "Positioning racks and pans" in "Using the...


