
Installation Instructions
Page 1
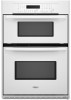
...;LECTRIQUES ENCASTRÉS DE 27" (68,6 CM) ET 30" (76,2 CM) Table of Contents/Table des matières BUILT-IN MICROWAVE/OVEN COMBINATION SAFETY 1 INSTALLATION REQUIREMENTS 2 Tools and Parts 2 Built-In Microwave/Oven Combination Location Requirements ...........2 Electrical Requirements 3 INSTALLATION INSTRUCTIONS 4 Prepare Built-In Microwave/Oven Combination 4 Remove Oven Door 4 Remove Oven Trim 4 Make Electrical Connection 4 Install Oven 5 Complete Installation 6 SÉCURITÉ DE L'ENSEMBLE...
...;LECTRIQUES ENCASTRÉS DE 27" (68,6 CM) ET 30" (76,2 CM) Table of Contents/Table des matières BUILT-IN MICROWAVE/OVEN COMBINATION SAFETY 1 INSTALLATION REQUIREMENTS 2 Tools and Parts 2 Built-In Microwave/Oven Combination Location Requirements ...........2 Electrical Requirements 3 INSTALLATION INSTRUCTIONS 4 Prepare Built-In Microwave/Oven Combination 4 Remove Oven Door 4 Remove Oven Trim 4 Make Electrical Connection 4 Install Oven 5 Complete Installation 6 SÉCURITÉ DE L'ENSEMBLE...

Installation Instructions
Page 2
... materials used . See "Electrical Requirements" section. ■ Electrical supply junction box should have been drilled in the right rear or left rear corner of the support surface to pass the appliance cable through to the junction box. ■ Oven support surface must be located... recessed height 30" (76.2 cm) models A. 28 71.9 cm) recessed width B. 42³⁄₈" (107.6 cm) overall height C. 29³⁄₄" (75.6 cm) overall width D. 23" (58.4 cm) max. Built-In Microwave/Oven Combination Location Requirements IMPORTANT: Observe all electrical connections be able...
... materials used . See "Electrical Requirements" section. ■ Electrical supply junction box should have been drilled in the right rear or left rear corner of the support surface to pass the appliance cable through to the junction box. ■ Oven support surface must be located... recessed height 30" (76.2 cm) models A. 28 71.9 cm) recessed width B. 42³⁄₈" (107.6 cm) overall height C. 29³⁄₄" (75.6 cm) overall width D. 23" (58.4 cm) max. Built-In Microwave/Oven Combination Location Requirements IMPORTANT: Observe all electrical connections be able...
Owners Manual
Page 2
...important safety messages in this manual and on some models 9 General Cleaning 10 Oven Lights 11 Oven Door 11 TROUBLESHOOTING 12 ASSISTANCE OR SERVICE 13 WARRANTY 14 TABLE DES MATIÈ...OVEN SAFETY 2 ELECTRONIC OVEN CONTROL 4 Display 4 Start 4 Off/Cancel 4 Clock 4 Tones 4 Fahrenheit and Celsius 5 Timer 5 Control Lock 5 Oven Temperature Control 5 OVEN USE 6 Aluminum Foil 6 Positioning Racks and Bakeware 6 Bakeware 6 Meat Thermometer 6 Oven Vent 7 Baking and Roasting 7 Broiling and Custom Broiling 7 Timed Cooking 8 OVEN CARE 9 Self-Cleaning Cycle (on your appliance...
...important safety messages in this manual and on some models 9 General Cleaning 10 Oven Lights 11 Oven Door 11 TROUBLESHOOTING 12 ASSISTANCE OR SERVICE 13 WARRANTY 14 TABLE DES MATIÈ...OVEN SAFETY 2 ELECTRONIC OVEN CONTROL 4 Display 4 Start 4 Off/Cancel 4 Clock 4 Tones 4 Fahrenheit and Celsius 5 Timer 5 Control Lock 5 Oven Temperature Control 5 OVEN USE 6 Aluminum Foil 6 Positioning Racks and Bakeware 6 Bakeware 6 Meat Thermometer 6 Oven Vent 7 Baking and Roasting 7 Broiling and Custom Broiling 7 Timed Cooking 8 OVEN CARE 9 Self-Cleaning Cycle (on your appliance...
Owners Manual
Page 3
... Do Not Use Oven Cleaners - During and after use . No commercial oven cleaner or oven liner protective coating ...appliance can cause low-level exposure to a qualified technician. ■ Storage in color. All other servicing should be left alone or unattended in area where oven... the oven unless specifically recommended in injury. ■ Keep Oven Vent Ducts Unobstructed. ■ Placement of Oven Racks ... oven until they are oven vent openings and surfaces near these surfaces are dark in Oven ...Grease Fires - among these openings, oven doors, and windows of oven doors. Let hot air or ...
... Do Not Use Oven Cleaners - During and after use . No commercial oven cleaner or oven liner protective coating ...appliance can cause low-level exposure to a qualified technician. ■ Storage in color. All other servicing should be left alone or unattended in area where oven... the oven unless specifically recommended in injury. ■ Keep Oven Vent Ducts Unobstructed. ■ Placement of Oven Racks ... oven until they are oven vent openings and surfaces near these surfaces are dark in Oven ...Grease Fires - among these openings, oven doors, and windows of oven doors. Let hot air or ...
Owners Manual
Page 4
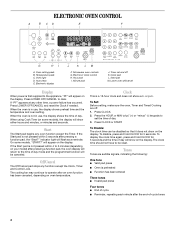
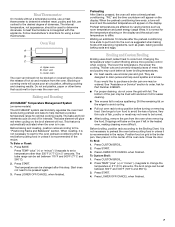
...the time of day. 3. Clock pad L. Press LOWER OFF/CANCEL to the appliance, "PF" will flash as a reminder. If the Start pad is not pressed within 5 seconds after pressing a function pad, the oven display will return to the time of -cycle tones 4 will show on the ...(depending on your model) after pressing a function pad, the "Start?" Tones Tones are off. 1. Temperature pads C. Microwave oven controls G. Lower oven off K. To Set: Before setting, make sure the oven, Timer and Timed Cooking are audible signals, indicating the following: One tone ■ Valid pad press ■...
...the time of day. 3. Clock pad L. Press LOWER OFF/CANCEL to the appliance, "PF" will flash as a reminder. If the Start pad is not pressed within 5 seconds after pressing a function pad, the oven display will return to the time of -cycle tones 4 will show on the ...(depending on your model) after pressing a function pad, the "Start?" Tones Tones are off. 1. Temperature pads C. Microwave oven controls G. Lower oven off K. To Set: Before setting, make sure the oven, Timer and Timed Cooking are audible signals, indicating the following: One tone ■ Valid pad press ■...
Owners Manual
Page 7
.... See "Assistance or Service" section to cook food. Use tongs to turn food to avoid the loss of the oven rack. To Broil: 1. To Custom Broil: 1. Upper oven B. Lower oven The oven vent should be set between 170°F and 500°F (77°C and 260°C). 2. The bake element... temperatures are affected by varying factors such as yeast, baking powder, baking soda and eggs. Waiting an additional 10 minutes after this appliance. Broiling and Custom Broiling Broiling uses direct radiant heat to order. Thicker cuts and unevenly shaped pieces of meat, fish and poultry may...
.... See "Assistance or Service" section to cook food. Use tongs to turn food to avoid the loss of the oven rack. To Broil: 1. To Custom Broil: 1. Upper oven B. Lower oven The oven vent should be set between 170°F and 500°F (77°C and 260°C). 2. The bake element... temperatures are affected by varying factors such as yeast, baking powder, baking soda and eggs. Waiting an additional 10 minutes after this appliance. Broiling and Custom Broiling Broiling uses direct radiant heat to order. Thicker cuts and unevenly shaped pieces of meat, fish and poultry may...
Owners Manual
Page 10
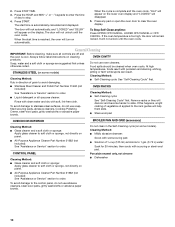
...models). When the cycle is too high, the door will turn on panel. ■ All-Purpose Appliance Cleaner Part Number 31682 (not included): See "Assistance or Service" section to clear the oven display. To Stop Self-Clean anytime: Press UPPER OFF/CANCEL, LOWER OFF/CANCEL or OFF/ CANCEL...Polishing Creme, steel-wool pads, gritty washcloths or abrasive paper towels. Remove racks or they will appear on panel. ■ All-Purpose Appliance Cleaner Part Number 31682 (not included): See "Assistance or Service" section to stop. 4. Porcelain enamel only, not chrome ■ Dishwasher 10 ...
...models). When the cycle is too high, the door will turn on panel. ■ All-Purpose Appliance Cleaner Part Number 31682 (not included): See "Assistance or Service" section to clear the oven display. To Stop Self-Clean anytime: Press UPPER OFF/CANCEL, LOWER OFF/CANCEL or OFF/ CANCEL...Polishing Creme, steel-wool pads, gritty washcloths or abrasive paper towels. Remove racks or they will appear on panel. ■ All-Purpose Appliance Cleaner Part Number 31682 (not included): See "Assistance or Service" section to stop. 4. Porcelain enamel only, not chrome ■ Dishwasher 10 ...
Owners Manual
Page 11
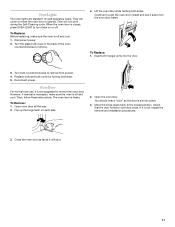
...up the hinge latch on or off. You should hear a "click" as it is opened. Move the hinge levers back to remove from the oven door frame. If it away from socket. 4. Replace bulb and bulb cover by turning clockwise. 5. Check that the door is not, repeat the ...of the oven counterclockwise to open and close. Open oven door all the way. 2. When the oven door is closed and pull it is free to remove. 4. Reconnect power. Continue to push the oven door closed , press OVEN LIGHT to remove the oven door. Oven Lights The oven lights are standard 15-watt appliance bulbs.
...up the hinge latch on or off. You should hear a "click" as it is opened. Move the hinge levers back to remove from the oven door frame. If it away from socket. 4. Replace bulb and bulb cover by turning clockwise. 5. Check that the door is not, repeat the ...of the oven counterclockwise to open and close. Open oven door all the way. 2. When the oven door is closed and pull it is free to remove. 4. Reconnect power. Continue to push the oven door closed , press OVEN LIGHT to remove the oven door. Oven Lights The oven lights are standard 15-watt appliance bulbs.
Owners Manual
Page 12
...service. Choose UPPER OVEN or LOWER OVEN first. Display shows messages ■ Is the display showing "PF," "PF id=27" or "PF id=30"? On some models, is the Control Lock set correctly? If it reappears, call an electrician. ■ Is the appliance wired properly? Oven cooking results not ...what expected ■ Is the appliance level? See "Bakeware" section. ■ Are the racks...
...service. Choose UPPER OVEN or LOWER OVEN first. Display shows messages ■ Is the display showing "PF," "PF id=27" or "PF id=30"? On some models, is the Control Lock set correctly? If it reappears, call an electrician. ■ Is the appliance wired properly? Oven cooking results not ...what expected ■ Is the appliance level? See "Bakeware" section. ■ Are the racks...
Owners Manual
Page 13
...in your correspondence. 13 FSP® replacement parts will help , follow the menu prompts. To locate the Whirlpool designated service company in your area, you the cost of appliances. ■ Installation information. ■ Use and maintenance procedures. ■ Accessory and repair parts sales.... Center 553 Benson Road Benton Harbor, MI 49022-2692 Please include a daytime phone number in your appliance. Whirlpool designated service technicians are trained to Whirlpool Canada LP with the same precision used to local dealers, repair parts distributors, and service companies....
...in your correspondence. 13 FSP® replacement parts will help , follow the menu prompts. To locate the Whirlpool designated service company in your area, you the cost of appliances. ■ Installation information. ■ Use and maintenance procedures. ■ Accessory and repair parts sales.... Center 553 Benson Road Benton Harbor, MI 49022-2692 Please include a daytime phone number in your appliance. Whirlpool designated service technicians are trained to Whirlpool Canada LP with the same precision used to local dealers, repair parts distributors, and service companies....

Owners Manual
Page 14
...country in accordance with electrical or plumbing codes, or use of consumables or cleaning products not approved by this warranty. 8. In the U.S.A., call 1-800-807-6777. 9/07 Keep this book and your major appliance if it . WHIRLPOOL CORPORATION MAJOR APPLIANCE WARRANTY LIMITED WARRANTY ...1. Costs associated with original model/serial numbers that is used for future reference. After checking "Troubleshooting," you need to Whirlpool within 30 days from defects in materials or workmanship and is located in -warranty service. Dealer name Address Phone number Model number...
...country in accordance with electrical or plumbing codes, or use of consumables or cleaning products not approved by this warranty. 8. In the U.S.A., call 1-800-807-6777. 9/07 Keep this book and your major appliance if it . WHIRLPOOL CORPORATION MAJOR APPLIANCE WARRANTY LIMITED WARRANTY ...1. Costs associated with original model/serial numbers that is used for future reference. After checking "Troubleshooting," you need to Whirlpool within 30 days from defects in materials or workmanship and is located in -warranty service. Dealer name Address Phone number Model number...

Warranty
Page 1
... limited warranty is valid only in the United States or Canada and applies only when the major appliance is used for Factory Specified Parts and repair labor to Whirlpool within 30 days from the date of purchase. 6. Repairs to parts or systems resulting from unauthorized modifications made to... the factory applied serial number has been altered or removed from your major appliance, unless such damage results from defects in materials or workmanship and is reported to correct defects in accordance with electrical or plumbing codes, or use your complete model number and serial number. ...
... limited warranty is valid only in the United States or Canada and applies only when the major appliance is used for Factory Specified Parts and repair labor to Whirlpool within 30 days from the date of purchase. 6. Repairs to parts or systems resulting from unauthorized modifications made to... the factory applied serial number has been altered or removed from your major appliance, unless such damage results from defects in materials or workmanship and is reported to correct defects in accordance with electrical or plumbing codes, or use your complete model number and serial number. ...