
Dimension Guide
Page 1
... B. 23" (58.4 cm) recessed oven depth Front View A F D E 27" (68.6 cm) models B A. 27" (68.6 cm) min. ® 27" (68.6 CM) AND 30" (76.2 CM) ELECTRIC BUILT-IN MICROWAVE/OVEN COMBINATION PRODUCT MODEL SERIES PRODUCT DIMENSIONS GSC309PV RMC275PV RMC305PV Electrical: Oven must be connected to 7.2 kW at ... of cutout to bottom of upper cabinet door C. 19-1/4" (48.9 cm) bottom of cabinet door F. 41-1/4" (104.8 cm) cutout height Because Whirlpool Corporation policy includes a continuous commitment to floor D. 28-1/2" (72.4 cm) cutout width C E. 1-1/2" (3.8 cm) min. bottom of cutout to ...
... B. 23" (58.4 cm) recessed oven depth Front View A F D E 27" (68.6 cm) models B A. 27" (68.6 cm) min. ® 27" (68.6 CM) AND 30" (76.2 CM) ELECTRIC BUILT-IN MICROWAVE/OVEN COMBINATION PRODUCT MODEL SERIES PRODUCT DIMENSIONS GSC309PV RMC275PV RMC305PV Electrical: Oven must be connected to 7.2 kW at ... of cutout to bottom of upper cabinet door C. 19-1/4" (48.9 cm) bottom of cabinet door F. 41-1/4" (104.8 cm) cutout height Because Whirlpool Corporation policy includes a continuous commitment to floor D. 28-1/2" (72.4 cm) cutout width C E. 1-1/2" (3.8 cm) min. bottom of cutout to ...

Installation Instructions
Page 2
... Parts supplied ■ # 8-14 x 1" screws - Built-In Microwave/Oven Combination Location Requirements IMPORTANT: Observe all electrical connections be located 3" (7.6 cm) maximum below the support surface when the oven is installed in accordance with the requirements of UL and CSA International and...must provide complete enclosure around the recessed portion of 194°F (90°C) Product Dimensions 27" (68.6 cm) and 30" (76.2 cm) Ovens A B E D C 27" (68.6 cm) models A. 25 64.3 cm) recessed width B. 42³⁄₈" (107.6 cm) overall height C. 26³⁄₄...
... Parts supplied ■ # 8-14 x 1" screws - Built-In Microwave/Oven Combination Location Requirements IMPORTANT: Observe all electrical connections be located 3" (7.6 cm) maximum below the support surface when the oven is installed in accordance with the requirements of UL and CSA International and...must provide complete enclosure around the recessed portion of 194°F (90°C) Product Dimensions 27" (68.6 cm) and 30" (76.2 cm) Ovens A B E D C 27" (68.6 cm) models A. 25 64.3 cm) recessed width B. 42³⁄₈" (107.6 cm) overall height C. 26³⁄₄...

Installation Instructions
Page 3
... the instructions provided for serviceability of cabinet door F. 41¹⁄₄" (104.8 cm) cutout height 30" (76.2 cm) models A. 30" (76.2 cm) min. See the following illustration. Oven front D. Cabinet A. The length of cabinet door F. 41¹⁄₄" (104.8 cm) cutout...Be sure that the ground path and wire gauge are in conformance with local codes. Cabinet Dimensions 27" (68.6 cm) and 30" (76.2 cm) Ovens A B F D E C 27" (68.6 cm) models A. 27" (68.6 cm) min. See "Make Electrical Connection" section. ■ Flexible conduit from : National Fire Protection ...
... the instructions provided for serviceability of cabinet door F. 41¹⁄₄" (104.8 cm) cutout height 30" (76.2 cm) models A. 30" (76.2 cm) min. See the following illustration. Oven front D. Cabinet A. The length of cabinet door F. 41¹⁄₄" (104.8 cm) cutout...Be sure that the ground path and wire gauge are in conformance with local codes. Cabinet Dimensions 27" (68.6 cm) and 30" (76.2 cm) Ovens A B F D E C 27" (68.6 cm) models A. 27" (68.6 cm) min. See "Make Electrical Connection" section. ■ Flexible conduit from : National Fire Protection ...

Installation Instructions
Page 6
... C. # 8-18 x ³⁄₈" screw D. If you purchased your tools. 3. On models with 1 cup (250 mL) of hinges into cabinet cutout. Set microwave oven cook time to the Use and Care Guide. Do not overtighten screws. Insert screw. 6. See "Prepare Built-In Microwave/Oven Combination" section. 15. or circuit breaker has not tripped. ■ Electrical supply...
... C. # 8-18 x ³⁄₈" screw D. If you purchased your tools. 3. On models with 1 cup (250 mL) of hinges into cabinet cutout. Set microwave oven cook time to the Use and Care Guide. Do not overtighten screws. Insert screw. 6. See "Prepare Built-In Microwave/Oven Combination" section. 15. or circuit breaker has not tripped. ■ Electrical supply...
Owners Manual
Page 2
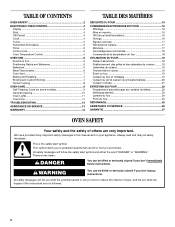
...messages. This is , tell you don't follow instructions. We have provided many important safety messages in this manual and on some models 9 General Cleaning 10 Oven Lights 11 Oven Door 11 TROUBLESHOOTING 12 ASSISTANCE OR SERVICE 13 WARRANTY 14 TABLE DES MATIÈRES SÉCURITÉ DU FOUR 15 COMMANDE ...;les 22 Nettoyage général 23 Lampes du four 24 Porte du four 24 DÉPANNAGE 25 ASSISTANCE OU SERVICE 26 GARANTIE 27 OVEN SAFETY Your safety and the safety of injury, and tell you don't immediately follow the safety alert symbol and either the word "DANGER" ...
...messages. This is , tell you don't follow instructions. We have provided many important safety messages in this manual and on some models 9 General Cleaning 10 Oven Lights 11 Oven Door 11 TROUBLESHOOTING 12 ASSISTANCE OR SERVICE 13 WARRANTY 14 TABLE DES MATIÈRES SÉCURITÉ DU FOUR 15 COMMANDE ...;les 22 Nettoyage général 23 Lampes du four 24 Porte du four 24 DÉPANNAGE 25 ASSISTANCE OU SERVICE 26 GARANTIE 27 OVEN SAFETY Your safety and the safety of injury, and tell you don't immediately follow the safety alert symbol and either the word "DANGER" ...
Owners Manual
Page 4
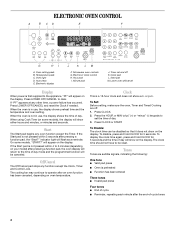
... use , the display shows preheat time and the temperature and oven setting. will show either hours and minutes, or minutes and seconds. Press CLOCK. 2. Tones Tones are off. 1. Temperature pads C. Microwave oven controls G. Timer set the time of day. Clock pad L.... The cooling fan may continue to operate after pressing a function pad, the oven display will return to 5 minutes (depending on your model) after an oven function has been canceled, depending on some models, "START?"...
... use , the display shows preheat time and the temperature and oven setting. will show either hours and minutes, or minutes and seconds. Press CLOCK. 2. Tones Tones are off. 1. Temperature pads C. Microwave oven controls G. Timer set the time of day. Clock pad L.... The cooling fan may continue to operate after pressing a function pad, the oven display will return to 5 minutes (depending on your model) after an oven function has been canceled, depending on some models, "START?"...

Owners Manual
Page 5
...;F (-5°C) ...a little less -20°F (-10°C) ...moderately less -30°F (-15°C) ...much less To Adjust Oven Temperature Calibration: 1. Tone Volume The volume is taken after 1 to 4 minutes (depending on your model) will return to 12 hours and 59 minutes and counts down the set time ends... seconds. Press the TEMP "+" or "-" keypad to increase or to cancel the Timer and/or stop the oven. On some models) will be changed to set between 30°F (15°C) and -30°F (-15°C). 3. To Change: Press and hold STOP TIME for 5 seconds. The Timer does ...
...;F (-5°C) ...a little less -20°F (-10°C) ...moderately less -30°F (-15°C) ...much less To Adjust Oven Temperature Calibration: 1. Tone Volume The volume is taken after 1 to 4 minutes (depending on your model) will return to 12 hours and 59 minutes and counts down the set time ends... seconds. Press the TEMP "+" or "-" keypad to increase or to cancel the Timer and/or stop the oven. On some models) will be changed to set between 30°F (15°C) and -30°F (-15°C). 3. To Change: Press and hold STOP TIME for 5 seconds. The Timer does ...
Owners Manual
Page 6
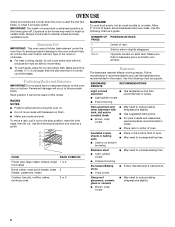
... crusts ■ May need to increase baking time. ■ Follow manufacturer's instructions. Side by side or slightly staggered. Opposite corners on this model. Use the following chart as a guide. Dark aluminum and other bakeware with foil because air must be able to move racks with any type... of oven. OVEN USE Odors and smoke are level. Rack position 5 cannot be able to circulate. NUMBER OF PAN(S) 1 2 3 or 4 POSITION ON RACK ...
... crusts ■ May need to increase baking time. ■ Follow manufacturer's instructions. Side by side or slightly staggered. Opposite corners on this model. Use the following chart as a guide. Dark aluminum and other bakeware with foil because air must be able to move racks with any type... of oven. OVEN USE Odors and smoke are level. Rack position 5 cannot be able to circulate. NUMBER OF PAN(S) 1 2 3 or 4 POSITION ON RACK ...
Owners Manual
Page 7
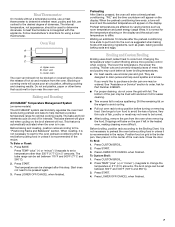
...the preheat conditioning time ends, a tone will sound and the selected temperature will glow red when cycling on some models) The ACCUBAKE® system electronically regulates the oven heat levels during preheat and bake to help avoid spatter and smoke. Slit the remaining fat on the display.... pan may not need to be ordered. Press CUSTOM BROIL. 2. Press START. 3. Press LOWER OFF/CANCEL when finished. Meat Thermometer On models without a temperature probe, use a meat thermometer to determine whether meat, poultry and fish, are affected by varying factors such as yeast, baking...
...the preheat conditioning time ends, a tone will sound and the selected temperature will glow red when cycling on some models) The ACCUBAKE® system electronically regulates the oven heat levels during preheat and bake to help avoid spatter and smoke. Slit the remaining fat on the display.... pan may not need to be ordered. Press CUSTOM BROIL. 2. Press START. 3. Press LOWER OFF/CANCEL when finished. Meat Thermometer On models without a temperature probe, use a meat thermometer to determine whether meat, poultry and fish, are affected by varying factors such as yeast, baking...
Owners Manual
Page 9
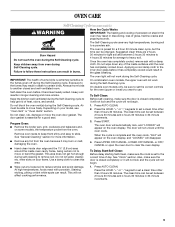
...the correct time of gloss, hairline cracks and popping sounds. On combination oven models, the upper oven will not work during the Self-Cleaning cycle to follow these instructions can be changed. Do not block the oven vent(s) during the Self-Cleaning cycle. Air must be able ...bakeware and, on door frame. See "Clock" section. Self-clean the oven before it may result in the glass breaking. On double oven models only, be set between 2 hours 30 minutes and 4 hours 30 minutes in 30-minute increments. 9 To Self-Clean: Keep the kitchen well-ventilated during...
...the correct time of gloss, hairline cracks and popping sounds. On combination oven models, the upper oven will not work during the Self-Cleaning cycle to follow these instructions can be changed. Do not block the oven vent(s) during the Self-Cleaning cycle. Air must be able ...bakeware and, on door frame. See "Clock" section. Self-clean the oven before it may result in the glass breaking. On double oven models only, be set between 2 hours 30 minutes and 4 hours 30 minutes in 30-minute increments. 9 To Self-Clean: Keep the kitchen well-ventilated during...
Owners Manual
Page 10
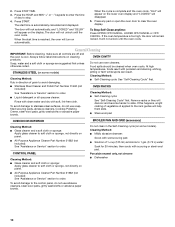
... is reached, the oven will remain locked. To avoid damage to clear the oven display. 2. Cleaning Method: ■ Mildly abrasive cleanser: Scrub with wet scouring pad. ■ Solution of vegetable oil applied to slide. The start time is too high, the door will turn on some models). Remove racks or ...they will not unlock until the oven cools. The door will discolor and become harder to the rack guides will appear on some...
... is reached, the oven will remain locked. To avoid damage to clear the oven display. 2. Cleaning Method: ■ Mildly abrasive cleanser: Scrub with wet scouring pad. ■ Solution of vegetable oil applied to slide. The start time is too high, the door will turn on some models). Remove racks or ...they will not unlock until the oven cools. The door will discolor and become harder to the rack guides will appear on some...
Owners Manual
Page 12
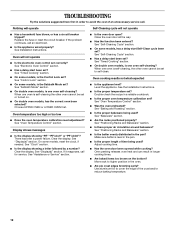
... section. ■ On some models, is self-cleaning the other oven cannot be set correctly? When one oven self-cleaning? Choose UPPER OVEN or LOWER OVEN first. Display shows messages ■ Is the display showing "PF," "PF id=27" or "PF id=30"? Clear the display. See "Self... tripped? See "Sabbath Mode" section. ■ On double oven models, is one oven is level in a reliable cookbook. ■ Is the proper oven temperature calibration set ? Oven temperature too high or too low ■ Does the oven temperature calibration need adjustment? See "Clock" section. ■ ...
... section. ■ On some models, is self-cleaning the other oven cannot be set correctly? When one oven self-cleaning? Choose UPPER OVEN or LOWER OVEN first. Display shows messages ■ Is the display showing "PF," "PF id=27" or "PF id=30"? Clear the display. See "Self... tripped? See "Sabbath Mode" section. ■ On double oven models, is one oven is level in a reliable cookbook. ■ Is the proper oven temperature calibration set ? Oven temperature too high or too low ■ Does the oven temperature calibration need adjustment? See "Clock" section. ■ ...
Owners Manual
Page 13
... you need to local dealers, repair parts distributors, and service companies. Call the Whirlpool Customer eXperience Center toll free: 1-800-253-1301. Stainless Steel Cleaner and Polish (stainless steel models) Order Part Number 31462 All-Purpose Appliance Cleaner Order Part Number 31682 Broiler Pan... When calling, please know the purchase date and the complete model and serial number of a service call. To locate FSP® replacement parts in your area, call the Whirlpool Customer eXperience Center toll free at www.whirlpool.com and click on our full line of appliances. ■...
... you need to local dealers, repair parts distributors, and service companies. Call the Whirlpool Customer eXperience Center toll free: 1-800-253-1301. Stainless Steel Cleaner and Polish (stainless steel models) Order Part Number 31462 All-Purpose Appliance Cleaner Order Part Number 31682 Broiler Pan... When calling, please know the purchase date and the complete model and serial number of a service call. To locate FSP® replacement parts in your area, call the Whirlpool Customer eXperience Center toll free at www.whirlpool.com and click on our full line of appliances. ■...

Owners Manual
Page 14
... ONE YEAR OR THE SHORTEST PERIOD ALLOWED BY LAW. If outside the 50 United States and Canada, contact your authorized Whirlpool dealer to know your complete model number and serial number. Write down the following information about your major appliance to be provided by calling... Whirlpool. Service calls to correct the installation of your major appliance, to Whirlpool within 30 days from your major appliance. Repairs when your major ...
... ONE YEAR OR THE SHORTEST PERIOD ALLOWED BY LAW. If outside the 50 United States and Canada, contact your authorized Whirlpool dealer to know your complete model number and serial number. Write down the following information about your major appliance to be provided by calling... Whirlpool. Service calls to correct the installation of your major appliance, to Whirlpool within 30 days from your major appliance. Repairs when your major ...

Warranty
Page 1
... or cannot be easily determined. In the U.S.A., call 1-800-807-6777. 9/07 Keep this major appliance is reported to Whirlpool within 30 days from defects in materials or workmanship and is operated and maintained according to instructions attached to correct house wiring or plumbing.... 2. Outside the 50 United States and Canada, this information on the model and serial number label located on how to use your authorized Whirlpool...
... or cannot be easily determined. In the U.S.A., call 1-800-807-6777. 9/07 Keep this major appliance is reported to Whirlpool within 30 days from defects in materials or workmanship and is operated and maintained according to instructions attached to correct house wiring or plumbing.... 2. Outside the 50 United States and Canada, this information on the model and serial number label located on how to use your authorized Whirlpool...


