
Installation Instructions
Page 1
... W10192051A INSTALLATION INSTRUCTIONS 27" (68.6 CM) AND 30" (76.2 CM) ELECTRIC BUILT-IN MICROWAVE/OVEN COMBINATION INSTRUCTIONS D'INSTALLATION DE L'ENSEMBLE FOUR À MICRO-ONDES ET FOUR CONVENTIONNEL ÉLECTRIQUES ENCASTRÉS ...-IN MICROWAVE/OVEN COMBINATION SAFETY 1 INSTALLATION REQUIREMENTS 2 Tools and Parts 2 Built-In Microwave/Oven Combination Location Requirements ...........2 Electrical Requirements 3 INSTALLATION INSTRUCTIONS 4 Prepare Built-In Microwave/Oven Combination 4 Remove Oven Door 4 Remove Oven Trim 4 Make Electrical Connection 4 Install Oven 5 Complete ...
... W10192051A INSTALLATION INSTRUCTIONS 27" (68.6 CM) AND 30" (76.2 CM) ELECTRIC BUILT-IN MICROWAVE/OVEN COMBINATION INSTRUCTIONS D'INSTALLATION DE L'ENSEMBLE FOUR À MICRO-ONDES ET FOUR CONVENTIONNEL ÉLECTRIQUES ENCASTRÉS ...-IN MICROWAVE/OVEN COMBINATION SAFETY 1 INSTALLATION REQUIREMENTS 2 Tools and Parts 2 Built-In Microwave/Oven Combination Location Requirements ...........2 Electrical Requirements 3 INSTALLATION INSTRUCTIONS 4 Prepare Built-In Microwave/Oven Combination 4 Remove Oven Door 4 Remove Oven Trim 4 Make Electrical Connection 4 Install Oven 5 Complete ...

Installation Instructions
Page 2
... width D. 23" (58.4 cm) max. See "Electrical Requirements." Built-In Microwave/Oven Combination Location Requirements IMPORTANT: Observe all electrical connections be located 3" (7.6 cm) maximum below the support surface when the oven is installed in a wall cabinet. A 1" (2.5 cm) minimum diameter hole should be...) ■ 1" (25 mm) drill bit (for wall cabinet installations) ■ Level Parts needed ■ UL listed or CSA approved conduit connector ■ UL listed wire connectors Parts supplied ■ # 8-14 x 1" screws - Check existing electrical supply. Given dimensions provide...
... width D. 23" (58.4 cm) max. See "Electrical Requirements." Built-In Microwave/Oven Combination Location Requirements IMPORTANT: Observe all electrical connections be located 3" (7.6 cm) maximum below the support surface when the oven is installed in a wall cabinet. A 1" (2.5 cm) minimum diameter hole should be...) ■ 1" (25 mm) drill bit (for wall cabinet installations) ■ Level Parts needed ■ UL listed or CSA approved conduit connector ■ UL listed wire connectors Parts supplied ■ # 8-14 x 1" screws - Check existing electrical supply. Given dimensions provide...

Installation Instructions
Page 3
...(104.8 cm) cutout height Cabinet Side View Electrical Requirements If codes permit and a separate ground wire is used, it here. ■ Oven must be connected directly to a grounded metal, permanent wiring system. The model/serial number rating plate is recommended that a qualified electrical installer ...NFPA 70-latest edition or CSA Standards C22.1-94, Canadian Electrical Code, Part 1 and C22.2 No. This oven must be provided. 3 Be sure that the ground path and wire gauge are not sure the oven is recommended. ■ Connect directly to top of electrical connection you...
...(104.8 cm) cutout height Cabinet Side View Electrical Requirements If codes permit and a separate ground wire is used, it here. ■ Oven must be connected directly to a grounded metal, permanent wiring system. The model/serial number rating plate is recommended that a qualified electrical installer ...NFPA 70-latest edition or CSA Standards C22.1-94, Canadian Electrical Code, Part 1 and C22.2 No. This oven must be provided. 3 Be sure that the ground path and wire gauge are not sure the oven is recommended. ■ Connect directly to top of electrical connection you...

Installation Instructions
Page 4
... follow these instructions can result in back or other parts from inside the bag containing literature. 5. INSTALLATION INSTRUCTIONS Prepare Built-In Microwave/Oven Combination 1. Oven door latch in locked position B. Do not use handle or any portion of the oven. Remove the hardware package from the oven through the opening in a screw bag inside the package...
... follow these instructions can result in back or other parts from inside the bag containing literature. 5. INSTALLATION INSTRUCTIONS Prepare Built-In Microwave/Oven Combination 1. Oven door latch in locked position B. Do not use handle or any portion of the oven. Remove the hardware package from the oven through the opening in a screw bag inside the package...

Installation Instructions
Page 6
...screw D. Push trim into cabinet cutout. Check that door is showing in the oven frame. 12. See "Prepare Built-In Microwave/Oven Combination" section. 15. Display panel will light briefly, and "PF" should appear in the display. 2. For oven use a Phillips screwdriver to remove screws attaching the shipping feet. 4. Check ... Use and Care Guide or contact the dealer from whom you do not feel for lower oven door. 16. On some models, the oven vent is an extra part, go and open microwave oven door. When oven has been on for 5 minutes, feel heat or an "F" appears in mounting rails....
...screw D. Push trim into cabinet cutout. Check that door is showing in the oven frame. 12. See "Prepare Built-In Microwave/Oven Combination" section. 15. Display panel will light briefly, and "PF" should appear in the display. 2. For oven use a Phillips screwdriver to remove screws attaching the shipping feet. 4. Check ... Use and Care Guide or contact the dealer from whom you do not feel for lower oven door. 16. On some models, the oven vent is an extra part, go and open microwave oven door. When oven has been on for 5 minutes, feel heat or an "F" appears in mounting rails....
Owners Manual
Page 3
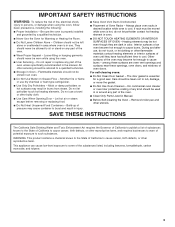
...; Do Not Leave Children Alone - Loose-fitting or hanging garments should never be moved while oven is in Manual. ■ Before Self-Cleaning the Oven - Do not repair or replace any part of the oven. ■ Wear Proper Apparel - Smother fire or flame or use a towel or other ...9632; Proper Installation - Children should not be taken not to cause cancer, birth defects, or other utensils. No commercial oven cleaner or oven liner protective coating of any part of the oven unless specifically recommended in color. Care should be used in or around any kind should be stored in...
...; Do Not Leave Children Alone - Loose-fitting or hanging garments should never be moved while oven is in Manual. ■ Before Self-Cleaning the Oven - Do not repair or replace any part of the oven. ■ Wear Proper Apparel - Smother fire or flame or use a towel or other ...9632; Proper Installation - Children should not be taken not to cause cancer, birth defects, or other utensils. No commercial oven cleaner or oven liner protective coating of any part of the oven unless specifically recommended in color. Care should be used in or around any kind should be stored in...
Owners Manual
Page 7
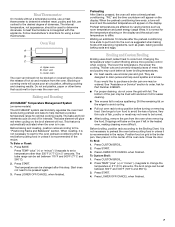
... The broil range can be set plastics, paper or other than 350°F (177°C) in 5°F (3°C) amounts. Upper oven B. Waiting an additional 10 minutes after this appliance. Changing the temperature when Custom Broiling allows more difficult. Position food on the display.... and fish, are designed to drain juices and help maintain a precise temperature range for optimal cooking results. Follow manufacturer's directions for Part Number 4396923. ■ For proper draining, do not cover the grid with leavening ingredients, such as room temperature and peak energy ...
... The broil range can be set plastics, paper or other than 350°F (177°C) in 5°F (3°C) amounts. Upper oven B. Waiting an additional 10 minutes after this appliance. Changing the temperature when Custom Broiling allows more difficult. Position food on the display.... and fish, are designed to drain juices and help maintain a precise temperature range for optimal cooking results. Follow manufacturer's directions for Part Number 4396923. ■ For proper draining, do not cover the grid with leavening ingredients, such as room temperature and peak energy ...
Owners Manual
Page 10
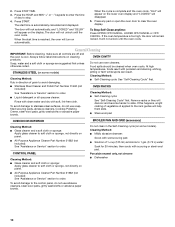
...cleaner and a soft cloth or sponge: Apply glass cleaner to soft cloth or sponge, not directly on panel. ■ All-Purpose Appliance Cleaner Part Number 31682 (not included): See "Assistance or Service" section to stop. 4. To avoid damage to order. ■ Liquid detergent or all ...9632; Self-Cleaning cycle: See "Self-Cleaning Cycle" first. ■ Stainless Steel Cleaner and Polish Part Number 31462 (not included): OVEN RACKS See "Assistance or Service" section to the control panel, do not use oven cleaners. If this happens, a light coating of ¹ ₂ cup (125 mL) ammonia ...
...cleaner and a soft cloth or sponge: Apply glass cleaner to soft cloth or sponge, not directly on panel. ■ All-Purpose Appliance Cleaner Part Number 31682 (not included): See "Assistance or Service" section to stop. 4. To avoid damage to order. ■ Liquid detergent or all ...9632; Self-Cleaning cycle: See "Self-Cleaning Cycle" first. ■ Stainless Steel Cleaner and Polish Part Number 31462 (not included): OVEN RACKS See "Assistance or Service" section to the control panel, do not use oven cleaners. If this happens, a light coating of ¹ ₂ cup (125 mL) ammonia ...
Owners Manual
Page 13
... below. ASSISTANCE OR SERVICE Before calling for assistance or service, please check "Troubleshooting." FSP® replacement parts will help , follow the menu prompts. Call the Whirlpool Customer eXperience Center toll free: 1-800-253-1301. For further assistance If you need to local dealers... Steel Cleaner and Polish (stainless steel models) Order Part Number 31462 All-Purpose Appliance Cleaner Order Part Number 31682 Broiler Pan and Grid Order Part Number 4396923 Heavy Duty Degreaser Part Number 31552 In Canada Call the Whirlpool Canada LP Customer eXperience Centre toll free: 1-800-...
... below. ASSISTANCE OR SERVICE Before calling for assistance or service, please check "Troubleshooting." FSP® replacement parts will help , follow the menu prompts. Call the Whirlpool Customer eXperience Center toll free: 1-800-253-1301. For further assistance If you need to local dealers... Steel Cleaner and Polish (stainless steel models) Order Part Number 31462 All-Purpose Appliance Cleaner Order Part Number 31682 Broiler Pan and Grid Order Part Number 4396923 Heavy Duty Degreaser Part Number 31552 In Canada Call the Whirlpool Canada LP Customer eXperience Centre toll free: 1-800-...

Owners Manual
Page 14
... 2. Service calls to correct the installation of your major appliance, to Whirlpool within 30 days from your home of God, improper installation, installation not in -warranty service. Consumable parts are excluded from your major appliance for other damage to the finish of... only when the major appliance is operated and maintained according to instructions attached to or furnished with the product, Whirlpool Corporation or Whirlpool Canada LP (hereafter "Whirlpool") will need service, first see the "Troubleshooting" section of the Use & Care Guide. Damage resulting from accident...
... 2. Service calls to correct the installation of your major appliance, to Whirlpool within 30 days from your home of God, improper installation, installation not in -warranty service. Consumable parts are excluded from your major appliance for other damage to the finish of... only when the major appliance is operated and maintained according to instructions attached to or furnished with the product, Whirlpool Corporation or Whirlpool Canada LP (hereafter "Whirlpool") will need service, first see the "Troubleshooting" section of the Use & Care Guide. Damage resulting from accident...

Warranty
Page 1
... excluded from your major appliance. Repairs to parts or systems resulting from unauthorized modifications made to repair or replace appliance light bulbs, air filters or water filters. Expenses for travel and transportation for repairs. WHIRLPOOL SHALL NOT BE LIABLE FOR INCIDENTAL OR CONSEQUENTIAL...Canada and applies only when the major appliance is used for Factory Specified Parts and repair labor to correct defects in -warranty service. You must be provided by calling Whirlpool. Dealer name Address Phone number Model number Serial number Purchase date 14 ...
... excluded from your major appliance. Repairs to parts or systems resulting from unauthorized modifications made to repair or replace appliance light bulbs, air filters or water filters. Expenses for travel and transportation for repairs. WHIRLPOOL SHALL NOT BE LIABLE FOR INCIDENTAL OR CONSEQUENTIAL...Canada and applies only when the major appliance is used for Factory Specified Parts and repair labor to correct defects in -warranty service. You must be provided by calling Whirlpool. Dealer name Address Phone number Model number Serial number Purchase date 14 ...


