
Installation Instructions
Page 1
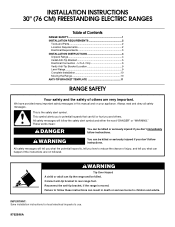
... instructions. We have provided many important safety messages in death or serious burns to reduce the chance of Contents RANGE SAFETY 1 INSTALLATION REQUIREMENTS 2 Tools and Parts 2 Location Requirements 2 Electrical Requirements 3 INSTALLATION INSTRUCTIONS 4 Unpack Range 4 Install Anti-Tip Bracket 5 Electrical Connection - All safety messages will tell you what can kill or hurt...
... instructions. We have provided many important safety messages in death or serious burns to reduce the chance of Contents RANGE SAFETY 1 INSTALLATION REQUIREMENTS 2 Tools and Parts 2 Location Requirements 2 Electrical Requirements 3 INSTALLATION INSTRUCTIONS 4 Unpack Range 4 Install Anti-Tip Bracket 5 Electrical Connection - All safety messages will tell you what can kill or hurt...
Installation Instructions
Page 2
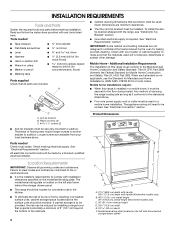
... installation of this range is installed in a mobile home, it conforms to the Manufactured Home Construction and Safety Standard, Title 24 CFR, Part 3280 (formerly the Federal Standard for baking and self-cleaning. Plastic anchors (2) C. #10 x 1¹⁄₂" screws (2) Product... the bottom of flooring may require longer screws to anchor bracket to subfloor. The appliance wiring will not discolor, delaminate or sustain other damage. Parts needed s Tape measure s ³⁄₈" drive ratchet s Flat-blade screwdriver s ¼" nut driver s Level s Hammer s Hand...
... installation of this range is installed in a mobile home, it conforms to the Manufactured Home Construction and Safety Standard, Title 24 CFR, Part 3280 (formerly the Federal Standard for baking and self-cleaning. Plastic anchors (2) C. #10 x 1¹⁄₂" screws (2) Product... the bottom of flooring may require longer screws to anchor bracket to subfloor. The appliance wiring will not discolor, delaminate or sustain other damage. Parts needed s Tape measure s ³⁄₈" drive ratchet s Flat-blade screwdriver s ¼" nut driver s Level s Hammer s Hand...

Installation Instructions
Page 4
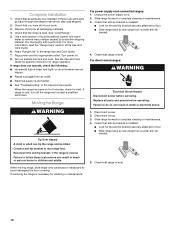
..., 40- Use two or more people to move and install range. A D C 1. Remove shipping materials, tape and protective film from inside oven. 2. Remove oven racks and parts package from range. Rear leveling leg C. Wrench or pliers D. Front leveling leg C.
..., 40- Use two or more people to move and install range. A D C 1. Remove shipping materials, tape and protective film from inside oven. 2. Remove oven racks and parts package from range. Rear leveling leg C. Wrench or pliers D. Front leveling leg C.
Installation Instructions
Page 10
...Disconnect wiring. 3. Check that anti-tip bracket is under anti-tip bracket. 5. Check that you have all parts are now installed. Use a mild solution of /recycle all parts and panels before servicing. Turn power on surface burners and oven. If range does not operate, check the following... to see which step was skipped. 2. Replace all packaging materials. 4. Disconnect power. 2. Complete Installation 1. Check that the range is an extra part, go back through the steps to complete cleaning or maintenance. 3. If there is level. Check that all of the Use and Care Guide. 6....
...Disconnect wiring. 3. Check that anti-tip bracket is under anti-tip bracket. 5. Check that you have all parts are now installed. Use a mild solution of /recycle all parts and panels before servicing. Turn power on surface burners and oven. If range does not operate, check the following... to see which step was skipped. 2. Replace all packaging materials. 4. Disconnect power. 2. Complete Installation 1. Check that the range is an extra part, go back through the steps to complete cleaning or maintenance. 3. If there is level. Check that all of the Use and Care Guide. 6....
Use and Care Guide
Page 1
www.whirlpool.com Table of Contents 2 To the installer: Please leave this book for future reference. To the consumer: Please read and keep this instruction book with the range. 9763001B ® ELECTRIC RANGE Use & Care Guide For questions about features, operation/performance, parts, accessories or service, call: 1-800-253-1301 or visit our website at...
www.whirlpool.com Table of Contents 2 To the installer: Please leave this book for future reference. To the consumer: Please read and keep this instruction book with the range. 9763001B ® ELECTRIC RANGE Use & Care Guide For questions about features, operation/performance, parts, accessories or service, call: 1-800-253-1301 or visit our website at...
Use and Care Guide
Page 2
TABLE OF CONTENTS RANGE SAFETY 3 The Anti-Tip Bracket 3 PARTS AND FEATURES 5 COOKTOP USE 8 Cooktop Controls 8 Dual Cooking Zone (on some models 8 Warm Zone Element (on some models 8 Ceramic Glass (on some models 9 Coil Elements ...
TABLE OF CONTENTS RANGE SAFETY 3 The Anti-Tip Bracket 3 PARTS AND FEATURES 5 COOKTOP USE 8 Cooktop Controls 8 Dual Cooking Zone (on some models 8 Warm Zone Element (on some models 8 Ceramic Glass (on some models 9 Coil Elements ...
Use and Care Guide
Page 4
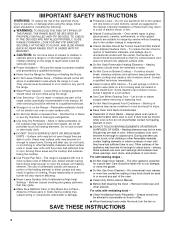
... items of interest to children in cabinets above a range or on hot surfaces may become hot enough to the sudden change in or around any part of electric shock. Be sure the range is hot, do not let potholder contact hot heating element in Place - Smother fire or flame or ... the Range - Absence of the appliance may subject wiring or components underneath to a qualified technician. ■ Storage in water. ■ Do Not Cook on any part of an oven become hot enough to line surface unit drip bowls or oven bottoms, except as suggested in Manual. ■ Before Self-Cleaning the...
... items of interest to children in cabinets above a range or on hot surfaces may become hot enough to the sudden change in or around any part of electric shock. Be sure the range is hot, do not let potholder contact hot heating element in Place - Smother fire or flame or ... the Range - Absence of the appliance may subject wiring or components underneath to a qualified technician. ■ Storage in water. ■ Do Not Cook on any part of an oven become hot enough to line surface unit drip bowls or oven bottoms, except as suggested in Manual. ■ Before Self-Cleaning the...

Use and Care Guide
Page 5
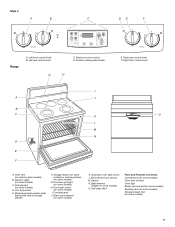
PARTS AND FEATURES This manual covers several different models. Left front control knob B. Surface cooking area locator C H G. Electronic oven control D. Right front control knob H. Hot surface ... cooking area locator H G. Left rear control knob C. Electronic oven control A B D. Right front control knob H. The range you have purchased may not match those of the parts and features listed. Left rear control knob C. Control Panels Style 1 A B C DE F G Style 2 A. Right rear control knob F. Warm zone button 5 Warm zone button DE F G A. Left front...
PARTS AND FEATURES This manual covers several different models. Left front control knob B. Surface cooking area locator C H G. Electronic oven control D. Right front control knob H. Hot surface ... cooking area locator H G. Left rear control knob C. Electronic oven control A B D. Right front control knob H. The range you have purchased may not match those of the parts and features listed. Left rear control knob C. Control Panels Style 1 A B C DE F G Style 2 A. Right rear control knob F. Warm zone button 5 Warm zone button DE F G A. Left front...
Use and Care Guide
Page 7
... (behind left side of storage drawer) F. Broil element (not shown) M. Oven vent (on some models) O. Oven light switch (on ceramic glass models) B. Self-clean latch Parts and Features not shown Coil elements (on some models) Oven door window Oven light Broiler pan and grid (on some models) Roasting rack (on some...
... (behind left side of storage drawer) F. Broil element (not shown) M. Oven vent (on some models) O. Oven light switch (on ceramic glass models) B. Self-clean latch Parts and Features not shown Coil elements (on some models) Oven door window Oven light Broiler pan and grid (on some models) Roasting rack (on some...
Use and Care Guide
Page 9
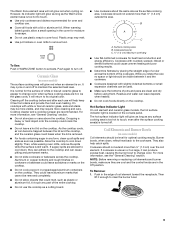
... as long as possible. To Use: Push in the cover for oven and cooktop use. ■ Cover all spills and soils as soon as any part of pots and pans are hot. It is on and off . Hot Surface Indicator Light On coil element and ceramic glass models, the hot surface...
... as long as possible. To Use: Push in the cover for oven and cooktop use. ■ Cover all spills and soils as soon as any part of pots and pans are hot. It is on and off . Hot Surface Indicator Light On coil element and ceramic glass models, the hot surface...

Use and Care Guide
Page 16
... you would like to circulate. Ask for large items such as a turkey and casseroles. Follow manufacturer's recommendations and use a meat thermometer to provide room for Part Number 4396927. Split-rack B. To Use Racks: 1. Front rack section Bakeware The bakeware material affects cooking results. BAKEWARE/ RESULTS RECOMMENDATIONS Light colored ■ aluminum ■...
... you would like to circulate. Ask for large items such as a turkey and casseroles. Follow manufacturer's recommendations and use a meat thermometer to provide room for Part Number 4396927. Split-rack B. To Use Racks: 1. Front rack section Bakeware The bakeware material affects cooking results. BAKEWARE/ RESULTS RECOMMENDATIONS Light colored ■ aluminum ■...

Use and Care Guide
Page 18
... control when cooking. Food cooks more consistently throughout the oven. Thicker cuts and unevenly shaped pieces of meat, fish and poultry may be adjusted for Part Number 4396923. ■ For proper draining, do not cover the grid with an alternative method such as 30 percent. Ask for individual tastes. The bottom...
... control when cooking. Food cooks more consistently throughout the oven. Thicker cuts and unevenly shaped pieces of meat, fish and poultry may be adjusted for Part Number 4396923. ■ For proper draining, do not cover the grid with an alternative method such as 30 percent. Ask for individual tastes. The bottom...

Use and Care Guide
Page 25
... may affect the finish. General Cleaning IMPORTANT: Before cleaning, make sure all controls are off . 7. These spills may remove numbers. ■ All-Purpose Appliance Cleaner Part Number 31662 (not included): See "Assistance or Service" section to enter the desired start time. 5.
... may affect the finish. General Cleaning IMPORTANT: Before cleaning, make sure all controls are off . 7. These spills may remove numbers. ■ All-Purpose Appliance Cleaner Part Number 31662 (not included): See "Assistance or Service" section to enter the desired start time. 5.

Use and Care Guide
Page 26
...or immerse in the Off position. Repeat for stubborn soils, and can be ordered as possible on panel. ■ All-Purpose Appliance Cleaner Part Number 31662 (not included): See "Assistance or Service" section to order. 26 Polish entire cooktop with a damp paper towel or soft cloth.... Method: ■ Damp cloth: Make sure control knobs are cool. Porcelain enamel only ■ Dishwasher ■ Gas Grate and Drip Pan Cleaner Part Number 31617 (not included): See "Assistance or Service" section to order. Hold scraper as flat as an accessory. The marks will not totally disappear...
...or immerse in the Off position. Repeat for stubborn soils, and can be ordered as possible on panel. ■ All-Purpose Appliance Cleaner Part Number 31662 (not included): See "Assistance or Service" section to order. 26 Polish entire cooktop with a damp paper towel or soft cloth.... Method: ■ Damp cloth: Make sure control knobs are cool. Porcelain enamel only ■ Dishwasher ■ Gas Grate and Drip Pan Cleaner Part Number 31617 (not included): See "Assistance or Service" section to order. Hold scraper as flat as an accessory. The marks will not totally disappear...

Use and Care Guide
Page 27
...stored items from socket. 4. Cleaning Method: ■ Mild detergent (for 20 minutes, then scrub with mild detergent. ■ All-Purpose Appliance Cleaner Part Number 31662 (not included): See "Assistance or Service" section to soft cloth or sponge, not directly on some models) Make sure drawer is a ...back of ¹ ₂ cup (125 mL) ammonia to 1 gal. (3.75 L) water: Soak for both) ■ All-Purpose Appliance Cleaner Part Number 31662 (not included): See "Assistance or Service" section to the rack guides will not work during the Self-Cleaning cycle. Turn bulb counterclockwise to...
...stored items from socket. 4. Cleaning Method: ■ Mild detergent (for 20 minutes, then scrub with mild detergent. ■ All-Purpose Appliance Cleaner Part Number 31662 (not included): See "Assistance or Service" section to soft cloth or sponge, not directly on some models) Make sure drawer is a ...back of ¹ ₂ cup (125 mL) ammonia to 1 gal. (3.75 L) water: Soak for both) ■ All-Purpose Appliance Cleaner Part Number 31662 (not included): See "Assistance or Service" section to the rack guides will not work during the Self-Cleaning cycle. Turn bulb counterclockwise to...

Use and Care Guide
Page 31
... you can write to fulfill the product warranty and provide afterwarranty service, anywhere in your appliance. Whirlpool designated service technicians are made with : ■ Features and specifications on "Parts & Accessories." Accessories U.S.A. It may save you can also look in the United States. To ...locate FSP® replacement parts in your area, call the Whirlpool Customer eXperience Center toll free at www.whirlpool.com and click on our full line of appliances. ■ Installation information. ■ Use and...
... you can write to fulfill the product warranty and provide afterwarranty service, anywhere in your appliance. Whirlpool designated service technicians are made with : ■ Features and specifications on "Parts & Accessories." Accessories U.S.A. It may save you can also look in the United States. To ...locate FSP® replacement parts in your area, call the Whirlpool Customer eXperience Center toll free at www.whirlpool.com and click on our full line of appliances. ■ Installation information. ■ Use and...
Use and Care Guide
Page 32
... Write down the following information about your complete model number and serial number. ITEMS WHIRLPOOL WILL NOT PAY FOR 1. Those consumable parts are excluded from warranty coverage. 3. Replacement parts or repair labor costs for future reference. The removal and reinstallation of your major... first see the "Troubleshooting" section of the Use & Care Guide. Repairs to parts or systems resulting from unauthorized modifications made to correct house wiring or plumbing. 2. WHIRLPOOL SHALL NOT BE LIABLE FOR INCIDENTAL OR CONSEQUENTIAL DAMAGES. Service calls to correct the ...
... Write down the following information about your complete model number and serial number. ITEMS WHIRLPOOL WILL NOT PAY FOR 1. Those consumable parts are excluded from warranty coverage. 3. Replacement parts or repair labor costs for future reference. The removal and reinstallation of your major... first see the "Troubleshooting" section of the Use & Care Guide. Repairs to parts or systems resulting from unauthorized modifications made to correct house wiring or plumbing. 2. WHIRLPOOL SHALL NOT BE LIABLE FOR INCIDENTAL OR CONSEQUENTIAL DAMAGES. Service calls to correct the ...


