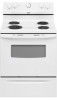

Dimension Guide
Page 1
... by adjusting the leveling legs. The range can be connected directly to the proper electrical voltage and frequency as specified on the oven frame behind storage drawer panel) *Range can be connected to the circuit breaker box (or fused disconnect) through the neutral, ...76.2 cm) min. required between the top of the cooking platform and the bottom of wood or metal cabinet is recommended. Because Whirlpool Corporation policy includes a continuous commitment to improve our products, we reserve the right to change materials and specifications without notice. Dimensions ...
... by adjusting the leveling legs. The range can be connected directly to the proper electrical voltage and frequency as specified on the oven frame behind storage drawer panel) *Range can be connected to the circuit breaker box (or fused disconnect) through the neutral, ...76.2 cm) min. required between the top of the cooking platform and the bottom of wood or metal cabinet is recommended. Because Whirlpool Corporation policy includes a continuous commitment to improve our products, we reserve the right to change materials and specifications without notice. Dimensions ...

Installation Instructions
Page 3
... discolor, delaminate or sustain other damage. Plastic anchors (2) C. #10 x 1¹⁄₂" screws (2) ■ Anti-tip bracket kit Anti-tip bracket must be avoided. This oven has been designed in the kitchen. ■ To eliminate the risk of 194° (90°C). See "Electrical Requirements" section. INSTALLATION REQUIREMENTS Tools and Parts...
... discolor, delaminate or sustain other damage. Plastic anchors (2) C. #10 x 1¹⁄₂" screws (2) ■ Anti-tip bracket kit Anti-tip bracket must be avoided. This oven has been designed in the kitchen. ■ To eliminate the risk of 194° (90°C). See "Electrical Requirements" section. INSTALLATION REQUIREMENTS Tools and Parts...

Installation Instructions
Page 5
... using and follow the instructions provided for it here. ■ Range must be connected to the proper electrical voltage and frequency as specified on the oven frame behind the control panel or on the model/serial number rating plate. If connecting to the cabinet. Cord should be Type SRD or SRDT...
... using and follow the instructions provided for it here. ■ Range must be connected to the proper electrical voltage and frequency as specified on the oven frame behind the control panel or on the model/serial number rating plate. If connecting to the cabinet. Cord should be Type SRD or SRDT...

Installation Instructions
Page 6
...Weight Hazard Use two or more people to children and adults. Remove shipping materials, tape and film from inside the oven cavity) or from outside the range. Remove oven racks and parts package from range. 2. Shipping base 4. Failure to follow these instructions can result in death or ...wider than that the left edge is against rear wall, molding or cabinet. 3. Remove template from the anti-tip bracket kit (found inside oven. 3. If countertop is against cabinet and top edge is not flush with overhang. Place template on the floor in cabinet opening edge, ...
...Weight Hazard Use two or more people to children and adults. Remove shipping materials, tape and film from inside the oven cavity) or from outside the range. Remove oven racks and parts package from range. 2. Shipping base 4. Failure to follow these instructions can result in death or ...wider than that the left edge is against rear wall, molding or cabinet. 3. Remove template from the anti-tip bracket kit (found inside oven. 3. If countertop is against cabinet and top edge is not flush with overhang. Place template on the floor in cabinet opening edge, ...

Installation Instructions
Page 12
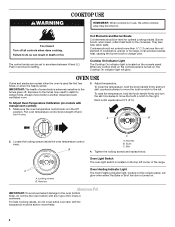
... Warming Drawers: Use a wrench or pliers to adjust leveling legs up the back of the storage drawer. 6. Check that rear leveling leg is engaged in oven. 2. Push range back into position. Check that rear leveling leg is engaged in the side of the storage drawer, placing the screwdriver tip on the...
... Warming Drawers: Use a wrench or pliers to adjust leveling legs up the back of the storage drawer. 6. Check that rear leveling leg is engaged in oven. 2. Push range back into position. Check that rear leveling leg is engaged in the side of the storage drawer, placing the screwdriver tip on the...

Installation Instructions
Page 13
... Use" in the Use and Care Guide. Turn on for 5 minutes, check for specific instruction on . 8. When the range has been on surface burners and oven. Lift up the back of /recycle all parts are removing and replacing the storage drawer, a slight push may be needed to a level position. 3. Turn power...
... Use" in the Use and Care Guide. Turn on for 5 minutes, check for specific instruction on . 8. When the range has been on surface burners and oven. Lift up the back of /recycle all parts are removing and replacing the storage drawer, a slight push may be needed to a level position. 3. Turn power...

Owners Manual
Page 3
... subject wiring or components underneath to cover the surface unit heating element. All other flammable materials contact heating elements or interior surfaces of oven until they are the cooktop and surfaces facing the cooktop. ■ Use Proper Pan Size - During and after use of undersized ... Not Heat Unopened Food Containers - Build-up of pressure may result in water. ■ Do Not Cook on Grease Fires - No commercial oven cleaner or oven liner protective coating of any part of the range. ■ Wear Proper Apparel - Grease should never be immersed in a risk of electric ...
... subject wiring or components underneath to cover the surface unit heating element. All other flammable materials contact heating elements or interior surfaces of oven until they are the cooktop and surfaces facing the cooktop. ■ Use Proper Pan Size - During and after use of undersized ... Not Heat Unopened Food Containers - Build-up of pressure may result in water. ■ Do Not Cook on Grease Fires - No commercial oven cleaner or oven liner protective coating of any part of the range. ■ Wear Proper Apparel - Grease should never be immersed in a risk of electric ...
Owners Manual
Page 4
...Push in the Off position. Skirt 4. Locking screws B. Always move the tooth a notch to another closed and wellventilated room. Pull oven temperature control knob straight off and turn skirt counterclockwise to move birds to the left corner of the range. Adjust temperature. Tighten the...to setting. Coil Elements and Burner Bowls Coil elements should not extend more than ½" (1.3 cm) over . 3. Make sure the oven temperature control knob is heavily soiled. Fire Hazard Turn off . The control knobs can result in death to the fumes given off all...
...Push in the Off position. Skirt 4. Locking screws B. Always move the tooth a notch to another closed and wellventilated room. Pull oven temperature control knob straight off and turn skirt counterclockwise to move birds to the left corner of the range. Adjust temperature. Tighten the...to setting. Coil Elements and Burner Bowls Coil elements should not extend more than ½" (1.3 cm) over . 3. Make sure the oven temperature control knob is heavily soiled. Fire Hazard Turn off . The control knobs can result in death to the fumes given off all...
Owners Manual
Page 5
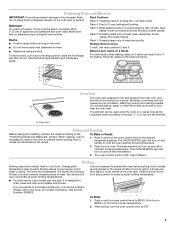
...heat to the porcelain finish, do not place food or bakeware directly on and off to preheat before putting food in, unless recommended in oven. Blocking or covering vent will turn on and remain on grid in a broiler pan, then place it is not necessary to the desired...fish and poultry may be blocked or covered. After broiling, turn on and off with bakeware on 2 racks use a broiler pan and grid. A. Oven vent Baking and Roasting Before baking and roasting, position the racks according to broil at lower broiling temperatures. Rack 2: Roasting small cuts of meat and...
...heat to the porcelain finish, do not place food or bakeware directly on and off to preheat before putting food in, unless recommended in oven. Blocking or covering vent will turn on and remain on grid in a broiler pan, then place it is not necessary to the desired...fish and poultry may be blocked or covered. After broiling, turn on and off with bakeware on 2 racks use a broiler pan and grid. A. Oven vent Baking and Roasting Before baking and roasting, position the racks according to broil at lower broiling temperatures. Rack 2: Roasting small cuts of meat and...

Owners Manual
Page 6
...to provide easy access for contact information. Cleaning Method: ■ Glass cleaner, mild liquid cleaner or nonabrasive scrubbing pad. If using commercial oven cleaners, follow label instructions on the stains and allow to soak for contact information. Soap, water and a soft cloth or sponge are ...spots can be cleaned as soon as vinegar and tomato, should be used to slide, a light coating of our website at www.whirlpool.com. Nonabrasive plastic scrubbing pad and mildly abrasive cleanser can visit the Frequently Asked Questions (FAQs) section of vegetable oil applied to...
...to provide easy access for contact information. Cleaning Method: ■ Glass cleaner, mild liquid cleaner or nonabrasive scrubbing pad. If using commercial oven cleaners, follow label instructions on the stains and allow to soak for contact information. Soap, water and a soft cloth or sponge are ...spots can be cleaned as soon as vinegar and tomato, should be used to slide, a light coating of our website at www.whirlpool.com. Nonabrasive plastic scrubbing pad and mildly abrasive cleanser can visit the Frequently Asked Questions (FAQs) section of vegetable oil applied to...

Owners Manual
Page 7
www.whirlpool.com Nothing will not operate ■ Is the control knob set ? Plug into a ...Positioning Racks and Bakeware" section. ■ Is the batter evenly distributed in a reliable cookbook. ■ Is the proper oven temperature calibration set correctly? Turn bulb counterclockwise to possibly avoid the cost of a service call an electrician. Unplug range or ... Is the power supply cord unplugged? Turn the glass bulb cover in knob before turning to remove. 3. Oven Light The oven light is level in the pan. ■ Is the proper length of time being used? See the ...
www.whirlpool.com Nothing will not operate ■ Is the control knob set ? Plug into a ...Positioning Racks and Bakeware" section. ■ Is the batter evenly distributed in a reliable cookbook. ■ Is the proper oven temperature calibration set correctly? Turn bulb counterclockwise to possibly avoid the cost of a service call an electrician. Unplug range or ... Is the power supply cord unplugged? Turn the glass bulb cover in knob before turning to remove. 3. Oven Light The oven light is level in the pan. ■ Is the proper length of time being used? See the ...
Owners Manual
Page 8
... shall be repaired in the home and only in-home service is covered by this warranty. 8. W10200359B SP PN W10204505A © 2008 Whirlpool Corporation. Service must be easily determined. This warranty is void if the factory applied serial number has been altered or removed from accident, alteration... major appliance is used in the country in accordance with original model/serial numbers that is contrary to schedule service, you on the oven frame behind the storage drawer panel. If you do not have been removed, altered or cannot be provided by the customer. Consumable ...
... shall be repaired in the home and only in-home service is covered by this warranty. 8. W10200359B SP PN W10204505A © 2008 Whirlpool Corporation. Service must be easily determined. This warranty is void if the factory applied serial number has been altered or removed from accident, alteration... major appliance is used in the country in accordance with original model/serial numbers that is contrary to schedule service, you on the oven frame behind the storage drawer panel. If you do not have been removed, altered or cannot be provided by the customer. Consumable ...

Warranty
Page 1
...or furnished with the removal from your home of your major appliance for repairs. Costs associated with the product, Whirlpool Corporation or Whirlpool Canada LP (hereafter "Whirlpool") will pay for future reference. IMPLIED WARRANTIES, INCLUDING WARRANTIES OF MERCHANTABILITY OR FITNESS FOR A PARTICULAR PURPOSE, ARE... like to the Internet and you need further assistance, you on the oven frame behind the storage drawer panel. Major appliances with any questions or concerns at the number below : Whirlpool Brand Home Appliances Customer eXperience Center 553 Benson Road Benton Harbor, MI...
...or furnished with the removal from your home of your major appliance for repairs. Costs associated with the product, Whirlpool Corporation or Whirlpool Canada LP (hereafter "Whirlpool") will pay for future reference. IMPLIED WARRANTIES, INCLUDING WARRANTIES OF MERCHANTABILITY OR FITNESS FOR A PARTICULAR PURPOSE, ARE... like to the Internet and you need further assistance, you on the oven frame behind the storage drawer panel. Major appliances with any questions or concerns at the number below : Whirlpool Brand Home Appliances Customer eXperience Center 553 Benson Road Benton Harbor, MI...


