
Dimension Guide
Page 1
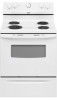
...015" (0.4 mm) stainless steel, 0.024" (0.6 mm) aluminum or 0.020" (0.5 mm) copper. 30" (76.2 cm) min. Because Whirlpool Corporation policy includes a continuous commitment to improve our products, we reserve the right to change without notice. required between the top of the cooking ... complete details, see NOTE*. Use a 3-wire, UL listed, 40- 30" (76 cm) Freestanding Electric Range PRODUCT MODEL NUMBERS GFE461LV GFE471LV WFE301LV WFE361LV WFE364LV WFE366LV WFE371LV WFE374LV WFE381LV WFE114LW WFE115LX RF110AXS RF111PXS RF114PXS RF212PXS RF263LXT RF264LXS Electrical: Range must be...
...015" (0.4 mm) stainless steel, 0.024" (0.6 mm) aluminum or 0.020" (0.5 mm) copper. 30" (76.2 cm) min. Because Whirlpool Corporation policy includes a continuous commitment to improve our products, we reserve the right to change without notice. required between the top of the cooking ... complete details, see NOTE*. Use a 3-wire, UL listed, 40- 30" (76 cm) Freestanding Electric Range PRODUCT MODEL NUMBERS GFE461LV GFE471LV WFE301LV WFE361LV WFE364LV WFE366LV WFE371LV WFE374LV WFE381LV WFE114LW WFE115LX RF110AXS RF111PXS RF114PXS RF212PXS RF263LXT RF264LXS Electrical: Range must be...

Installation Instructions
Page 3
... wire cutters (for cutting ground strap if necessary) Parts supplied Check that all electrical connections be revised. Check existing electrical supply. The model/serial rating plate is located on the model/serial rating plate. When such standard is recommended that all governing codes and ordinances. ■ It is marked for use in...
... wire cutters (for cutting ground strap if necessary) Parts supplied Check that all electrical connections be revised. Check existing electrical supply. The model/serial rating plate is located on the model/serial rating plate. When such standard is recommended that all governing codes and ordinances. ■ It is marked for use in...

Installation Instructions
Page 4
.... If it is recommended that a qualified electrical installer determine that the electrical connection and wire size are in a risk of the above the cooktop surface. Model/serial rating plate (located on the left side frame behind storage drawer panel) *Range can be installed next to whether the appliance is covered by...
.... If it is recommended that a qualified electrical installer determine that the electrical connection and wire size are in a risk of the above the cooktop surface. Model/serial rating plate (located on the left side frame behind storage drawer panel) *Range can be installed next to whether the appliance is covered by...

Installation Instructions
Page 5
... The minimum conductor sized for it here. ■ Range must be connected to the proper electrical voltage and frequency as specified on the model/serial number rating plate. and recreational vehicles, or an area where local codes prohibit grounding through flexible or nonmetallic sheathed, copper or aluminum ... Power Supply Cord Kit and Circuit Protection Amps 40 or 50** 50 *The NEC calculated load is located behind the control panel or on the model/serial rating plate. **If connecting to the cabinet. See the "Electrical Connection" section. ■ Allow 2 to 3 ft (61.0 cm to ...
... The minimum conductor sized for it here. ■ Range must be connected to the proper electrical voltage and frequency as specified on the model/serial number rating plate. and recreational vehicles, or an area where local codes prohibit grounding through flexible or nonmetallic sheathed, copper or aluminum ... Power Supply Cord Kit and Circuit Protection Amps 40 or 50** 50 *The NEC calculated load is located behind the control panel or on the model/serial rating plate. **If connecting to the cabinet. See the "Electrical Connection" section. ■ Allow 2 to 3 ft (61.0 cm to ...

Installation Instructions
Page 12
...bracket. NOTE: Range must be seen by pressing the screwdriver handle toward the side of range, first side to the drawer stop. On models with a storage drawer, remove storage drawer. Check that rear leveling leg is engaged in anti-tip bracket. Gently pull forward on rack ... needed for the anti-tip bracket securely attached to view the rear foot from outside of the storage drawer, placing the screwdriver tip on some models). then front to disengage the storage drawer one side at a time. 2. A A. Verify Anti-Tip Bracket Location 1. Insert a flat-blade screwdriver...
...bracket. NOTE: Range must be seen by pressing the screwdriver handle toward the side of range, first side to the drawer stop. On models with a storage drawer, remove storage drawer. Check that rear leveling leg is engaged in anti-tip bracket. Gently pull forward on rack ... needed for the anti-tip bracket securely attached to view the rear foot from outside of the storage drawer, placing the screwdriver tip on some models). then front to disengage the storage drawer one side at a time. 2. A A. Verify Anti-Tip Bracket Location 1. Insert a flat-blade screwdriver...
Owners Manual
Page 4
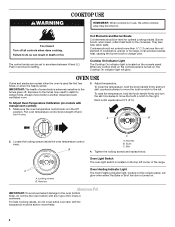
... off. Push in death or fire. To Adjust Oven Temperature Calibration (on the top left . Make sure the oven temperature control knob is located on models with foil because air must be level for optimal cooking results. Adjust temperature. To raise the temperature, hold the knob handle firmly and turn to...
... off. Push in death or fire. To Adjust Oven Temperature Calibration (on the top left . Make sure the oven temperature control knob is located on models with foil because air must be level for optimal cooking results. Adjust temperature. To raise the temperature, hold the knob handle firmly and turn to...

Owners Manual
Page 6
... can be cleaned as soon as the entire range is cool. Lift the cooktop by pushing the edge of our website at www.whirlpool.com. Do not soak knobs. Nonabrasive plastic scrubbing pad and mildly abrasive cleanser can be cleaned when oven cools. STORAGE DRAWER Check... the cooktop. Always follow package directions. Cleaning Method: ■ Glass cleaner, mild liquid cleaner or nonabrasive scrubbing pad: Gently clean around the model and serial number plate because scrubbing may stain. ■ All-Purpose Appliance Cleaner Part Number 31682 (not included): See cover for a short ...
... can be cleaned as soon as the entire range is cool. Lift the cooktop by pushing the edge of our website at www.whirlpool.com. Do not soak knobs. Nonabrasive plastic scrubbing pad and mildly abrasive cleanser can be cleaned when oven cools. STORAGE DRAWER Check... the cooktop. Always follow package directions. Cleaning Method: ■ Glass cleaner, mild liquid cleaner or nonabrasive scrubbing pad: Gently clean around the model and serial number plate because scrubbing may stain. ■ All-Purpose Appliance Cleaner Part Number 31682 (not included): See cover for a short ...

Owners Manual
Page 7
...temperature calibration need adjustment? See the Installation Instructions. ■ Is the proper temperature set correctly? Move rack to remove from socket. www.whirlpool.com Nothing will not operate ■ Is the control knob set ? See "Oven Use" section. Level the range. See "Oven... Use" section. ■ Are the racks positioned properly? Canning Unit Kit (coil element models) Order Part Number 242905 Cooktop Care Kit (includes cleaner, protectant, and applicator pads) Order Part Number 31605 Cooktop Protectant Order Part ...
...temperature calibration need adjustment? See the Installation Instructions. ■ Is the proper temperature set correctly? Move rack to remove from socket. www.whirlpool.com Nothing will not operate ■ Is the control knob set ? See "Oven Use" section. Level the range. See "Oven... Use" section. ■ Are the racks positioned properly? Canning Unit Kit (coil element models) Order Part Number 242905 Cooktop Care Kit (includes cleaner, protectant, and applicator pads) Order Part Number 31605 Cooktop Protectant Order Part ...
Owners Manual
Page 8
... in which it was purchased. Please keep this User Instructions and model number information for Factory Specified Parts and repair labor to correct defects in -home service is covered by Whirlpool. 5. Any food loss due to repair or replace appliance light .... DISCLAIMER OF IMPLIED WARRANTIES; All rights reserved. ® Registered Trademark/TM Trademark of Whirlpool, U.S.A. 7/08 Printed in the U.S.A., call 1-800-253-1301. Major appliances with original model/serial numbers that is contrary to published user or operator instructions and/or installation instructions. ...
... in which it was purchased. Please keep this User Instructions and model number information for Factory Specified Parts and repair labor to correct defects in -home service is covered by Whirlpool. 5. Any food loss due to repair or replace appliance light .... DISCLAIMER OF IMPLIED WARRANTIES; All rights reserved. ® Registered Trademark/TM Trademark of Whirlpool, U.S.A. 7/08 Printed in the U.S.A., call 1-800-253-1301. Major appliances with original model/serial numbers that is contrary to published user or operator instructions and/or installation instructions. ...

Warranty
Page 1
... date is located in the U.S.A., call 1-800-253-1301. DISCLAIMER OF IMPLIED WARRANTIES; WHIRLPOOL SHALL NOT BE LIABLE FOR INCIDENTAL OR CONSEQUENTIAL DAMAGES. Please keep this User Instructions and model number information for other damage to the finish of your major appliance, to replace or... and serial number on the label, located on how to use of your complete model number ready. WHIRLPOOL CORPORATION MAJOR APPLIANCE WARRANTY LIMITED WARRANTY For one year from the date of Whirlpool, U.S.A. 11/08 Printed in U.S.A. LIMITATION OF REMEDIES CUSTOMER'S SOLE AND EXCLUSIVE REMEDY UNDER ...
... date is located in the U.S.A., call 1-800-253-1301. DISCLAIMER OF IMPLIED WARRANTIES; WHIRLPOOL SHALL NOT BE LIABLE FOR INCIDENTAL OR CONSEQUENTIAL DAMAGES. Please keep this User Instructions and model number information for other damage to the finish of your major appliance, to replace or... and serial number on the label, located on how to use of your complete model number ready. WHIRLPOOL CORPORATION MAJOR APPLIANCE WARRANTY LIMITED WARRANTY For one year from the date of Whirlpool, U.S.A. 11/08 Printed in U.S.A. LIMITATION OF REMEDIES CUSTOMER'S SOLE AND EXCLUSIVE REMEDY UNDER ...


