

Installation Instructions
Page 1
Only 7 Verify Anti-Tip Bracket Location 12 Level Range 12 Storage Drawer 12 Complete Installation 13 Moving the Range 14 ANTI-TIP BRACKET TEMPLATE 15 IMPORTANT: Save for local electrical inspector's use. U.S.A. U.S.A. INSTALLATION INSTRUCTIONS 30" (76 CM) FREESTANDING ELECTRIC RANGES Table of Contents RANGE SAFETY 2 INSTALLATION REQUIREMENTS 3 Tools and Parts 3 Location Requirements 3 Electrical Requirements - W10252706B Only 4 INSTALLATION INSTRUCTIONS 6 Unpack Range 6 Install Anti-Tip Bracket 6 Electrical Connection -
Only 7 Verify Anti-Tip Bracket Location 12 Level Range 12 Storage Drawer 12 Complete Installation 13 Moving the Range 14 ANTI-TIP BRACKET TEMPLATE 15 IMPORTANT: Save for local electrical inspector's use. U.S.A. U.S.A. INSTALLATION INSTRUCTIONS 30" (76 CM) FREESTANDING ELECTRIC RANGES Table of Contents RANGE SAFETY 2 INSTALLATION REQUIREMENTS 3 Tools and Parts 3 Location Requirements 3 Electrical Requirements - W10252706B Only 4 INSTALLATION INSTRUCTIONS 6 Unpack Range 6 Install Anti-Tip Bracket 6 Electrical Connection -

Installation Instructions
Page 3
... with the maximum allowable wood cabinet temperatures of 194° (90°C). Thickness of the cabinets. ■ Cabinet opening and must be installed. Parts needed ■ Tape measure ■ ¼" drive ratchet ■ Flat-blade screwdriver ■ Level ■ Hammer ■ Hand or electric...a minimum of 5" (12.7 cm) beyond the bottom of flooring may require longer screws to anchor bracket to make sure that all parts are shown must be avoided. Check local codes. Location Requirements IMPORTANT: Observe all governing codes and ordinances. ■ It is the installer...
... with the maximum allowable wood cabinet temperatures of 194° (90°C). Thickness of the cabinets. ■ Cabinet opening and must be installed. Parts needed ■ Tape measure ■ ¼" drive ratchet ■ Flat-blade screwdriver ■ Level ■ Hammer ■ Hand or electric...a minimum of 5" (12.7 cm) beyond the bottom of flooring may require longer screws to anchor bracket to make sure that all parts are shown must be avoided. Check local codes. Location Requirements IMPORTANT: Observe all governing codes and ordinances. ■ It is the installer...

Installation Instructions
Page 6
... INSTRUCTIONS Unpack Range WARNING Excessive Weight Hazard Use two or more people to lower the rear leveling legs one-half turn. Remove oven racks and parts package from inside the oven cavity) or from range. 2. On Ranges Equipped with overhang. Contact a qualified floor covering installer for the best procedure for drilling...
... INSTRUCTIONS Unpack Range WARNING Excessive Weight Hazard Use two or more people to lower the rear leveling legs one-half turn. Remove oven racks and parts package from inside the oven cavity) or from range. 2. On Ranges Equipped with overhang. Contact a qualified floor covering installer for the best procedure for drilling...

Installation Instructions
Page 8
... fused Direct wire disconnect 3" (7.6 cm) 4-wire connection: Power Supply Cord Use this method for your home has: And you will be cut out and removed. Part of metal ground strap must be Go to Section: connecting to remove the ground-link screw from the back of the range. Discard C. Use a Phillips...
... fused Direct wire disconnect 3" (7.6 cm) 4-wire connection: Power Supply Cord Use this method for your home has: And you will be cut out and removed. Part of metal ground strap must be Go to Section: connecting to remove the ground-link screw from the back of the range. Discard C. Use a Phillips...

Installation Instructions
Page 10
... Wire Installation: Copper or Aluminum Wire This range may be connected directly to torque as shown in the following Bare Wire Torque Specifications chart. A B 3" (7.6 cm) 2. Part of the ground-link under the screw. C G D EF A. Line 1 (black) wire 4. Securely tighten setscrew to the fuse disconnect or circuit breaker box. Terminal block B. Cord...
... Wire Installation: Copper or Aluminum Wire This range may be connected directly to torque as shown in the following Bare Wire Torque Specifications chart. A B 3" (7.6 cm) 2. Part of the ground-link under the screw. C G D EF A. Line 1 (black) wire 4. Securely tighten setscrew to the fuse disconnect or circuit breaker box. Terminal block B. Cord...

Installation Instructions
Page 13
... the drawer stop notch past the drawer glides. If there is fully engaged on range operation. Check that you are now installed. Check that all parts are removing and replacing the storage drawer, a slight push may be needed to see which step was skipped. 2. Dry thoroughly with the gap in the...
... the drawer stop notch past the drawer glides. If there is fully engaged on range operation. Check that you are now installed. Check that all parts are removing and replacing the storage drawer, a slight push may be needed to see which step was skipped. 2. Dry thoroughly with the gap in the...

Installation Instructions
Page 14
... Hazard Disconnect power before operating. Check that range is under anti-tip bracket. Reconnect power. 6. Check that range is under anti-tip bracket. 5. Replace all parts and panels before servicing. Check that anti-tip bracket is installed: ■ Look for cleaning or maintenance: For power supply cord-connected ranges: 1. If removing...
... Hazard Disconnect power before operating. Check that range is under anti-tip bracket. Reconnect power. 6. Check that range is under anti-tip bracket. 5. Replace all parts and panels before servicing. Check that anti-tip bracket is installed: ■ Look for cleaning or maintenance: For power supply cord-connected ranges: 1. If removing...

Owners Manual
Page 3
... kind should be allowed to accumulate on hood or filter. ■ When flambeing foods under the hood, turn the fan on any part of the oven. ■ Clean Only Parts Listed in a risk of electric shock, or fire. ■ Glazed Cooking Utensils - Smother fire or flame or use a towel or... to burst and result in desired location while oven is used in or around any part of the range. ■ Wear Proper Apparel - No commercial oven cleaner or oven liner protective coating of any part of the range unless specifically recommended in Place - Care should never be used to ...
... kind should be allowed to accumulate on hood or filter. ■ When flambeing foods under the hood, turn the fan on any part of the oven. ■ Clean Only Parts Listed in a risk of electric shock, or fire. ■ Glazed Cooking Utensils - Smother fire or flame or use a towel or... to burst and result in desired location while oven is used in or around any part of the range. ■ Wear Proper Apparel - No commercial oven cleaner or oven liner protective coating of any part of the range unless specifically recommended in Place - Care should never be used to ...
Owners Manual
Page 5
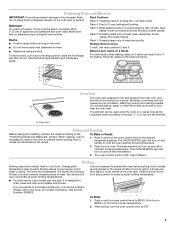
.... To Bake or Roast: 1. To Broil: 1. Close the door to the broil stop position, raise the front edge, and then lift out. Rack 4: Use for Part Number 4396923. Rack 1: Roasting large cuts of the oven rack. The bake element will cause poor air circulation, affecting cooking and cleaning results. Rack 3: Most...
.... To Bake or Roast: 1. To Broil: 1. Close the door to the broil stop position, raise the front edge, and then lift out. Rack 4: Use for Part Number 4396923. Rack 1: Roasting large cuts of the oven rack. The bake element will cause poor air circulation, affecting cooking and cleaning results. Rack 3: Most...

Owners Manual
Page 6
... Liquid detergent or all controls are off and elements are cool. Lift the cooktop by pushing the edge of our website at www.whirlpool.com. Cleaning Method: ■ Glass cleaner, mild liquid cleaner or nonabrasive scrubbing pad. CONTROL PANEL AND OVEN DOOR EXTERIOR To avoid ...cleaner or nonabrasive scrubbing pad: Gently clean around the model and serial number plate because scrubbing may stain. ■ All-Purpose Appliance Cleaner Part Number 31682 (not included): See cover for contact information. For heavily soiled bowls, place an ammonia soaked paper towel on a cool ...
... Liquid detergent or all controls are off and elements are cool. Lift the cooktop by pushing the edge of our website at www.whirlpool.com. Cleaning Method: ■ Glass cleaner, mild liquid cleaner or nonabrasive scrubbing pad. CONTROL PANEL AND OVEN DOOR EXTERIOR To avoid ...cleaner or nonabrasive scrubbing pad: Gently clean around the model and serial number plate because scrubbing may stain. ■ All-Purpose Appliance Cleaner Part Number 31682 (not included): See cover for contact information. For heavily soiled bowls, place an ammonia soaked paper towel on a cool ...

Owners Manual
Page 7
... or too low ■ Does the oven temperature calibration need adjustment? Level the range. Move rack to a setting. www.whirlpool.com Nothing will not operate ■ Is the control knob set ? See the Installation Instructions. See the Installation Instructions. &#... models) Order Part Number 242905 Cooktop Care Kit (includes cleaner, protectant, and applicator pads) Order Part Number 31605 Cooktop Protectant Order Part Number 31463 ACCESSORIES Cooktop Cleaner (ceramic glass models) Order Part Number 31464 Cooktop Scraper (ceramic glass models) Order Part Number WA906B Stainless...
... or too low ■ Does the oven temperature calibration need adjustment? Level the range. Move rack to a setting. www.whirlpool.com Nothing will not operate ■ Is the control knob set ? See the Installation Instructions. See the Installation Instructions. &#... models) Order Part Number 242905 Cooktop Care Kit (includes cleaner, protectant, and applicator pads) Order Part Number 31605 Cooktop Protectant Order Part Number 31463 ACCESSORIES Cooktop Cleaner (ceramic glass models) Order Part Number 31464 Cooktop Scraper (ceramic glass models) Order Part Number WA906B Stainless...
Owners Manual
Page 8
...PROVINCE TO PROVINCE. Have your correspondence. For assistance or service in the U.S.A., visit www.whirlpool.com. Proof of repair or replacement under this warranty. 8. Consumable parts are excluded from unauthorized modifications made to the Internet and you need further assistance, you may.... Please keep this limited warranty does not apply. You can write to parts or systems resulting from warranty coverage. 3. W10200359B SP PN W10204505A © 2008 Whirlpool Corporation. Repairs to Whirlpool with electrical or plumbing codes, or use your major appliance, unless such ...
...PROVINCE TO PROVINCE. Have your correspondence. For assistance or service in the U.S.A., visit www.whirlpool.com. Proof of repair or replacement under this warranty. 8. Consumable parts are excluded from unauthorized modifications made to the Internet and you need further assistance, you may.... Please keep this limited warranty does not apply. You can write to parts or systems resulting from warranty coverage. 3. W10200359B SP PN W10204505A © 2008 Whirlpool Corporation. Repairs to Whirlpool with electrical or plumbing codes, or use your major appliance, unless such ...

Warranty
Page 1
... major appliance is used in a remote area where service by an authorized Whirlpool servicer is void if the factory applied serial number has been altered or removed from your major appliance. Consumable parts are excluded from warranty coverage. 3. Any food loss due to repair or... electrical or plumbing codes, or use or when it was purchased. Costs associated with the product, Whirlpool Corporation or Whirlpool Canada LP (hereafter "Whirlpool") will pay for Factory Specified Parts and repair labor to correct defects in which it is used in the country in materials or workmanship...
... major appliance is used in a remote area where service by an authorized Whirlpool servicer is void if the factory applied serial number has been altered or removed from your major appliance. Consumable parts are excluded from warranty coverage. 3. Any food loss due to repair or... electrical or plumbing codes, or use or when it was purchased. Costs associated with the product, Whirlpool Corporation or Whirlpool Canada LP (hereafter "Whirlpool") will pay for Factory Specified Parts and repair labor to correct defects in which it is used in the country in materials or workmanship...


