
Installation Instructions
Page 2
... that all governing codes and ordinances. Check existing electrical supply. It is approved. When installing cooktop, use over an undercounter built-in these Installation Instructions. Model/serial rating plate 2 I When installing cooktop over an undercounter built-in undercounter use and proper cutout dimensions. See "Electrical Requirements." Check the cooktop base for correct installation. Given dimensions are...
... that all governing codes and ordinances. Check existing electrical supply. It is approved. When installing cooktop, use over an undercounter built-in these Installation Instructions. Model/serial rating plate 2 I When installing cooktop over an undercounter built-in undercounter use and proper cutout dimensions. See "Electrical Requirements." Check the cooktop base for correct installation. Given dimensions are...

Installation Instructions
Page 3
... countertop NOTES: After making the countertop cutout, some installations may require notching down the base cabinet side walls to follow hood instructions for dimensional clearances above cooktop L. 1½" (3.8 cm) max. If installing a hood above the cooktop, follow these instructions can result in death, fire, or electrical shock. Electrically ground cooktop. Electrically ground cooktop. Use 8 gauge copper wire. counter...
... countertop NOTES: After making the countertop cutout, some installations may require notching down the base cabinet side walls to follow hood instructions for dimensional clearances above cooktop L. 1½" (3.8 cm) max. If installing a hood above the cooktop, follow these instructions can result in death, fire, or electrical shock. Electrically ground cooktop. Electrically ground cooktop. Use 8 gauge copper wire. counter...
Installation Instructions
Page 5
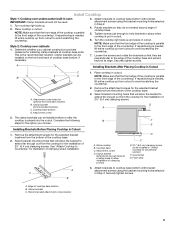
...the attachment screws for the selected bracket locations from the bottom of cooktop base bottom B. B F E A. Cooktop base C. Edge of the cooktop base. 2. Turn cooktop right side up and place in cutout. 6. Determine whether your cabinet construction provides clearance for optional front ...NOTE: Make sure that will allow the bracket to Countertop" for the option you choose. Installing Brackets Before Placing Cooktop in Cutout C 1. See "Attach Cooktop to extend far enough out from the bottom of clamping screw installation. Foam strip 4. Securely tighten screws. A....
...the attachment screws for the selected bracket locations from the bottom of cooktop base bottom B. B F E A. Cooktop base C. Edge of the cooktop base. 2. Turn cooktop right side up and place in cutout. 6. Determine whether your cabinet construction provides clearance for optional front ...NOTE: Make sure that will allow the bracket to Countertop" for the option you choose. Installing Brackets Before Placing Cooktop in Cutout C 1. See "Attach Cooktop to extend far enough out from the bottom of clamping screw installation. Foam strip 4. Securely tighten screws. A....