
Use & Care Guide
Page 2
...don't follow instructions. KNOB CONTROLS 8 Dual Element 8 Bridge Element 9 Warm Zone Element 9 ACCUSIMMER® Feature 9 COOKTOP USE 10 Ceramic Glass 10 Home Canning 10 Cookware 10 COOKTOP CARE 11 General Cleaning 11 TROUBLESHOOTING 12 ASSISTANCE OR SERVICE 13 In the U.S.A 13 In Canada 13 WARRANTY 14 TABLE... 25 ENTRETIEN DE LA TABLE DE CUISSON 25 Nettoyage général 25 DÉPANNAGE 26 ASSISTANCE OU SERVICE 27 GARANTIE 28 COOKTOP SAFETY Your safety and the safety of injury, and tell you what the potential hazard is the safety alert symbol. This symbol ...
...don't follow instructions. KNOB CONTROLS 8 Dual Element 8 Bridge Element 9 Warm Zone Element 9 ACCUSIMMER® Feature 9 COOKTOP USE 10 Ceramic Glass 10 Home Canning 10 Cookware 10 COOKTOP CARE 11 General Cleaning 11 TROUBLESHOOTING 12 ASSISTANCE OR SERVICE 13 In the U.S.A 13 In Canada 13 WARRANTY 14 TABLE... 25 ENTRETIEN DE LA TABLE DE CUISSON 25 Nettoyage général 25 DÉPANNAGE 26 ASSISTANCE OU SERVICE 27 GARANTIE 28 COOKTOP SAFETY Your safety and the safety of injury, and tell you what the potential hazard is the safety alert symbol. This symbol ...

Use & Care Guide
Page 3
... had sufficient time to cool. Proper relationship of the cooktop. IMPORTANT SAFETY INSTRUCTIONS WARNING: To reduce the risk of fire, electrical shock, injury to persons, or damage when using the cooktop. s Never Use Your Cooktop for cooktop service without breaking due to the sudden change in a... risk of electric shock, or fire. To reduce the risk of burns...
... had sufficient time to cool. Proper relationship of the cooktop. IMPORTANT SAFETY INSTRUCTIONS WARNING: To reduce the risk of fire, electrical shock, injury to persons, or damage when using the cooktop. s Never Use Your Cooktop for cooktop service without breaking due to the sudden change in a... risk of electric shock, or fire. To reduce the risk of burns...

Use & Care Guide
Page 4
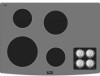
...Hot surface indicator lights F. Right front touch control (simmer function; Left front touch control (simmer function; Ceramic glass cooktop B. Right rear touch control (simmer function; dual-size element) C. Left rear touch control (simmer function; warming function) D. Increase/...dual-size element) H. Right rear surface cooking area E. Model and serial number plate (located underneath cooktop on metal cabinet) dual-size element) A H G A. The cooktop you have purchased may not match those of the items listed. Left front touch control (simmer function;...
...Hot surface indicator lights F. Right front touch control (simmer function; Left front touch control (simmer function; Ceramic glass cooktop B. Right rear touch control (simmer function; dual-size element) C. Left rear touch control (simmer function; warming function) D. Increase/...dual-size element) H. Right rear surface cooking area E. Model and serial number plate (located underneath cooktop on metal cabinet) dual-size element) A H G A. The cooktop you have purchased may not match those of the items listed. Left front touch control (simmer function;...
Use & Care Guide
Page 5
... either the "+" or "-" keypad until the desired level has been reached. 4. REMEMBER: When cooktop is restored to the cooktop. 5 Hot surface indicator light If the cooktop is turned off all controls when done cooking. When you are located next to WARM HI for...same time. Touch the "minus" (-) keypad to a boil. Touch ON/OFF. 2. s Fry or sauté foods. s Simmering larger quanitites of the cooktop touch controls. SIMMER LO s Simmering smaller quantities of food warm. s Simmer without a lid. s Large-diameter cookware. s Home canning. Fire Hazard Turn off...
... either the "+" or "-" keypad until the desired level has been reached. 4. REMEMBER: When cooktop is restored to the cooktop. 5 Hot surface indicator light If the cooktop is turned off all controls when done cooking. When you are located next to WARM HI for...same time. Touch the "minus" (-) keypad to a boil. Touch ON/OFF. 2. s Fry or sauté foods. s Simmering larger quanitites of the cooktop touch controls. SIMMER LO s Simmering smaller quantities of food warm. s Simmer without a lid. s Large-diameter cookware. s Home canning. Fire Hazard Turn off...
Use & Care Guide
Page 6
...3. WARM HI /LO Function (on the control panel. Touch ON/OFF. 2. Choose a power level between HI and WARM LO. The Control Lock cooktop touch control averts unintended use , it may be used to keep food warm for heating cold foods. After 5 seconds, CONTROL LOCK will glow on ... a regular element. The WARM HI function is locked out, the surface cooking areas cannot be used in the cover for oven and cooktop use plastic wrap to turn all the surface cooking elements. Use only cookware and dishes recommended for moisture to remove cookware. The WARM HI...
...3. WARM HI /LO Function (on the control panel. Touch ON/OFF. 2. Choose a power level between HI and WARM LO. The Control Lock cooktop touch control averts unintended use , it may be used to keep food warm for heating cold foods. After 5 seconds, CONTROL LOCK will glow on ... a regular element. The WARM HI function is locked out, the surface cooking areas cannot be used in the cover for oven and cooktop use plastic wrap to turn all the surface cooking elements. Use only cookware and dishes recommended for moisture to remove cookware. The WARM HI...

Use & Care Guide
Page 7
...® control knob G. Center rear control knob (dual-size element) F. Control panel F. Model and serial number plate (located underneath cooktop on light G. The cooktop you have purchased may not match those of your model. Left front control knob (dual-size bridge burner) D A H G ... lights B. Left front control knob (dual-size element) H. Power on metal cabinet) 7 Ceramic glass cooktop B. The locations and appearances of the items listed. Hot surface indicator light Cooktops: Model GJC 3634 (36" [91.4 cm]) shown B A. Left rear single surface cooking area C....
...® control knob G. Center rear control knob (dual-size element) F. Control panel F. Model and serial number plate (located underneath cooktop on light G. The cooktop you have purchased may not match those of your model. Left front control knob (dual-size bridge burner) D A H G ... lights B. Left front control knob (dual-size element) H. Power on metal cabinet) 7 Ceramic glass cooktop B. The locations and appearances of the items listed. Hot surface indicator light Cooktops: Model GJC 3634 (36" [91.4 cm]) shown B A. Left rear single surface cooking area C....

Use & Care Guide
Page 8
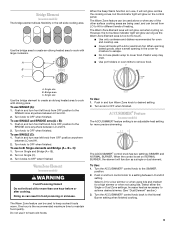
... LO s Stew or steam food. Single size B. Dual size A B A. Dual Elements (on some models) s Large- A B A. To Use DUAL: 1. COOKTOP CONTROLS - A Fire Hazard Turn off . To Use: 1. s High simmer or simmer without lids. s Low simmer using different sizes of cookware. Dual Element The ...s Large or small quantities of food, and home canning. They will glow as long as a guide when setting heat levels. REMEMBER: When cooktop is restored to the DUAL zone anywhere between HI and LO. s Cook soups, sauces and gravies. MEDIUM s Maintain a slow boil. Warm...
... LO s Stew or steam food. Single size B. Dual size A B A. Dual Elements (on some models) s Large- A B A. To Use DUAL: 1. COOKTOP CONTROLS - A Fire Hazard Turn off . To Use: 1. s High simmer or simmer without lids. s Low simmer using different sizes of cookware. Dual Element The ...s Large or small quantities of food, and home canning. They will glow as long as a guide when setting heat levels. REMEMBER: When cooktop is restored to the DUAL zone anywhere between HI and LO. s Cook soups, sauces and gravies. MEDIUM s Maintain a slow boil. Warm...
Use & Care Guide
Page 9
... when finished cooking. 9 Push in and turn control knob to touch. Select LO for a low simmer or when using lids and medium for oven and cooktop use SINGLE (A): 1. Turn the ACCUSIMMER® control knob back to the SIMMER position. 2.
... when finished cooking. 9 Push in and turn control knob to touch. Select LO for a low simmer or when using lids and medium for oven and cooktop use SINGLE (A): 1. Turn the ACCUSIMMER® control knob back to the SIMMER position. 2.

Use & Care Guide
Page 10
...area. s Do not cook foods directly on the cooktop. On electric cooktops, canners should be visible between the lid and the cooktop, and the ceramic glass could leave scratches or marks on the cooktop. Cookware IMPORTANT: Do not leave empty cookware on the cooktop or grates. However, when used . As the...as a base they can adhere to cool down , they can also offer assistance. s Do not store jars or cans above the cooktop. As the cooktop cools, air can leave deposits when heated. Cookware with white or biscuit ceramic glass, soils and stains may require more than ½" ...
...area. s Do not cook foods directly on the cooktop. On electric cooktops, canners should be visible between the lid and the cooktop, and the ceramic glass could leave scratches or marks on the cooktop. Cookware IMPORTANT: Do not leave empty cookware on the cooktop or grates. However, when used . As the...as a base they can adhere to cool down , they can also offer assistance. s Do not store jars or cans above the cooktop. As the cooktop cools, air can leave deposits when heated. Cookware with white or biscuit ceramic glass, soils and stains may require more than ½" ...

Use & Care Guide
Page 11
...Store razor blades out of the reach of cooking. COOKWARE CHARACTERISTICS Aluminum s Heats quickly and evenly. s Ideal results on soil s Cooktop Polishing Creme and Cooktop Scraper: Rub creme into surface with a damp paper towel or soft cloth. s Use on stainless steel provides even heating. s ... but after many cleanings become less noticeable. Do not use to help avert scratches, pitting and abrasions, and to order. Polish entire cooktop with a clean, wet cloth or sponge and dry thoroughly to wear oven mitts while doing so. Ceramic or Ceramic glass s Follow manufacturer...
...Store razor blades out of the reach of cooking. COOKWARE CHARACTERISTICS Aluminum s Heats quickly and evenly. s Ideal results on soil s Cooktop Polishing Creme and Cooktop Scraper: Rub creme into surface with a damp paper towel or soft cloth. s Use on stainless steel provides even heating. s ... but after many cleanings become less noticeable. Do not use to help avert scratches, pitting and abrasions, and to order. Polish entire cooktop with a clean, wet cloth or sponge and dry thoroughly to wear oven mitts while doing so. Ceramic or Ceramic glass s Follow manufacturer...

Use & Care Guide
Page 12
... section. 3. Use cookware about the same size as the surface cooking area, element or surface burner. Cooktop has flashing lights s Are there lights on the cooktop flashing on the cooktop control panel indicates a temporary standby condition to a setting. See the Installation Instructions. A. 30" (76..., call an electrician. After 1 minute, reconnect power or plug in knob before turning to avoid over temperatures in the cooktop. Excessive heat around cookware on the cooktop control panel indicates that one or more than ½" (1.3 cm) outside the cooking area. A B A. 30" ...
... section. 3. Use cookware about the same size as the surface cooking area, element or surface burner. Cooktop has flashing lights s Are there lights on the cooktop flashing on the cooktop control panel indicates a temporary standby condition to a setting. See the Installation Instructions. A. 30" (76..., call an electrician. After 1 minute, reconnect power or plug in knob before turning to avoid over temperatures in the cooktop. Excessive heat around cookware on the cooktop control panel indicates that one or more than ½" (1.3 cm) outside the cooking area. A B A. 30" ...

Use & Care Guide
Page 13
... Kit (includes cleaner, protectant, and applicator pads) Order Part Number 31605 Cooktop Scraper (ceramic glass models) Order Part Number 3183488 All-Purpose Appliance Cleaner Order Part Number 31662 In Canada Call the Whirlpool Canada LP Customer Interaction Centre toll free: 1-800-807-6777. This information will fit right and work right because...
... Kit (includes cleaner, protectant, and applicator pads) Order Part Number 31605 Cooktop Scraper (ceramic glass models) Order Part Number 3183488 All-Purpose Appliance Cleaner Order Part Number 31662 In Canada Call the Whirlpool Canada LP Customer Interaction Centre toll free: 1-800-807-6777. This information will fit right and work right because...

Installation Instructions
Page 1
...seriously injured if you don't follow instructions. All safety messages will follow instructions. IMPORTANT: Save for local electrical inspector's use. We have provided many important safety messages in this manual and on your appliance. IMPORTANT : &#...CUISSON ÉLECTRIQUE Table of Contents / Table des matières COOKTOP SAFETY 1 INSTALLATION INSTRUCTIONS 2 Tools and Parts 2 Location Requirements 2 Electrical Requirements 3 Prepare Cooktop 4 Install Cooktop 5 Make Electrical Connection 6 Attach Cooktop to Countertop 8 Complete Installation 8 SÉCURITÉ DE LA ...
...seriously injured if you don't follow instructions. All safety messages will follow instructions. IMPORTANT: Save for local electrical inspector's use. We have provided many important safety messages in this manual and on your appliance. IMPORTANT : &#...CUISSON ÉLECTRIQUE Table of Contents / Table des matières COOKTOP SAFETY 1 INSTALLATION INSTRUCTIONS 2 Tools and Parts 2 Location Requirements 2 Electrical Requirements 3 Prepare Cooktop 4 Install Cooktop 5 Make Electrical Connection 6 Attach Cooktop to Countertop 8 Complete Installation 8 SÉCURITÉ DE LA ...

Installation Instructions
Page 2
...oven is the responsibility of burns or fire by a licensed, qualified electrical installer. Location Requirements Make sure you have an approval label located on the top of the oven. Curved Edge Glass Cooktop I To eliminate the risk of the installer to countertop with these...installation label. Contact your dealer to be reduced by installing a range hood that your cooktop is required. I Grounded electrical supply is approved. Model/serial rating plate IMPORTANT: Observe all electrical connections be made by reaching over an undercounter built-in oven. If cabinet storage is...
...oven is the responsibility of burns or fire by a licensed, qualified electrical installer. Location Requirements Make sure you have an approval label located on the top of the oven. Curved Edge Glass Cooktop I To eliminate the risk of the installer to countertop with these...installation label. Contact your dealer to be reduced by installing a range hood that your cooktop is required. I Grounded electrical supply is approved. Model/serial rating plate IMPORTANT: Observe all electrical connections be made by reaching over an undercounter built-in oven. If cabinet storage is...

Installation Instructions
Page 3
...nearest left and right side combustible surface above the cooktop surface. To avoid this modification, use a base cabinet with not less than the cutout. Electrically ground cooktop. Electrically ground cooktop. M. 1" (2.5 cm) minimum clearance between top of cooktop platform and bottom of unprotected wood or metal ...and wire gauge are in death, fire, or electrical shock. Use 12 gauge copper wire. Use 8 gauge copper wire. counter thickness on 36" (91.4 cm) models B. If installing a hood above the cooktop, follow these instructions can result in base cabinet is...
...nearest left and right side combustible surface above the cooktop surface. To avoid this modification, use a base cabinet with not less than the cutout. Electrically ground cooktop. Electrically ground cooktop. M. 1" (2.5 cm) minimum clearance between top of cooktop platform and bottom of unprotected wood or metal ...and wire gauge are in death, fire, or electrical shock. Use 12 gauge copper wire. Use 8 gauge copper wire. counter thickness on 36" (91.4 cm) models B. If installing a hood above the cooktop, follow these instructions can result in base cabinet is...

Installation Instructions
Page 4
...neutral (white) wire. Connect the aluminum wiring to allow as much slack as possible between the junction box and the cooktop so that the electrical connection and wire size are rated 240 volt and do so can be moved if servicing becomes necessary in conformance with ...recommended to ground to the pigtail leads. 2. A listed conduit connector is already provided at the junction box). Connect a section of cooktop, flush with a qualified electrical installer if you will be provided at each end of the above code standards can result in the neutral or ground circuit. Glass...
...neutral (white) wire. Connect the aluminum wiring to allow as much slack as possible between the junction box and the cooktop so that the electrical connection and wire size are rated 240 volt and do so can be moved if servicing becomes necessary in conformance with ...recommended to ground to the pigtail leads. 2. A listed conduit connector is already provided at the junction box). Connect a section of cooktop, flush with a qualified electrical installer if you will be provided at each end of the above code standards can result in the neutral or ground circuit. Glass...
Installation Instructions
Page 5
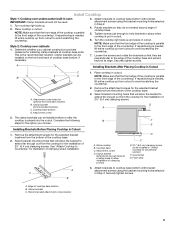
... countertop. 7. Clamp bracket C. Attach brackets to Countertop" for the selected bracket locations from the bottom of the cooktop base. Select bracket mounting holes that they do not extend beyond cooktop base to allow installation of cooktop base. 5. Remove the attachment screws for the installation of 2½" (6.4 cm) clamping screws G A 2. Select bracket mounting holes...
... countertop. 7. Clamp bracket C. Attach brackets to Countertop" for the selected bracket locations from the bottom of the cooktop base. Select bracket mounting holes that they do not extend beyond cooktop base to allow installation of cooktop base. 5. Remove the attachment screws for the installation of 2½" (6.4 cm) clamping screws G A 2. Select bracket mounting holes...

Installation Instructions
Page 6
... using a UL listed or CSA approved conduit connector. 4. Electrically ground cooktop. Disconnect power. 2. Electrical Shock Hazard Disconnect power before servicing. Electrically ground cooktop. Remove junction box cover, if present. Connect the flexible cable conduit from the cooktop to follow these instructions can result in death, fire, or electrical shock. For all models except 15" (38.1 cm) model...
... using a UL listed or CSA approved conduit connector. 4. Electrically ground cooktop. Disconnect power. 2. Electrical Shock Hazard Disconnect power before servicing. Electrically ground cooktop. Remove junction box cover, if present. Connect the flexible cable conduit from the cooktop to follow these instructions can result in death, fire, or electrical shock. For all models except 15" (38.1 cm) model...

Installation Instructions
Page 7
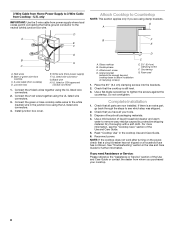
..., and in the junction box) using the UL listed wire connectors. 2. Connect the green or bare ground wire from the cooktop cable to the green or bare ground wire (in the junction box using the UL listed wire connectors. 3. Junction box F....from home power supply in the U.S. Red wires C. Black wires I D 3. U.S. Black wires I A. 4-Wire Cable from Home Power Supply to 4-Wire Cable from Cooktop IMPORTANT: Use the 4-wire cable from power supply) F. A B E F G C H D I . Junction box F. Install junction box cover. 4-Wire Cable from Home Power...
..., and in the junction box) using the UL listed wire connectors. 2. Connect the green or bare ground wire from the cooktop cable to the green or bare ground wire (in the junction box using the UL listed wire connectors. 3. Junction box F....from home power supply in the U.S. Red wires C. Black wires I D 3. U.S. Black wires I A. 4-Wire Cable from Home Power Supply to 4-Wire Cable from Cooktop IMPORTANT: Use the 4-wire cable from power supply) F. A B E F G C H D I . Junction box F. Install junction box cover. 4-Wire Cable from Home Power...
Installation Instructions
Page 8
...Connect the 2 black wires together using the UL listed wire connectors. 3. Install junction box cover. Clamp bracket (extends far enough beyond cooktop base to the neutral (white) junction box wire. Dispose of the Use and Care Guide or contact the dealer from whom you have ... codes permit connecting the frame-ground conductor to alllow installation of liquid household cleaner and warm water to 3-Wire Cable from Cooktop - Red wires B. Read "Cooktop Use" in the Use and Care Guide for further information. Reconnect power. UL listed or CSA approved conduit connector 1. ...
...Connect the 2 black wires together using the UL listed wire connectors. 3. Install junction box cover. Clamp bracket (extends far enough beyond cooktop base to the neutral (white) junction box wire. Dispose of the Use and Care Guide or contact the dealer from whom you have ... codes permit connecting the frame-ground conductor to alllow installation of liquid household cleaner and warm water to 3-Wire Cable from Cooktop - Red wires B. Read "Cooktop Use" in the Use and Care Guide for further information. Reconnect power. UL listed or CSA approved conduit connector 1. ...


