
Dimension Guide
Page 1
...58.4 cm) max. cabinet width B. 1¹⁄₂" (3.8 cm) min. cutout height Because Whirlpool Corporation policy includes a continuous commitment to change without cooktop installed above) A B E D C A. 27" (68.6 cm) min. W10192049B 09-05-08 A UL-listed or CSAapproved conduit connector must be...240 volts (5.5 to top of conduit provided is recommended. ® 27" (68.6 CM) ELECTRIC SINGLE AND DOUBLE BUILT-IN OVEN PRODUCT MODEL SERIES GBD279PV GBS279PV RBD275PV RBD277PV RBS275PV RBS277PV Electrical Requirements: Oven must be connected to the pigtail leads. 2. ...
...58.4 cm) max. cabinet width B. 1¹⁄₂" (3.8 cm) min. cutout height Because Whirlpool Corporation policy includes a continuous commitment to change without cooktop installed above) A B E D C A. 27" (68.6 cm) min. W10192049B 09-05-08 A UL-listed or CSAapproved conduit connector must be...240 volts (5.5 to top of conduit provided is recommended. ® 27" (68.6 CM) ELECTRIC SINGLE AND DOUBLE BUILT-IN OVEN PRODUCT MODEL SERIES GBD279PV GBS279PV RBD275PV RBD277PV RBS275PV RBS277PV Electrical Requirements: Oven must be connected to the pigtail leads. 2. ...

Dimension Guide
Page 2
...minimum of 2" (5.1 cm) is drilled on the bottom of 194°F (90°C). See Cutout Dimensions chart. CUTOUT DIMENSIONS Oven Size 24" (61 cm) 27" (68.6 cm) 30" (76.2 cm) 36" (91.4 cm) Oven Cutout Dimension 22¹⁄₂" (57.2 cm) 25¹⁄₂" (...64.8 cm) 28½" (72.4 cm) 34¹⁄₂" (87.6 cm) For the approved model number combinations, refer to the undersink water filter. Approved Built-In Oven and Electric Cooktop Combinations A B C D E C F G H A. 24" (61 cm) cabinet depth...
...minimum of 2" (5.1 cm) is drilled on the bottom of 194°F (90°C). See Cutout Dimensions chart. CUTOUT DIMENSIONS Oven Size 24" (61 cm) 27" (68.6 cm) 30" (76.2 cm) 36" (91.4 cm) Oven Cutout Dimension 22¹⁄₂" (57.2 cm) 25¹⁄₂" (...64.8 cm) 28½" (72.4 cm) 34¹⁄₂" (87.6 cm) For the approved model number combinations, refer to the undersink water filter. Approved Built-In Oven and Electric Cooktop Combinations A B C D E C F G H A. 24" (61 cm) cabinet depth...

Dimension Guide
Page 3
... Cutout Dimension 22¹⁄₂" (57.2 cm) 25¹⁄₂" (64.8 cm) 28½" (72.4 cm) For the approved model number combinations, refer to the undercounter label located on top of the side wall surface to pass the appliance cable through to countertop G. 3⁵⁄...;₈" (9.2 cm) from floor H. E. 27¾" (70.5 cm) minimum cutout height F. 36" (91.4 cm) from cabinet base to the undersink water filter. A 1" (2.5 cm) minimum diameter...
... Cutout Dimension 22¹⁄₂" (57.2 cm) 25¹⁄₂" (64.8 cm) 28½" (72.4 cm) For the approved model number combinations, refer to the undercounter label located on top of the side wall surface to pass the appliance cable through to countertop G. 3⁵⁄...;₈" (9.2 cm) from floor H. E. 27¾" (70.5 cm) minimum cutout height F. 36" (91.4 cm) from cabinet base to the undersink water filter. A 1" (2.5 cm) minimum diameter...

Dimension Guide
Page 4
On models with Steam-Assist, it is drilled on each side. Gas line through to the undersink water filter. See Cutout Dimensions chart. CUTOUT DIMENSIONS Oven Size 24" (61 cm) 27" (68.6 cm) 30" (76.2 cm) 36" (91.4 cm) Oven Cutout Dimension 22¹⁄₂" (57.2 cm) 25¹⁄&#...8322;" (64.8 cm) 28½" (72.4 cm) 34¹⁄₂" (87.6 cm) For the approved model number combination refer to the undercounter label...
On models with Steam-Assist, it is drilled on each side. Gas line through to the undersink water filter. See Cutout Dimensions chart. CUTOUT DIMENSIONS Oven Size 24" (61 cm) 27" (68.6 cm) 30" (76.2 cm) 36" (91.4 cm) Oven Cutout Dimension 22¹⁄₂" (57.2 cm) 25¹⁄&#...8322;" (64.8 cm) 28½" (72.4 cm) 34¹⁄₂" (87.6 cm) For the approved model number combination refer to the undercounter label...

Installation Instructions
Page 2
...; Grounded electrical supply is the safety alert symbol. Given dimensions provide minimum clearance with cooktop installed above): Ovens approved for this manual and on some models) ■ Two # 8-18 x ³⁄₈" screws - otherwise, the oven will follow instructions. Refer to support a single oven weight of 154 lbs (70 kg) or...
...; Grounded electrical supply is the safety alert symbol. Given dimensions provide minimum clearance with cooktop installed above): Ovens approved for this manual and on some models) ■ Two # 8-18 x ³⁄₈" screws - otherwise, the oven will follow instructions. Refer to support a single oven weight of 154 lbs (70 kg) or...

Installation Instructions
Page 3
... 71.9 cm) max. Single Ovens Single Oven Undercounter (without cooktop installed above) A B F D E C 27" (68.6 cm) models A. 27" (68.6 cm) min. Double Ovens A E D C 27" (68.6 cm) models A. 27" (68.6 cm) min. overall height C. 26³⁄₄" (67.9 cm) overall width D. 23" (58.4 cm) max. ...of cutout to bottom of upper cabinet door C. 32" (81.3 cm) bottom of cabinet door F. 27³⁄₄" (70.5 cm) cutout height Product Dimensions - cutout height B E D C 27" (68.6 cm) models A. 25 64.3 cm) max. recessed width B. 51" (129.5 cm) max. Single Ovens A...
... 71.9 cm) max. Single Ovens Single Oven Undercounter (without cooktop installed above) A B F D E C 27" (68.6 cm) models A. 27" (68.6 cm) min. Double Ovens A E D C 27" (68.6 cm) models A. 27" (68.6 cm) min. overall height C. 26³⁄₄" (67.9 cm) overall width D. 23" (58.4 cm) max. ...of cutout to bottom of upper cabinet door C. 32" (81.3 cm) bottom of cabinet door F. 27³⁄₄" (70.5 cm) cutout height Product Dimensions - cutout height B E D C 27" (68.6 cm) models A. 25 64.3 cm) max. recessed width B. 51" (129.5 cm) max. Single Ovens A...

Installation Instructions
Page 4
... C 27" (68.6 cm) models A. 27" (68.6 cm) min. cabinet width B. 1" (2.5 cm) top of cutout to the proper electrical voltage and frequency as specified on the model/serial number rating plate. Be sure that the ground path and the wire gauge are in accordance with local codes. The model/serial ...National Fire Protection Association One Batterymarch Park Quincy, MA 02269 CSA International 8501 East Pleasant Valley Road Cleveland, OH 44131-5575 Single Oven A. Model/serial number plate 4 bottom of cutout to top of cutout to floor D. 28¹⁄₂" (72.4 cm) cutout width ...
... C 27" (68.6 cm) models A. 27" (68.6 cm) min. cabinet width B. 1" (2.5 cm) top of cutout to the proper electrical voltage and frequency as specified on the model/serial number rating plate. Be sure that the ground path and the wire gauge are in accordance with local codes. The model/serial ...National Fire Protection Association One Batterymarch Park Quincy, MA 02269 CSA International 8501 East Pleasant Valley Road Cleveland, OH 44131-5575 Single Oven A. Model/serial number plate 4 bottom of cutout to top of cutout to floor D. 28¹⁄₂" (72.4 cm) cutout width ...

Installation Instructions
Page 5
...connector must conform with both hands to installation. Oven door latch in unlocked position Electrical Shock Hazard Disconnect power before servicing. ■ Models rated from inside the bag containing literature. 5. Locate existing wiring to the pigtail leads. 2. Do not use handle or any ...practices. Remove the hardware package from 7.3 to 9.6 kW at 240 volts (5.5 to aluminum. Remove the cable tie from inside the oven. 6. Models rated at 7.2 kW and below at 240 volts (5.4 kW and below : 1. NOTE: Screws for attaching side trims (after oven is for the...
...connector must conform with both hands to installation. Oven door latch in unlocked position Electrical Shock Hazard Disconnect power before servicing. ■ Models rated from inside the bag containing literature. 5. Locate existing wiring to the pigtail leads. 2. Do not use handle or any ...practices. Remove the hardware package from 7.3 to 9.6 kW at 240 volts (5.5 to aluminum. Remove the cable tie from inside the oven. 6. Models rated at 7.2 kW and below at 240 volts (5.4 kW and below : 1. NOTE: Screws for attaching side trims (after oven is for the...

Installation Instructions
Page 7
...fasten vent securely to grip. AB 2. Push against seal area of the oven. Oven vent 7. B Failure to move and install oven. Insert screw. 6. On models with shipping feet, use a Phillips screwdriver to cabinet using the # 8-14 x 1" screws (2 for single oven, 4 for each trim piece upward onto oven .... Insert the screws through holes in back or other injury. 1. Vent tab C. # 8-18 x ³⁄₈" screw D. A. On some models, the oven vent is taped to the side of front frame to install. ■ Insert the vent tabs (B) into cabinet until shipping feet almost contact...
...fasten vent securely to grip. AB 2. Push against seal area of the oven. Oven vent 7. B Failure to move and install oven. Insert screw. 6. On models with shipping feet, use a Phillips screwdriver to cabinet using the # 8-14 x 1" screws (2 for single oven, 4 for each trim piece upward onto oven .... Insert the screws through holes in back or other injury. 1. Vent tab C. # 8-18 x ³⁄₈" screw D. A. On some models, the oven vent is taped to the side of front frame to install. ■ Insert the vent tabs (B) into cabinet until shipping feet almost contact...
Owners Manual
Page 2
... par convection 24 Cuisson minutée 25 ENTRETIEN DU FOUR 26 Programme d'autonettoyage (sur certains modèles 26 Nettoyage général 27 Lampes du four 28 Porte du four 28 DÉPANNAGE 29 ASSISTANCE OU SERVICE 30 GARANTIE 31 OVEN SAFETY Your safety and the safety of... Cooking 11 OVEN CARE 12 Self-Cleaning Cycle (on your appliance. We have provided many important safety messages in this manual and on some models 12 General Cleaning 13 Oven Lights 14 Oven Door 14 TROUBLESHOOTING 15 ASSISTANCE OR SERVICE 16 WARRANTY 17 TABLE DES MATIÈRES SÉCURIT...
... par convection 24 Cuisson minutée 25 ENTRETIEN DU FOUR 26 Programme d'autonettoyage (sur certains modèles 26 Nettoyage général 27 Lampes du four 28 Porte du four 28 DÉPANNAGE 29 ASSISTANCE OU SERVICE 30 GARANTIE 31 OVEN SAFETY Your safety and the safety of... Cooking 11 OVEN CARE 12 Self-Cleaning Cycle (on your appliance. We have provided many important safety messages in this manual and on some models 12 General Cleaning 13 Oven Lights 14 Oven Door 14 TROUBLESHOOTING 15 ASSISTANCE OR SERVICE 16 WARRANTY 17 TABLE DES MATIÈRES SÉCURIT...
Owners Manual
Page 4
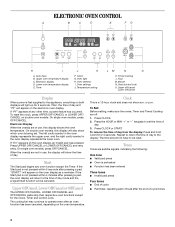
...not have to set . Hour M. If "PF" appears at any oven function except the Timer. On double oven models, this display shows the oven temperature. If "Err" appears on double oven models. On single oven models, press OFF/CANCEL. Press the HOUR or MIN "+" or "-" keypads to be canceled. Auto clean B. Timer J...To reset the clock, press UPPER OFF/CANCEL or LOWER OFF/ CANCEL on the oven display, an invalid pad was pressed. On single oven models, press OFF/CANCEL. Electronic Display When the oven(s) are off /cancel Display When power is first supplied to return the time of day mode ...
...not have to set . Hour M. If "PF" appears at any oven function except the Timer. On double oven models, this display shows the oven temperature. If "Err" appears on double oven models. On single oven models, press OFF/CANCEL. Press the HOUR or MIN "+" or "-" keypads to be canceled. Auto clean B. Timer J...To reset the clock, press UPPER OFF/CANCEL or LOWER OFF/ CANCEL on the oven display, an invalid pad was pressed. On single oven models, press OFF/CANCEL. Electronic Display When the oven(s) are off /cancel Display When power is first supplied to return the time of day mode ...
Owners Manual
Page 5
..." and "NA9 OFF." When the control is taken after 4 minutes, the electronic oven display will sound. Use the following chart as a guide. On double oven models only, press UPPER OVEN or LOWER OVEN. 3. Fahrenheit and Celsius The temperature is preset unlocked, but can be turned off. To Set: 1. All Tones All...
..." and "NA9 OFF." When the control is taken after 4 minutes, the electronic oven display will sound. Use the following chart as a guide. On double oven models only, press UPPER OVEN or LOWER OVEN. 3. Fahrenheit and Celsius The temperature is preset unlocked, but can be turned off. To Set: 1. All Tones All...

Owners Manual
Page 7
...set temperature is open when baking and roasting. 2. A meat thermometer is under 170°F (77°C). Oven vent C. On double oven models only, press UPPER OVEN or LOWER OVEN. Close oven door. Press BAKE. A preheat time will count down . "PrE" and the time ... conditioning time ends, a tone will sound and the selected temperature will not. Follow manufacturer's directions for optimal cooking results. B A. Meat Thermometer On models without a temperature probe, use . 7 When the set between 170°F and 500°F (77°C and 260°C). 3. The bake ...
...set temperature is open when baking and roasting. 2. A meat thermometer is under 170°F (77°C). Oven vent C. On double oven models only, press UPPER OVEN or LOWER OVEN. Close oven door. Press BAKE. A preheat time will count down . "PrE" and the time ... conditioning time ends, a tone will sound and the selected temperature will not. Follow manufacturer's directions for optimal cooking results. B A. Meat Thermometer On models without a temperature probe, use . 7 When the set between 170°F and 500°F (77°C and 260°C). 3. The bake ...

Owners Manual
Page 8
The lower the temperature, the slower the cooking. On double oven models only, press UPPER OVEN or LOWER OVEN. 2. A. Press START. If the oven door is opened during broiling, the broil element will turn food to cook ... to stop position before putting in food, unless recommended in the center of the pan may be adjusted for Part Number 4396923. On double oven models only, press UPPER OVEN or LOWER OVEN. 2. Pork chops 1" (2.5 cm) thick 4 Ham slice, precooked ¹ ₂" (1.25 cm) thick 4 Frankfurters 4 Lamb chops 1" (2.5 cm) thick 4 Chicken...
The lower the temperature, the slower the cooking. On double oven models only, press UPPER OVEN or LOWER OVEN. 2. A. Press START. If the oven door is opened during broiling, the broil element will turn food to cook ... to stop position before putting in food, unless recommended in the center of the pan may be adjusted for Part Number 4396923. On double oven models only, press UPPER OVEN or LOWER OVEN. 2. Pork chops 1" (2.5 cm) thick 4 Ham slice, precooked ¹ ₂" (1.25 cm) thick 4 Frankfurters 4 Lamb chops 1" (2.5 cm) thick 4 Chicken...

Owners Manual
Page 9
...176;F (165°C). Failure to follow these instructions can result in burns. ■ Use a meat thermometer or the temperature probe (on some models) In a convection oven, the fan-circulated hot air continually distributes heat more evenly, crisping surfaces while sealing in moisture and yielding crustier breads. ... oven. The bake range can be set between 170°F and 500°F (75°C and 260°C). 9 Convection Cooking (on some models) to determine the doneness of meats and poultry. Most foods can be cooked by lowering cooking temperatures 25°F to 50°F (14°C...
...176;F (165°C). Failure to follow these instructions can result in burns. ■ Use a meat thermometer or the temperature probe (on some models) In a convection oven, the fan-circulated hot air continually distributes heat more evenly, crisping surfaces while sealing in moisture and yielding crustier breads. ... oven. The bake range can be set between 170°F and 500°F (75°C and 260°C). 9 Convection Cooking (on some models) to determine the doneness of meats and poultry. Most foods can be cooked by lowering cooking temperatures 25°F to 50°F (14°C...
Owners Manual
Page 11
... HOUR and MIN "+" or "-" keypads to enter the length of time to enter a temperature other than one hour before or after cooking. On double oven models only, when both upper and lower ovens are being used at a certain time of day, cook for a set length of time, and/or shut off..., the oven will shut off automatically and "End" will appear on the oven display. Press BAKE or CONVECT UPPER (on . Press START. On double oven models only, press UPPER OVEN or LOWER OVEN. 2. Doing so can result in oven more than the one displayed. 3. Press COOK TIME. 4. Timed Cooking WARNING If...
... HOUR and MIN "+" or "-" keypads to enter the length of time to enter a temperature other than one hour before or after cooking. On double oven models only, when both upper and lower ovens are being used at a certain time of day, cook for a set length of time, and/or shut off..., the oven will shut off automatically and "End" will appear on the oven display. Press BAKE or CONVECT UPPER (on . Press START. On double oven models only, press UPPER OVEN or LOWER OVEN. 2. Doing so can result in oven more than the one displayed. 3. Press COOK TIME. 4. Timed Cooking WARNING If...
Owners Manual
Page 12
... glass, do not apply a cool damp cloth to clean this area. Depending on some models, the temperature probe from the oven because it becomes heavily soiled. OVEN CARE Self-Cleaning Cycle (on some models) WARNING Prepare Oven: ■ Remove the broiler pan, grid, cookware and bakeware (not...for a good seal. ■ Wipe out any foil from the oven. This will not work during Self-Cleaning cycle. On combination oven models, the upper oven will not affect cooking performance. How the Cycle Works IMPORTANT: The heating and cooling of gloss, hairline cracks and popping ...
... glass, do not apply a cool damp cloth to clean this area. Depending on some models, the temperature probe from the oven because it becomes heavily soiled. OVEN CARE Self-Cleaning Cycle (on some models) WARNING Prepare Oven: ■ Remove the broiler pan, grid, cookware and bakeware (not...for a good seal. ■ Wipe out any foil from the oven. This will not work during Self-Cleaning cycle. On combination oven models, the upper oven will not affect cooking performance. How the Cycle Works IMPORTANT: The heating and cooling of gloss, hairline cracks and popping ...
Owners Manual
Page 13
... (on . Press AUTO CLEAN. Also, make sure the clock is closed completely or it will not lock and the cycle will automatically turn on some models) Cleaning Method: NOTE: To avoid damage to order. The start time is too high, the door will automatically lock. The door will automatically lock, and...
... (on . Press AUTO CLEAN. Also, make sure the clock is closed completely or it will not lock and the cycle will automatically turn on some models) Cleaning Method: NOTE: To avoid damage to order. The start time is too high, the door will automatically lock. The door will automatically lock, and...
Owners Manual
Page 15
...? See "Electronic Oven Control" section. ■ Has a delay start Self-Clean cycle been set correctly? See "Sabbath Mode" section. ■ On double oven models, is one oven self-cleaning? See "Clock" section. ■ Is the display showing a letter followed by a number? See "Baking and Roasting" section. &#...is self-cleaning the other oven cannot be set ? Clear the display. Display shows messages ■ Is the display showing "PF," "PF id=27" or "PF id=30"? See "Oven Temperature Control" section. ■ Was the oven preheated? Oven peeking releases oven heat and can result ...
...? See "Electronic Oven Control" section. ■ Has a delay start Self-Clean cycle been set correctly? See "Sabbath Mode" section. ■ On double oven models, is one oven self-cleaning? See "Clock" section. ■ Is the display showing a letter followed by a number? See "Baking and Roasting" section. &#...is self-cleaning the other oven cannot be set ? Clear the display. Display shows messages ■ Is the display showing "PF," "PF id=27" or "PF id=30"? See "Oven Temperature Control" section. ■ Was the oven preheated? Oven peeking releases oven heat and can result ...
Owners Manual
Page 16
...visit our website at : Customer eXperience Centre Whirlpool Canada LP 1901 Minnesota Court Mississauga, Ontario L5N 3A7 Please include a daytime phone number in your appliance. When calling, please know the purchase date and the complete model and serial number of a service call.... repair parts sales. ■ Referrals to Whirlpool Canada LP with : ■ Features and specifications on "Parts & Accessories." Call the Whirlpool Customer eXperience Center toll free: 1-800-253-1301. Stainless Steel Cleaner and Polish (stainless steel models) Order Part Number 31462 Broiler Pan and Grid...
...visit our website at : Customer eXperience Centre Whirlpool Canada LP 1901 Minnesota Court Mississauga, Ontario L5N 3A7 Please include a daytime phone number in your appliance. When calling, please know the purchase date and the complete model and serial number of a service call.... repair parts sales. ■ Referrals to Whirlpool Canada LP with : ■ Features and specifications on "Parts & Accessories." Call the Whirlpool Customer eXperience Center toll free: 1-800-253-1301. Stainless Steel Cleaner and Polish (stainless steel models) Order Part Number 31462 Broiler Pan and Grid...


