
Dimension Guide
Page 1
... height Because Whirlpool Corporation policy includes a continuous commitment to improve Dimensions are for joining copper to floor D. 25¹⁄₂" (64.8 cm) cutout width E. 27³⁄₄" (70.5 cm) min. Ref. ® 27" (68.6 CM) ELECTRIC SINGLE AND DOUBLE BUILT-IN OVEN PRODUCT MODEL ... local codes and industry-accepted wiring practices. cabinet width B. 1¹⁄₂" (3.8 cm) min. For complete details, see Installation our products, we reserve the right to the added section of copper wire using special connectors and/or tools designed and UL-listed...
... height Because Whirlpool Corporation policy includes a continuous commitment to improve Dimensions are for joining copper to floor D. 25¹⁄₂" (64.8 cm) cutout width E. 27³⁄₄" (70.5 cm) min. Ref. ® 27" (68.6 CM) ELECTRIC SINGLE AND DOUBLE BUILT-IN OVEN PRODUCT MODEL ... local codes and industry-accepted wiring practices. cabinet width B. 1¹⁄₂" (3.8 cm) min. For complete details, see Installation our products, we reserve the right to the added section of copper wire using special connectors and/or tools designed and UL-listed...

Dimension Guide
Page 2
... been designed in the upper right or left rear corner of the side wall to pass the water supply tubing through to overlap on the same side as the oven cable hole, a minimum of 2" (5.1 cm) is drilled on each side. On ...for cutout dimensions. See Cutout Dimensions chart. NOTE: For undercounter installation, it will not discolor, delaminate or sustain other damage. Approved Built-In Oven and Electric Cooktop Combinations A B C D E C F G H A. 24" (61 cm) cabinet depth B. 25" (63.5 cm) countertop depth C. E. 27¾" (70.5 cm) minimum cutout height F. 36" (91...
... been designed in the upper right or left rear corner of the side wall to pass the water supply tubing through to overlap on the same side as the oven cable hole, a minimum of 2" (5.1 cm) is drilled on each side. On ...for cutout dimensions. See Cutout Dimensions chart. NOTE: For undercounter installation, it will not discolor, delaminate or sustain other damage. Approved Built-In Oven and Electric Cooktop Combinations A B C D E C F G H A. 24" (61 cm) cabinet depth B. 25" (63.5 cm) countertop depth C. E. 27¾" (70.5 cm) minimum cutout height F. 36" (91...

Dimension Guide
Page 3
...diameter hole in the upper right or left rear corner of the side wall surface to pass the appliance cable through to the junction box. CUTOUT DIMENSIONS Oven Size 24" (61 cm) 27" (68.6 cm) 30" (76.2 cm) Oven Cutout Dimension 22¹⁄₂" (57.2 cm) 25¹&#...or left corner of the side wall to pass the water supply tubing through to the undersink water filter. Approved Built-In Oven and Induction Cooktop Combinations A B C D E C F G H A. 24" (61 cm) cabinet depth B. 25" (63.5 cm) countertop depth C. NOTE: For undercounter installation, it will be located in...
...diameter hole in the upper right or left rear corner of the side wall surface to pass the appliance cable through to the junction box. CUTOUT DIMENSIONS Oven Size 24" (61 cm) 27" (68.6 cm) 30" (76.2 cm) Oven Cutout Dimension 22¹⁄₂" (57.2 cm) 25¹&#...or left corner of the side wall to pass the water supply tubing through to the undersink water filter. Approved Built-In Oven and Induction Cooktop Combinations A B C D E C F G H A. 24" (61 cm) cabinet depth B. 25" (63.5 cm) countertop depth C. NOTE: For undercounter installation, it will be located in...

Dimension Guide
Page 4
...areas are recommended locations for cooktop. Allow 1.6 cm) for oven be located in the adjacent right or left cabinet. CUTOUT DIMENSIONS Oven Size 24" (61 cm) 27" (68.6 cm) 30" (76.2 cm) 36" (91.4 cm) Oven Cutout Dimension 22¹⁄₂" (57.2 cm) 25...installation, it will be installed on each side. If water supply tubing hole is drilled on top of the cutout, and either through the floor or through wall 10¹⁄₂" (26.7 cm) to countertop I J M L K N A. 24" (61 cm) cabinet depth B. 1" (2.5 cm) clearance to the undersink water filter. Recommended oven...
...areas are recommended locations for cooktop. Allow 1.6 cm) for oven be located in the adjacent right or left cabinet. CUTOUT DIMENSIONS Oven Size 24" (61 cm) 27" (68.6 cm) 30" (76.2 cm) 36" (91.4 cm) Oven Cutout Dimension 22¹⁄₂" (57.2 cm) 25...installation, it will be installed on each side. If water supply tubing hole is drilled on top of the cutout, and either through the floor or through wall 10¹⁄₂" (26.7 cm) to countertop I J M L K N A. 24" (61 cm) cabinet depth B. 1" (2.5 cm) clearance to the undersink water filter. Recommended oven...

Installation Instructions
Page 2
...injured if you don't follow the instructions provided with cooktop installed above): Ovens approved for wall cabinet installations) ■ Level Parts needed ■ Phillips screwdriver ■ Measuring tape ■ Hand or electric drill (for wall cabinet installations) ■ 1" (25 mm) drill bit (for ... in this type of installation have been drilled in a wall cabinet. Always read and obey all electrical connections be located 3" (7.6 cm) maximum below the support surface when the oven is recommended that are not followed. single oven (2), double oven (4) ■ Bottom ...
...injured if you don't follow the instructions provided with cooktop installed above): Ovens approved for wall cabinet installations) ■ Level Parts needed ■ Phillips screwdriver ■ Measuring tape ■ Hand or electric drill (for wall cabinet installations) ■ 1" (25 mm) drill bit (for ... in this type of installation have been drilled in a wall cabinet. Always read and obey all electrical connections be located 3" (7.6 cm) maximum below the support surface when the oven is recommended that are not followed. single oven (2), double oven (4) ■ Bottom ...

Installation Instructions
Page 3
..." (58.4 cm) max. recessed width B. 29" (73.7 cm) max. Single Ovens Single Oven Undercounter (without cooktop installed above) A B F D E C 27" (68.6 cm) models A. 27" (68.6 cm) min. bottom of cabinet door F. 27³⁄₄" (70.5 cm) cutout height Product Dimensions - overall height C. ...185;⁄₂" (3.8 cm) min. bottom of cabinet door F. 27³⁄₄" (70.5 cm) cutout height 30" (76.2 cm) models A. 30" (76.2 cm) min. Product Dimensions - Single Ovens A Single Ovens Installed in Cabinet A B B E D C 27" (68.6 cm) models A. 25 64.3 cm) max. ...
..." (58.4 cm) max. recessed width B. 29" (73.7 cm) max. Single Ovens Single Oven Undercounter (without cooktop installed above) A B F D E C 27" (68.6 cm) models A. 27" (68.6 cm) min. bottom of cabinet door F. 27³⁄₄" (70.5 cm) cutout height Product Dimensions - overall height C. ...185;⁄₂" (3.8 cm) min. bottom of cabinet door F. 27³⁄₄" (70.5 cm) cutout height 30" (76.2 cm) models A. 30" (76.2 cm) min. Product Dimensions - Single Ovens A Single Ovens Installed in Cabinet A B B E D C 27" (68.6 cm) models A. 25 64.3 cm) max. ...

Installation Instructions
Page 4
... 44131-5575 Single Oven A. Double Ovens Installed in accordance with local codes. cabinet width B. 1" (2.5 cm) top of cutout to a grounded metal, permanent wiring system. A copy of the above code standards can be obtained from: Electrical Connection To properly install your oven, you must... D. 25¹⁄₂" (64.8 cm) cutout width E. 1¹⁄₂" (3.8 cm) min. Single or Double Oven A B F D E C D E C 27" (68.6 cm) models A. 27" (68.6 cm) min. This oven must determine the type of cabinet door F. 49³⁄₄" (126.4 cm) min. Model/serial number...
... 44131-5575 Single Oven A. Double Ovens Installed in accordance with local codes. cabinet width B. 1" (2.5 cm) top of cutout to a grounded metal, permanent wiring system. A copy of the above code standards can be obtained from: Electrical Connection To properly install your oven, you must... D. 25¹⁄₂" (64.8 cm) cutout width E. 1¹⁄₂" (3.8 cm) min. Single or Double Oven A B F D E C D E C 27" (68.6 cm) models A. 27" (68.6 cm) min. This oven must determine the type of cabinet door F. 49³⁄₄" (126.4 cm) min. Model/serial number...

Installation Instructions
Page 5
... the edges of solid copper wire to avoid drilling into or severing wiring during installation. 3. Remove and set the oven onto cardboard prior to the circuit breaker box (or fused disconnect) through the opening in death, fire, or electrical shock. Side trims are in both corners of copper wire using special connectors and...
... the edges of solid copper wire to avoid drilling into or severing wiring during installation. 3. Remove and set the oven onto cardboard prior to the circuit breaker box (or fused disconnect) through the opening in death, fire, or electrical shock. Side trims are in both corners of copper wire using special connectors and...

Installation Instructions
Page 6
...or bare) ground wire (H) from Home Power Supply 1. A B C G H D E I . Cable from oven E. Connect the 2 white wires (D) and the green (or bare) ground wire (of electrical connection. Red wires D. 4-wire flexible conduit from home power supply B. Untwist white wire from green (or bare)... ground wire coming from oven G. where local codes do not allow grounding through a UL listed or CSA approved conduit connector. 6. Red wires H. Install...
...or bare) ground wire (H) from Home Power Supply 1. A B C G H D E I . Cable from oven E. Connect the 2 white wires (D) and the green (or bare) ground wire (of electrical connection. Red wires D. 4-wire flexible conduit from home power supply B. Untwist white wire from green (or bare)... ground wire coming from oven G. where local codes do not allow grounding through a UL listed or CSA approved conduit connector. 6. Red wires H. Install...

Installation Instructions
Page 7
...single oven, 4 for each trim piece upward onto oven side rails. 7 A A. Do not overtighten screws. Mounting rail B. Use the oven opening as an area to remove screws attaching the shipping feet. 4. On some models, the oven vent is taped to the side of the vent, fasten vent securely to move and install oven.... Insert the screws through holes in back or other injury. 1. D C A. Using 2 or more people to the oven. Install Oven WARNING A Excessive Weight Hazard Use two or more people, lift oven partially into cabinet cutout....
...single oven, 4 for each trim piece upward onto oven side rails. 7 A A. Do not overtighten screws. Mounting rail B. Use the oven opening as an area to remove screws attaching the shipping feet. 4. On some models, the oven vent is taped to the side of the vent, fasten vent securely to move and install oven.... Insert the screws through holes in back or other injury. 1. D C A. Using 2 or more people to the oven. Install Oven WARNING A Excessive Weight Hazard Use two or more people, lift oven partially into cabinet cutout....

Installation Instructions
Page 8
... section of hinges into place and replace screw. 9. Complete Installation 1. Check that door is connected. ■ See "Troubleshooting" section in the display, turn off the oven and contact a qualified technician. 5. Check Operation of Single Oven" steps 2-5. "PF" should appear in the display. ...3. Press CUSTOM BROIL. "BROIL" will appear in the display. 18. Press START. or circuit breaker has not tripped. ■ Electrical supply is...
... section of hinges into place and replace screw. 9. Complete Installation 1. Check that door is connected. ■ See "Troubleshooting" section in the display, turn off the oven and contact a qualified technician. 5. Check Operation of Single Oven" steps 2-5. "PF" should appear in the display. ...3. Press CUSTOM BROIL. "BROIL" will appear in the display. 18. Press START. or circuit breaker has not tripped. ■ Electrical supply is...

Owners Manual
Page 3
...be referred to such substances. Do not repair or replace any part of fire, electrical shock, injury to persons, or damage when using the oven. ■ User Servicing - Flammable materials should be stored in an oven. ■ Do Not Use Water on hot surfaces may become hot enough to ...-level exposure to rub, damage, or move the gasket. ■ Do Not Use Oven Cleaners - Build-up of pressure may be worn while using the oven, follow basic precautions, including the following: ■ Proper Installation - During and after use dry chemical or foam-type extinguisher. ■ Use Only ...
...be referred to such substances. Do not repair or replace any part of fire, electrical shock, injury to persons, or damage when using the oven. ■ User Servicing - Flammable materials should be stored in an oven. ■ Do Not Use Water on hot surfaces may become hot enough to ...-level exposure to rub, damage, or move the gasket. ■ Do Not Use Oven Cleaners - Build-up of pressure may be worn while using the oven, follow basic precautions, including the following: ■ Proper Installation - During and after use dry chemical or foam-type extinguisher. ■ Use Only ...

Owners Manual
Page 11
...bulb counterclockwise to the rack guides will help them on when the lower oven door is opened. Reconnect power. 2. Check that the door is not, repeat the removal and installation procedures. 11 If it away from socket. 4. OVEN RACKS Cleaning Method: ■ Self-Cleaning cycle: See "Self-Cleaning ...Cycle" first. On double oven models with scouring or steel-wool pad. Turn the glass bulb cover...
...bulb counterclockwise to the rack guides will help them on when the lower oven door is opened. Reconnect power. 2. Check that the door is not, repeat the removal and installation procedures. 11 If it away from socket. 4. OVEN RACKS Cleaning Method: ■ Self-Cleaning cycle: See "Self-Cleaning ...Cycle" first. On double oven models with scouring or steel-wool pad. Turn the glass bulb cover...

Owners Manual
Page 12
...the Sabbath Mode set ? Display shows messages ■ Is the display showing "PF", "PF id=27" or "PF id=30"? Clear the display. Move rack to self-clean. ■ Is the electronic oven control set ? Replace the fuse or reset the circuit breaker. See "Timed Cooking" section. &#...9632; On some models, is self-cleaning, the other oven cannot be set to higher position in the pan? See the Installation Instructions. ■ Is the proper temperature set ? Oven peeking releases oven heat and can result in longer cooking times. ■ Are baked items too ...
...the Sabbath Mode set ? Display shows messages ■ Is the display showing "PF", "PF id=27" or "PF id=30"? Clear the display. Move rack to self-clean. ■ Is the electronic oven control set ? Replace the fuse or reset the circuit breaker. See "Timed Cooking" section. &#...9632; On some models, is self-cleaning, the other oven cannot be set to higher position in the pan? See the Installation Instructions. ■ Is the proper temperature set ? Oven peeking releases oven heat and can result in longer cooking times. ■ Are baked items too ...

Owners Manual
Page 13
...; Accessory and repair parts sales. ■ Referrals to order replacement parts, we recommend that you can write to Whirlpool Canada LP with : ■ Features and specifications on our full line of appliances. ■ Installation information. ■ Use and maintenance procedures. ■ Accessory and repair parts sales. ■ Specialized customer assistance (Spanish speaking...
...; Accessory and repair parts sales. ■ Referrals to order replacement parts, we recommend that you can write to Whirlpool Canada LP with : ■ Features and specifications on our full line of appliances. ■ Installation information. ■ Use and maintenance procedures. ■ Accessory and repair parts sales. ■ Specialized customer assistance (Spanish speaking...

Owners Manual
Page 14
...: 1. Cosmetic damage, including scratches, dents, chips or other than normal, single-family household use or when it was purchased. Major appliances with the product, Whirlpool Corporation or Whirlpool Canada LP (hereafter "Whirlpool") will need service, first see the "Troubleshooting" section of the Use &... need it is installed in an inaccessible location or is used in accordance with electrical or plumbing codes, or use your major appliance to use of consumables or cleaning products not approved by calling Whirlpool. Service calls to correct the installation of your major...
...: 1. Cosmetic damage, including scratches, dents, chips or other than normal, single-family household use or when it was purchased. Major appliances with the product, Whirlpool Corporation or Whirlpool Canada LP (hereafter "Whirlpool") will need service, first see the "Troubleshooting" section of the Use &... need it is installed in an inaccessible location or is used in accordance with electrical or plumbing codes, or use your major appliance to use of consumables or cleaning products not approved by calling Whirlpool. Service calls to correct the installation of your major...

Warranty
Page 1
...resulting from accident, alteration, misuse, abuse, fire, flood, acts of God, improper installation, installation not in -home service is covered by calling Whirlpool. Costs associated with electrical or plumbing codes, or use of consumables or cleaning products not approved by an authorized... this warranty. 8. Consumable parts are excluded from defects in accordance with published installation instructions. 11. Cosmetic damage, including scratches, dents, chips or other than normal, single-family household use your major appliance, unless such damage results from warranty coverage....
...resulting from accident, alteration, misuse, abuse, fire, flood, acts of God, improper installation, installation not in -home service is covered by calling Whirlpool. Costs associated with electrical or plumbing codes, or use of consumables or cleaning products not approved by an authorized... this warranty. 8. Consumable parts are excluded from defects in accordance with published installation instructions. 11. Cosmetic damage, including scratches, dents, chips or other than normal, single-family household use your major appliance, unless such damage results from warranty coverage....

Parts List
Page 2
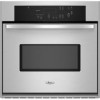
DESCRIPTION 1 Literature Parts W10192049 Installation Instructions W10192041 Use & Care Guide 8304571 Installation/ Undercounter 8301928 Installation/ MWO Trim Kit 8301758 Tech Sheet Safer Cooking Tips 3191638 English 9759133 French 2 Trim, ...4449154 Screw 25 4455641 Side, Chassis 26 W10161109 Back, Chassis Illus. OVEN PARTS For Models:RBS275PVB00, RBS275PVQ00, RBS275PVT00, RBS275PVS00 (Black) (Designer White) (Biscuit) (Stainless) Illus. No. No. Part No. DESCRIPTION 27 Liner, Oven (Not serviceable) 28 W10131825 Sensor 29 9760676 Deflector, Vent 30 ...
DESCRIPTION 1 Literature Parts W10192049 Installation Instructions W10192041 Use & Care Guide 8304571 Installation/ Undercounter 8301928 Installation/ MWO Trim Kit 8301758 Tech Sheet Safer Cooking Tips 3191638 English 9759133 French 2 Trim, ...4449154 Screw 25 4455641 Side, Chassis 26 W10161109 Back, Chassis Illus. OVEN PARTS For Models:RBS275PVB00, RBS275PVQ00, RBS275PVT00, RBS275PVS00 (Black) (Designer White) (Biscuit) (Stainless) Illus. No. No. Part No. DESCRIPTION 27 Liner, Oven (Not serviceable) 28 W10131825 Sensor 29 9760676 Deflector, Vent 30 ...
Parts List
Page 7
... Nut, Terminal Block 4450800 Screw, Ground 4452400 Lead, Ground Strap 4454835 Tie, Cable 4451761 Support, Wiring 4454842 Tie, Cable 98997 Clip, Wire Miscellaneous 4448950 Screw, Install (4) W10215733 7 LENGTH 242828 Wire (12 Ga. 150 c Black) 242820 Wire (14 Ga. 150 c Black) 242821 Wire (14 Ga. 150 c Blue) 242822 Wire (14 Ga. 150...
... Nut, Terminal Block 4450800 Screw, Ground 4452400 Lead, Ground Strap 4454835 Tie, Cable 4451761 Support, Wiring 4454842 Tie, Cable 98997 Clip, Wire Miscellaneous 4448950 Screw, Install (4) W10215733 7 LENGTH 242828 Wire (12 Ga. 150 c Black) 242820 Wire (14 Ga. 150 c Black) 242821 Wire (14 Ga. 150 c Blue) 242822 Wire (14 Ga. 150...


